Instructions for Changing Color Panels - DiscoverMyMobility.com
Instructions for Changing Color Panels - DiscoverMyMobility.com
Instructions for Changing Color Panels - DiscoverMyMobility.com

Create successful ePaper yourself
Turn your PDF publications into a flip-book with our unique Google optimized e-Paper software.
<strong>Changing</strong> <strong>Color</strong> <strong>Panels</strong><br />
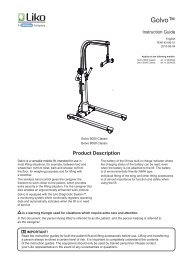
Spitfire EX 1420<br />
Your Spitfire EX 1420 mobility scooter features<br />
interchangeable panels which allow you to change<br />
the color of your scooter. The panel colors<br />
included are Metallic Red, Blue and Silver.<br />
Your Spitfire EX <strong>com</strong>es with one set of panels preinstalled.<br />
The remaining two sets of color panels are<br />
packaged with the scooter.<br />
These instructions will guide you through the<br />
process of changing the panels. The panels that can<br />
be changed are indicated in the illustration at the<br />
right.<br />
Tools Required:<br />
• Phillips screwdriver<br />
• Socket wrench<br />
• 10mm socket<br />
• 19mm socket<br />
Note: The color panels can crack or break if excessive<br />
<strong>for</strong>ce is used when replacing them. Please use caution.<br />
To replace the tiller color panel<br />
Using your thumbs, press the tiller panel outward at the locations indicated until<br />
the side edges pop out. Gently grip the top of the panel and lift upward until the<br />
panel lifts off the tiller.<br />
Insert the new color panel into place so that the two pegs on the underside of the<br />
panel fit into the corresponding holes in the tiller. Push in on the sides of the panel<br />
until they click into place.<br />
10-020
Replacing the front fender color panels – Per<strong>for</strong>m this procedure <strong>for</strong> each front fender color panel.<br />
The front wheels must be removed in order to replace the<br />
front fender color panels. Firmly grasp and pull the plastic<br />
hubcap to remove it from the center of the wheel, revealing<br />
the bolt underneath.<br />
Using a 10mm socket wrench, remove the bolt holding the<br />
wheel in place. Take care not to misplace all washers so that<br />
they can be returned to their proper place when the wheel is<br />
replaced.<br />
After removing the wheels, prop up the scooter so that the underside of the front<br />
end is accessible. Using a Phillips screwdriver, remove the screw holding the color<br />
panel in place. After the screw has been removed, lift up on the color panel to<br />
remove it.<br />
Insert the black rubber footplate into the new color panel be<strong>for</strong>e the color panel<br />
and set the color panel/rubber footplate assembly into place, making sure to insert<br />
the tabs of the color panels into the corresponding slots on the scooter body.<br />
Affix the color panel assembly to the scooter using the screw removed previously<br />
and replace the wheels.<br />
Replacing the rear fender color panels – Per<strong>for</strong>m this procedure <strong>for</strong> each rear fender color panel.<br />
The rear wheels must be removed in order to replace the rear fender color<br />
panels. Firmly grasp and pull the plastic hubcap to remove it from the center of<br />
the wheel, revealing the bolt underneath.<br />
Using a 19mm socket wrench, remove the bolt holding the wheel in place. Take<br />
care not to misplace the washer so that it can be returned to its proper place<br />
when the wheel is replaced.<br />
After removing the wheels, prop up the scooter so that the underside<br />
of the rear end is accessible. Using a Phillips screwdriver, remove the<br />
screw holding the color panel in place. After the screw has been<br />
removed, lift up on the color panel to remove it.<br />
Set the color panel into place, making sure to insert the tabs of the<br />
color panels into the corresponding slots on the scooter body.<br />
Affix the color panel assembly to the scooter using the screw removed<br />
previously and replace the wheels.