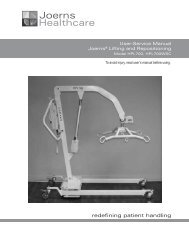
lf1030 hydraulic patient lift lf1040 electric patient lift user manual
lf1030 hydraulic patient lift lf1040 electric patient lift user manual
lf1030 hydraulic patient lift lf1040 electric patient lift user manual

Create successful ePaper yourself
Turn your PDF publications into a flip-book with our unique Google optimized e-Paper software.
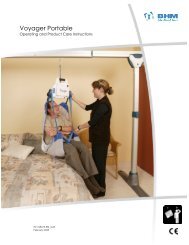
Removing the sling<br />
Gently pull the leg sections to the side, out from under the <strong>patient</strong>’s thighs. Standing by the <strong>patient</strong>’s<br />
side, lean the <strong>patient</strong> forward while supporting the <strong>patient</strong> with one hand. Pull the sling up<br />
from behind the <strong>patient</strong>’s back and position the <strong>patient</strong> in the chair.<br />
WARNING: Pulling sharply on the sling may cause the <strong>patient</strong> to fall forward, resulting<br />
in personal injury. Always support the <strong>patient</strong> by keeping one arm around the <strong>patient</strong>’s<br />
shoulders when placing or removing the sling.<br />
Note: If possible, the <strong>patient</strong> should be encouraged to take an active part in removing the<br />
sling. The <strong>patient</strong> can lean forward, <strong>lift</strong> their thighs, and help in removing the leg sections.<br />
Transferring the <strong>patient</strong> from a bed to a wheelchair or commode chair<br />
1. For smooth, easy <strong>lift</strong>ing, have the wheelchair or commode chair in ready position with wheel<br />
locks in locked position.<br />
2. With <strong>patient</strong> face-up in center of bed, roll <strong>patient</strong> onto their side away from attendant.<br />
3. Place sling, folded lengthwise, halfway under <strong>patient</strong> with lower edge just beneath knees.<br />
4. Roll <strong>patient</strong> to side toward attendant, pull sling to smooth it, and center <strong>patient</strong> on sling.<br />
5. Pull the leg loops forward and under the thighs.<br />
6. Cross the loops, one through the other.<br />
7. With base of <strong>lift</strong> under bed, SLOWLY release pressure knob by turning counter-clockwise and<br />
pull down boom. Attach sling to spreader bar.<br />
8. Turn pressure knob clockwise until tight, and <strong>lift</strong> the <strong>patient</strong> by operating the pump handle.<br />
9. Lift <strong>patient</strong>, maintaining <strong>patient</strong>'s position facing attendant, until <strong>patient</strong>'s feet swing easily off<br />
the bed.<br />
10. Position <strong>patient</strong> above wheelchair or commode chair. Lock <strong>lift</strong> brakes.<br />
WARNING: Before transfer, ensure wheelchair or commode chair wheel locks are in<br />
locked position. Wheelchair wheel locks must be in a LOCKED POSITION before lowering<br />
the <strong>patient</strong> into the wheelchair, or unexpected wheelchair movement could result, which<br />
may result in serious injury to both the <strong>patient</strong> and the attendants.<br />
11. SLOWLY release pressure knob by turning counter-clockwise to gradually lower <strong>patient</strong>. During<br />
descent, assist <strong>patient</strong> in attaining correct sitting posture.<br />
12. When <strong>patient</strong> is seated, push down on boom to slacken sling loops. Patient can remain seated<br />
on sling.<br />
13. For commode chair use, adjust clothing before moving <strong>lift</strong> to straddle commode chair. Keep<br />
sling loops taut and ensure that <strong>patient</strong> is in a comfortable position.<br />
LF1030-INS-LAB-RevB10 15