Create successful ePaper yourself
Turn your PDF publications into a flip-book with our unique Google optimized e-Paper software.
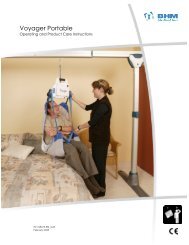
<strong>TOPCHAIR</strong>-S<br />
Stair-climbing wheelchair<br />
User Guide<br />
Distributed by:
<strong>TOPCHAIR</strong>-S<br />
USER GUIDE<br />
Table of contents<br />
Contact ................................................................................ 4<br />
Introduction ........................................................................ 5<br />
Safety instructions ............................................................... 6<br />
I. Electromagnetic <strong>com</strong>patibility .............................................................. 7<br />
II. Safety advice when travelling on wheels .............................................. 8<br />
1. Avoid tilting risk .......................................................................................................... 8<br />
2. Avoid collisions ........................................................................................................... 9<br />
3. Avoid breakdowns in difficult conditions ................................................................... 9<br />
III. Safety advice when climbing steps ................................................... 10<br />
1. Avoid risk of tilting ................................................................................................... 10<br />
2. Avoid sliding risk ....................................................................................................... 10<br />
3. ‘Automatic stair’ mode use ...................................................................................... 10<br />
Description of TopChair-S .................................................. 11<br />
I. Main parts ........................................................................................... 11<br />
II. Electric/electronic systems .................................................................. 12<br />
1. Protection of the electronic system ......................................................................... 12<br />
2. Fuse .......................................................................................................................... 12<br />
3. Batteries ................................................................................................................... 13<br />
a. Charging the batteries ................................................................................................................... 14<br />
III. Control and operating ...................................................................... 15<br />
1. Operating the joystick .............................................................................................. 16<br />
a. Motion control .............................................................................................................................. 16<br />
b. Speed ............................................................................................................................................. 16<br />
c. Horn (5) ......................................................................................................................................... 17<br />
d. Charge Indicator (6)....................................................................................................................... 17<br />
e. Special functions ........................................................................................................................... 17<br />
2. Operating auxiliary LCD box ..................................................................................... 18<br />
a. Function modes ............................................................................................................................. 19<br />
b. Operating screen navigation ......................................................................................................... 20<br />
c. ‘Road’ mode .................................................................................................................................. 22<br />
d. ‘Automatic stair’ mode .................................................................................................................. 22<br />
e. ‘Manual track’ mode ..................................................................................................................... 24<br />
f. Front wheels movement ............................................................................................................... 25<br />
g. Rear wheels movement ................................................................................................................ 26<br />
h. Seat movement ............................................................................................................................. 28<br />
i. Lights ............................................................................................................................................. 29<br />
j. Adjusting the sound ...................................................................................................................... 31<br />
k. Configuration mode ...................................................................................................................... 32<br />
Rev11/12 2 / 54
<strong>TOPCHAIR</strong>-S<br />
USER GUIDE<br />
Operating TopChair-S ........................................................ 33<br />
I. Crossing an obstacle in ‘Automatic stair’ mode ................................... 33<br />
1. Climb an obstacle in ‘Automatic stair’ mode ........................................................... 34<br />
2. Descend an obstacle in ‘automatic stair’ case ......................................................... 36<br />
3. Warning message in ‘automatic stair’ mode ........................................................... 38<br />
II. Crossing an obstacle in ‘manual track’ mode ....................................... 39<br />
1. Climb an obstacle in ’manual track’ mode ............................................................... 40<br />
2. Descend an obstacle in ’manual track’ mode .......................................................... 42<br />
III. Manual movement ........................................................................... 45<br />
1. Motor brakes declutching: ....................................................................................... 45<br />
2. Motor brakes clutching: ........................................................................................... 45<br />
IV. Other functions ................................................................................ 46<br />
1. Locking the wheelchair ............................................................................................. 46<br />
2. Unlocking the wheelchair ......................................................................................... 46<br />
Care and maintenance ....................................................... 47<br />
I. Diagnosis of the joystick in case of error detection .............................. 47<br />
II. Cleaning the vehicle ............................................................................ 48<br />
III. Monthly checks ................................................................................ 48<br />
IV. Repair a tyre..................................................................................... 49<br />
V. Replace batteries ................................................................................. 50<br />
1. Remove batteries ..................................................................................................... 51<br />
2. Reassemble the batteries ......................................................................................... 52<br />
Warranty ........................................................................... 53<br />
Technical Specifications ..................................................... 54<br />
Rev11/12 3 / 54
<strong>TOPCHAIR</strong>-S<br />
USER GUIDE<br />
Contact<br />
For any questions on this material,<br />
Please contact your distributor first.<br />
If you wish to contact us directly, please contact us at:<br />
TopChair<br />
2, Longueterre lane,<br />
31850 MONTRABE<br />
France<br />
Telephone number: + 33 9 61 22 72 02<br />
Email: info@topchair.net<br />
Rev11/12 4 / 54
<strong>TOPCHAIR</strong>-S<br />
USER GUIDE<br />
Introduction<br />
Before anything else, we want to thank you for your confidence in our products. We hope<br />
that your new electric wheelchair will give you much satisfaction.<br />
This user guide contains information on the characteristics, use and safety conditions of<br />
your wheelchair. It is important to acquaint yourself with this user guide before your first<br />
use. If you have any questions or if you are unsure whether your wheelchair is in its<br />
optimum state, call your dealer or contact us.<br />
Users have very different needs. Only and exclusively qualified medical personnel can decide<br />
whether the model is suitable for your particular case.<br />
We disclaim any responsibility if a wheelchair is not suitable for the disabled user.<br />
Some adjustments and maintenance require specialized technical training and must be<br />
performed by your dealer or an authorised representative.<br />
We are not liable for damages resulting from the non-observation of the user guide,<br />
improper maintenance or improper use. Generally, our liability is limited to the replacement<br />
of defective parts.<br />
Rev11/12 5 / 54
<strong>TOPCHAIR</strong>-S<br />
USER GUIDE<br />
Safety instructions<br />
There is a risk of accident, injury or damage under certain conditions. Here are some<br />
guidelines:<br />
— Do not use the wheelchair under the influence of alcohol or drugs restricting your driving<br />
skills.<br />
— If necessary, seek the help of an attendant.<br />
— Do not install or leave the chair without turning off the system power. This helps prevent<br />
inadvertent operation of the wheelchair.<br />
— When you leave the chair, do not put all your weight on the footrests. The wheelchair<br />
could tip forward, especially if the ground is sloping.<br />
— In case of manual push, do not let the brakes disengage if on a slope.<br />
— If you have to brake in an emergency, simply release the joystick, it will stop the<br />
wheelchair. Pressing the start / stop button causes an abrupt and violent stop.<br />
— Avoid loading the wheelchair in a vehicle with the person sitting in the chair.<br />
— If the wheelchair must be loaded with the driver via a ramp, an attendant should stand<br />
near the chair to prevent tipping. (When using the ramp, you must use the ‘manual track'<br />
mode).<br />
— Do not use the electric wheelchair as a vehicle seat if there is no suitable anchoring<br />
system or if there is no seat belt.<br />
— Use a seat belt when necessary, especially when you do not have a sufficient back<br />
support.<br />
— Do not lean forward or to the side or above the top edge of the wheelchair, especially if<br />
the ground is sloping.<br />
— For transfer, get the closest you can to the new wheelchair.<br />
— Do not connect any electric devices to your wheelchair. Give any possible installation to<br />
your dealer.<br />
— This chair has several moving parts driven by powerful jacks. Pay attention to the people<br />
around that they don’t get injured. Watch out for children’s fingers, they could be crushed<br />
by the lift wheels and the seat tilt system.<br />
Rev11/12 6 / 54
<strong>TOPCHAIR</strong>-S<br />
USER GUIDE<br />
— The operation of the rear wheel must be performed on flat ground only. There is a risk of<br />
disengaging the wheel during this manoeuvre. This can cause uncontrolled movement and<br />
dangerous if the ground is sloping and if the train front wheel is not recovered.<br />
— Do not switch from the 'Road' mode to 'Automatic step' mode if the ground is sloping.<br />
— If the ground is sloped, you can use the ‘manual track’ mode and manoeuvre the wheel<br />
sets, but it is imperative to take the first set of front wheels <strong>com</strong>pletely and then the rear<br />
wheels. If you have a doubt, ask the help of a third person capable of holding the chair.<br />
I. Electromagnetic <strong>com</strong>patibility<br />
The electromagnetic <strong>com</strong>patibility of this wheelchair has been tested according to<br />
international standards.<br />
There is however a risk of disruption of the electronic system of the wheelchair when near a<br />
source of powerful electromagnetic radiation.<br />
It is necessary to take the following precautions:<br />
— Avoid the immediate proximity of powerful transmitters (radio, television, telephone).<br />
— Check that your transmitters (mobile or otherwise) have no influence. If in doubt, use<br />
them only when the wheelchair is switched off.<br />
— If your vehicle should be set in motion itself, or if the brakes are released, switch off the<br />
electronics of the wheelchair as soon as possible.<br />
— Report to your dealer any unwanted movement of the vehicle that occurres, or release of<br />
the electric brakes.<br />
You should also know that adding electrical accessories may significantly alter the<br />
electromagnetic <strong>com</strong>patibility.<br />
Rev11/12 7 / 54
<strong>TOPCHAIR</strong>-S<br />
USER GUIDE<br />
II.<br />
Safety advice when travelling on wheels<br />
1. Avoid tilting risk<br />
— Do not move on land with a slope greater than the limit specified in chapter Technical<br />
Specifications.<br />
— Do not exceed the maximum load stated in chapter Technical Specifications.<br />
— Do not carry more than one person.<br />
— In any case, do not exceed a 20 ° angle for the backrest while moving.<br />
— In case of steep slope, straighten the seat.<br />
— In case of steep slope, ensure that the device is in automatic stabilization function.<br />
— In case of steep slope, drive slowly. If necessary, switch to 'manual track' mode.<br />
— In case of a steep slope, avoid sudden braking manoeuvres, changing direction or<br />
acceleration.<br />
— On a slope, make the trip directly; do not try to make a u-turn.<br />
— If the slope has a risk of skidding, switch to ‘manual track’ mode.<br />
— Never attempt to climb or descend stairs with your electric wheelchair in ‘road’ mode but<br />
uses the 'Automatic step' mode.<br />
— Never attempt to climb or descend stairs with your wheelchair electric ‘Manual track’<br />
mode but uses the 'Automatic step' mode.<br />
— As far as possible, approach obstacles with a right angle. Clear the obstacle with the front<br />
and rear wheels in one continual motion, without stopping halfway.<br />
— In any case, do not exceed a 20 ° angle for backrest while moving.<br />
— Avoid leaving your seat on a slope.<br />
— When you sit in your chair, on the highway, you are less visible to motorists. Before<br />
crossing a road, make sure the traffic has stopped and proceed with caution.<br />
— Never manoeuvre down a step or a sidewalk in reverse.<br />
Rev11/12 8 / 54
<strong>TOPCHAIR</strong>-S<br />
USER GUIDE<br />
2. Avoid collisions<br />
Drive slowly in crowded or narrow passages through doorways and along corridors.<br />
Do not use TopChair-S on paths or roadways with car traffic and be very careful crossing the<br />
street.<br />
3. Avoid breakdowns in difficult conditions<br />
Do not go out without an escort for trips in remote locations or when weather conditions are<br />
very bad.<br />
Rev11/12 9 / 54
<strong>TOPCHAIR</strong>-S<br />
USER GUIDE<br />
III.<br />
Safety advice when climbing steps<br />
1. Avoid risk of tilting<br />
— Avoid descending steps that you have not previously ascended and without being sure<br />
that the step height and slope are below the limits specified in chapter Technical<br />
Specifications. In case of doubt on the slope, it is imperative to ask an attendant.<br />
— Pay special attention to the external staircases where the steps have often different<br />
heights.<br />
— Do not lean out of the seat.<br />
Check before every use the proper functioning of the automatic seat tilt.<br />
When you switch to the ‘Automatic step' mode, check that the front wheels being<br />
<strong>com</strong>pletely back and the system adjusts the seat tilt. In case of malfunction, notify your<br />
dealer immediately. Begin ascent and descent at very low speed. In the case of climbing an<br />
obstacle, increase the speed if necessary (lack of power).<br />
Do not cross the icy steps,<br />
2. Avoid sliding risk<br />
Do not cross stairs with a slippery surface (carpet, linoleum without fixed edge of step),<br />
Do not approach steps when they are wet and slippery,<br />
Ensure the robustness of the step nosing. They must be fixed to the stairs through a rigid<br />
connection.<br />
3. ‘Automatic stair’ mode use<br />
The 'Automatic stair' mode automatically handles the movement of the wheels and<br />
simplifies user operations. However, this method uses the information provided by optical<br />
sensors. Do not use this mode when these sensors may provide false information,<br />
particularly in the following cases:<br />
• Glass steps<br />
• Steps slatted<br />
• Steps covered with highly reflective material<br />
• Uneven and / or damaged steps<br />
If you need to take steps in these conditions, you must use the ‘manual track’<br />
mode, and manually control the movement of the input and output of the<br />
wheel sets. Carefully follow the paragraph Crossing obstacles in 'manual track' mode.<br />
Rev11/12 10 / 54
<strong>TOPCHAIR</strong>-S<br />
USER GUIDE<br />
Description of TopChair-S<br />
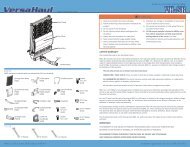
I. Main parts<br />
1) Headrest<br />
2) Seatback<br />
3) Seatback angle adjustment<br />
4) Freewheel lever<br />
5) Rear wheel<br />
6) Armrest<br />
7) Joystick<br />
8) Leg rest<br />
9) Auxiliary control box<br />
1<br />
9<br />
7<br />
6<br />
2<br />
3<br />
8<br />
4<br />
5<br />
Rev11/12 11 / 54
<strong>TOPCHAIR</strong>-S<br />
USER GUIDE<br />
II.<br />
Electric/electronic systems<br />
1. Protection of the electronic system<br />
The electronic control of the motors of the wheelchair is equipped with a device for<br />
controlling the current which avoids deterioration of the circuit in case of overload.<br />
When the motors are subjected to strain for a prolonged period, the power provided by the<br />
device is progressively reduced to avoid overheating. This power reduction can be up to a<br />
<strong>com</strong>plete stop of the chair. This phenomenon occurs more rapidly when the ambient<br />
temperature is high.<br />
Several minutes may then be necessary to return back to maximum power.<br />
When the drive is blocked by an impassable obstacle and the user insists, forcing drivers to<br />
remain stalled for more than 20 seconds, the electronic system automatically shuts off the<br />
power.<br />
2. Fuse<br />
In addition to the coverage described in the preceding paragraph, the entire electrical<br />
system of the wheelchair is protected against overload by a fuse between the batteries.<br />
The fuse should not blow under normal operation. However, this may happen if the<br />
batteries are too low and under excessive load.<br />
Do not replace the fuse after a thorough check of the entire electrical system. (Section V<br />
Replace batteries)<br />
Rev11/12 12 / 54
<strong>TOPCHAIR</strong>-S<br />
USER GUIDE<br />
3. Batteries<br />
The power chair is supplied with two 12V batteries. These batteries contain a gelled<br />
electrolyte. They are sealed, no risk of leakage and do not require maintenance. They were<br />
designed to hold their charge a long time, which is not the case of automotive batteries that<br />
cannot be substituted.<br />
Before the first use, you should charge <strong>com</strong>pletely the new batteries. They will get about<br />
90% of maximum charge. Total maximum charge will be reached after about ten recharges.<br />
A number of factors will affect the distance of running time per battery charge: hills, uneven<br />
surfaces, weight of the user, tyre pressure… etc.<br />
Gel batteries are not hazardous and can be transported without restriction by means of<br />
road, rail or air.<br />
It is re<strong>com</strong>mended to recharge the wheelchair every day even if the batteries are not<br />
drained, this does not affect the life of the batteries.<br />
In case of <strong>com</strong>plete discharge, charging can take up to 10 hours.<br />
— Avoid placing the charger near any heat sources such as radiators or direct exposure to<br />
sunlight.<br />
— Do not move with deeply discharged batteries, this reduces their lifespan.<br />
— If you do not use your chair for a long period, it is re<strong>com</strong>mended to recharge the batteries<br />
once a month (in this case, it would be useful to leave the wheelchair on its tracks, front and<br />
rear wheels rose up to prevent distortion of the tires).<br />
— Do not leave the battery fully discharged for several days. This affects their lifespan.<br />
— Do not use when the battery indicator drops below 3 lights. This affects their lifespan.<br />
— Do not store the wheelchair in cold / hot extremes. This affects the life of the batteries<br />
(risk of freezing).<br />
Rev11/12 13 / 54
<strong>TOPCHAIR</strong>-S<br />
USER GUIDE<br />
a. Charging the batteries<br />
Only use the charger supplied with the wheelchair or charger re<strong>com</strong>mended by your<br />
provider.<br />
Consider the re<strong>com</strong>mendations of the manufacturer of chargers.<br />
Do not recharge the batteries when you are sitting on the wheelchair.<br />
Avoid the risk of electrocution<br />
— Protect the charger from moisture.<br />
— Do not use the charger if it has been dropped or damaged.<br />
— Only use extension cords in good condition.<br />
Charging the batteries<br />
— Turn the wheelchair off by pressing the ON / OFF button of the joystick.<br />
— Connect the charger to the joystick. The charging socket is located on the bottom front of<br />
the joystick.<br />
— Connect the charger to the mains and switch on if necessary.<br />
The power control of the wheelchair is inhibited when the charger is connected.<br />
— Once charging is <strong>com</strong>plete, first unplug the charger from the mains, and then unplug the<br />
charger plug that is connected to the joystick.<br />
Rev11/12 14 / 54
<strong>TOPCHAIR</strong>-S<br />
USER GUIDE<br />
III.<br />
Control and operating<br />
Auxiliary LCD box<br />
Controller<br />
The TopChair-S is equipped with a controller and an auxiliary LCD box.<br />
It has 3 modes of operation:<br />
‘Road’ mode : drive on the rear wheels, standard wheelchair mode<br />
‘Automatic stair’ mode : the chair automatically configures itself for clearing<br />
an obstacle (steps, stairs, sidewalks)<br />
‘Manual track’ mode : drive on the tracks (function for advanced users)<br />
The joystick controls the movement of TopChair-S and optional special functions (power leg<br />
rests, electric seatback, environmental control…)<br />
The auxiliary LCD box can control special functions of TopChair-S:<br />
• Control the 'Automatic stair' mode<br />
• Control the movement of the rear wheels<br />
• Control the movement of the front wheels<br />
• Control the seatback tilt<br />
• Control lights (if option installed)<br />
Rev11/12 15 / 54
<strong>TOPCHAIR</strong>-S<br />
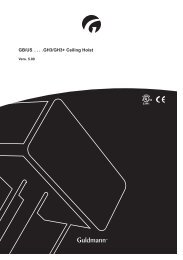
1. Operating the joystick<br />
To turn the joystick on, press the ON / OFF button (1)<br />
1<br />
USER GUIDE<br />
6<br />
5<br />
It is not always necessary to turn the auxiliary LCD box on to<br />
use TopChair S in ‘Road' mode (standard wheelchair).<br />
The lights of the charging indicator should be lit confirming that<br />
all batteries are fully charged.<br />
You can adjust the speed of the wheelchair by pressing the<br />
button (2) to reduce and (3) to increase.<br />
The electronic control of the wheelchair is adjustable. The<br />
behaviour of the chair can be changed and adjusted. Your<br />
provider will adjust these parameters according to your<br />
requirements and wishes.<br />
8<br />
7<br />
3<br />
2<br />
4<br />
a. Motion control<br />
The joystick (4) allows you to control the speed (in the range<br />
defined by the speed buttons) and the direction of the chair.<br />
The more you push forward, the faster you go. To top travel backwards, you pull back.<br />
Move the joystick to the left or to the right to direct.<br />
If you push the joystick full left or right, the wheelchair rotates in its minimum turning circle.<br />
To slow, guide the joystick to the center in neutral position.<br />
If you have to stop, simply release the joystick. It automatically returns to the neutral<br />
position and the wheelchair stops.<br />
In case of problem, press the ON / OFF button (1) which can be used as an emergency stop.<br />
Once stop on wheels, the wheelchair is blocked by the electromagnetic brakes, the chair is<br />
then perfectly stopped, even in a sloping road.<br />
The brakes are declutching manually. This release is useful when the seat has to be pushed<br />
by an attendant (Section III Manual movement)<br />
It is possible to program the system to make the speed buttons inoperative.<br />
If this is not the case, the user can set the maximum speed to adapt to the environment by<br />
pressing the speed control. The current speed is displayed on the speedometer.<br />
b. Speed<br />
Select the fastest speed (3) to increase the maximum speed. The highest value is reached<br />
when you see five bars lit on the speedometer (7).<br />
Select the slowest speed (2) to decrease the speed. The smallest value is reached when we<br />
see one bar lit on the speedometer (7).<br />
Rev11/12 16 / 54
<strong>TOPCHAIR</strong>-S<br />
USER GUIDE<br />
c. Horn (5)<br />
Press this button to sound the horn.<br />
d. Charge Indicator (6)<br />
The charge indicator is the main source of information for the user.<br />
When the lights are on and fixed, they indicate battery charge.<br />
Display Meaning Remarks<br />
All lights are off<br />
System off<br />
Lights are on and fixed System on Full charge if all lights are on.<br />
Fewer LEDs lit indicate a low<br />
battery charge<br />
LEDs blink slowly The battery charge is low The batteries must be charged<br />
as soon as possible.<br />
LEDs lights every 2,5<br />
seconds.<br />
One or few LEDs flashes<br />
rapidly<br />
The system is on "standby"<br />
Error detection<br />
The system enters a "sleep"<br />
after a configurable time delay.<br />
To restart press twice the<br />
power button<br />
See the table in paragraph<br />
Diagnosis of the manipulator in<br />
case of error detection and<br />
contact your dealer if necessary.<br />
e. Special functions<br />
When the wheelchair is equipped with special functions (power seat, leg rests…), the MODE<br />
button (8) allows using these functions.<br />
Rev11/12 17 / 54
<strong>TOPCHAIR</strong>-S<br />
USER GUIDE<br />
2. Operating auxiliary LCD box<br />
1<br />
2<br />
4<br />
5<br />
3<br />
The housing is <strong>com</strong>posed of a LCD display (4), of three buttons (1) (2) (3) and an ON / OFF<br />
switch (5).<br />
To switch on the LCD screen, use button ON / OFF (5).<br />
Button (1) to navigate to the right of the screen<br />
Button (3) to navigate to the left of the screen<br />
Button (2) to validate the selected active area<br />
Rev11/12 18 / 54
<strong>TOPCHAIR</strong>-S<br />
USER GUIDE<br />
a. Function modes<br />
At the start of LCD display, 3 operating modes are possible:<br />
MODES<br />
Description<br />
‘Road’ mode<br />
‘Automatic stair’ mode<br />
‘Manual track’ mode<br />
Use the keys (1) and (3) to select the desired mode and confirm with the button (2).<br />
Rev11/12 19 / 54
<strong>TOPCHAIR</strong>-S<br />
USER GUIDE<br />
b. Operating screen navigation<br />
Navigation screen works on the principle of active zones:<br />
No active zone selected<br />
Press button 3<br />
3<br />
Active zone selected<br />
Rev11/12 20 / 54
<strong>TOPCHAIR</strong>-S<br />
USER GUIDE<br />
Active zone selected<br />
2<br />
Press button 2<br />
‘Automatic stair’ mode<br />
selected<br />
Rev11/12 21 / 54
<strong>TOPCHAIR</strong>-S<br />
USER GUIDE<br />
c. ‘Road’ mode<br />
In ‘road’ mode, it is possible to select:<br />
‘Road’ mode selected<br />
<br />
<br />
‘Manuel track’ mode (see III-2-e)<br />
‘Automatic stair’ mode (see III-2-d)<br />
And act on:<br />
• Movement of the seat (see III-2-h)<br />
• The movement of the front wheels (see III-2-f)<br />
• The movement of the rear wheels (see III-2-g)<br />
• The lamps (see III-2-i)<br />
• Adjusting the sound (see III-2-j)<br />
Use buttons (1) and (3) to select the desired mode and confirm with the button (2).<br />
The representation of the wheelchair changes depending on the condition of the wheels<br />
In this operating mode, the wheels are driven, the seat remains in the adjusted position<br />
automatically.<br />
d. ‘Automatic stair’ mode<br />
This mode allows crossing obstacle safely in automating the movement of the seat and the<br />
wheels.<br />
The details of the operation is given in paragraph I Crossing obstacles in ’automatic stair’<br />
mode.<br />
Rev11/12 22 / 54
<strong>TOPCHAIR</strong>-S<br />
USER GUIDE<br />
In ‘Automatic stair’ mode, it is not possible to change mode, neither control the wheels nor<br />
move the seat tilt.<br />
We can only act on:<br />
<br />
<br />
Lighting kit (see III-2-i)<br />
Sound adjustment (see III-2-j)<br />
Use button (1) and (3) to select the desired mode and confirm with the button (2)<br />
Rev11/12 23 / 54
<strong>TOPCHAIR</strong>-S<br />
USER GUIDE<br />
e. ‘Manual track’ mode<br />
To facilitate the understanding in track mode, the wheelchair is represented wheels raised<br />
up (this does not correspond to the actual state of the chair).<br />
In this mode, it is driving tracks.<br />
Ii is possible to select the mode:<br />
<br />
Road (see III-2-c)<br />
And act on:<br />
<br />
<br />
<br />
<br />
The movements of the front wheels (see III-2-f)<br />
The movements of the rear wheels (see III-2-g)<br />
Lighting kit (see III-2-i)<br />
Sound adjustment (see III-2-j)<br />
Use button (1) and (3) to select the desired mode and confirm with the button (2)<br />
In this mode, the inputs / outputs of the front / rear wheels are managed by<br />
the user. In case of misuse, there is a risk of tipping when crossing an<br />
obstacle. If we use this mode on the ground, the tracks can move out of their<br />
place. Always check the correct positioning of the tracks after an operation on the<br />
ground.<br />
Rev11/12 24 / 54
<strong>TOPCHAIR</strong>-S<br />
USER GUIDE<br />
f. Front wheels movement<br />
To rise up or down the front wheels, select (button (2)) the<br />
front wheel mode:<br />
Front wheel mode selected.<br />
<br />
To lower down the front wheels<br />
Press button (3)<br />
Repeating animation shows the movement of the wheel.<br />
Once the wheels are <strong>com</strong>pletely down, this message appears:<br />
Before lowering down the front wheels, make sure you are in ‘manual track’<br />
mode with rear wheels down.<br />
In case of non-<strong>com</strong>pliance with this instruction and subject to certain conditions, the<br />
rear wheels might not be fully extended.<br />
Rev11/12 25 / 54
<strong>TOPCHAIR</strong>-S<br />
USER GUIDE<br />
<br />
To raise the front wheels<br />
Press button (1)<br />
Repeating animation shows the movement of the wheel.<br />
Once the wheels are <strong>com</strong>pletely up, this message appears:<br />
To exit the front wheel mode press button (2)<br />
g. Rear wheels movement<br />
To rise up or down the rear wheels, select (button (2)) the<br />
rear wheel mode:<br />
Rear wheel mode selected<br />
Rev11/12 26 / 54
<strong>TOPCHAIR</strong>-S<br />
USER GUIDE<br />
<br />
To lower the rear wheels<br />
Press button (3)<br />
Repeating animation shows the movement of the wheel.<br />
Once the wheels are <strong>com</strong>pletely down, this message appears:<br />
<br />
To raise up the rear wheels<br />
Press button (1)<br />
Repeating animation shows the movement of the wheel.<br />
Once the wheels are <strong>com</strong>pletely up, this message appears:<br />
Before lowering down the front wheels, make sure you are in ‘manual track’<br />
mode with rear wheels down.<br />
In case of non-<strong>com</strong>pliance with this instruction and subject to certain<br />
conditions, the rear wheels might not be fully extended.<br />
To exit the rear wheel mode press button (2)<br />
Rev11/12 27 / 54
<strong>TOPCHAIR</strong>-S<br />
USER GUIDE<br />
h. Seat movement<br />
To tilt the seat forward or backward, select (button (2)) seat<br />
mode:<br />
Seat mode selected<br />
<br />
Tilt the seat backward<br />
Press button (3)<br />
Repeating animation shows the movement of the seat.<br />
Once the seat is <strong>com</strong>pletely backward, this message appears:<br />
Rev11/12 28 / 54
<strong>TOPCHAIR</strong>-S<br />
USER GUIDE<br />
<br />
Tilt the seat forward<br />
Press button (1)<br />
Repeating animation shows the movement of the seat.<br />
Once the seat is <strong>com</strong>pletely forward, this message appears:<br />
To exit the seat forward mode press button (2)<br />
i. Lights<br />
To control the lights (an option), select (button (2))<br />
light mode:<br />
Light mode selected<br />
Rev11/12 29 / 54
<strong>TOPCHAIR</strong>-S<br />
USER GUIDE<br />
<br />
To use the left indicator<br />
Press button (3), if the lights were previously off, this image appears:<br />
<br />
To use the right indicator<br />
Press button (1), if the lights were previously off, this image appears:<br />
To use the lights<br />
Press button (2), if the lights were previously off, this image appears:<br />
To exit this mode, press and hold the button (2)<br />
A countdown appears. Do not release the button until the previous statement appears.<br />
Rev11/12 30 / 54
<strong>TOPCHAIR</strong>-S<br />
USER GUIDE<br />
j. Adjusting the sound<br />
TopChair has an integrated horn to alert the user of possible hazards.<br />
It is possible to mute this alarm.<br />
To control the sound, select (button (2)) the<br />
sound mode:<br />
Sound is activated<br />
Sound is inactivated<br />
Rev11/12 31 / 54
<strong>TOPCHAIR</strong>-S<br />
USER GUIDE<br />
k. Configuration mode<br />
This mode is reserved for the after-sales-service; it is protected by a code.<br />
Configuration mode<br />
To exit, select the exit door and press button (2):<br />
Exit door selected<br />
Rev11/12 32 / 54
<strong>TOPCHAIR</strong>-S<br />
USER GUIDE<br />
Operating TopChair-S<br />
I. Crossing an obstacle in ‘Automatic stair’ mode<br />
To over<strong>com</strong>e unusual obstacles (eg: sidewalk> 5 cm) or stairs, the procedure is identical.<br />
Warning:<br />
Consider the re<strong>com</strong>mendations in paragraph III.3 Safety advice and,<br />
in particular, the limitations due to the use of infrared captors and<br />
the type of stair nosing.<br />
The speed limit authorized is:<br />
- 1 to 2 during transition phases (entry and exit stairs)<br />
- 1 to 2 during the descent of obstacle<br />
- 1 to 5 during the crossing of obstacle<br />
Always begin by using the smallest speed limit authorised and increase if<br />
necessary.<br />
Rev11/12 33 / 54
<strong>TOPCHAIR</strong>-S<br />
USER GUIDE<br />
1. Climb an obstacle in ‘Automatic stair’ mode<br />
<br />
Place yourself at the bottom of the stairs, in reverse,<br />
until the chair <strong>com</strong>es into contact with the first step,<br />
<br />
<br />
Put in speed 2 (or 3, if the wheelchair needs more<br />
power),<br />
Select the ‘automatic stair’ mode (see III-2-d) which<br />
has the effect of rising up the front wheels and<br />
gives motion/traction to the caterpillar track,<br />
Direction<br />
<br />
Go backwards until the tracks are up against the<br />
first step,<br />
<br />
When the system has detected the nose of the first<br />
step, it stops the caterpillars, beeps and controls<br />
the rise of the rear wheel.<br />
Wait until the end of the operation (beep), leaving the<br />
joystick in neutral position.<br />
<br />
Start climbing slowly backwards using the joystick.<br />
You have to drive particularly slowly on the first<br />
two steps for the jack to maintain the seat<br />
horizontally.<br />
If the chair has difficulty climbing stairs, gradually increase the<br />
speed.<br />
Rev11/12 34 / 54
<strong>TOPCHAIR</strong>-S<br />
USER GUIDE<br />
<br />
When you reach the top of the stairs, the<br />
system stops the movement and beeps. You<br />
need to make sure that you have arrived safely<br />
on the top floor and that the descent of the<br />
wheels can be done safely.<br />
The correct position corresponds to the alignment of the<br />
center of the rear wheel with the nose of the last step.<br />
If the wheelchair is in this position:<br />
We allow the system to perform this operation by<br />
selecting YES,<br />
OK<br />
Warning:<br />
Exceptionally, if it is not on the top floor (incorrect position), you select NO.<br />
The descent of the rear wheels will then be performed when necessary by<br />
selecting the ‘Rear wheels’ mode (see paragraph II Crossing an obstacle in<br />
‘Manual track’ mode).<br />
<br />
Illustrations shows the rear wheels moving<br />
down,<br />
<br />
Go backwards,<br />
Warning:<br />
For stairs with a slope less than or equal to 31<br />
°, the output of the rear wheels totally avoids<br />
tipping the wheelchair on the arrival of the<br />
top floor. But for the steepest stairs, you feel a shift back a<br />
few degrees.<br />
It is re<strong>com</strong>mended to help you with the ramp of the stairs if<br />
it is possible.<br />
31°<br />
Rev11/12 35 / 54
<strong>TOPCHAIR</strong>-S<br />
USER GUIDE<br />
<br />
When the wheelchair has fully reached the top<br />
floor, go backwards at least 30cm from the edge,<br />
and then select the 'road' mode which has the<br />
effect of lowering the front set of wheels and<br />
getting traction on the rear wheels.<br />
Note:<br />
For security reasons, the system prohibits slanting climbing<br />
beyond an acceptable angle and attempts to automatically<br />
correct misalignment. In some cases, the drive is stopped and<br />
it is necessary to initiate a short descent to get back in line<br />
before starting climbing again.<br />
2. Descend an obstacle in ‘automatic stair’ case<br />
<br />
Place yourself forward near the stairs and lined<br />
up,<br />
Put in speed 1,<br />
<br />
<br />
Select ‘automatic stair’ mode which has the<br />
effect of rising the front wheels and getting<br />
traction to the caterpillar track,<br />
Begin the descent forward and very slowly<br />
using the joystick,<br />
Direction<br />
<br />
When the tracks are in abutment on the nose of<br />
the step, the system stops the movement, beeps<br />
and automatically raises the rear wheels.<br />
An animation shows the rear wheels going up.<br />
Wait until the end of the operation (beep), leaving the<br />
joystick in neutral position.<br />
Rev11/12 36 / 54
<strong>TOPCHAIR</strong>-S<br />
USER GUIDE<br />
Follow the descent using the joystick. If<br />
necessary increase the speed.<br />
<br />
Decrease speed when you arrive down the stairs.<br />
<br />
When the tracks are butted up against the last<br />
nose of the stairs and at the low floor, the system<br />
stops the movement, beeps and automatically<br />
lowers down the front wheels.<br />
Wait until the end of the operation (beep), leaving the<br />
joystick in neutral position.<br />
<br />
Forward a few inches to be clear of the stairs,<br />
<br />
Select ‘road’ mode, which has the effect of lowering the front set of wheels and<br />
getting traction on the rear wheels.<br />
Note:<br />
For safety reasons, the system prohibits slanting descent<br />
beyond an acceptable angle and attempts to correct<br />
automatically misalignment.<br />
Rev11/12 37 / 54
<strong>TOPCHAIR</strong>-S<br />
USER GUIDE<br />
3. Warning message in ‘automatic stair’ mode<br />
MESSAGE CAUSES CORRECTIONS<br />
The wheelchair is misaligned<br />
with the axis of the stairs<br />
Correct the trajectory of the<br />
wheelchair to return it to the<br />
axis<br />
The angle of the obstacle<br />
exceeds the authorized limit<br />
Leave the obstacle<br />
Non-<strong>com</strong>pliant stairs<br />
The joystick is activated during<br />
a period of transition (eg:<br />
wheels going up or down)<br />
Release the joystick during and<br />
until the manoeuvre is<br />
<strong>com</strong>pleted<br />
The speed selected is too high<br />
Reduce your speed<br />
Rev11/12 38 / 54
<strong>TOPCHAIR</strong>-S<br />
USER GUIDE<br />
II.<br />
Crossing an obstacle in ‘manual track’ mode<br />
This procedure must be used only if the ‘automatic stair’<br />
mode is inoperative.<br />
Warning:<br />
Consider the re<strong>com</strong>mendations in paragraph III.3 Safety advice<br />
and, in particular, the limitations dues to the use of infrared<br />
captors and the type of stair nosing.<br />
The speed limit authorized is:<br />
- 1 to 2 during transition phases (entry and exit stairs)<br />
- 1 to 2 during the descent of obstacle<br />
- 1 to 5 during the crossing of obstacle<br />
Always begin by using the smallest speed limit authorised and increase if<br />
necessary.<br />
Rev11/12 39 / 54
<strong>TOPCHAIR</strong>-S<br />
USER GUIDE<br />
1. Climb an obstacle in ’manual track’ mode<br />
<br />
Place yourself at the bottom of the stairs in reverse,<br />
until it <strong>com</strong>es into contact with the first step,<br />
Put in speed 1 or 2,<br />
<br />
Select ‘manual track’ mode,<br />
Select ‘front wheels’ mode ,<br />
<br />
Activate the set of front wheel until it is <strong>com</strong>pletely in a high position,<br />
<br />
Go backwards until the tracks are butted up against the first step,<br />
Rev11/12 40 / 54
<strong>TOPCHAIR</strong>-S<br />
USER GUIDE<br />
<br />
Select the ’rear wheels’ mode,<br />
<br />
Activate the set of wheels until they are <strong>com</strong>pletely up,<br />
<br />
<br />
Begin the climbing backwards and slowly using the joystick. Drive particularly<br />
slowly for the jack to maintain the horizontal seat position.<br />
Stop when you reach the top of the stairs before the tilting point<br />
Warning:<br />
If you exceed the balance point without taking out the rear<br />
wheels, the wheelchair will suddenly tilt backwards.<br />
Inexperienced users must ask the help of another person to determine the<br />
position of the balance point and by holding onto the chair to help reduce the eventual<br />
tilting.<br />
It is re<strong>com</strong>mended to help you with the ramp of the stairs if it is possible.<br />
Make sure you have arrived properly at the top floor and that<br />
the descent of the rear wheels can be performed safely,<br />
<br />
<br />
Then select the ‘rear wheels’ mode,<br />
Activate the set of rear wheels until it is<br />
<strong>com</strong>pletely in the low position,<br />
Rev11/12 41 / 54
<strong>TOPCHAIR</strong>-S<br />
USER GUIDE<br />
<br />
<br />
Go backwards until you are <strong>com</strong>pletely on the top<br />
floor, at least 30 cm from the edge,<br />
Select the ’front wheels’ mode,<br />
<br />
Activate the set of front wheels until it is <strong>com</strong>pletely<br />
in the low position,<br />
<br />
Select the ‘road’ mode<br />
2. Descend an obstacle in ’manual track’ mode<br />
<br />
Place yourself forward near the stairs and lined up<br />
Put in speed 1,<br />
<br />
Select ‘manual track’ mode,<br />
Rev11/12 42 / 54
<strong>TOPCHAIR</strong>-S<br />
USER GUIDE<br />
<br />
Select the ‘front wheels’ mode until they are in a high position<br />
<br />
Begin the descent forward and very slowly using the joystick.<br />
<br />
Stop when you reach the top of the stairs before the tilting point. Same note as<br />
below.<br />
Warning:<br />
If you exceed the balance point without taking out the rear<br />
wheels, the wheelchair will suddenly tilt backwards.<br />
Inexperienced users must ask the help of another person to determine the<br />
position of the balance point and by holding onto the chair to help reduce the eventual<br />
tilting. It is re<strong>com</strong>mended to help you with the ramp of the stairs if it is possible.<br />
<br />
<br />
Select the ‘rear wheels’ mode until the wheels are in high position.<br />
Follow the descent using the joystick,<br />
<br />
<br />
<br />
Reduce the speed when you arrive at the bottom of the stairs,<br />
Stop when the tracks are resting on the last step and the lower floor.<br />
Select the ‘rear wheels’ mode until the wheels are <strong>com</strong>pletely down.<br />
Rev11/12 43 / 54
<strong>TOPCHAIR</strong>-S<br />
USER GUIDE<br />
<br />
<br />
Go forward a few inches to be clear of the stairs,<br />
Select the ‘front wheels’ mode until they are <strong>com</strong>pletely lowered,<br />
<br />
Select the ‘road’ mode, which has the effect of getting traction on the rear<br />
wheels.<br />
Rev11/12 44 / 54
<strong>TOPCHAIR</strong>-S<br />
USER GUIDE<br />
III.<br />
Manual movement<br />
The motors of the wheelchair are equipped with magnetic brakes that prevent the<br />
wheelchair rolling alone when it has been stopped. The brakes of the engine are tightened<br />
automatically when the joystick is in the neutral position.<br />
To push the wheelchair, you must disengage the magnetic brakes.<br />
A lever for disengaging the motor brake is located on the rear of the motor of the main<br />
wheels.<br />
— In disengaged state, the motor brakes are off. You must be careful that the wheelchair<br />
does not move in an uncontrolled manner if the ground is sloping.<br />
— You must always think of returning the release levers in position "on" after a use by<br />
pushing.<br />
1. Motor brakes declutching:<br />
— Switch the joystick off,<br />
— Turn the button of the right motor clockwise and the button of the left motor<br />
anticlockwise.<br />
2. Motor brakes clutching:<br />
— Turn the button of the right motor anticlockwise and the button of the left motor<br />
clockwise.<br />
Rev11/12 45 / 54
<strong>TOPCHAIR</strong>-S<br />
USER GUIDE<br />
IV.<br />
Other functions<br />
1. Locking the wheelchair<br />
To lock the system and prevent unauthorised use of your wheelchair, follow these<br />
instructions:<br />
When the system is running, select the on / off button and hold it,<br />
After 1 second, the system beeps, release the button on /off,<br />
Push the joystick forward until the system beeps,<br />
Push the joystick backward until the system beeps,<br />
Release the joystick, the system sounds a long beep.<br />
The wheelchair is now locked.<br />
2. Unlocking the wheelchair<br />
<br />
<br />
<br />
<br />
Switch on the system by pressing the on / off button,<br />
Push the joystick forward until the system beeps shortly,<br />
Push the joystick backward until the system beeps shortly,<br />
Release the joystick. The system sounds a long beep, the wheelchair is<br />
unlocked. The wheelchair can now function normally.<br />
Rev11/12 46 / 54
<strong>TOPCHAIR</strong>-S<br />
USER GUIDE<br />
Care and maintenance<br />
I. Diagnosis of the joystick in case of error detection<br />
The electronic system can detect an abnormal condition related to the engines, the<br />
brakes, the wiring or the electronic module itself.<br />
The error code is indicated by one or more LEDs rapidly blinking on the charge<br />
indicator.<br />
For example, 4 LEDs lighting together indicates: problem on the right engine.<br />
Depending on the severity, the system can authorise or prohibit being driven. In<br />
certain cases, driving will only be available at a reduced speed.<br />
Display Description Meaning Notes<br />
All the LEDs are off System off<br />
All the LEDs are on System is on<br />
Fewer LEDs lit indicate a<br />
and fixed<br />
The red LED on the<br />
left flashes<br />
The battery charge is<br />
low<br />
Two red lights flash Left engine not<br />
connected well<br />
Three red lights flash The left motor is shortcircuited<br />
Four red lights flash Right engine not<br />
connected well<br />
Five lights flash Right motor is shortcircuited<br />
Six lights flash Blocking system for<br />
various reasons<br />
low battery charge<br />
Batteries must be<br />
charged as soon as<br />
possible.<br />
Check the connection<br />
Contact your distributor<br />
Check the connection<br />
Contact your distributor<br />
Check that the charger is<br />
not connected. If this is<br />
not the case contact your<br />
dealer<br />
Seven lights flash Joystick default Make sure that the<br />
manipulator is in neutral<br />
position when starting<br />
Eight lights flash System default Check all connections<br />
Nine lights flash The parking brakes<br />
aren’t connected<br />
properly<br />
All lights flash Excessive voltage on<br />
control system<br />
Check the connection of<br />
brakes<br />
Check the connection of<br />
batteries<br />
Perform the necessary checks and contact your dealer if the problem persists.<br />
Rev11/12 47 / 54
<strong>TOPCHAIR</strong>-S<br />
USER GUIDE<br />
II.<br />
III.<br />
Cleaning the vehicle<br />
When cleaning the vehicle:<br />
— Only use a damp cloth and a mild detergent.<br />
— Do not use abrasive cleaning.<br />
— Do not expose parts of the electronic system in direct contact with water.<br />
— Do not use a pressure washer.<br />
Monthly checks<br />
• Side part and armrest:<br />
— Check fasteners.<br />
— Check that the armrests can be adjusted without undue effort.<br />
— Check that the arms are locked in place.<br />
The leg rest:<br />
— Check that the leg rest are located correctly.<br />
— Check that they can be adjusted properly.<br />
The track:<br />
The track wear varies significantly depending on the surfaces. Frequent use on<br />
aggressive surfaces such as concrete leads to premature wear.<br />
Tyres:<br />
— Check that the tyre pressure is correct.<br />
Front forks/front wheels:<br />
— Check that the wheels turn freely.<br />
— Check the hold of the forks.<br />
Electronic/electrical systems:<br />
— Control the condition and proper mounting and wiring connections.<br />
Mechanical:<br />
— Check the tightening of the screws.<br />
— Check the hold of the wheels on their axes<br />
— Check that the rotation of the rear set is correct.<br />
— Check that the rear wheels rotate without warping.<br />
Annual check:<br />
Once a year, have your wheelchair checked by your dealer who will perform a full<br />
maintenance. Regular maintenance can quickly detect damaged or worn parts and<br />
enhance the normal functioning of the wheelchair.<br />
Rev11/12 48 / 54
<strong>TOPCHAIR</strong>-S<br />
USER GUIDE<br />
IV.<br />
Repair a tyre<br />
Tools<br />
— Allen key for hexagon socket screws, 5 mm<br />
— Torque wrench<br />
— Repair kit for tire inner tube or a new tube.<br />
— Talcum powder<br />
— Lacquer block screws<br />
Removing a wheel<br />
— Replace the front and rear hindquarters to put the chair support on the tracks.<br />
— Turn off the power (ON / OFF button)<br />
— Unscrew the 5 bolts<br />
— Remove the wheel from wheel hub<br />
Reassemble a wheel<br />
Assemble in reverse order. Ensure that the wheels are put back on the same sides as<br />
they were removed from.<br />
— Tighten the bolts 30 Nm<br />
— Tighten the screws with lacquer block screws.<br />
WARNING: if a wheel isn’t tightened enough when reassembled, it can <strong>com</strong>e loose<br />
and could cause serious injury.<br />
Repair a tyre<br />
— Unscrew the valve cap,<br />
— Release the air in the tire by pressing the pin in the valve,<br />
— Unscrew the 5 screws on the back of the wheel,<br />
— Remove the half of the rim of the shells,<br />
— Remove the air chamber of the tire,<br />
— Repair the tube and put it in place or put a new one (if the old inner tube has to be<br />
repaired and put back in place, and if it has be<strong>com</strong>e wet during repair, it is best for dusting),<br />
— Slightly inflate the tube and replace the rim,<br />
— Screw the rim,<br />
— Control the position of the tyre,<br />
— Inflate it to the prescribed pressure.<br />
Rev11/12 49 / 54
<strong>TOPCHAIR</strong>-S<br />
USER GUIDE<br />
V. Replace batteries<br />
Fig 5a plan<br />
Tools<br />
— A pair of pliers<br />
— 11 key<br />
Rev11/12 50 / 54
<strong>TOPCHAIR</strong>-S<br />
USER GUIDE<br />
1. Remove batteries<br />
- Remove the rear cover<br />
(Figure 5b)<br />
- Remove the fuse box cover and then the fuse<br />
- Disconnect connectors C1 and C2<br />
(Figure 5c)<br />
- Remove the batteries<br />
(Figure 5d)<br />
- Unscrew the poles – (GND) and + (+24) of the batteries and the cables of the fuse<br />
(FUSE1 and FUSE2)<br />
Rev11/12 51 / 54
<strong>TOPCHAIR</strong>-S<br />
USER GUIDE<br />
2. Reassemble the batteries<br />
Remove the cover (fig. 5b)<br />
Remove the fuse box cover and then the fuse (fig 5c)<br />
Screw the battery poles (fig. 5d and fig. 5a)<br />
<br />
<br />
<br />
<br />
Push the battery in the normal position<br />
Connect the connectors C1 and C2<br />
Replace the fuse and its cover<br />
Replace the rear cover<br />
Rev11/12 52 / 54
<strong>TOPCHAIR</strong>-S<br />
USER GUIDE<br />
Warranty Certificate<br />
The chair is guaranteed for a period of 2 years from the date of delivery, except batteries<br />
and wheels which are warranted for a period of 1 year (excluding the period of<br />
immobilisation for possible repair chair).<br />
The warranty covers any defects in workmanship or quality raw material and <strong>com</strong>ponents,<br />
under normal conditions of use (excluding normal wear parts).<br />
The warranty is limited to the repair or the replacement for free only for the parts and the<br />
sub-assemblies found to be defective (parts, labour and transport), after inspection by an<br />
authorised representative.<br />
Warranty repairs must be authorised and carried out in an authorised supplier. Do not<br />
return parts without obtaining prior authorisation.<br />
This warranty does not apply to any failure of product due to:<br />
— Accidental collisions or accidents<br />
— Negligence<br />
— Abnormal use,<br />
— Improper maintenance<br />
— Installation, use of parts without the manufacturer’s authorisation<br />
— Failure to operate and use the product in accordance with the instructions provided in the<br />
Owner's Manual supplied<br />
— If the serial number has been removed, altered or defaced.<br />
— Cold storage or batteries left <strong>com</strong>pletely discharged for an extended period.<br />
Rev11/12 53 / 54
<strong>TOPCHAIR</strong>-S<br />
USER GUIDE<br />
Technical Specifications<br />
Total length without footrests<br />
Overall length with footrest<br />
Total height standard seat<br />
Total height of Recaro seat option with headrest<br />
Width<br />
Empty weight TopChair-S standard seat<br />
Maximum user weight<br />
98 cm / 38,5 inches<br />
115 cm / 45,2 inches<br />
107 cm / 42,1 inches<br />
128 cm / 50,4 inches<br />
69 cm / 27,2 inches<br />
145 kg<br />
110 kg<br />
Standard seat<br />
. seat height 55 cm / 21,6 inches<br />
. width 38 to 46 cm (15 to 18”)<br />
. depth 46 cm / 18 inches<br />
. back height 47 cm / 18,5 inches<br />
Recaro seat option<br />
. seat height 50-62 cm (19 to 24,5”)<br />
. depth 46-51 cm (18 to 20”)<br />
. seat height 77-83 cm (30,3 to 32,6“)<br />
Seating angle -3° + 30° (*)<br />
Diameter of rear wheels 35.5 cm (14")<br />
Diameter of front wheels 20 cm (8")<br />
Radius of gyration<br />
Maximum speed on wheels<br />
Maximum speed on tracks<br />
85 cm / inches<br />
9.2 km/h<br />
0.7 km/h<br />
Autonomy on the flat 35 to 48 km (**)<br />
Wheels motors<br />
Caterpillars engine<br />
Battery capacity<br />
Obstacle height, forward, in ‘road’ mode<br />
Obstacle height, backward, in ‘route’ mode<br />
2 x 350 w<br />
2 x 400 w<br />
60 Ah<br />
3 cm / 1,8 inches<br />
6 cm / 2,3 inches<br />
Obstacle height, forward, in ‘Automatic stair’ or ‘Manual track’<br />
20 cm / 8 inches<br />
mode<br />
Maximum slope in ‘road’ mode 6°<br />
Maximum slope in ‘Automatic stair’ or ‘Manual track’ mode 33° (65 %)<br />
* : The chair has an automatic stabilisation system that keeps the seat level. If the wheelchair is set into 'road'<br />
mode, the user can, for example, order a seat tilt forward for easy loading, transfer...<br />
** : The range of an electric wheelchair depends on the state of battery charge, temperature, weight of the<br />
user, and the slope of the ground surface, the tire pressure…<br />
Rev11/12 54 / 54