7-Series Instruction Booklet - CTM Homecare Product, Inc
7-Series Instruction Booklet - CTM Homecare Product, Inc
7-Series Instruction Booklet - CTM Homecare Product, Inc

Create successful ePaper yourself
Turn your PDF publications into a flip-book with our unique Google optimized e-Paper software.
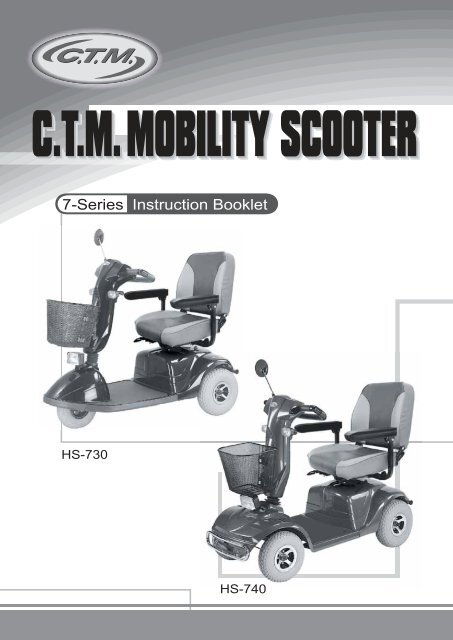
C.T.M. MOBILITY SCOOTER<br />
7-<strong>Series</strong> <strong>Instruction</strong> <strong>Booklet</strong><br />
HS-730<br />
HS-740
7-<strong>Series</strong><br />
<strong>Instruction</strong> <strong>Booklet</strong><br />
TABLE OF CONTENTS<br />
INTRODUCTION<br />
-------------------------------------------------------1<br />
IMPORTANT PRECAUTIONS<br />
----------------------------------------2<br />
ELECTROMAGNETIC INTERFERENCE AND WARNINGS<br />
----3<br />
IDENTIFICATION OF PARTS<br />
----------------------------------------5<br />
OPERATING YOUR SCOOTER---------------------------------------7<br />
DISASSEMBLING YOUR SCOOTER---------------------------------9<br />
ASSEMBLING YOUR SCOOTER<br />
----------------------------------11<br />
CHARGING THE BATTERIES<br />
--------------------------------------12<br />
CARE AND MAINTENANCE<br />
----------------------------------------13<br />
TROUBLESHOOTING<br />
------------------------------------------------14<br />
TECHNICAL SPECIFICATIONS<br />
------------------------------------15
7-<strong>Series</strong><br />
<strong>Instruction</strong> <strong>Booklet</strong><br />
INTRODUCTION<br />
Thank you and congratulations on purchasing your new C.T.M. Mobility Scooter. It<br />
is designed to provide you with transportation indoors and outdoors.<br />
We pride ourselves on providing safe and comfortable products. Our goal is to ensure<br />
your complete satisfaction with our product. We are certain that you will enjoy your<br />
C.T.M. mobility scooter.<br />
Please read and observe all warnings and instructions given in the owner's manual<br />
before operating this scooter. Also, retain this booklet for future reference.<br />
If you have any questions, you can contact:<br />
C.T.M.HOMECARE PRODUCT, INC.<br />
6191 Schaefer Ave Suite B Chino CA 91710<br />
Tel : +909-590-1388 Fax : +909-590-3365<br />
E-Mail : ctm@ctmhomecare.com http : //www.ctmhomecare.com<br />
or your local dealer:<br />
1
7-<strong>Series</strong><br />
<strong>Instruction</strong> <strong>Booklet</strong><br />
IMPORTANT PRECAUTIONS<br />
Only one person at a time can ride a C.T.M. Mobility Scooter.<br />
Maximum load is 181 kg / 399 lbs.<br />
Turn key off before getting on or off.<br />
Always drive carefully and be aware of others using the same area as yourself.<br />
Always use pedestrian crossings where possible. Take extreme care crossing roads.<br />
Do not drive on slopes exceeding a 1 in 4, and take extreme care when turning on slopes.<br />
Do not use full power when turning sharp corners.<br />
Take great care and use low speeds for backing up, downhill, uneven surfaces, and<br />
curb climbing.<br />
Scooter may not operate well in high humidity.<br />
If you are caught in the rain, it is handy to carry a scooter canopy. This can offer<br />
complete protection for yourself and the scooter.<br />
Never put scooter in neutral on slopes.<br />
Follow traffic laws when you ride outside.<br />
2
7-<strong>Series</strong><br />
<strong>Instruction</strong> <strong>Booklet</strong><br />
ELECTROMAGNETIC INTERFERENCE<br />
AND WARNINGS<br />
CAUTION: It is very important that you read this information regarding the possible<br />
effects of Electromagnetic Interference on your motorized scooter.<br />
Powered wheelchairs and motorized scooters may be susceptible to electromagnetic<br />
interference (EMI), which is interfering electromagnetic energy (EM) emitted from sources<br />
such a radio stations, TV stations, amateur radio (HAM) transmitters, two-way radios, and<br />
cellular phones. The interference (from radio wave sources) can cause the motorized<br />
scooter to release its brakes, move by itself, or move in unintended directions. It can also<br />
permanently damage the motorized scooter control system. The intensity of the interfering<br />
EM energy can be measured in volts per meter (V/m). Each motorized scooter can resist<br />
EMI up to a certain intensity. This is called its "immunity level." The higher the immunity<br />
level, the greater the protection. At this time, current technology is capable of achieving at<br />
least a 20 V/m immunity level, which would provide useful protection from the more common<br />
sources of radiated EMI. The immunity level of this motorized scooter model is not known.<br />
There are a number of sources of relatively intense electromagnetic fields in the everyday<br />
environment. Some of these sources are obvious and easy to avoid. Others are not apparent<br />
and exposure is unavoidable. However, we believe that by following the warnings listed<br />
below, your risk to EMI will be minimized.<br />
The sources of radiated EMI can be broadly classified into three types :<br />
1.on the transmitting unit. Examples include: citizens band (CB) radios, "walkie talkie,"<br />
security, fire, and police transceivers, cellular telephones, and other personal communication<br />
devices;<br />
Some cellular telephones and similar devices transmit signals while<br />
they are ON, even when not being used.<br />
2.Medium-range mobile transceivers, such as those used in police cars, fire trucks,<br />
ambulances, and taxis. These usually have the antenna mounted on the outside of the<br />
vehicle; and<br />
3.Long-range transmitters and transceivers such as commercial broadcast transmitters<br />
(radio and TV broadcast antenna towers) and amateur (HAM) radios.<br />
Other types of hand-held devices, such as cordless phones, laptop<br />
computers, AM/FM radios, TV sets, CD players, and cassette players,<br />
and small appliances, such as electric shavers and hair dryers, so far as<br />
we know, are not likely to cause EMI problems to your motorized scooter.<br />
3
7-<strong>Series</strong><br />
<strong>Instruction</strong> <strong>Booklet</strong><br />
Motorized Scooter Electromagnetic Interference<br />
Because EM energy rapidly becomes more intense as one moves closer to the transmitting<br />
antenna (source), the EM fields from hand-held radio wave sources (transceivers) are of<br />
special concern. It is possible to unintentionally bring high levels of EM energy very close<br />
to the motorized scooter control system while using these devices. This can affect motorized<br />
scooter movement and braking. Therefore, the warnings listed below are recommended<br />
to prevent possible interference with the control system of the motorized scooter.<br />
Warnings<br />
Electromagnetic interference (EMI) from sources such as radio and TV stations, amateur<br />
radio (HAM) transmitters, two-way radios, and cellular phones can affect motorized scooters.<br />
Following the warnings listed below should reduce the chance of unintended brake release<br />
or motorized scooter movement which could result in serious injury.<br />
1.Do not operate hand-held transceivers (transmitters-receivers), such as citizens band<br />
(CB) radios, or turn ON personal communication devices, such as cellular phones, while<br />
the motorized scooter is turned ON;<br />
2.Be aware of nearby transmitters, such as radio or TV stations, and try to avoid coming<br />
close to them;<br />
3.If unintended movement or brake release occurs, turn the motorized scooter OFF as<br />
soon as it is safe;<br />
4.Be aware that adding accessories or components, or modifying the motorized scooter,<br />
may make it more susceptible to EMI; and<br />
There is no easy way to evaluate their effect on the overall immunity of<br />
the motorized scooter.<br />
5.Report all incidents of unintended movement or brake release to the distributor listed<br />
on the inside front cover of this manual. Note whether there is a source of EMI nearby.<br />
Important Information<br />
1.20 volts per meter (V/m) is a generally achievable and useful immunity level against<br />
EMI (as of May 1994). The higher the level, the greater the protection.<br />
2.The immunity level of this product is not known.<br />
4
7-<strong>Series</strong><br />
<strong>Instruction</strong> <strong>Booklet</strong><br />
IDENTIFICATION OF PARTS<br />
Before attempting to drive this scooter on your own, it is important that you familiarize<br />
yourself with the controls, and how to operate<br />
Mirror<br />
Delta handle bar<br />
Tall Back Rotating<br />
Seat-Sliding Adjustment<br />
Tilting<br />
Armrest<br />
Front Basket<br />
Seat Rotation<br />
Head Light<br />
Front<br />
Bumper<br />
13" Rear Wheels<br />
11" Front Wheels<br />
Seat Slide<br />
Tiller Angle Adjustment<br />
Figure 1 - HS-740 Scooter Front View<br />
Self-diagnostic<br />
Warning Light<br />
Power Reserve<br />
Indicator<br />
Amrest Width<br />
Adjustment<br />
Thumbscrews<br />
Free-Wheels<br />
Lever<br />
Rear Light<br />
and Turn<br />
Signals<br />
Horn<br />
button<br />
Warning<br />
button<br />
Speed<br />
Control Knob<br />
Anti-Tip Wheels<br />
Figure 2 - HS-740 Controls Panel Top View<br />
Figure 3 - HS-740 Scooter Rear View<br />
5
7-<strong>Series</strong><br />
<strong>Instruction</strong> <strong>Booklet</strong><br />
FUNCTION OF PARTS<br />
TOP CONTROL PANEL<br />
Speed Dial Knob<br />
Turning knob counter-clock, scooter will reduce speed.<br />
Turning speed knob clock-wise, scooter will gain speed.<br />
Total control speed will be transferred to the thumb lever controls.<br />
Self Diagnostic Warning Light Fig. 2<br />
A flash code will inform of a malfunction of scooter. See page 17 for flash code information.<br />
Battery Gauge Indicator<br />
There are total of five LED lights to indicate voltage from batteries. LED lights will turn<br />
off as battery voltage drops.<br />
When only two LED are ON, please charge batteries before discharging<br />
batteries. (will void warranty)<br />
ADJUCT TO TOP CONTROL PANEL<br />
Thumb Lever<br />
Pushing the right thumb lever moves the scooter forward. Pushing the left thumb lever<br />
moves the scooter backward. (This can be reversed if required by local dealer.) Releasing<br />
both engages the automatic brake. These are also your accelerator. The further you<br />
depress them, the faster you go. (Subject to the position of the Rabbit/Turtle control).<br />
AT BASE OF STEERING TILLER<br />
Tiller Adjustment Knob<br />
Pushing down on Lever Knob, (located next to key switch) user can adjust angle of<br />
Tiller.<br />
Release Lever Knob to lock Tiller at desired angle<br />
BELOW SEAT<br />
Seat Locker Knob<br />
Turn the seat locker knob counterclockwise to loose. Turn it clockwise to lock the seat<br />
position.<br />
Seat Height Adjuster<br />
There are three holes on the seat tube to adjust the seat height. Be sure the detent pin<br />
is fully inserted at its new height before sitting on the seat.<br />
Armrest width Adjustment Thumbscrews<br />
Loosen the two thumbscrews to adjust the arm width; tighten again to lock in the desired<br />
position.<br />
Legroom Adjuster<br />
Pull on "Seat Slide Mechanism" located underneath seat right side.<br />
With Seat Slide Mechanism pulled, push seat desired position.<br />
REAR BODY<br />
Rear Compartment Cover<br />
Open the compartment Cover to access the on board charger.<br />
Anti-tip wheels<br />
Helps keep the scooter from tipping over.<br />
Free-Wheeling Lever<br />
When lever is in the N (Neutral) position, the scooter can be moved without power.<br />
When lever is in the D (Drive) position, the scooter can be driven. Normal position is D.<br />
6
7-<strong>Series</strong><br />
<strong>Instruction</strong> <strong>Booklet</strong><br />
OPERATING YOUR SCOOTER<br />
You can make the following adjustments to increase your comfort when driving.<br />
adjust seat height and location<br />
adjust steering column to comfortable position.<br />
adjust legroom.<br />
1.Before operating your scooter, check the following:<br />
free-wheeling device on D<br />
speed dial is at the turtle picture.<br />
2.Sit on scooter and turn on key. All Battery Gauge LED Lights should be lit. The Self-<br />
Diagnostic Warning Lights should not be blinking.<br />
3.When your hands rest comfortably on the handlebars, the thumb control levers should<br />
be within easy reach. The right lever moves the scooter forward, the left one moves it<br />
backward. When you release both levers the scooter will stop.<br />
This scooter has automatic braking systems. Release the thumb finger<br />
control and the brakes will stop the scooter.<br />
4.Steer the scooter by turning the whole steering column the way you want to go.<br />
5.Practice driving where there are no obstacles. Start at the slowest speed and drive<br />
forward and backward; make some turns. As you get more comfortable you can<br />
increase the speed by turning the speed dial toward the picture of the rabbit.<br />
6.If two Battery Gauge LED Lights be lit, you should plan to recharge the batteries very soon.<br />
7.If the scooter stops, locate the circuit breaker on the top of the battery pack. Push it<br />
and try the scooter again.<br />
8.When you are finished riding, turn off the key before getting off.<br />
9.If you are finished riding for the day, immediately recharge the batteries.<br />
See CHARGING THE BATTERIES, page 14 and 15.<br />
7
7-<strong>Series</strong><br />
<strong>Instruction</strong> <strong>Booklet</strong><br />
Keep in mind these rules<br />
Release thumb levers and allow scooter to stop completely before changing from forward<br />
to reverse, or reverse to forward.<br />
When turning a corner, swing the front wheels wide, because the back wheels will turn<br />
more tightly.<br />
Use the scooter only where it would be safe to walk.<br />
Use low speeds for reverse, downhills, ramps, curbs, or uneven surfaces.<br />
Other Operating Information<br />
Hill climbing: You may need to use a higher speed. Turn to lower speed before going<br />
downhill.<br />
Down slopes: To proceed down steep slopes slowly, set speed control in proximity of the<br />
turtle. This enables driver control, as the closer the speed control is set<br />
toward the turtle, the slower it will become. However, this scooter will not<br />
self accelerate down hills due to the automatic braking taking effect should<br />
you attempt to drive too fast.<br />
Curb climbing: Approach slowly at right angles to the curb. A slight angle is permissible<br />
with a 4-wheel scooter, but a direct approach is needed on a 3-wheel<br />
scooter. Do not attempt greater than a 3" curb.<br />
If Self-Diagnostic Warning Lights start to blink, identify the problem from<br />
the chart on page 17 and take action.<br />
If the scooter breaks down and must be moved, get off the scooter, push the Free-Wheeling<br />
Lever to N, move the scooter slowly to a safe location, and move the lever back to D.<br />
8
7-<strong>Series</strong><br />
<strong>Instruction</strong> <strong>Booklet</strong><br />
DISASSEMBLING YOUR SCOOTER<br />
No tools are necessary to disassemble scooter. You can disassemble scooter for<br />
transportation.<br />
Remove seat by releasing Seat Rotation Lever (A) and then lift off. (See Fig. 4)<br />
Remove Battery Cover (B) by pressing button in center. (See Fig. 5)<br />
B<br />
A<br />
Figure 4 Figure 5<br />
Remove Battery Fixing Velcro (C). (See Fig. 6)<br />
Detach Battery Power Plugs (D) and remove two batteries (E). (See Fig. 7)<br />
C<br />
D<br />
Figure 6 Figure 7<br />
E<br />
Unplug Wire Connect (F) between the front rear units. (See Fig. 8)<br />
Unscrew the Free-Wheeling Knob (G). (See Fig. 9)<br />
F<br />
Figure 8<br />
Figure 9<br />
G<br />
9
7-<strong>Series</strong><br />
<strong>Instruction</strong> <strong>Booklet</strong><br />
Remove Rear Hood (H) by pushing the end forward. (See Fig. 10)<br />
Release two Locking Pins (I) to separate front and rear units. (See Fig. 11)<br />
H<br />
I<br />
Figure 10 Figure 11<br />
With one hand on Rear Frame (J) and other on Seat Piller (K) as Hand hold. detach front<br />
and rear sections. (See Fig. 12)<br />
By removing the Front Basket (L) and adjusting the tiller down by using the Tiller Angle<br />
Adjustment (M) you should be able to place all parts in the trunt and part of rear seat.<br />
(See Fig. 13)<br />
K<br />
M<br />
J<br />
Figure 12 Figure 13<br />
L<br />
10
7-<strong>Series</strong><br />
<strong>Instruction</strong> <strong>Booklet</strong><br />
ASSEMBLING YOUR SCOOTER<br />
To assemble the scooter, you can repeat the disassembly directions in reverse.<br />
Abbreviated directions are given below. Refer to the Figures on pages 11 - 12 to<br />
locate the parts.<br />
1.Use the tiller angle adjustment lever to move the steering column up out of the way.<br />
2.Place the front basket<br />
3.Tilting the rear end to a horizontal position, insert the scooter frame tube of the front<br />
end into the rear section first, making sure that the locking pins are removed.<br />
4.Slide the two sections of the unit together until the front half reaches its limits.<br />
5.Insert the two locking pins into their corresponding holes. Both locking pins must be<br />
fully inserted whenever the scooter is assembled.<br />
6.Place batteries, one on each side of the seat post, and use Vel-cro to fix the position.<br />
7.Attach the battery power plugs.<br />
8.Attach the wire connect.<br />
9.Place rear hood, battery cover and free-wheeling knob.<br />
10.Loosen Seat Rotation Lever counterclockwise. Place seat on seat post. Tighten Lever<br />
again by turning clockwise. Lock Seat Control Lever on bottom of seat before sitting<br />
down.<br />
11
7-<strong>Series</strong><br />
<strong>Instruction</strong> <strong>Booklet</strong><br />
CHARGING THE BATTERIES<br />
Batteries must be charged before using the scooter for the first time and should be<br />
recharged after each day use. You will need the scooter and the battery charger.<br />
Each country may supply different<br />
charger. The charging procedure<br />
may be different from below.<br />
If you require more details, please<br />
contact your authorized dealer.<br />
Be sure the scooter key is in the<br />
OFF position<br />
Figure 14<br />
1.Insert battery charger cord into the charger connector on the charger output. Refer to<br />
above figure for correct position<br />
2.Plug the other end of the battery charger cable into a standard electrical outlet.<br />
3.Turn the power on. Normally, The LED (Power) Light will turn on when electric current<br />
passes.<br />
4.Charging starts. During charging, LED (Charge) will indicate orange light, when it turns<br />
to green light, that means well-charged.<br />
5.LED indication<br />
LED(POWER) - GREEN LIGHT ON : Power On.<br />
LED(CHARGE) - ORANGE LIGHT ON : Charging / GREEN LIGHT ON : Fully Charged<br />
6.Charger Trouble Shooting<br />
(A)If LED (POWER) light is off<br />
Check the input voltage (115V/230V) is the same as you adjust.<br />
If light is still off, please check and repair the battery charger.<br />
(B)If LED (CHARGE) light is off<br />
Check to see clips connection is correct.<br />
If the battery is fully charged, the LED (CHARGE) light will be off.<br />
If light is still off, the battery may be defective.<br />
(C)If ORANGE light can turn to GREEN<br />
The battery can not be charged. Please check and recover it.<br />
(D)If ORANGE light turns to GREEN immediately<br />
Check to see the battery is fully charged, if not, The battery may be defective<br />
Check and recover it.<br />
The time needed to recharge will vary depending on the depletion of the<br />
batteries. Charging for longer than necessary will not harm the batteries.<br />
They can not be overcharged.<br />
Keep in mind these rules<br />
Fully charge batteries at lease once a month, more if you use the scooter regularly.<br />
Charge after each trip exceeding 3 kilometers / 1.9 miles.<br />
If storing your scooter for some time (1 month or more) make sure that the batteries<br />
are fully charged, and on returning, charge them again before using scooter.<br />
Batteries will only give maximum performance after the scooter has been used, and<br />
the batteries have been recharged up to 10 times. A bit like running in a new car.<br />
12
7-<strong>Series</strong><br />
<strong>Instruction</strong> <strong>Booklet</strong><br />
CARE AND MAINTENANCE<br />
Cleaning Your Scooter<br />
If your scooter is dirty, use a damp or lightly soapy cloth to wipe it down. Do not use running<br />
water to wash or rinse the scooter in order to protect the electrical parts. Polish with an<br />
automotive liquid polish.<br />
Maintaining Your Scooter<br />
All maintenance and repair of your scooter should be done by an authorized dealer.<br />
The following areas required periodic inspection:<br />
the signs of wear on the tires<br />
all electrical connections are firmly attached<br />
Storing Your Scooter<br />
Between uses, your scooter is best stored in a dry location.<br />
13
7-<strong>Series</strong><br />
<strong>Instruction</strong> <strong>Booklet</strong><br />
TROUBLESHOOTING<br />
Here are some suggestions about solving problems you may have with your scooter. There<br />
is a Self-Diagnostic Warning Light on the Control Panel. To check the Self-Diagnostic<br />
Warning Light, turn on the key and count the number of blinks on the Warning Light.<br />
Number of<br />
Flashes<br />
1<br />
2<br />
3<br />
4<br />
5<br />
6<br />
7<br />
8<br />
9<br />
Problem<br />
Battery needs<br />
recharging<br />
Battery voltage too low<br />
to operate scooter<br />
Battery voltage too high<br />
Short in motor<br />
Brake malfunction<br />
Transmission lever<br />
not in neutral<br />
Transmission lever<br />
malfunction<br />
Motor problems<br />
Other internal errors<br />
Solution<br />
Recharge the batteries soon.<br />
Must recharge before using. Check<br />
battery condition and connections.<br />
Check battery condition and connections.<br />
Contact your authorized dealer to check<br />
your battery charger.<br />
Contact your authorized dealer.<br />
Contact your authorized dealer.<br />
Contact your authorized dealer.<br />
Contact your authorized dealer.<br />
Contact your authorized dealer.<br />
Contact your authorized dealer.<br />
Other Problems<br />
Low tire pressure: pump up tires to 30-40 lbs.<br />
During charging, the light on the charger does not change to green: Contact your authorized<br />
dealer.<br />
Scooter will not move when key is turned on:<br />
1.Check Power Reserve Indicator on the control panel. It should be lit in the green, yellow,<br />
and red zones.<br />
2.Check Self-Diagnostic Warning Light. It should be steady. If it is flashing, see chart on<br />
page 17 for problem identification.<br />
3.Check all electrical connections to be sure they are tight.<br />
4.If none of these correct the problem, contact your authorized dealer.<br />
14
7-<strong>Series</strong><br />
<strong>Instruction</strong> <strong>Booklet</strong><br />
SPECIFICATION<br />
SPECIFICATIONS HS-730 HS-740<br />
Overall Length<br />
Overall Width<br />
Overall Height<br />
Wheels: Front<br />
Wheels: Rear<br />
Weight w/ Batteries<br />
Max. Speed<br />
Weight Capacity<br />
52.8"<br />
26.6"<br />
40"<br />
10"<br />
13"<br />
217.7 lbs<br />
7.5 mph<br />
399 lbs<br />
54.7"<br />
26.6"<br />
40"<br />
11"<br />
13"<br />
246.4 lbs<br />
7.5 mph<br />
399 lbs<br />
Ground Clearance<br />
Grade Climbable<br />
Curb Climbing<br />
Turning Radius<br />
Suspension<br />
Brake<br />
Seat Type<br />
Seat Width<br />
Motor Size<br />
Battery Size<br />
Battery Weight<br />
Travel Range<br />
Battery Charger<br />
Electronics<br />
3"<br />
12 degree<br />
2.4"<br />
43.3"<br />
Rear<br />
Electro-Mechanical<br />
19"<br />
700W 4100 r.p.m<br />
(2) 12V. 50Ah<br />
69 lbs<br />
22.7 Miles<br />
5A Off Board<br />
3"<br />
12 degree<br />
2.4"<br />
59.1"<br />
Rear<br />
Electro-Mechanical<br />
Tall Back Luxury SwivelSeat-Sliding Adjustment<br />
19"<br />
700W, 4100 r.p.m<br />
(2) 12V. 50Ah<br />
69 lbs<br />
21.1 Miles<br />
5A Off Board<br />
On/Off Key Switch, Battery Level Indicator,<br />
Speed Control Knob<br />
*Subject to change without notice.(Issue A)<br />
15