here - Snap-on Equipment
here - Snap-on Equipment here - Snap-on Equipment
Maintenance Maintaining the Oil Separator Bowl Metal Oil Separator Bowl Press the oil separator light switch to access the separator maintenance mode. The following message displays: RECYCLING REFRIGERANT FROM OIL SEPARATOR! PLEASE WAIT! A five minute deep recovery is performed on the oil separator bowl. After recycling is finished, the oil separator light switch illuminates continuously and two short beeps sound. Your Kool Kare unit attempts to recycle the contents of the bowl during a recycling program when the separator float switch activates. Recovery continues for an additional three minutes and then returns to normal recycling operation if the float switch deactivates within three minutes. 3 If the float switch remains activated after the three minute recovery, separator maintenance mode is entered and the following message displays: RECYCLING REFRIGERANT FROM OIL SEPARATOR! PLEASE WAIT! 3 Record maintenance on Oil Separator Bowl Maintenance Schedule in this chapter. Use the procedure in this section to remove the metal oil separator bowl. • Wear safety goggles, user and bystander. Everyday eyeglasses only have impact resistant lenses, they are NOT safety glasses. • Never open the metal oil separator bowl when it is under pressure. • Service should be performed by a certified A/C service technician. • Remove bowl by performing maintenance procedure in Chapter 3–Metal Oil Separator Bowl in this manual. • Remove bowl only when light is on continuously and no refrigerant is present. • Loosen metal oil separator bowl vacuum release thumbscrew only when light is on continuously and no refrigerant is present. • Read, understand and follow Safety Information in the front of this manual. 3-2
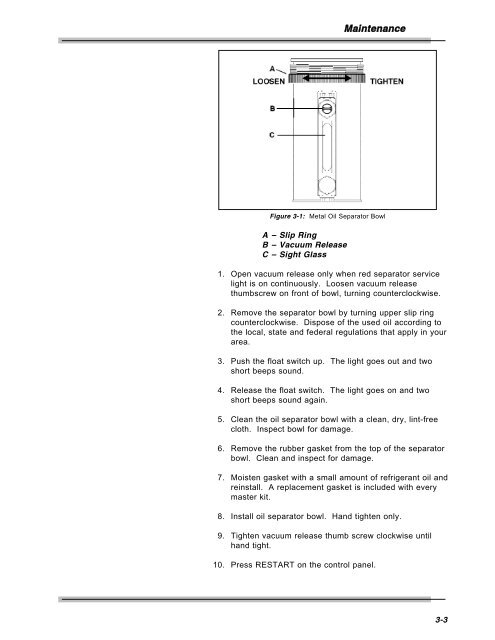
Maintenance Figure 3-1: Metal Oil Separator Bowl A – Slip Ring B – Vacuum Release C – Sight Glass 1. Open vacuum release only when red separator service light is on continuously. Loosen vacuum release thumbscrew on front of bowl, turning counterclockwise. 2. Remove the separator bowl by turning upper slip ring counterclockwise. Dispose of the used oil according to the local, state and federal regulations that apply in your area. 3. Push the float switch up. The light goes out and two short beeps sound. 4. Release the float switch. The light goes on and two short beeps sound again. 5. Clean the oil separator bowl with a clean, dry, lint-free cloth. Inspect bowl for damage. 6. Remove the rubber gasket from the top of the separator bowl. Clean and inspect for damage. 7. Moisten gasket with a small amount of refrigerant oil and reinstall. A replacement gasket is included with every master kit. 8. Install oil separator bowl. Hand tighten only. 9. Tighten vacuum release thumb screw clockwise until hand tight. 10. Press RESTART on the control panel. 3-3
- Page 1: USER’S MANUAL Kool Kare
- Page 4 and 5: Part Number ZEEAC304D Revision A ©
- Page 6 and 7: Safety Information The signal word
- Page 8 and 9: Safety Information Oil (Lubricant)
- Page 10 and 11: Safety Information Risk of injury.
- Page 12 and 13: ii Table of Contents
- Page 14 and 15: Trademark and Copyright Information
- Page 16 and 17: Using This Manual Safety Messages S
- Page 18 and 19: viii Using This Manual
- Page 20 and 21: Introduction Refrigerant Gases Halo
- Page 22 and 23: Introduction Refrigerant Substitute
- Page 24 and 25: Introduction Functional Description
- Page 26 and 27: Introduction Back View Figure 1-2:
- Page 28 and 29: Introduction Particle Filter Assemb
- Page 30 and 31: Introduction Language Selection Wit
- Page 32 and 33: 1-14 Introduction
- Page 34 and 35: Installation and Operation 3. Conne
- Page 36 and 37: Installation and Operation Adding R
- Page 38 and 39: Installation and Operation Operatio
- Page 40 and 41: Installation and Operation Connecti
- Page 42 and 43: Installation and Operation — If t
- Page 44 and 45: Installation and Operation Charge O
- Page 46 and 47: Installation and Operation Removing
- Page 50 and 51: Maintenance Master Filter The maste
- Page 52 and 53: Maintenance Changing the Master Fil
- Page 54 and 55: Maintenance • Wear safety goggles
- Page 56 and 57: Maintenance Figure 3-4: Particle Fi
- Page 58 and 59: Maintenance Symptom Possible Cause
- Page 60: 3-14 Maintenance
Maintenance<br />
Figure 3-1: Metal Oil Separator Bowl<br />
A – Slip Ring<br />
B – Vacuum Release<br />
C – Sight Glass<br />
1. Open vacuum release <strong>on</strong>ly when red separator service<br />
light is <strong>on</strong> c<strong>on</strong>tinuously. Loosen vacuum release<br />
thumbscrew <strong>on</strong> fr<strong>on</strong>t of bowl, turning counterclockwise.<br />
2. Remove the separator bowl by turning upper slip ring<br />
counterclockwise. Dispose of the used oil according to<br />
the local, state and federal regulati<strong>on</strong>s that apply in your<br />
area.<br />
3. Push the float switch up. The light goes out and two<br />
short beeps sound.<br />
4. Release the float switch. The light goes <strong>on</strong> and two<br />
short beeps sound again.<br />
5. Clean the oil separator bowl with a clean, dry, lint-free<br />
cloth. Inspect bowl for damage.<br />
6. Remove the rubber gasket from the top of the separator<br />
bowl. Clean and inspect for damage.<br />
7. Moisten gasket with a small amount of refrigerant oil and<br />
reinstall. A replacement gasket is included with every<br />
master kit.<br />
8. Install oil separator bowl. Hand tighten <strong>on</strong>ly.<br />
9. Tighten vacuum release thumb screw clockwise until<br />
hand tight.<br />
10. Press RESTART <strong>on</strong> the c<strong>on</strong>trol panel.<br />
3-3


