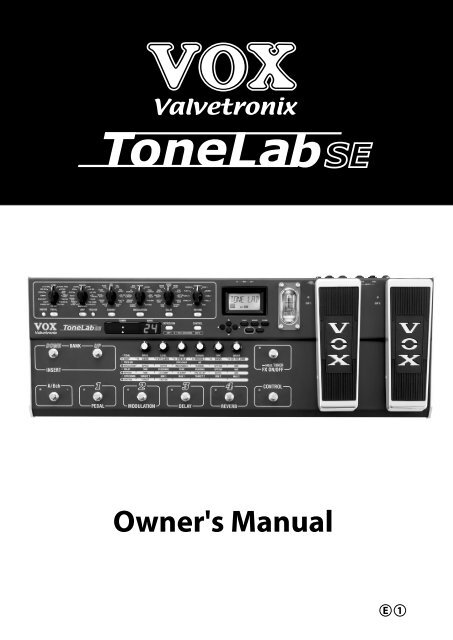
ToneLab SE Owner's manual - Vox
ToneLab SE Owner's manual - Vox
ToneLab SE Owner's manual - Vox

You also want an ePaper? Increase the reach of your titles
YUMPU automatically turns print PDFs into web optimized ePapers that Google loves.
<strong>Owner's</strong> Manual<br />
E 1
Precautions<br />
Location<br />
Using the unit in the following locations can result in a malfunction.<br />
• In direct sunlight<br />
• Locations of extreme temperature or humidity<br />
• Excessively dusty or dirty locations<br />
• Locations of excessive vibration<br />
• Close to magnetic fields<br />
Power supply<br />
Please connect the designated AC/AC power supply to an AC outlet of the correct voltage.<br />
Do not connect it to an AC outlet of voltage other than that for which your unit is intended.<br />
Interference with other electrical devices<br />
Radios and televisions nearby may experience reception interference. Operate this unit at a<br />
suitable distance from radios and televisions.<br />
Handling<br />
To avoid breakage, do not apply excessive force to the switches or controls.<br />
Care<br />
If the exterior becomes dirty, wipe it with a clean, dry cloth. Do not use liquid cleaners such<br />
as benzene or thinner, cleaning compounds or flammable polishes.<br />
Keep this <strong>manual</strong><br />
After reading this <strong>manual</strong>, please keep it for later reference.<br />
Keeping foreign matter out of your equipment<br />
Never set any container with liquid on this equipment. If liquid gets into the equipment, it<br />
could cause a breakdown, fire, or electrical shock.<br />
Be careful not to let metal objects get into the equipment. If something does slip into the<br />
equipment, unplug the AC/AC power supply from the wall outlet. Then contact your nearest<br />
Korg dealer or the store where the equipment was purchased.<br />
THE FCC REGULATION WARNING (for U.S.A.)<br />
This equipment has been tested and found to comply with the limits for a Class B digital device, pursuant<br />
to Part 15 of the FCC Rules. These limits are designed to provide reasonable protection<br />
against harmful interference in a residential installation. This equipment generates, uses, and can<br />
radiate radio frequency energy and, if not installed and used in accordance with the instructions, may<br />
cause harmful interference to radio communications. However, there is no guarantee that interference<br />
will not occur in a particular installation. If this equipment does cause harmful interference to<br />
radio or television reception, which can be determined by turning the equipment off and on, the user<br />
is encouraged to try to correct the interference by one or more of the following measures:<br />
• Reorient or relocate the receiving antenna.<br />
• Increase the separation between the equipment and receiver.<br />
• Connect the equipment into an outlet on a circuit different from that to which the receiver is<br />
connected.<br />
• Consult the dealer or an experienced radio/TV technician for help.<br />
Unauthorized changes or modification to this system can void the user’s authority to operate this<br />
equipment.<br />
ii
CE mark for European Harmonized Standards<br />
CE mark which is attached to our company’s products of AC mains operated apparatus until December<br />
31, 1996 means it conforms to EMC Directive (89/336/EEC) and CE mark Directive (93/68/EEC).<br />
And, CE mark which is attached after January 1, 1997 means it conforms to EMC Directive (89/336/<br />
EEC), CE mark Directive (93/68/EEC) and Low Voltage Directive (73/23/EEC).<br />
Also, CE mark which is attached to our company’s products of Battery operated apparatus means it<br />
conforms to EMC Directive (89/336/EEC) and CE mark Directive (93/68/EEC).<br />
IMPORTANT NOTICE TO CONSUMERS<br />
This product has been manufactured according to strict specifications and voltage requirements that<br />
are applicable in the country in which it is intended that this product should be used. If you have purchased<br />
this product via the internet, through mail order, and/or via a telephone sale, you must verify<br />
that this product is intended to be used in the country in which you reside.<br />
WARNING: Use of this product in any country other than that for which it is intended could be dangerous<br />
and could invalidate the manufacturer's or distributor's warranty.<br />
Please also retain your receipt as proof of purchase otherwise your product may be disqualified from<br />
the manufacturer's or distributor's warranty.<br />
Data Handling<br />
Incorrect operation or malfunction may cause the contents of memory to be lost, so we recommend<br />
that you save important data on a floppy disk or other media source. Please be aware that<br />
Korg will accept no responsibility for any damages which may result from loss of data.<br />
* A United States patent has been obtained for Valve Reactor technology. Patents are pending<br />
in other countries. (As of March 2003)<br />
* Company names, product names, and names of formats etc. are the trademarks or registered<br />
trademarks of their respective owners.<br />
iii
Quick Start<br />
A GUIDE FOR THO<strong>SE</strong> WHO WANT TO PLAY GUITAR FIRST,<br />
AND READ THE MANUAL LATER!<br />
Yep, we know. You’d rather be playing guitar than reading this <strong>manual</strong>. Who<br />
wouldn’t? I know I would so here’s a “Quick Start” to get you up and running<br />
without delay (pun intended)<br />
First we’ll get started by trying out <strong>ToneLab</strong><strong>SE</strong>s programs and then we’ll<br />
explain how to use the various controls and knobs to create your own sounds.<br />
Right. Once you’ve gotten the urge to play out of your system, you should<br />
really give this <strong>manual</strong> a chance - it’s been written by a fellow guitar fanatic and is<br />
full of useful tips and info that’ll give you much more detail about <strong>ToneLab</strong><strong>SE</strong> than<br />
what’s in the “Quick Start.”<br />
Ok, ok we’re almost done here. I just want to recommend to you that you<br />
fold out the inside back cover of this <strong>manual</strong>. Go ahead, I’ll wait.<br />
Good. The reason you should do this is so you can see the pictures of the<br />
Top and Rear panels whilst we talk. There, now plug in and play!!!!<br />
<strong>SE</strong>TUP<br />
1. If you’re connecting <strong>ToneLab</strong><strong>SE</strong> to a mixer or recorder, connect OUTPUT jacks<br />
L/MONO and R (11.4) to the input jacks of your mixer or recorder. If you’re listening<br />
through headphones, connect your headphones to the PHONES jack<br />
(11.5).<br />
If you’re connecting <strong>ToneLab</strong><strong>SE</strong> to a guitar amp(s) connect OUTPUT jacks L/<br />
MONO and R to the input jacks of your guitar amp(s).<br />
NOTE: If you’re connecting <strong>ToneLab</strong><strong>SE</strong> to something that only has a mono input,<br />
just use the L/MONO jack.<br />
HINT: Rear panel area 9 (at the end of this <strong>manual</strong>) shows an illustration of this.<br />
2. Turn the LEVEL knob (11.3) on the rear panel of <strong>ToneLab</strong><strong>SE</strong> all the way to the<br />
left (as viewed from the rear), setting the volume to 0.<br />
3. Plug the supplied AC/AC power supply into <strong>ToneLab</strong><strong>SE</strong>’s rear panel AC9V<br />
power inlet (10.2), and plug the power supply into an AC wall socket.<br />
4. Plug your guitar into the rear panel INPUT jack (11.1).<br />
5. Before you turn <strong>ToneLab</strong><strong>SE</strong> on, lower the volume of your amp or mixer so you<br />
don’t hear any potentially speaker-damaging pops or buzzes. Then turn on the<br />
STANDBY switch (10.1) to power up <strong>ToneLab</strong><strong>SE</strong>.<br />
6. If you’ve connected <strong>ToneLab</strong><strong>SE</strong> to a mixer or recorder, press the GLOBAL<br />
switch (3.4) to select the OUT <strong>SE</strong>L menu, and use the value knob [6] or the ▲,<br />
iv
▼ buttons to select “Ln” (LINE). If you’ve connected <strong>ToneLab</strong><strong>SE</strong> to your guitar<br />
amp, set this to “AP” (AMP).<br />
7. Turn up the volume controls of your amp or mixer, and <strong>ToneLab</strong><strong>SE</strong>’s rear panel<br />
LEVEL knob (11.3) to adjust the volume.<br />
NOTE: You won’t hear sound for several seconds while the valve (a.k.a. “vacuum<br />
tube” if you live on the west side of the Atlantic) warms up. This isn’t a malfunction<br />
– it’s a real analogue valve!<br />
LISTEN TO THE PROGRAMS<br />
8. Use the BANK UP, DOWN buttons (6.1) to select a bank 1–24.<br />
Notice that the number in the bank display (5.1) blinks and changes.<br />
HINT: <strong>ToneLab</strong><strong>SE</strong> has 96 programs, organized into 24 banks with four programs in<br />
each bank (24 x 4 = 96). When shipped from the factory, banks 1–8 contain 32 programs.<br />
(The programs in banks 1-8, 9-16 and 17-24 are identical to each other)<br />
Program Select mode lets you select these programs. There’s also an effect ON/<br />
OFF mode that lets you turn individual effects on/off.<br />
HINT: For an illustration, look at 3 “Bank/Program/Channel/Select/Display Section”<br />
in the diagram at the end of this <strong>manual</strong>.<br />
9. Use the program select 1–4 pedals (6.2) to select a program.<br />
The program LED you selected will light, and the number in the bank display<br />
will also change and stay lit. Go ahead and play your guitar.<br />
For example if you want to select program 3-1 (bank 3, program 1), press the<br />
BANK UP or DOWN pedal to make the bank display read “3,” and then press<br />
the program select 1 pedal to make the LED light.<br />
If you’re selecting a program in the same bank, simply press a program select<br />
1–4 pedal. If you want to select a program from a different bank, you’ll need to<br />
perform steps 8 and 9 in that order.<br />
NOTE: If you can’t select a program, you’re probably not in Program Select mode.<br />
Get back into Program Select mode as described in “Program Select mode” (p.16).<br />
HINT: The preset programs cover an amazing range of sounds; fat hi-gain lead<br />
sounds, nostalgic clean sounds that work best with your rhythm (neck) pickup,<br />
aggressive modern crunch sounds for heavy riffing with your lead (bridge) pickup,<br />
and much more. P.68 has a list of the preset programs.<br />
10. The two expression pedals are assigned to control the most appropriate<br />
parameters for each program, such as wah, volume, delay, reverb input level,<br />
or other effect parameter. The CONTROL switch is assigned functions such as<br />
TAP tempo input of the delay time.<br />
11. By pressing the A/B Ch switch you can instantly switch between 2 sets of amp<br />
and cabinet models within each program.<br />
12. By pressing the FX ON/OFF (TUNER) switch you can switch to Effect On/Off<br />
mode. Effect On/Off mode lets you switch each effect on/off just like you were<br />
using a set of stomp boxes. Program select 1–4 will switch pedal, modulation,<br />
delay, and reverb on/off respectively, and the BANK DOWN pedal will bypass<br />
the insert effect.<br />
v
SWITCHING EFFECTS ON/OFF<br />
13. The model select buttons will be lit (ON) or dark (OFF) to indicate the on/off<br />
state of each effect. If you press a button that is dark or turn the model selector,<br />
the effect will turn on and the model select button will blink. If you press a<br />
button that is blinking, the effect will turn off and the button will go dark.<br />
CREATE YOUR OWN SOUNDS<br />
14. To adjust the sound of the AMP model, use the AMP selector to select one of<br />
the sixteen amp models. Then you can simply adjust the sound pretty much in<br />
the same way as if you were really using the actual model of guitar amp you<br />
selected.<br />
Adjust the GAIN value knob 1, TREBLE value knob 3, MIDDLE value knob 4,<br />
BASS value knob 5, and the VR GAIN value knob 2 (which corresponds to the<br />
MASTER) as you like. To get the most accurate vintage tube amp distortion,<br />
raise the VR GAIN as high as possible. The CH VOLUME value knob 6 lets you<br />
adjust the volume while retaining the overall sound including the distortion produced<br />
by the Valve Reactor.<br />
If you press the PRES-NR button, you can then use value knob 3 to adjust<br />
PRE<strong>SE</strong>NCE and value knob 4 to adjust the NR (Noise Reduction) effect.<br />
When you use the AMP MODEL and CABINET MODEL selectors, a different<br />
type of guitar amp will appear before your very eyes – or, should we say, ears!<br />
<strong>ToneLab</strong><strong>SE</strong> holds in its memory two combinations of amp and cabinet models<br />
for each program, and you can use the A/B ch pedal to switch instantly<br />
between these.<br />
HINT: P.34 lists recommended combinations of amp and cabinet models but others<br />
are fine too.<br />
HINT: If you want to replicate the sound of the original amp, set [VR GAIN] to the<br />
maximum setting on vintage-type models that do not have a master volume control<br />
(i.e., AC15, AC15TB, AC30, AC30TB, UK BLUES, UK 68P, BLACK 2x12, TWEED<br />
1x12, and TWEED 4x10). For modern-type amps that have a master volume control,<br />
adjust [VR GAIN] in the same way that you would on the original amp. When<br />
the [VR GAIN] setting is low, preamp-type distortion will occur. As you raise the [VR<br />
GAIN] setting, the pre-amp will begin loading the Valve Reactor to cause clipping,<br />
and the warmth and distortion of the Valve Reactor will be added.<br />
HINT: For an illustration, look at area 1 in the top panel diagram at the end of this<br />
<strong>manual</strong>.<br />
vi
15. <strong>ToneLab</strong><strong>SE</strong> provides a PEDAL effect that is placed before the amp, and MOD-<br />
ULATION, DELAY, and REVERB effects that are placed after the cabinet.<br />
For example if you want use the PEDAL effect TREBLE BOOST, turn the<br />
PEDAL selector to select TREBLE BOOST. The PEDAL parameter LED of the<br />
edit section will blink, indicating the parameter line (the region listing the<br />
parameter names). Also, the LEDs below the value knobs will light, indicating<br />
the location of the knobs that you can use to control TREBLE BOOST. Now<br />
turn value knobs 1, 2, and 3 to adjust DRIVE, LEVEL, and TONE respectively.<br />
You can edit other effects using the same procedure.<br />
HINT: Some effect settings may cause unwanted distortion (if there is such a<br />
thing!!). If this happens, lower the CH VOLUME.<br />
HINT: For an illustration, look at area 2 in the top panel diagram at the end of this<br />
<strong>manual</strong>.<br />
vii
Table of Contents<br />
Quick Start................................................................................................... iv<br />
Setup....................................................................................................................... iv<br />
Listen to the Programs.............................................................................................v<br />
Switching effects on/off........................................................................................... vi<br />
Create your own Sounds ........................................................................................ vi<br />
Introduction ................................................................................................. 1<br />
Main Features..........................................................................................................1<br />
Valve Reactor Technology.......................................................................................2<br />
An overview of <strong>ToneLab</strong><strong>SE</strong> .....................................................................................4<br />
Signal Route .....................................................................................................4<br />
Modes ...............................................................................................................4<br />
Amp and effect settings (Edit)...........................................................................4<br />
Realtime expression and control pedals..........................................................4<br />
Saving a program .............................................................................................4<br />
MIDI and output destination settings ................................................................4<br />
A Guitarist’s Guided Panel Tour ................................................................. 5<br />
The Top Panel .........................................................................................................5<br />
Model select section ........................................................................................5<br />
Edit section ......................................................................................................7<br />
Chain/Global/Rename/Write/Exit/Display section............................................8<br />
Control Setup section ......................................................................................9<br />
Bank display/Tuner display..............................................................................9<br />
Bank/Program/Channel/Select section ............................................................9<br />
FX ON/OFF Switch ........................................................................................10<br />
Effect control section .....................................................................................10<br />
Valve..............................................................................................................10<br />
Rear panel .............................................................................................................11<br />
Power supply .................................................................................................11<br />
Inputs and Outputs ........................................................................................11<br />
MIDI ...............................................................................................................11<br />
Setup........................................................................................................... 13<br />
Output settings.......................................................................................................13<br />
Basic connections..................................................................................................13<br />
Using <strong>ToneLab</strong><strong>SE</strong> with a mixer or recorder...........................................................14<br />
Example of connections to a mixer or recorder ..............................................14<br />
Using <strong>ToneLab</strong><strong>SE</strong> with a guitar amp(s) .................................................................15<br />
Example of connection to a guitar amp (or amps) ..........................................15<br />
Using <strong>ToneLab</strong><strong>SE</strong> with a MIDI device or computer ...............................................15<br />
Playing <strong>ToneLab</strong><strong>SE</strong> .................................................................................... 16<br />
viii
Program Select mode ............................................................................................16<br />
Selecting a program........................................................................................16<br />
Effect On/Off mode ................................................................................................16<br />
Switching effects on/off...................................................................................17<br />
A/B Channel Hold ...........................................................................................17<br />
Activating or deactivating the Key Lock function....................................................18<br />
Activating the Key Lock function.....................................................................18<br />
Deactivating the Key Lock function.................................................................18<br />
Creating and Storing your own Programs............................................... 19<br />
Creating your own Program...................................................................................19<br />
Changing the connection order of the effects (CHAIN)..........................................21<br />
Naming a program .................................................................................................21<br />
Storing a program ..................................................................................................22<br />
Restoring a setting to its original value (Original Value) ........................................22<br />
Explanations of the Amp, Cabinet and Effect Types............................... 23<br />
A. AMP Models ......................................................................................................23<br />
B. CABINET Models ..............................................................................................32<br />
WHAT GOES WITH WHAT? ..........................................................................34<br />
C. PEDAL Effects...................................................................................................35<br />
D. MOD (Modulation) effects .................................................................................39<br />
E. DELAY effects ...................................................................................................45<br />
F. REVERB effects ................................................................................................48<br />
Tuner (Bypass, Mute)................................................................................. 51<br />
Tuning procedure...................................................................................................51<br />
Calibrating the tuner...............................................................................................52<br />
Using the expression pedals..................................................................... 53<br />
Expression pedal settings......................................................................................53<br />
Expression Target Quick Assign.....................................................................53<br />
Setting the Expression Target ........................................................................54<br />
Expression pedal control initialization settings ...............................................55<br />
Control switch settings...........................................................................................56<br />
Switching each effect on/off............................................................................56<br />
Using TAP TEMPO to set a parameter...........................................................56<br />
FACTOR value knob 2 setting ........................................................................56<br />
Effect control...................................................................................................57<br />
Adjusting the sensitivity of the pedals....................................................................57<br />
Expression pedal 1 .........................................................................................57<br />
Expression pedal 2 .........................................................................................58<br />
Control via MIDI ......................................................................................... 59<br />
Connecting a MIDI Device or Computer ................................................................59<br />
Setting the MIDI Channel (GLOBAL “MIDI CH”)....................................................60<br />
ix
Program Change (GLOBAL “PCHG OUT”) ...........................................................60<br />
Control Change (GLOBAL “CCHG I/O”) ................................................................60<br />
Parameter Change (GLOBAL “SYEX OUT”) .........................................................61<br />
Backing up and Restoring Program Data (GLOBAL “DUMP CUR,” DUMP ALL”).62<br />
Backing Up .....................................................................................................62<br />
Restoring ........................................................................................................63<br />
Restoring the Factory Preset Programs................................................... 64<br />
Troubleshooting ........................................................................................ 65<br />
Specifications............................................................................................. 67<br />
Program list................................................................................................ 68<br />
Index ........................................................................................................... 69<br />
x
Introduction<br />
WELCOME ABOARD!<br />
Many thanks for adding the VOX Valvetronix <strong>ToneLab</strong><strong>SE</strong> to your sonic<br />
arsenal. We’re sure it’ll give you countless hours of great guitar tones that<br />
will feel as good as they sound!<br />
To maximize your chances of enjoying a long and happy relationship with<br />
your <strong>ToneLab</strong><strong>SE</strong>, please read this <strong>manual</strong> at least once, and (as they say), “use<br />
the product as directed.” Keep the <strong>manual</strong> for future reference after you’ve read it;<br />
you’ll want to re-read it later at some point to pick up cool tips you may have<br />
missed the first time around.<br />
MAIN FEATURES<br />
• <strong>ToneLab</strong><strong>SE</strong> features Valve Reactor technology that switches between Class A<br />
and Class AB power amp circuits with an actual 12AX7 (ECC 83) miniature triode<br />
valve (vacuum tube) to create the sound of an actual tube power amp,<br />
delivering the response and tone of classic amps.<br />
• <strong>ToneLab</strong><strong>SE</strong> uses sophisticated modeling technology to create classic amp, cabinet,<br />
and effect sounds. You can choose from sixteen amp types that include<br />
classic vintage amps and expensive high-end valve amps, and eleven different<br />
cabinet types. By combining amp types and cabinet types you can create an<br />
amazing range of sounds, many of which have never been heard before.<br />
• Since high-quality effects are built in, <strong>ToneLab</strong><strong>SE</strong> is all you need to create a<br />
completely finished sound. Sixteen types of pedal effects are placed before the<br />
amp, and after the cabinet are eleven types of modulation, eleven types of<br />
delay, and eleven types of reverb. You can choose one type for each effect, and<br />
use these four effects simultaneously plus Noise Reduction.<br />
• You can store all of your own amp settings and effect model settings as a “program”<br />
in one of 96 program memories. <strong>ToneLab</strong><strong>SE</strong> comes with 32 preset programs<br />
for instant gratification.<br />
• Manual Mode lets you use <strong>ToneLab</strong><strong>SE</strong> just like conventional amps and effects.<br />
The sound will be exactly as specified by the physical positions of the amp section<br />
knobs. In other words...what you see is what you get!<br />
• For convenient tuning, an Auto Chromatic Tuner is built-in.<br />
• There are two expression pedals that you can use as a wah pedal, volume<br />
pedal, or to control a variety of effect parameters – a great feature for live performance.<br />
• There’s a Quick Assign function that makes it easy to assign parameters to the<br />
expression pedal.<br />
• <strong>ToneLab</strong><strong>SE</strong> provides control switches that let you do things like set the delay<br />
time via TAP TEMPO, switch insert effects on/off, or switch the speed of a rotary<br />
speaker ... again, must-have features for live performance.<br />
Introduction<br />
Panel Tour<br />
Setup<br />
Playing<br />
Creating<br />
and Storing<br />
1
• You can use the effect insert jacks to connect an external effect processor or<br />
stompbox.<br />
• With MIDI IN and OUT connectors, <strong>ToneLab</strong><strong>SE</strong> gives you plenty of potential for<br />
expanding your system.<br />
• <strong>ToneLab</strong><strong>SE</strong> Sound Editor is an editor/librarian software that lets you visually edit<br />
<strong>ToneLab</strong><strong>SE</strong>’s numerous parameters, and save and manage programs.<br />
To obtain the “<strong>ToneLab</strong><strong>SE</strong> Sound Editor,” please contact the VOX distributor in<br />
your country or download the latest version from:<br />
“http://www.voxamps.co.uk” or “http://www.valvetronix.com/”<br />
To find your local Distributor go to:<br />
“http://www.voxamps.co.uk/dealers/worldwid.htm”<br />
VALVE REACTOR TECHNOLOGY<br />
THE POWER (AMP) AND THE GLORY!<br />
Valve Reactor technology was first used on the critically acclaimed VOX<br />
AD60/120VT Valvetronix amps.<br />
The Valve Reactor circuitry in <strong>ToneLab</strong><strong>SE</strong> however has been tuned-up<br />
especially for live performance.<br />
Since conventional modeling effects for line recording are not used directly<br />
with a speaker, they do not include a power amp circuit, output transformer, or<br />
speaker. In other words, they only have a preamp circuit.<br />
A real valve amp sound, however, is produced not just by the preamp, but also by<br />
the tone and distortion of the power amp, and by the constant changes in impedance<br />
that are created by the power amp driving the speakers. <strong>ToneLab</strong><strong>SE</strong> contains<br />
an actual low-wattage valve power amp circuit, a virtual output transformer<br />
(patent applied for) that uses solid-state components to simulate an output transformer,<br />
and a dummy speaker circuit that simulates the varying impedance of a<br />
real speaker. This means that although it’s low-power, <strong>ToneLab</strong><strong>SE</strong> has the same<br />
circuit structure of an actual all-valve amp.<br />
While much of the tone creation and shaping carried out is done in the digital<br />
domain, its Valve Reactor power amp is 100% analogue. The resulting journey your<br />
guitar’s signal takes through the analogue world of the power stage plays a major<br />
role in providing the all-important feel and tone of the original amps we modelled.<br />
The Valve Reactor power stage is, to all intents and purposes, a bona fide valve<br />
(tube) push-pull power amplifier, but in miniature. It utilizes a 12AX7 (ECC83) valve<br />
(a dual triode device - meaning “two valves in one”) and is equipped with an output<br />
transformer, like a “real” valve amp.<br />
The power amp output of <strong>ToneLab</strong><strong>SE</strong>’s Valve Reactor is designed to “read” the constantly<br />
changing impedance curve of the dummy speaker circuit system and feed this<br />
information back to the virtual output transformer – just like real valve amplifiers do.<br />
This information permits the behavior of the valve stage of the amp to vary with the<br />
speaker load (impedance), which is another important part of “real world” valve tone.<br />
2
Apart from the vital<br />
valve tone this ingenious<br />
power amp design provides, it<br />
also allows us to replicate various<br />
“circuit characteristics”<br />
that are unique to the all-valve<br />
power stages of the amps<br />
we’ve modelled. These “characteristics”<br />
include: Class A or<br />
Class AB operation, Presence<br />
and Resonance (low end)<br />
control circuitry (both found in<br />
the negative feedback circuit<br />
that some, but not all, valve<br />
power amps have). Being able<br />
PREAMP<br />
FEEDBACK<br />
CIRCUIT<br />
(WITH OR W/O<br />
PRE<strong>SE</strong>NCE &<br />
RESONANCE)<br />
MODEL<br />
DEPENDENT<br />
VOX VALVE REACTOR<br />
PHA<strong>SE</strong><br />
INVERTER<br />
BIAS<br />
BIAS<br />
12AX7<br />
(ECC83)<br />
12AX7<br />
(ECC83)<br />
12AX7 (DUAL TRIODE)<br />
PUSH–PULL OUTPUT<br />
CLASS A OR AB<br />
MODEL DEPENDENT<br />
REACTOR<br />
AMP<br />
USING<br />
CONSTANT<br />
CURRENT &<br />
REACTIVE<br />
FEEDBACK<br />
to match such vital characteristics helps ensure that each and every one of our<br />
models is as tonally authentic as possible - as opposed to the usual “close but definitely<br />
no cigar” norm of digital modeling. And just so you know, this patented in<br />
USA power amp technology is unique to VOX Valvetronix.<br />
VIRTUAL OUTPUT<br />
TRANSFORMER<br />
DUMMY<br />
SPEAKER<br />
Introduction<br />
Panel Tour<br />
Setup<br />
Playing<br />
Creating<br />
and Storing<br />
3
AN OVERVIEW OF TONELAB<strong>SE</strong><br />
Let’s talk about how <strong>ToneLab</strong><strong>SE</strong> is structured.<br />
SIGNAL ROUTE<br />
When you plug into <strong>ToneLab</strong><strong>SE</strong> the signal passes through the following stages.<br />
You might want to glance at the explanations in “A Guitarist’s Guided Panel<br />
Tour” (p.5) while you read this section.<br />
IN<strong>SE</strong>RT<br />
EFFECT<br />
PEDAL<br />
EFFECT<br />
A ch<br />
B ch<br />
AMP MODEL<br />
16 TYPE VALVE REACTOR<br />
AMP MODEL<br />
POWER AMP<br />
16 TYPE VALVE REACTOR<br />
PRE AMP<br />
POWER CLASS AAMP<br />
PRE AMP CLASS A<br />
CLASS AB CH<br />
GAIN VR GAIN CLASS AB VOLUME CH<br />
GAIN VR GAIN<br />
VOLUME<br />
CABINET<br />
MODEL CABINET<br />
10 MODEL TYPE<br />
11 TYPE<br />
A ch<br />
B ch<br />
VOLUME<br />
PEDAL<br />
EFFECT<br />
MODULATION<br />
DELAY<br />
REVERB<br />
OUTPUT<br />
<strong>SE</strong>LECT<br />
MODES<br />
<strong>ToneLab</strong><strong>SE</strong> has a Program Select mode (where you can switch programs) and<br />
an Effect On/Off mode (where you can switch individual effects on/off). To<br />
switch between these modes, simply press the FX ON/OFF pedal which can<br />
be done even while you are performing.<br />
AMP AND EFFECT <strong>SE</strong>TTINGS (EDIT)<br />
The six model selectors, six value knobs, and various buttons let you edit the<br />
amp and effect settings directly and intuitively. You can use the CHAIN switch<br />
to change the order in which the modulation, delay, and reverb effects are connected.<br />
For the amp and cabinet model, you can make settings for two channels<br />
(A and B) and switch between them while you perform.<br />
REALTIME EXPRESSION AND CONTROL PEDALS<br />
You can use the expression pedal and control pedal to control wah, volume, or<br />
effect parameters with your feet. Use the EXPRESSION button or the CON-<br />
TROL button to specify the parameter that will be controlled by the corresponding<br />
pedal.<br />
SAVING A PROGRAM<br />
By using the WRITE button, all settings you make can be saved as a “program.”<br />
When doing so, you should use the RENAME button to give the program a new<br />
name. Once you’ve saved a program, you can use the program select pedals to<br />
recall it instantly (in Program Select mode).<br />
MIDI AND OUTPUT DESTINATION <strong>SE</strong>TTINGS<br />
The GLOBAL button lets you make MIDI-related settings and specify the destination<br />
to which <strong>ToneLab</strong><strong>SE</strong> is connected. The settings you make here are automatically<br />
saved within <strong>ToneLab</strong><strong>SE</strong> so there’s no need to perform the WRITE<br />
operation.<br />
4
A Guitarist’s Guided Panel Tour<br />
Here we’re going to learn about the buttons and other controls on <strong>ToneLab</strong><strong>SE</strong>’s<br />
top and rear panel.<br />
HINT: The inside back cover of this <strong>manual</strong> folds out to reveal a big picture of<br />
<strong>ToneLab</strong><strong>SE</strong>’s top panel, rear panel, and display. Leave this folded out as you continue<br />
reading so you’ll be able to see the panel diagram while you read about each<br />
section.<br />
Introduction<br />
Panel Tour<br />
Setup<br />
THE TOP PANEL<br />
1 MODEL <strong>SE</strong>LECT <strong>SE</strong>CTION<br />
Here you can select the model of amp, cabinet and effect models.<br />
1.1 MODEL select buttons<br />
Use these when selecting the effect category you want to edit with value knobs<br />
1–6, and when switching effects on/off. If an effect you’re using is ON it will be<br />
lit (or blinking during editing), and if OFF it will be dark.<br />
Press a button once and its LED will blink; now you can use value knobs 1–6 to<br />
edit the parameters of that effect.<br />
If you want turn off an effect that is currently on, press the model select button<br />
for the appropriate effect once (it blinks), and then press that model switch button<br />
once again to turn it off (dark); the name display will indicate [--OFF--].<br />
The pedal effect is placed in front of the amp model and the modulation, delay,<br />
and reverb are placed after the cabinet model.<br />
NOTE: While the cabinet model select button is blinking, you can use the value<br />
knobs to adjust the parameters of the amp model.<br />
NOTE: The amp and cabinet model select buttons will change color depending on<br />
the channel you select; they will be lit (or blinking) green when channel A is<br />
selected, and red when channel B is selected.<br />
NOTE: The reason that modulation, delay, and reverb effects are placed after the<br />
amp — rather than before it as a “stompbox” would be — is that they sound better<br />
and more realistic. For example, REVERB emulates the sound created by a room<br />
or hall. So, logic dictates that if we’re going to add it to our sound, the closer to the<br />
end of the signal chain we put it, the more “real” and natural it’s going to sound. The<br />
same is true for DELAY and MODULATION effects — they’re going to sound more<br />
natural if added near the end of your signal path, not at its beginning. Also, if you’re<br />
using a crunch or high gain lead sound then it makes much more sense to add<br />
effects like ROTARY, ROOM (reverb), or DELAY after it’s been distorted, rather<br />
than before.<br />
1.2 IN<strong>SE</strong>RT button<br />
Use this to switch the insert effect on/off. This will be lit if the signal input/output<br />
to the external effect is ON, or dark if it is OFF. The external effect is placed<br />
before the pedal effect.<br />
Playing<br />
Creating<br />
and Storing<br />
5
1.3 PRES-NR (Presence/Noise Reduction) button<br />
Use this to change the presence and noise reduction settings of the amp.<br />
While this button is blinking, you can use value knob [3] to adjust the presence,<br />
and value knob [4] to adjust the noise reduction. This will light (blink) green<br />
when channel A is selected, or red when channel B is selected.<br />
1.4 PEDAL selector<br />
This lets you select one of the sixteen pedal effect models <strong>ToneLab</strong><strong>SE</strong> offers.<br />
When you turn the PEDAL selector, the PEDAL select button will blink, and you<br />
can use value knobs 1–6 to adjust the pedal effect parameters. (For an explanation<br />
of each effect, refer to p.35–.) As stated before, pedal effects are connected<br />
before the amp.<br />
NOTE: The parameters will be initialized when you switch effect types.<br />
1.5 AMP MODEL selector<br />
This lets you select from sixteen types of classic amp models, including the<br />
legendary VOX AC30TBX. (For details, see p.23.) When you turn the AMP<br />
MODEL selector, the AMP MODEL select button will blink, and you can use<br />
value knobs 1–6 to adjust its parameters.<br />
The operating mode of the preamp and power amp, the response of the tone<br />
controls, and their placement within the circuit will change depending on the<br />
type of amp you select here, precisely replicating the exact gain and tonal<br />
character of the original amp. The all-important power amp stage (class A or<br />
AB) and negative-feedback circuit (or lack thereof) are also carefully simulated.<br />
1.6 CABINET MODEL selector<br />
This selects one of eleven cabinet models that replicate the shape and size of<br />
the cabinet and the type and number of its speakers. (For details, refer to<br />
p.32.) When you turn the CABINET MODEL selector, the CABINET MODEL<br />
select button will blink.<br />
NOTE: While the CABINET MODEL select button is blinking, you can use the value<br />
knobs to adjust its parameters.<br />
1.7 MODULATION selector<br />
This selects one of eleven modulation effect models. When you turn the MOD-<br />
ULATION selector, the MODULATION select button will blink, and you can use<br />
value knobs 1–6 to adjust the parameters of the modulation effect. (For details<br />
on each effect, refer to p.39–.)<br />
NOTE: The parameters will be initialized when you switch effect types.<br />
1.8 DELAY selector<br />
This selects one of eleven delay effect models. When you turn the DELAY<br />
selector, the DELAY select button will blink, and you can use value knobs 1–6<br />
to adjust the parameters of the delay effect. (For details on each effect, refer to<br />
p.45–.)<br />
NOTE: The parameters will be initialized when you switch effect types.<br />
6
2<br />
1.9 REVERB selector<br />
This selects one of eleven reverb effect models. When you turn the REVERB<br />
selector, the REVERB select button will blink, and you can use value knobs 1–<br />
6 to adjust the parameters of the reverb effect. (For details on each effect, refer<br />
to p.48–.)<br />
NOTE: The parameters will be initialized when you switch effect types.<br />
EDIT <strong>SE</strong>CTION<br />
2.1 Edit category LEDs<br />
One of the LEDs will blink to indicate the category of effect you are currently<br />
editing.<br />
When adjusting the parameters, an LED will blink to indicate the line of parameter<br />
names that you are adjusting.<br />
2.2 Value knobs 1–6<br />
Use these to adjust the parameters of the effects or amp model. Your adjustments<br />
will modify the effect whose MODEL select button you pressed (i.e., the<br />
button that is blinking). The LEDs below the knobs will light to indicate the<br />
knobs that are available.<br />
For details on the parameter controlled by each knob, refer to p.35–. (From the<br />
left, we refer to these as value knobs 1–6.)<br />
When the EXPRESSION button or CONTROL button is blinking, these knobs<br />
adjust the corresponding functions.<br />
When you are making RENAME or GLOBAL settings, or when executing the<br />
WRITE operation, you can use value knob 6 to change values.<br />
Introduction<br />
Panel Tour<br />
Setup<br />
Playing<br />
Creating<br />
and Storing<br />
7
3<br />
CHAIN/GLOBAL/RENAME/WRITE/EXIT/DISPLAY <strong>SE</strong>CTION<br />
This area displays the name of the program, and the name and value of the<br />
parameter you are editing in the amp or effect section. Use RENAME to edit the<br />
name of the program, and WRITE to save the program.<br />
CHAIN lets you change the connection order of the modulation, delay, and reverb<br />
effects. GLOBAL lets you make MIDI and output settings.<br />
3.1 ▲, ▼ buttons<br />
Use these to edit the value of parameters.<br />
3.2 √, ® buttons<br />
Use these to select the parameter you want to edit, or to edit the program<br />
name.<br />
3.3 CHAIN button<br />
Use this to change the connection order of the modulation, delay, and reverb<br />
effects. Use value knob 6 or the ▲, ▼ buttons to edit the value.<br />
3.4 GLOBAL button<br />
Use this to make settings related to MIDI or to <strong>ToneLab</strong><strong>SE</strong>’s audio output.<br />
Press the GLOBAL button and use the √, ® buttons to move through the<br />
menu items in the order shown below. After you have selected a menu item,<br />
use value knob 6 or the ▲, ▼ buttons to adjust the value.<br />
OUT <strong>SE</strong>L: Specifies the output destination (p.13)<br />
CH HOLD: Specifies whether the channel (A/B) selection will be (p.17)<br />
maintained when you switch programs<br />
MIDI CH: Specifies the MIDI channel (p.59)<br />
PCHG OUT: Specifies the program change message output setting (p.60)<br />
CCHG I/O: Specifies the control change message input/output setting(p.60)<br />
SYEX OUT: Specifies the system exclusive message output setting (p.61)<br />
DUMP CUR: Dumps the current program data from the MIDI OUT connector<br />
(p.62)<br />
DUMP ALL: Dumps all of <strong>ToneLab</strong><strong>SE</strong>’s data from the MIDI OUT connector<br />
(p.62)<br />
3.5 RENAME button<br />
Use this to change the program name (p.21).<br />
Use the √, ® buttons to move between spaces (characters) in the display, and<br />
use value knob 6 or the ▲, ▼ buttons to change the character at that space.<br />
3.6 WRITE button<br />
Use this when you want to save the settings you’ve created (p.22).<br />
3.7 EXIT button<br />
Use this to abort a program-write operation or to cancel a GLOBAL setting.<br />
By pressing and holding this button for a longer time, you can activate/cancel<br />
the Key Lock function, which disables operation of the buttons, selectors, and<br />
knobs (p.18).<br />
8
3.8 Name display<br />
Displays program names, effect names, or parameter names.<br />
3.9 Valve icon<br />
Indicates the number and type of power valve – a.k.a. “vacuum tube” – used in<br />
the original amp that is being modeled.<br />
3.10 Value display<br />
Indicates the value of the parameter you are editing.<br />
If the displayed parameter value matches the original value (i.e., the value<br />
saved in the program), the ORIG (original value) icon will appear.<br />
If you have edited any parameter of the program, the EDIT icon will appear.<br />
4 CONTROL <strong>SE</strong>TUP <strong>SE</strong>CTION<br />
4.1 CONTROL pedal setting button<br />
Use this to make control pedal settings. While this button is blinking, you can<br />
use value knobs 1–2 to edit the control pedal settings.<br />
4.2 EXPRESSION pedal setting button<br />
Use this to make expression pedal settings. While this button is blinking, you<br />
can use value knobs 1–6 to edit the expression pedal settings.<br />
If this is lit while you’re editing, the expression pedal Quick Assign function is<br />
available.<br />
HINT(Quick Assign): If the expression pedal setting button is lit while you are editing<br />
an effect, you can use the expression pedal Quick Assign function. To assign<br />
the parameter shown in the name display to expression pedal 1, simply press and<br />
hold the expression pedal setting button for one second. If you want to assign the<br />
parameter to expression pedal 2, press and hold the control pedal setting button for<br />
one second. When the assignment is completed, the name display will indicate<br />
COMPLETE.<br />
Introduction<br />
Panel Tour<br />
Setup<br />
Playing<br />
Creating<br />
and Storing<br />
5<br />
6<br />
BANK DISPLAY/TUNER DISPLAY<br />
5.1 Bank display<br />
Indicates the bank number. If the tuner is operating, this indicates the note<br />
name. (p.51)<br />
5.2 Tuner display<br />
If the tuner is on, this displays the pitch you are playing. (p.51)<br />
BANK/PROGRAM/CHANNEL/<strong>SE</strong>LECT <strong>SE</strong>CTION<br />
6.1 BANK UP/DOWN pedals<br />
In Program Select mode, press BANK UP to increment the bank by one, or<br />
BANK DOWN to decrement it by one. In Effect On/Off mode, you can use the<br />
BANK DOWN pedal to switch IN<strong>SE</strong>RT (the external effect) on/off.<br />
6.2 Program select pedals, Program LEDs<br />
Use these to select programs. The program LED at the upper left of each pedal<br />
will light accordingly.<br />
9
In Effect On/Off mode, these switches individually switch the Pedal, Modulation,<br />
Delay, and Reverb effects on/off.<br />
6.3 A/B ch channel select pedal, Channel LEDs<br />
Use this to change channels within the currently selected program. The channel<br />
LEDs located above the pedal will light accordingly (green when channel A<br />
is selected, red when channel B is selected).<br />
FX ON/OFF SWITCH<br />
7<br />
Press this switch when you want to switch to Effect On/Off mode and the LED<br />
at the upper left of the pedal will light.<br />
In Effect On/Off mode you can use the program select pedals to individually<br />
switch the Pedal, Modulation, Delay, and Reverb effects on/off.<br />
If you press and hold this switch for 0.5 seconds or longer, the output will be<br />
bypassed. If you press and hold this pedal for one second or longer, the output<br />
will be muted. The tuner will operate when <strong>ToneLab</strong><strong>SE</strong> is bypassed or muted.<br />
To cancel bypass or mute (Tuner), press this switch once again.<br />
8<br />
9<br />
EFFECT CONTROL <strong>SE</strong>CTION<br />
8.1 CONTROL (Control switch)<br />
This pedal controls the effect function specified by the Control switch setting.<br />
8.2 EXP1, EXP2 (Expression pedal 1, Expression pedal 2)<br />
These pedals control the effect parameter you assigned as the expression<br />
pedal setting; e.g., volume, wah, or other effect parameter. Pressing down<br />
firmly on an expression pedal will activate a switch underneath the pedal, letting<br />
you turn the assigned effect on/off (except when you’ve assigned volume<br />
or an amp parameter).<br />
VALVE<br />
9.1 Valve window<br />
<strong>ToneLab</strong><strong>SE</strong> contains a 12AX7 (ECC83) valve (“vacuum tube”).<br />
NOTE: The valve cover and or valve may break if it’s subjected to impact. If the<br />
valve cover breaks, please have it replaced; leaving a damaged cover may lead to<br />
the valve itself to become damaged.<br />
10
REAR PANEL<br />
10<br />
11<br />
POWER SUPPLY<br />
10.1 ~AC9V<br />
Connect the included AC/AC power supply here.<br />
10.2 STANDBY button<br />
Turns the power on/off.<br />
INPUTS AND OUTPUTS<br />
11.1 INPUT jack<br />
Connect your guitar to this jack.<br />
11.2 IN<strong>SE</strong>RT jacks (<strong>SE</strong>ND, RETURN)<br />
You can connect an external effect processor or stompbox to these jacks.<br />
Connect <strong>SE</strong>ND to the input of your external effect device.<br />
Connect RETURN to the output of your external effect device.<br />
11.3 LEVEL knob<br />
Adjusts the output level from the OUTPUT jacks and the PHONE jack.<br />
11.4 OUTPUT jacks (L/MONO, R)<br />
These are analog output jacks (balanced/unbalanced TRS). If you’re using a<br />
mono output, connect the L/MONO jack.<br />
11.5 PHONE jack (stereo)<br />
Connect your headphones to this jack.<br />
Introduction<br />
Panel Tour<br />
Setup<br />
Playing<br />
Creating<br />
and Storing<br />
12 MIDI<br />
12.1 MIDI OUT connector<br />
This connector transmits MIDI data. Use it when you want to control a connected<br />
external MIDI device.<br />
12.2 MIDI IN connector<br />
This connector receives MIDI data. Use it when you want to control<br />
<strong>ToneLab</strong><strong>SE</strong> from a connected external MIDI device.<br />
11
Setup<br />
NOTE: You must turn off the power of all your equipment before you make connections.<br />
If you ignore this warning, you may damage your speaker system or experience<br />
malfunctions!<br />
Introduction<br />
Panel Tour<br />
OUTPUT <strong>SE</strong>TTINGS<br />
Here’s how to specify whether you’re connecting <strong>ToneLab</strong><strong>SE</strong> to a guitar amp or to<br />
a mixer/recorder.<br />
1. Press the GLOBAL button, and use the √, ® buttons to make the display read<br />
“OUT <strong>SE</strong>L.”<br />
2. Use value knob 6 or the ▲, ▼ buttons to set the value.<br />
When connecting to a guitar amp<br />
When connecting to a mixer/recorder<br />
Setup<br />
Playing<br />
Creating<br />
and Storing<br />
NOTE: With the factory settings, “AP” is selected.<br />
BASIC CONNECTIONS<br />
1. Use audio cables to connect <strong>ToneLab</strong><strong>SE</strong>’s OUTPUT L/MONO and R jacks<br />
(11.4) to a mixer/recorder or guitar amp (p.13, 14). If desired, you can also<br />
connect an external effect processor. To do this simply connect <strong>SE</strong>ND to the<br />
input of your external processor, and RETURN to the output of your external<br />
processor.<br />
NOTE: If you’re making connections in mono, use the OUTPUT L/MONO jack.<br />
However to take the fullest advantage of <strong>ToneLab</strong><strong>SE</strong>’s sound, we strongly recommend<br />
that you use stereo connections.<br />
If you are using headphones, plug them into the PHONES jack (11.5).<br />
NOTE: Signal from the OUTPUT jack(s) will still be heard even if headphones are<br />
plugged in. If you only want to hear signal from headphones you must disconnect<br />
any cables from the Output jacks or turn off or lower any equipment <strong>ToneLab</strong><strong>SE</strong> is<br />
connected to.<br />
2. Turn the LEVEL knob (11.3) located on the rear panel of <strong>ToneLab</strong><strong>SE</strong> all the<br />
way toward the left (as seen from the rear), setting the volume to 0.<br />
3. Connect the included AC/AC power supply to the rear panel AC9V power supply<br />
jack (10.2), and then connect the plug to an AC outlet.<br />
4. Plug your guitar into the rear panel INPUT jack (11.1).<br />
5. Turn down the volume of your amp or mixer so you don’t hear crackles or pops<br />
when the power is turned on. Then turn on the STANDBY switch (10.1) to turn<br />
on the power.<br />
13
MIC1<br />
-10dBV<br />
MIC GAIN<br />
U<br />
10 60<br />
+10dB -40dB<br />
TRIM<br />
MIC2<br />
BAL<br />
BAL<br />
OR<br />
OR<br />
UNBAL<br />
UNBAL<br />
LINE IN 1 LINE IN 2<br />
LOW CUT<br />
LOW CUT<br />
75Hz<br />
75Hz<br />
18dB/OCT<br />
18dB/OCT<br />
U<br />
+15<br />
U<br />
U<br />
+15<br />
-15 +15<br />
U<br />
-12 +12<br />
U<br />
-15<br />
+15<br />
L R<br />
1<br />
MUTE<br />
ALT 3–4<br />
AUX<br />
1<br />
MON/<br />
EFX<br />
2<br />
EFX<br />
EQ<br />
HI<br />
12kHz<br />
MID<br />
2.5kHz<br />
LOW<br />
80Hz<br />
PAN<br />
dB<br />
dB<br />
10<br />
10<br />
SOLO<br />
5<br />
5<br />
U<br />
U<br />
5<br />
5<br />
10<br />
10<br />
20<br />
20<br />
30<br />
30<br />
40<br />
40<br />
50<br />
50<br />
60<br />
60<br />
-10dBV<br />
MIC GAIN<br />
U<br />
10 60<br />
+10dB -40dB<br />
TRIM<br />
U<br />
+15<br />
U<br />
+15<br />
U<br />
-15 +15<br />
U<br />
-12 +12<br />
U<br />
-15<br />
+15<br />
L R<br />
2<br />
MUTE<br />
ALT 3–4<br />
AUX<br />
1<br />
MON/<br />
EFX<br />
2<br />
EFX<br />
EQ<br />
HI<br />
12kHz<br />
MID<br />
2.5kHz<br />
LOW<br />
80Hz<br />
MIC3<br />
BAL<br />
OR<br />
UNBAL<br />
LINE IN 3<br />
LOW CUT<br />
75Hz<br />
18dB/OCT<br />
-10dBV<br />
MIC GAIN<br />
-15 +15<br />
U<br />
-12 +12<br />
U<br />
-15<br />
+15<br />
MID<br />
2.5kHz<br />
LOW<br />
80Hz<br />
MIC4<br />
BAL<br />
OR<br />
UNBAL<br />
LINE IN 4<br />
LOW CUT<br />
75Hz<br />
18dB/OCT<br />
-10dBV<br />
MIC GAIN<br />
-12 +12<br />
U<br />
-15<br />
+15<br />
MID<br />
2.5kHz<br />
LOW<br />
80Hz<br />
LINE IN 5<br />
LOW CUT<br />
75Hz<br />
18dB/OCT<br />
-10dBV<br />
MIC GAIN<br />
-12 +12<br />
U<br />
-15<br />
STEREO AUX RETURNS AUX <strong>SE</strong>ND TAPE TAPE MAIN OUTS<br />
MIC5 MIC6<br />
1<br />
1 INPUT OUTPUT<br />
L<br />
L<br />
MICRO <strong>SE</strong>RIES 1402-VLZ<br />
14-CHANNEL MIC/LINE MIXER<br />
2<br />
2<br />
R<br />
R<br />
LEFT(1/MONO) RIGHT ALL BAL/UNBAL<br />
BAL/UNBAL<br />
BAL<br />
BAL<br />
OR<br />
OR<br />
MONO<br />
MONO<br />
MONO<br />
MONO<br />
UNBAL<br />
UNBAL<br />
L<br />
L<br />
L<br />
L<br />
LINE IN 6<br />
BAL<br />
BAL<br />
BAL<br />
BAL<br />
LOW CUT<br />
OR<br />
OR<br />
OR<br />
OR<br />
75Hz<br />
UNBAL<br />
UNBAL<br />
UNBAL<br />
UNBAL<br />
18dB/OCT<br />
R<br />
R<br />
R<br />
R<br />
LEVEL<br />
LEVEL<br />
LEVEL<br />
LEVEL<br />
+4<br />
+4<br />
+4<br />
+4<br />
-10<br />
-10<br />
-10<br />
-10<br />
PHONES<br />
LINE IN 9-10 LINE IN 11-12 LINE IN 13-14<br />
U AUX U AUX U AUX<br />
U<br />
U<br />
1<br />
1<br />
1<br />
MON/<br />
MON/<br />
MON/<br />
EFX<br />
EFX<br />
EFX<br />
1<br />
+15<br />
+15<br />
+15<br />
+10<br />
+20<br />
NORMALLED<br />
U<br />
U<br />
U<br />
AUX 1 MASTER<br />
U<br />
2<br />
2<br />
2<br />
2 PRE<br />
EFX<br />
EFX<br />
EFX POST<br />
AUX 1<br />
EFX TO<br />
+15<br />
+15<br />
+15<br />
<strong>SE</strong>LECT<br />
MONITOR<br />
+20<br />
U EQ U EQ U EQ SOURCE<br />
LEFT RIGHT<br />
HI<br />
HI<br />
HI<br />
MAIN<br />
+28 CLIP<br />
12kHz<br />
12kHz<br />
12kHz<br />
MIX<br />
+10<br />
-15 +15<br />
-15 +15<br />
-15 +15<br />
U<br />
U<br />
U<br />
+7<br />
ALT<br />
MID<br />
MID<br />
MID<br />
MID<br />
MID<br />
MID<br />
3-4<br />
+4<br />
2.5kHz<br />
2.5kHz<br />
2.5kHz<br />
2.5kHz<br />
2.5kHz<br />
2.5kHz<br />
+2<br />
-12 +12<br />
-12 +12<br />
-12 +12<br />
-12 +12<br />
-12 +12<br />
U<br />
U<br />
U<br />
U<br />
U<br />
TAPE<br />
0<br />
-2<br />
LOW<br />
LOW<br />
LOW<br />
LOW<br />
LOW<br />
LOW<br />
80Hz<br />
80Hz<br />
80Hz<br />
80Hz<br />
80Hz<br />
80Hz<br />
-4<br />
+15<br />
-15 +15<br />
-15 +15<br />
-15 +15<br />
-15 +15<br />
-15 +15<br />
-7<br />
ASSIGN<br />
PAN<br />
PAN<br />
PAN<br />
PAN<br />
PAN<br />
PAN TO MAIN MIX<br />
-10<br />
-20<br />
NORMAL(AFL)<br />
LEVEL <strong>SE</strong>T(PFL)<br />
-30<br />
0dB=0dBu<br />
-10dBV<br />
MIC GAIN<br />
U<br />
U<br />
U<br />
U<br />
10 60<br />
10 60<br />
10 60<br />
10 60<br />
+10dB -40dB<br />
+10dB -40dB<br />
+10dB -40dB<br />
+10dB -40dB<br />
TRIM<br />
TRIM<br />
TRIM<br />
TRIM LINE IN 7-8<br />
U AUX U AUX U AUX U AUX U AUX<br />
1<br />
1<br />
1<br />
1<br />
1<br />
MON/<br />
MON/<br />
MON/<br />
MON/<br />
MON/<br />
EFX<br />
EFX<br />
EFX<br />
EFX<br />
EFX<br />
+15<br />
+15<br />
+15<br />
+15<br />
+15<br />
U<br />
U<br />
U<br />
U<br />
U<br />
2<br />
EFX<br />
2<br />
2<br />
2<br />
2<br />
EFX<br />
EFX<br />
EFX<br />
EFX<br />
+15<br />
+15<br />
+15<br />
+15<br />
+15<br />
U EQ U EQ U EQ U EQ U EQ<br />
HI<br />
HI<br />
HI<br />
HI<br />
HI<br />
12kHz<br />
12kHz<br />
12kHz<br />
12kHz<br />
12kHz<br />
-15 +15<br />
-15 +15<br />
-15 +15<br />
-15 +15<br />
U<br />
U<br />
U<br />
U<br />
PAN<br />
PAN<br />
PAN<br />
L R<br />
L R<br />
L R<br />
L R<br />
L R<br />
L R<br />
L R<br />
L R<br />
SOLO<br />
MODE<br />
3<br />
4<br />
5 6 7–8 9–10 11–12 13–14<br />
MUTE<br />
MUTE<br />
MUTE<br />
MUTE<br />
MUTE<br />
MUTE<br />
MUTE<br />
MUTE<br />
ALT 3–4<br />
ALT 3–4<br />
ALT 3–4<br />
ALT 3–4<br />
ALT 3–4<br />
ALT 3–4<br />
ALT 3–4<br />
ALT 3–4<br />
PHANTOM POWER<br />
RUDE SOLO LIGHT<br />
CONTROL<br />
ROOM / PHONES MAIN MIX<br />
dB<br />
dB<br />
dB<br />
dB<br />
dB<br />
dB<br />
dB<br />
dB<br />
dB<br />
dB<br />
10<br />
10<br />
10<br />
10<br />
10<br />
10<br />
10<br />
10<br />
10<br />
10<br />
SOLO SOLO<br />
SOLO<br />
SOLO SOLO<br />
SOLO<br />
SOLO<br />
SOLO<br />
SOLO<br />
5<br />
5<br />
5<br />
5<br />
5<br />
5<br />
5<br />
5<br />
5<br />
5<br />
U<br />
U<br />
U<br />
U<br />
U<br />
U<br />
U<br />
U<br />
U<br />
U<br />
5<br />
5<br />
5<br />
5<br />
5<br />
5<br />
5<br />
5<br />
5<br />
5<br />
10<br />
10<br />
10<br />
10<br />
10<br />
10<br />
10<br />
10<br />
10<br />
10<br />
20<br />
20<br />
20<br />
20<br />
20<br />
20<br />
20<br />
20<br />
20<br />
20<br />
30<br />
30<br />
30<br />
30<br />
30<br />
30<br />
30<br />
30<br />
30<br />
30 30<br />
40<br />
40<br />
40<br />
40<br />
40<br />
40<br />
40<br />
40<br />
40<br />
40 40<br />
50<br />
50<br />
50<br />
50<br />
50<br />
50<br />
50<br />
50<br />
50<br />
50 50<br />
60<br />
60<br />
60<br />
60<br />
60<br />
60<br />
60<br />
60<br />
60<br />
60 60<br />
AUX<br />
RETURNS<br />
6. If you’ve connected <strong>ToneLab</strong><strong>SE</strong> to a mixer/recorder, press the GLOBAL switch to<br />
access the OUT <strong>SE</strong>L menu, and use value knob 6 or the ▲, ▼ buttons to select<br />
“Ln” (LINE). If you’ve connected <strong>ToneLab</strong><strong>SE</strong> to a guitar amp, select “AP” (AMP).<br />
7. To adjust the volume, turn up your amp or mixer and <strong>ToneLab</strong><strong>SE</strong>’s rear panel<br />
LEVEL knob to a desired level (11.3).<br />
NOTE: Since <strong>ToneLab</strong><strong>SE</strong> uses an actual valve (vacuum tube), it will produce no<br />
sound for several seconds until the valve warms up. This isn’t a malfunction – it’s<br />
just the nature of valves.<br />
Guitar<br />
to your MIDI<br />
sequencer/computer<br />
<strong>ToneLab</strong><strong>SE</strong><br />
Headphones<br />
PHONES<br />
to your mixer/recorder<br />
or guitar amp<br />
LINE/AMP<br />
External effect processor<br />
RETURN <strong>SE</strong>ND<br />
OUTPUT<br />
L/MONO<br />
R<br />
AC/AC<br />
power supply<br />
to an<br />
~AC9V AC outlet<br />
Monaural phone jack INPUT<br />
INPUT<br />
USING TONELAB<strong>SE</strong> WITH A MIXER OR RECORDER<br />
EXAMPLE OF CONNECTIONS TO A MIXER OR RECORDER<br />
• When using <strong>ToneLab</strong><strong>SE</strong> for direct-line recording, connect the OUTPUT L/<br />
MONO and R jacks to the input jacks of your mixer or recorder. Press the GLO-<br />
BAL switch to access the OUT <strong>SE</strong>L menu, and use value knob 6 or the ▲, ▼<br />
buttons to select “Ln” (LINE).<br />
HINT: If you’re using a mono connection, use the OUTPUT L/MONO jack only.<br />
HINT: If you’re using a stereo connection, pan the input channels of your mixer/<br />
recorder to the far left and right respectively.<br />
Guitar<br />
OUTPUT<br />
L/MONO<br />
R<br />
LINE IN 1<br />
PAN L<br />
Tape<br />
Send<br />
LINE IN 2<br />
PAN R<br />
Tape<br />
Return<br />
Headphones<br />
<strong>ToneLab</strong><strong>SE</strong><br />
Monaural phone jack<br />
INPUT<br />
Mixer/recorder<br />
PHONES<br />
14
USING TONELAB<strong>SE</strong> WITH A GUITAR AMP(S)<br />
EXAMPLE OF CONNECTION TO A GUITAR AMP (OR AMPS)<br />
• If you are connecting <strong>ToneLab</strong><strong>SE</strong> to one or more guitar amps, connect the OUT-<br />
PUT L/MONO and R jacks to the input jack of your guitar amp(s). If desired, you<br />
can also connect an external effect processor; connect <strong>SE</strong>ND to the effect processor’s<br />
input, and RETURN to its output. Press the GLOBAL switch to access<br />
the OUT <strong>SE</strong>L menu, and use value knob 6 or the ▲, ▼ buttons to select “AP”<br />
(AMP).<br />
HINT: If <strong>ToneLab</strong><strong>SE</strong> is connected immediately before a combo amp or amp head,<br />
set the tone controls of your guitar amp to their center positions and then adjust for<br />
taste. To avoid unintentional distortion, press and hold the FX ON/OFF (Effect On/<br />
Off) pedal for 0.5 seconds to bypass <strong>ToneLab</strong><strong>SE</strong>, and adjust the rear panel LEVEL<br />
knob so that the volume is the same as when your guitar is connected directly to<br />
the amp.<br />
HINT: If you’re connecting <strong>ToneLab</strong><strong>SE</strong> to a guitar amp that has a jack allowing you<br />
to connect directly before the power amp (such as Return or Main In), set the OUT<br />
<strong>SE</strong>L menu item to “Ln” (LINE), and then connect <strong>ToneLab</strong><strong>SE</strong> to that jack. If you<br />
want to take advantage of the tonal character of that amp (and cabinet), you may<br />
want to turn <strong>ToneLab</strong><strong>SE</strong>’s CABINET setting “OFF.”<br />
HINT: When the program name is displayed, you can press and hold the EXIT<br />
switch for one second or longer to activate the Key Lock function; this disables<br />
operation of the buttons, selectors, and knobs. (The name display will indicate KEY<br />
LOCK for one second, and the value knob LEDs will go dark.) To cancel the Key<br />
Lock function, press and hold the EXIT switch again for one second or longer. (The<br />
name display will indicate LOCK OFF for one second.)<br />
Introduction<br />
Panel Tour<br />
Setup<br />
Playing<br />
Creating<br />
and Storing<br />
Guitar<br />
OUTPUT<br />
L/MONO<br />
R<br />
INPUT<br />
Monaural<br />
phone jack<br />
INPUT<br />
Monaural<br />
phone jack<br />
<strong>ToneLab</strong><strong>SE</strong><br />
Monaural phone jack<br />
INPUT<br />
Guitar amp(s)<br />
USING TONELAB<strong>SE</strong> WITH A MIDI DEVICE OR COMPUTER<br />
By using MIDI you can control <strong>ToneLab</strong><strong>SE</strong> from a sequencer or control an external<br />
MIDI device from <strong>ToneLab</strong><strong>SE</strong>. You can also save <strong>ToneLab</strong><strong>SE</strong> programs on a<br />
sequencer or MIDI data filer that is able to transmit and receive MIDI exclusive<br />
data, and then load the program data back into <strong>ToneLab</strong><strong>SE</strong> when desired.<br />
HINT: For details on MIDI connections refer to p.59.<br />
15
Playing <strong>ToneLab</strong><strong>SE</strong><br />
PROGRAM <strong>SE</strong>LECT MODE<br />
<strong>ToneLab</strong><strong>SE</strong> has 96 programs (24 banks x 4 programs), and every one of these<br />
programs can be totally rewritten or “custom tweaked” to your heart’s content. With<br />
the factory settings, banks 1–8 contain a total of 32 preset programs. (Banks 9–16<br />
and 17–24 contain the same preset programs as banks 1–8.)<br />
In order to select programs, you need to be in Program Select mode.<br />
<strong>SE</strong>LECTING A PROGRAM<br />
As an example, here’s how to select program 2-3 (bank 2, program 3).<br />
1. Make sure that <strong>ToneLab</strong><strong>SE</strong> is in Program Select mode.<br />
If the Effect On/Off pedal LED is lit, you’re in Effect On/Off mode. Press the FX<br />
ON/OFF pedal to change to Program Select mode.<br />
2. Use the BANK UP/DOWN pedals (6.1) to select bank 2.<br />
The bank number blinks in the bank display.<br />
3. Press the program select 3 pedal (6.2).<br />
Program 2-3 will be recalled instantly. The program select 3 pedal LED will<br />
light, and the bank number will also change to be steadily lit.<br />
HINT: When you’ve selected the Bank but not the Program, the previously-selected<br />
program is still active. So if you’re playing live and your next program change<br />
requires you to switch to a different bank, you can select that bank ahead of time,<br />
ensuring a timely, seamless change.<br />
EFFECT ON/OFF MODE<br />
You can use program select pedals 1–4 to switch the pedal effect, modulation<br />
effect, delay effect, and reverb effect of the current program on/off individually.<br />
Also, you can use the BANK DOWN pedal to switch the signal that is being sent<br />
through the external effect processor connected to the IN<strong>SE</strong>RT jacks.<br />
When you want to switch programs, press the effect ON/OFF pedal once again to<br />
return to Program Select mode.<br />
NOTE: In Effect On/Off mode, the BANK UP pedal does nothing.<br />
16
SWITCHING EFFECTS ON/OFF<br />
As an example, here’s how you can switch the pedal and insert effects on/off for<br />
the current program.<br />
1. If the Effect ON/OFF pedal LED is dark, you’re in Program Select mode. Press<br />
the Effect ON/OFF pedal to change to Effect On/Off mode.<br />
Program LEDs 1–4 indicate the on/off status of the pedal, modulation, delay,<br />
and reverb effects.<br />
2. If program LED 1 is lit, the pedal effect is ON. When you press program select<br />
pedal 1, the pedal effect will turn off and LED 1 will go dark.<br />
3. If the IN<strong>SE</strong>RT button LED is dark, your guitar signal is not being sent through<br />
the external effect. When you press the BANK DOWN pedal, the external<br />
effect send/return will be turned ON, and the IN<strong>SE</strong>RT switch LED will light.<br />
NOTE: If you haven’t connected an external effect processor to the IN<strong>SE</strong>RT <strong>SE</strong>ND/<br />
RETURN jacks, the INPUT signal will bypass the insert circuit whether the IN<strong>SE</strong>RT<br />
switch LED is lit or dark.<br />
Introduction<br />
Panel Tour<br />
Setup<br />
Playing<br />
Creating<br />
and Storing<br />
A/B CHANNEL HOLD<br />
You can specify whether the channel (A or B) memorized in the program will be<br />
automatically selected when you select the program (OFF), or whether your current<br />
channel selection (A or B) will be maintained even when you select a different<br />
program(ON).<br />
1. Press the GLOBAL button, and use the √, ® buttons to access the “CH<br />
HOLD” display.<br />
2. Use value knob 6 or the ▲, ▼ buttons to change the setting.<br />
NOTE: With the factory settings this is set to “OFF.”<br />
17
ACTIVATING OR DEACTIVATING THE KEY LOCK FUNCTION<br />
Here’s how you can use the Key Lock function to disable <strong>ToneLab</strong><strong>SE</strong>’s buttons,<br />
selectors, and knobs so they can’t be accidentally changed during a live performance.<br />
NOTE: While the Key Lock function is activated, you won’t be able to operate any<br />
controls except for the switches, pedals and the EXIT button.<br />
NOTE: The Key Lock setting is cancelled when you turn off the power; it will<br />
be disabled when you turn on the power once again.<br />
ACTIVATING THE KEY LOCK FUNCTION<br />
1. If the name display shows anything other than a program name, or if the characters<br />
of the program name are blinking, press the EXIT button.<br />
2. With the program name shown in the name display, press and hold the EXIT<br />
button for at least one second.<br />
The name display will indicate KEY LOCK for one second, and then the value<br />
knob LEDs will go dark.<br />
DEACTIVATING THE KEY LOCK FUNCTION<br />
1. If the name display shows anything other than a program name, press the<br />
EXIT button.<br />
2. Press and hold the EXIT button for at least one second.<br />
The name display will indicate LOCK OFF for one second, and then the value<br />
knob LEDs will light.<br />
18
Creating and Storing your own<br />
Programs<br />
There are two ways you can do this; by “tweaking an existing program” or by “starting<br />
from scratch.”<br />
CREATING YOUR OWN PROGRAM<br />
If you want to tweak an existing program, select one that’s close to the sound you<br />
want. Set the MODEL select switches to the amp, cabinet and effects you want to<br />
use, and use value knobs 1–6 to adjust the sound.<br />
For example, you might start with a certain preset that has a crunchy, modern<br />
rhythm sound that you like, but create a complementary lead sound that is louder,<br />
has a bit more gain, and boosted mid-range.<br />
Now here’s how to create your own program from scratch.<br />
NOTE: Before you continue, make sure that the GLOBAL menu OUT <strong>SE</strong>L setting<br />
is set correctly as described in Basic Connections on p.13.<br />
1. Select any program (p.16).<br />
HINT: It doesn’t matter which program you select, because we’re starting from<br />
scratch.<br />
2. In the PEDAL, MODULATION, DELAY, REVERB section, press any model<br />
select switch that is lit two times. This will turn off (bypass) all effects other than<br />
the amp model and cabinet.<br />
3. Press the channel select switch to select the channel (A or B) whose sound<br />
you want to adjust. The LED will light green if channel A is selected, or red if<br />
channel B is selected. For this example, let’s make the LED light green to<br />
select channel A.<br />
4. Use the AMP MODEL selector to choose the amp you want.<br />
HINT: For details on amp types, cabinet types, and effect types, refer to “Explanations<br />
of the Amp, Cab and Effect Types” (p. 23).<br />
5. Use value knobs 1–6 to adjust the GAIN, VR GAIN, TREBLE, MIDDLE, BASS,<br />
and CH VOLUME as desired. CH VOLUME adjusts the volume while preserving<br />
the overall character of the sound, including the distortion of the power<br />
stage. To adjust PRE<strong>SE</strong>NCE, press the PRES-NR button and turn value knob<br />
3. To return to adjusting GAIN etc., press the AMP model select button.<br />
HINT: The key to getting the most accurate vintage tube amp distortion is to raise<br />
the VR GAIN.<br />
NOTE: Some settings may cause your output sound to be distorted (i.e., in a way<br />
you don’t intend). If so, lower the CH VOLUME.<br />
Introduction<br />
Panel Tour<br />
Setup<br />
Playing<br />
Creating<br />
and Storing<br />
19
6. Use the CABINET model selector to choose the cabinet you want.<br />
HINT: For recommended combinations of amp type and cabinet type, refer to p.34.<br />
7. Press the PRES-NR button and adjust NR <strong>SE</strong>NS (value knob 4) appropriately.<br />
Higher values of noise reduction (0.2, 0.4, ... 10.0) will produce a correspondingly<br />
greater effect. With a setting of “OFF” there will be no noise reduction.<br />
NOTE: We recommend that you use noise reduction if you’re using a high-gain setting<br />
such as the RECTO or US HIGAIN amp type, since high gain usually generates<br />
more noise. Depending on the guitar you’re using, raising the noise reduction<br />
excessively may cause some of your notes to be cut off unnaturally.<br />
HINT: You can set noise reduction independently for channels A and B.<br />
HINT: You can also specify a different amp or cabinet for channel B. To do so, press<br />
the channel select pedal to make the LED light red, and repeat steps 4–7.<br />
8. In each section, choose the effect you want to use. For example if you want to<br />
add spring reverb, use the REVERB selector to select SPRING 1 (or SPRING<br />
2).<br />
HINT: When you do so, the reverb model will automatically be turned on, the<br />
REVERB parameter line LED of the edit section will blink, and the LEDs below the<br />
value knobs will light to indicate the REVERB parameters. For example if you’ve<br />
selected SPRING 1, value knobs 1–4 will control TIME, LO DAMP, HI DAMP, and<br />
PRE DELAY, while value knob 6 will control MIX.<br />
9. To adjust the reverb mix amount, use value knob 6 which controls the MIX<br />
parameter.<br />
In the same way for PEDAL, MODULATION, and DELAY effects, use the<br />
selector to choose an effect and the value knobs to adjust the parameters.<br />
HINT: In some cases, it’s easier to adjust the PEDAL effect if modulation, delay,<br />
and reverb are not being applied. If you’re using the PEDAL effect, it’s best to make<br />
your amp and cabinet settings first, and then adjust the pedal effect before the<br />
other effects.<br />
NOTE: For some of the models, the name of the actual parameter you will be editing<br />
may differ from what is printed in the parameter line of the edit section. The<br />
name that appears in the display when you operate a value knob is the actual<br />
name. For details on parameters refer to p.35.<br />
10. If you want to continue making adjustments, simply press the select button for<br />
the model you want to edit, and turn the value knobs.<br />
If the EXPRESSION button lights when you operate a value knob, you have<br />
the option of assigning that parameter to an expression pedal. If you press and<br />
hold the EXPRESSION switch for at least one second, the parameter will be<br />
assigned to the expression pedal (EXP 1). (We call this the Expression Pedal<br />
Quick Assign function.) Now you can use the pedal to control that parameter<br />
while you perform. (Similarly, you can hold down the CONTROL switch to<br />
assign the parameter to expression pedal 2 (EXP 2).) For example if you set<br />
the PEDAL model selector to U-VIBE and use value knob 1 to adjust the<br />
SPEED parameter, the EXPRESSION button will light to indicate that you can<br />
use the above method to assign the SPEED parameter to the expression<br />
pedal. For details, refer to p.53.<br />
20
HINT: If you’ve used the PEDAL selector to select VOX WAH, the MANUAL parameter<br />
will automatically be assigned to expression pedal 1 (EXP 1), letting you use<br />
the pedal as a wah pedal.<br />
CHANGING THE CONNECTION ORDER OF THE EFFECTS<br />
(CHAIN)<br />
You are free to change the order in which the modulation effect, delay effect, and<br />
reverb effect are connected.<br />
The effect connection order is saved independently for each program.<br />
1. Press the CHAIN button, and the current connection order is displayed.<br />
2. Use value knob 6 or the ▲, ▼ buttons to change the order.<br />
Display<br />
Connection order<br />
MD>DL>RV modulation→delay→reverb<br />
MD>RV>DL modulation→reverb→delay<br />
DL>MD>RV delay→modulation→reverb<br />
DL>RV>M delay→reverb→modulation<br />
RV>MD>DL reverb→modulation→delay<br />
RV>DL>MD reverb→delay→modulation<br />
Introduction<br />
Panel Tour<br />
Setup<br />
Playing<br />
Creating<br />
and Storing<br />
NAMING A PROGRAM<br />
Here’s how you can name a program.<br />
NOTE: The program name is saved as part of each program. If you switch to a different<br />
program or turn off the power before you save, your settings will be lost.<br />
1. Press the RENAME button.<br />
2. Use the √, ® buttons to move the cursor to the character you want to change<br />
(the selected character blinks), and use value knob 6 or the ▲, ▼ buttons to<br />
change the character.<br />
You can use the following characters.<br />
3. Repeat step 2 to finish entering a name for your program.<br />
4. When you’ve finished entering a name, press the EXIT button (3.7) to return to<br />
the mode you were in.<br />
21
STORING A PROGRAM<br />
When your tweaking has resulted in a sound you’re happy with, store (write) it!<br />
1. Press the WRITE button (3.6).<br />
The name display (3.8) shows “*WRITE*” and the bank display (5.1) and program<br />
LEDs 1–4 will blink.<br />
2. Use value knob 6 (2.2) or the ▲, ▼ buttons (3.1) to select the bank you want to<br />
use, and use the √, ® buttons to select the destination program (1–4).<br />
For example if you want to store your program in 9-1 (bank 9, program 1), use<br />
value knob 6 or the ▲, ▼ buttons to make the bank display show “9,” and then<br />
use the √, ® buttons to make the program 1 pedal LED blink.<br />
HINT: You can also select the store-destination program by using the BANK UP/<br />
DOWN buttons or the program 1–4 select buttons.<br />
3. Press the WRITE button (3.6) once again.<br />
The name display will indicate “COMPLETE.” Your program is now stored, and<br />
you’ll be back in Program Select mode.<br />
NOTE: The program is written over the previous contents of that bank/program.<br />
The program that previously occupied the number you selected in step 2 will be<br />
erased.<br />
NOTE: If you decide not to store your new program, press the EXIT button (3.7) to<br />
cancel the procedure.<br />
NOTE: If you switch to a different program or turn off the power without storing the<br />
program you edited, your changes will be lost.<br />
RESTORING A <strong>SE</strong>TTING TO ITS ORIGINAL VALUE (ORIGI-<br />
NAL VALUE)<br />
The Original Value icon in the value display (3.10) gives you a way to find out the<br />
parameter values that are stored in a program.<br />
When you are using a knob or button to change the value of a parameter, the<br />
ORIG (original value) icon will appear when the value you are adjusting matches<br />
the “original value” stored in the program.<br />
HINT: So, you’re flipping through the programs on your new <strong>ToneLab</strong><strong>SE</strong>, and you<br />
come across one you really like. It’s easy to find out exactly what settings are<br />
dialed in to get such an awesome tone — just use this Original Value display feature!<br />
22
Explanations of the Amp,<br />
Cabinet and Effect Types<br />
This section explains <strong>ToneLab</strong><strong>SE</strong>’s sixteen amp models, sixteen pedal<br />
effects, eleven cabinet models, modulation, delay, and reverb effects.<br />
A. AMP MODELS<br />
Which amps did we painstakingly model for our seductive selection of 16? Believe me<br />
when I say it wasn’t easy ‘cos, as I’m sure you know, there’s a plethora of great sounding<br />
amps out there. After countless hours of soul searching, earnest discussions (not<br />
to mention the occasional friendly argument!), calls to tone-wise friends (some professional<br />
players, some not...but all blessed with great ears) plus, of course, listening and<br />
playing, a top 16 list was finally drawn up. As you’re about to discover, the ones we<br />
went with are not only the cream of the crop but also offer up the widest possible array<br />
of the greatest guitar tones known to man - from pristine clean to outrageous overdrive<br />
and all points in-between. First though, some stuff you should know...<br />
Controlling Factors<br />
As already touched on in this <strong>manual</strong>, although the amp model of your<br />
<strong>ToneLab</strong><strong>SE</strong> houses controls for GAIN, VR GAIN, TREBLE, MIDDLE, BASS,<br />
PRE<strong>SE</strong>NCE and CH VOLUME, not all of the amps we’ve modelled have as<br />
many controls. In such cases, rather than leave you with knobs that do nothing<br />
(what on earth would be the point of that!?), we’ve made full use of all six (6)<br />
<strong>ToneLab</strong><strong>SE</strong> controls without compromising the accuracy of any of our models.<br />
This means you’ll be able to mimic the full tonal spectrum of each and every<br />
one of the originals we’ve modelled...and then some, thanks to the extra flexibility<br />
and additional control the six <strong>ToneLab</strong><strong>SE</strong> controls give you.<br />
For example, if an original amp doesn’t have a complete 3 band EQ network<br />
then we’ll set up the “missing” tone controls on our model to be “neutral” (i.e.<br />
as the original) when set it at 12 o’clock - thus giving you extra tonal flexibility in<br />
those EQ areas, if you so wish. Just so you know, the amps we modelled that<br />
don’t have individual controls for Treble, Middle and Bass are:<br />
AMP<br />
AC15<br />
AC15TB<br />
AC30<br />
AC30TB<br />
TWEED 1x12<br />
ORGINAL TONE CONTROLS<br />
Top Cut & Bass Cut Switch<br />
Treble & Bass<br />
Top Cut only<br />
Treble, Bass and Cut<br />
Just one, called Tone!<br />
REVERB DELAY MODULATION PEDAL CABINET AMP TYPE Amp/Effect<br />
TYPE<br />
Also, as you’d probably expect, we do the same exact thing with the<br />
<strong>ToneLab</strong><strong>SE</strong>’s PRE<strong>SE</strong>NCE control too - namely, if one isn’t present (bad pun,<br />
not intended!) on the original then PRE<strong>SE</strong>NCE will be an added control on our<br />
23
model. This time though, the “neutral” position is when the control is all the way<br />
off (turned fully counterclockwise). The two models this applies to are BLACK<br />
2x12 and TWEED 1x12.<br />
IMPORTANT NOTE: As you’ll discover when you read their descriptions, in the case<br />
of the AC15, AC15TB, AC30 and AC30TB models, we’ve utilized the PRE<strong>SE</strong>NCE<br />
control to mimic the TOP CUT control - whether it was present on the original or not.<br />
About the Gain and Volume knobs<br />
<strong>ToneLab</strong><strong>SE</strong>’s amp models provide three programmable knobs that affect the<br />
volume (gain); GAIN, VR GAIN, and CH VOLUME. Each control does has its<br />
own specific job, and the sound of a particular amp model can vary over an<br />
amazingly wide range just depending on the settings of these knobs.<br />
As some of you will know, most vintage amps only have one VOLUME control<br />
to set up the sound, whilst more modern amps usually have two types of level<br />
controls – GAIN (or sometimes PREAMP VOLUME) that controls the input<br />
level of the preamp section, and MASTER VOLUME that controls how much<br />
signal is (and how loud it is going to be) passed from the preamp to the power<br />
amp. With many vintage amps there is no MASTER VOLUME, the preamp<br />
feeds directly into the power amp without any type of control.<br />
The <strong>ToneLab</strong><strong>SE</strong>’s controls are designed to cover all these points:<br />
<strong>ToneLab</strong><strong>SE</strong> GAIN: On vintage type models that do not have a master volume<br />
(i.e., AC15, AC15TB, AC30, AC30TB, UK BLUES, UK 68P, BLACK 2x12,<br />
TWEED 1x12, TWEED 4x10), the GAIN control works like the VOLUME of the<br />
original amp. On other model amps that do have a master volume, the GAIN<br />
control works like GAIN or PREAMP VOLUME.<br />
<strong>ToneLab</strong><strong>SE</strong> VR GAIN: MASTER VOLUME that controls how much preamp signal<br />
level is passed to the power amp, which in our case is the VALVE REAC-<br />
TOR stage. (Your <strong>ToneLab</strong><strong>SE</strong> works like a real amp.)<br />
<strong>ToneLab</strong><strong>SE</strong> CH VOLUME: For want of a better way of putting it, this is like a<br />
power attenuator that you would add between the output of your amp and the<br />
input of your speaker cabinet. This controls the level of the final mix and allows<br />
you to balance all your programmed amp sounds to each other.<br />
As in how the original amps work, we have made the relationship between<br />
preamp and power amp work in the same way. Therefore to obtain truly<br />
authentic tones please use the VR GAIN control in the same way, i.e. with VIN-<br />
TAGE type models that do not have Master Volume control’s, turn the VR GAIN<br />
control up to maximum.<br />
When using a model of a modern amp that does have a master volume control,<br />
adjust VR GAIN just as you would adjust the master volume control. Low<br />
settings of VR GAIN will tend to produce more of a preamp distortion, while<br />
high settings will add the distinctive distortion and warmth of the Valve Reactor.<br />
Lastly, if an original amp features a unique switch or control we make sure that we<br />
cover it! Such things will be revealed in the model descriptions that follow shortly...<br />
Tube Talk<br />
Us Brits call ‘em valves while our US cousins call ‘em tubes...as the saying<br />
goes: England and America are merely two countries divided by a common<br />
24
language! Anyway, call ‘em what you will, these wondrous glass bottles lie at<br />
the tonal heart of each of our 16 models. As all the amps we’ve modelled hail<br />
from one of the two countries just mentioned, in honour of their heritage, the<br />
descriptions of all English amps will employ the words “valve” and “valves,”<br />
while the American ones will be tubular!<br />
QUESTION: What’s the difference between an ECC83 preamp valve and a<br />
12AX7 preamp tube?<br />
ANSWER: Nothing! They’re the same exact thing – namely the most popular<br />
preamp tube in ampland. ECC83 is the British name, 12AX7 (a.k.a.<br />
7025) is the American. See, I told you we were two countries divided by a<br />
common language!<br />
Power Amp Accuracy<br />
What happens in the power stage of any good tube amp is of paramount importance<br />
to the way the amp sounds, feels and behaves. The way the power amp<br />
operates (Class A or Class AB), the power tubes used (EL84s, EL34s, 6L6s,<br />
6V6s), the exact nature of the negative feedback loop circuitry (if one even exists)<br />
and how the power stage interacts (a relationship called damping) with the<br />
speaker(s) it is driving - all these things play a vital role in the creation of tone.<br />
That is why we have fitted your <strong>ToneLab</strong><strong>SE</strong> with our patented Valve Reactor<br />
Technology – a modelling breakthrough that is unique to VOX and infuses our<br />
critically acclaimed Valvetronix range of amps with life and feel. This revolutionary<br />
technology emulates a tube power-amp by using real tubes in a real tube amp<br />
circuit and ensures that all the important bases inherent in a tube amp are faithfully<br />
and accurately covered. For example: if you choose amp model AC30TB -<br />
an amp with a Class A power stage, EL84 output tubes and no negative feedback,<br />
that’s exactly what your Valve Reactor power amp reconfigures itself to be.<br />
This all said, let’s take a look at each of our amp models...<br />
1. AC15<br />
This is modelled on Channel 2 of an amazing sounding 1962 VOX AC15,<br />
which is part of our vast amp collection. This 1x12", 15 Watt, valve driven, dual channel<br />
combo was unleashed on the market in 1958 and was the first ever VOX amplifier.<br />
The reason for it being named the AC15 is simple: AC stands for Amplifier<br />
Combination, while 15 indicates the Wattage. Thanks to its compactness, power,<br />
built in tremolo/vibrato effects (on Channel 1 only) and tremendous tone, this combo<br />
was a huge hit with the popular British guitar bands of the time, including several<br />
chart topping acts, the majority of whom were only too happy to endorse <strong>Vox</strong>.<br />
One of the biggest reasons for the unique, signature tone of this amp is the fact<br />
that it employs EL84 output valves in a Class A circuit with no negative feedback. This is<br />
also true of the other three VOX amps, we’ve modelled - the AC15TB, AC30 and AC30TB.<br />
In a nutshell, the result of this design is more power and more distortion - the latter of<br />
which gets thick with second and third order harmonics that become more and more prevalent<br />
as the amp is cranked. Thanks to our unique Valve Reactor Technology the power<br />
stage of your <strong>ToneLab</strong><strong>SE</strong> is automatically switched to its “EL84s in a Class A circuit with<br />
REVERB DELAY MODULATION PEDAL CABINET AMP TYPE Amp/Effect<br />
TYPE<br />
25
no feedback” emulation whenever AC15, or any of the other three <strong>Vox</strong> models, is chosen.<br />
Like most amps of its era, the AC15 is the very essence of simplicity. In<br />
fact, the Channel we modelled, Channel 2 (remember!?), only has three controls -<br />
Volume, Brilliance (really a bass cut) and Top Cut. When you select AC15, the<br />
<strong>ToneLab</strong><strong>SE</strong>’s GAIN control mimics the original’s Volume control, while the PRES-<br />
ENCE control acts as the Top Cut.* FYI, the AC15’s Top Cut control affects the<br />
high frequencies in a very different way than a “regular” Treble control. Deft use of<br />
it will help you dial in the exact amount of that instantly recognizable, world-famous<br />
VOX “sparkle.” The BASS control acts as the Bass Cut (Originally labelled Brilliance)<br />
with total variability instead of the Original two position switch.<br />
As for what the “extra” TREBLE and MIDDLE controls on our AC15 model<br />
do: as already mentioned earlier, they’re exactly that - “extra!” Set them at 12<br />
o’clock and they’re “neutral” (i.e. they mimic the exact tone of the original) or tweak<br />
them for extra tonal flexibility.<br />
*CONTROL NOTE: The original AC15’s Top Cut control works in the opposite way<br />
you’d expect - it “cuts” when you turn it up! You’ll be glad to read that our model of<br />
the Top Cut control (the PRE<strong>SE</strong>NCE knob) works in a much more logical fashion -<br />
turn it up for more “sparkle,” turn it down for less.<br />
Original’s valve compliment: 1 x EF86, 3 x ECC83s, 1 x ECC82 in the<br />
preamp, 1 x EZ81 rectifier, 2 x EL84s in the power amp.<br />
2. AC15TB<br />
While the AC15 was born in the late ’50s, the AC15TB is a modern-day child of the<br />
’90s which combines the sweet “n” desirable tonal characteristics of the AC15’s low<br />
Wattage power stage, with the increased tonal flexibility that the Top Boost (TB)<br />
channel of an AC30 has to offer. Then, to sweeten the pot even further, a 12" Celestion<br />
“Blue” speaker (what else?), Reverb and a Master Volume control were thrown<br />
in too. The result is a highly flexible 15 Watt, all-valve, 1x12 combo that successfully<br />
marries the pureness of great vintage VOX tone with modern features.<br />
The original has two tone controls - Treble and Bass. So, as is the norm,<br />
the <strong>ToneLab</strong><strong>SE</strong>’s TREBLE and BASS controls mimic their namesakes while the<br />
MIDDLE (“neutral” at 12 o’clock) and PRE<strong>SE</strong>NCE add further tonal flexibility...should<br />
you want it. To ensure maximum “<strong>Vox</strong>iness,” we’ve made sure that the<br />
PRE<strong>SE</strong>NCE control behaves exactly like the “Top Cut” on the original AC15 -<br />
except in reverse (“off” = cut) to make it more logical, just like on our AC15 model.<br />
In trademark VOX fashion, our AC15TBX model oozes clean tones that<br />
“jangle” and “chime,” while its overdrives are smooth yet pulsating with desirable<br />
harmonic overtones. Enjoy!<br />
Original’s valve compliment: 5 x ECC83s in the preamp, 1 x 5Y3GT rectifier,<br />
2 x EL84s in the power amp.<br />
3. AC30<br />
As already stated, the VOX AC15 was a huge hit with the British guitar bands of<br />
the late ’50s. However, as the popularity of the AC15 using bands grew, so did<br />
their need for a more powerful amp. Sure, the AC15 was loud for a 15 Watt amp -<br />
26
darned loud in fact - but it was no match for 1,000 + screaming fans! Remember<br />
folks, back in the late ’50s/early ’60s, guitar amps weren’t being fed through the PA<br />
- that was reserved purely for vocals, the band’s back-line had to do the rest.<br />
Clearly VOX needed to come up with a louder amp and the company was only too<br />
happy to rise to the challenge...<br />
The fruit of VOX’s labour was unveiled to the world in 1959 - the 30 Watt,<br />
2x12, AC30. Several top British bands graduated up to the AC30 instantly and,<br />
within months, one of them had scored a number one single with a stirring guitar<br />
instrumental. Not surprisingly, pretty much every other UK act worth its salt immediately<br />
followed suit and the AC30 became the amp behind the so-called “Beat Boom”<br />
of the time. More importantly, it also became the driving force behind the now legendary<br />
“British Invasion” - the name given to the huge wave of success that several<br />
English bands enjoyed in America during the ’60s. This charge was led by a quartet<br />
hailing from Liverpool who quickly became VOX’s most famous ambassadors ever.<br />
We’ve modelled the sterling sounds of the AC30’s Normal channel as they definitely<br />
encapsulate those classic tones that defined the aforementioned British invasion.<br />
Just like its smaller brother, the AC15, the AC30’s Normal channel boasts the bare minimum<br />
of knobs - Volume and Top Cut (modelled by GAIN and PRE<strong>SE</strong>NCE* respectively).<br />
*CONTROL NOTE: Once again, our PRE<strong>SE</strong>NCE control models the “Top Cut” on<br />
the original AC30 exactly - except in reverse (“off” = cut) to make it more logical,<br />
just like on our AC15 model.<br />
Original’s valve compliment: 4 x ECC83s, 1 x ECC82 in the preamp, 1 x<br />
GZ34 rectifier, 4 x EL84s in the power amp.<br />
4. AC30TB<br />
Even though the AC30 was a runaway success, several artists expressed a desire for the<br />
amp to have more tonal flexibility and a pinch of extra gain too. VOX reacted quickly and<br />
came up with some clever extra tone circuitry that featured an additional ECC83 valve<br />
and was called “Top Boost.”* When “Top Boost” was added to an AC30 it increased the<br />
gain of the combo’s Brilliant channel, and added two extra EQ controls, giving the amp<br />
three tone controls -Treble, Bass and Cut. To say it was an instant hit with the guitar playing<br />
public would be a gross understatement! In fact, its gutsy tone became an instantly<br />
recognisable signature sound of many major groups in the mid ’60s.<br />
NERDY HISTORICAL NOTE: VOX initially called this their “Brilliance Unit” but it<br />
quickly became known as “Top Boost.” When Top Boost was first introduced it was<br />
only available as a retrofit assembly. Even though this modification was not particularly<br />
difficult to add, it was beyond most folk (hey, I don’t know about you, but messing<br />
around with electricity is hardly my idea of fun!). Consequently, in 1964, Top<br />
Boost was fitted to the AC30 as standard.<br />
Once again, the PRE<strong>SE</strong>NCE control of our model acts as the original’s Cut<br />
(but in reverse: “off” = cut) while the GAIN, TREBLE and BASS mimic the original’s<br />
Volume, Treble and Bass controls. The MIDDLE is an “extra” with 12 o’clock being<br />
its “neutral” position.<br />
Our AC30TB model produces clean sounds that are rich and jangly with a<br />
smooth yet detailed top end, and overdrives that have a glorious, throaty bark -<br />
just like those classic, “Class A” tones that have made the original a “must have” in<br />
any serious player’s amp collection.<br />
27<br />
REVERB DELAY MODULATION PEDAL CABINET AMP TYPE Amp/Effect<br />
TYPE
Original’s valve compliment: 5 x ECC83s & 1 x ECC82 in the preamp, 1 x<br />
GZ34 rectifier, 4 x EL84s in the power amp.<br />
5. UK BLUES<br />
Our UK BLUES model is based on the “High Treble” channel of an extremely rare, handwired<br />
head made in jolly old England in the early ’60s. Although the TWEED 4x10 circuit<br />
was used as a basic template for this amp, several fundamental changes (e.g. different<br />
tubes, different transformers, a higher output impedance and vastly different speakers in<br />
a closed-back cab), give UK BLUES its own unique and highly desirable character.<br />
Indeed, when cranked-up this 30 Watt baby produces a crunch that forever changed the<br />
sound of rock “n” roll - which is why it is still highly revered to this very day.<br />
Original’s valve compliment: 3 x ECC83s in the preamp, 1 x GZ34 rectifier, 2<br />
x KT66s in the power amp.<br />
6. UK 68P<br />
This is based on the “High Treble” channel of a 1968, 50 Watt, all-valve head, boasting<br />
a Plexiglas front panel and four (4) inputs. The no-nonsense original doesn’t feature<br />
a Master Volume control so the best and, arguably, only way to set it up is to<br />
max out the volume and let rip! And, that’s exactly what everyone did - and still does!<br />
This amp was chosen because the tone was incredibly rich and warm, instant classic<br />
heaven! As this amp has no master volume facility, the only, and greatest, way of<br />
using it to its full potential was to wind the volume up to maximum.<br />
To achieve the same response as the original, remember to turn the VR Gain control<br />
to maximum. The <strong>ToneLab</strong><strong>SE</strong> works EXACTLY like the original. This goes for all<br />
non-master type amp models.<br />
So, wind the GAIN control all the way up and immerse yourself in an<br />
instantly recognizable, organic overdrive that responds beautifully to the subtle<br />
dynamics of your playing and dominates “classic rock.” Rolling back your guitar’s<br />
volume control results in a unique and highly useable clean sound.<br />
Original’s valve compliment: 3 x ECC83s in the preamp, 2 x EL34s in the<br />
power amp.<br />
7. UK ’80S<br />
This is modelled on a 1983, all tube, single channel 100 Watt head that boasts a<br />
Master Volume control - a wonderful feature that allows the user to dial in a decent<br />
crunch tone without having to max out the amp’s volume. Invariably played with it’s<br />
(preamp) Gain control cranked to the max, this amp was responsible for the fat, roaring<br />
sound that dominated ’80s hard rock and heavy metal. Yes sir, from spandex clad<br />
Europeans who rocked like hurricanes, to American speed freaks who rode the lightning<br />
and reigned in blood, UK ’80s was the only amp of choice...and, for many, still is!<br />
Although UK ’80s became famous for it’s distinctive, cranium-crushing crunch,<br />
it isn’t merely a “one trick pony” and neither is our model - just like the original, when<br />
you roll back your guitar’s volume knob you’ll get a bright, clean sound that’s perfect<br />
for chord work and will cut through any mix like a hot knife through butter.<br />
28
Original’s valve compliment: 3 x ECC83s in the preamp, 4 x EL34s in the<br />
power amp.<br />
8. UK ’90S<br />
This model is based on the “lead” channel of a 100 Watt, dual channel head that is<br />
capable of so much preamp distortion it houses a Gain control that goes all the way<br />
up to a Nigel Tufnel approved “20, dunnit!” This amp replaced UK ’80s and was<br />
developed to satisfy the ever-evolving rock guitarists’ insatiable lust for more gain,<br />
features and flexibility. Was this amp popular? Judging by the fact it quickly became<br />
the “industry standard” for the decade in question, the answer is a resounding “yes!”<br />
Original’s valve compliment: 4 x ECC83s in the preamp, 4 x EL34s in the<br />
power amp.<br />
9. UK MODERN (UK MODRN)<br />
This is modelled on the High Gain channel of a modern, all-tube 100 Watter that is<br />
effectively a hybrid of the UK ’80s and UK ’90s amps. It combines the toneful high<br />
gain preamp stage and modern features of UK ’90s with the unmistakable, “snarling”<br />
punch and girth the UK ’80s power stage had to offer. The result is a highly aggressive,<br />
tone-breathing monster capable of mondo-gain while retaining individual note<br />
definition. With the GAIN control on full, UK MODERN allows lead lines to soar into<br />
soulful feedback, while its low-end “chunk” remains tight and punchy. Wimps beware!<br />
Original’s valve compliment: 4 x ECC83s in the preamp, 4 x EL34s in the<br />
power amp.<br />
10. RECTO<br />
This bad boy is based on the “Modern High Gain” channel of a brutal, 100 Watt,<br />
armour-plated beast hailing from California. Its deep, dark, loose low-end, some<br />
what “fizzy” top and Monster-like gain has made this all-tuber a mainstay for many<br />
modern, metal acts who either tune their guitars down as low as they can possibly<br />
go, or wield 7-string axes.<br />
At low GAIN settings, RECTO produces a distinctive, bright clean sound<br />
bolstered by some rich, upper harmonics that add fullness and dimension. This<br />
said, RECTO is definitely not recommended for Country “n” Western picking. But,<br />
if you play slamming, “nu-metal” that’s tuned lower than whale droppings, then<br />
RECTO could well be the only way to go!<br />
Original’s tube compliment: 5 x 12AX7s in the preamp, 2 x 5U4G rectifier<br />
tubes, 4 x 6L6s in the power amp.<br />
11. US HIGAIN (US HI-G)<br />
This is modelled on the Overdrive Channel of an all-tube, 100 Watt head built in<br />
1991 and covered in snakeskin! This high gain, power house was designed by a guy<br />
who also builds and drives Hot Rod cars so it should come as no surprise that the<br />
originals controls all go to eleven - after all, “that’s one louder innit!” (© Nigel Tufnel!)<br />
US HIGAIN is capable of a powerful, heavily saturated sound that combines<br />
an open low-end with compressed mids and highs. The result is a tone that<br />
29<br />
REVERB DELAY MODULATION PEDAL CABINET AMP TYPE Amp/Effect<br />
TYPE
emains focused and well defined at even the most extreme gain settings. These<br />
attributes have made this head a favourite with several of the world’s leading players,<br />
and its versatility make it ideal for a wide variety of purposes and styles.<br />
Original’s tube compliment: 4 x 12AX7s in the preamp, 4 x 6L6s in the<br />
power amp.<br />
12. BOUTIQUE OD (BTQ OD)<br />
For this one we modelled the Overdrive channel of a very rare, very expensive and<br />
very respected 100 Watt head named the Overdrive Special. This custom-order,<br />
hand-wired beauty has a spectacular overdriven sound that’s perfect for sax-like,<br />
legato soloing. With its GAIN control wide-open, BOUTIQUE OD produces a stunning<br />
sustain which is very smooth and very soulful - can you say “woman tone!?”<br />
Original’s tube compliment: 3 x 12AX7s in the preamp, 4 x EL34s in the<br />
power amp.<br />
13. BOUTIQUE CL (BTQ CL)<br />
For this amp type, we modelled the Clean channel of another very expensive, handwired,<br />
custom amp made by the same boutique builder as BOUTIQUE OD. We auditioned<br />
several top-shelf boutique amps for this model but this amp was the clear winner.<br />
Even though its garish, fuzzy red covering wasn’t to everyone’s taste, it’s<br />
beautiful clean sound was! Its beautifully rounded low-end, delightfully transient midrange<br />
attack and sweet treble make it the perfect partner for single-coil pickups. It is<br />
also incredibly responsive and extremely sensitive to picking styles and pickup<br />
selection. And, as an added bonus, strummed chords just ring out and blossom.<br />
Original’s tube compliment: 3 x 12AX7s in the preamp, 4 x 6L6s in the<br />
power amp.<br />
14. BLACK 2X12 (BLK 2X12)<br />
The dual channel, blackfaced beauty we modelled here is considered a “musthave”<br />
2x12 combo for country and blues players, and rightfully so - after all, its celebrated<br />
clean sound is very tight “n” twangy, with a deep, taut, piano-like bass.<br />
Pristine clean tones aside, BLACK 2x12 is also capable of producing that<br />
classic Chicago blues tone - especially with single coil pickups. In keeping with the<br />
original, when pushed hard the bass on our model tends to crumble. So, to emulate<br />
this classic, BLACK 2x12 overdrive, here’s what you dial in on your<br />
<strong>ToneLab</strong><strong>SE</strong>: full GAIN and VR GAIN, not much BASS, full MIDDLE and set TRE-<br />
BLE to taste. Because the EQ network of BLACK 2x12 lies before the main gain<br />
stage of its preamp y’see, pushing the mids in this way emphasizes the distortion<br />
in that frequency range and the result is a lovely, singing blues tone.<br />
As already mentioned elsewhere, the original amp doesn’t have a Presence<br />
control but does have a Bright Switch. The PRE<strong>SE</strong>NCE control on your<br />
<strong>ToneLab</strong><strong>SE</strong> emulates this switch when “off” and “on,” plus all points in-between!<br />
Original’s tube compliment: 4 x 12AX7s & 2 x 12AT7 (a.k.a. ECC81) in the<br />
preamp, 4 x 6L6s in the power amp.<br />
30
TONAL HINT: BLACK 2x12 is the perfect partner for ACOUSTIC (Acoustic Guitar<br />
Simulator) in the Pedal section.<br />
15. TWEED 1X12 (TWD 1X12)<br />
The original we modelled here was born in Fullerton, California, in 1958, and clad in<br />
“tweed” - hence its name! Just like the AC15, this 18 Watt, 1x12, all-tube combo is<br />
the very essence of simplicity. Aside from the obligatory Volume knob, it only housed<br />
one other knob - a single Tone control creatively named (wait for it!) Tone! This Tone<br />
control is merely a treble cut and boost, and its behaviour can be mimicked by using<br />
the Valvetronix’s TREBLE, MIDDLE and BASS EQ network as follows:<br />
Original Tone control turned all the way down (off) = BASS on full; TREBLE<br />
and MIDDLE at 9 o’clock (PRE<strong>SE</strong>NCE “off”).<br />
Original Tone control turned up “full” (on 10) = TREBLE on full; MIDDLE<br />
and BASS at 9 o’clock (PRE<strong>SE</strong>NCE “off”).<br />
NOTE: As the original doesn’t have a Presence control, PRE<strong>SE</strong>NCE is “neutral”<br />
when “off,” but can be used to add “extra” sparkle and cut to the model if you so wish.<br />
In keeping with the original, the TWEED 1x12 produces an open, relatively uncoloured<br />
sound when clean, but starts to “snarl” beautifully when pushed into overdrive.<br />
Its highly desirable “snarl” is rich with harmonic content and cranking this puppy up<br />
will produce those classic, old rockabilly and rock “n” roll sounds of the ’50s and ’60s,<br />
at the drop of a 10 gallon hat - especially when a single coil pickup is used.<br />
Original’s tube compliment: 1 x 12AY7, 1 x 12AX7s in the preamp, 1 x<br />
5Y3GT rectifier, 2 x 6V6s in the power amp.<br />
16. TWEED 4X10 (TWD 4X10)<br />
The 4x10 combo we modelled here was built in 1959 and originally intended for<br />
bass guitar. This said, six-stringers were quick to embrace its smooth-yet-cutting<br />
overdrive which is perfect for R&B (rhythm “n” blues) guitar. TWEED 4x10 is also<br />
very sensitive and responsive to both picking strength and the volume setting on<br />
your guitar. This means that by backing-off your axe’s volume when the amp is<br />
cranked, you can produce a beautifully clean and full tone. It also means that<br />
dynamic picking control allows you to make notes or chords more distorted or<br />
clean than others, depending on how hard or how soft you pick ‘em.<br />
Another cool tonal quirk of TWEED 4x10 is the classic, vintage tube amp sag<br />
its GZ34 rectifier tube adds to your notes whenever the amp is driven really hard.<br />
“What is sag?” Do I hear you ask? Well, crank the Gain and VR GAIN controls on<br />
this model, dig in hard with your pick and you’ll soon find out! Can you hear how the<br />
note literally “sags” when you first hit it and then it opens up? That’s sag, geddit?<br />
TONAL NOTE: Just like on the original, the Middle and Treble control of TWEED<br />
4x10 are highly interactive and high settings of the Middle control automatically add<br />
treble to your sound. As a result, you may want to turn down the Treble control as a<br />
counter measure. Conversely, low Middle settings reduce treble so you might want<br />
to crank the Treble a little more in such instances.<br />
Original’s tube compliment: 1 x 12AY7, 2 x 12AX7s in the preamp, 1x GZ34<br />
rectifier, 2 x 5881s in the power amp.<br />
REVERB DELAY MODULATION PEDAL CABINET AMP TYPE Amp/Effect<br />
TYPE<br />
31
B. CABINET MODELS<br />
Now let’s look at the CABINET models:<br />
CABINET AND SPEAKER ACCURACY<br />
There’s not much point in having incredibly accurate amp models if the<br />
speaker cabinet models on offer aren’t of the same exacting standards. As you<br />
may know, in real life, the output stage of a tube amp works in close harmony<br />
with the varying impedance curve of the speaker(s) it is driving. This intimate<br />
and vital relationship plays a major role in producing the warm, punchy sound<br />
and pleasing feel that we all know and love. In a nutshell, modelling a speaker<br />
cabinet is not just a case of frequency response, but is a combination of frequency<br />
response, transient response (how a speaker reacts to the strength of<br />
how a note is played), and the all-important interaction of the amps output to<br />
the speaker’s impedance curve. In addition, other vitally important factors that<br />
have to be taken into account when modelling a cabinet are the actual physical<br />
dimensions of the enclosure (cabinet), the unique tonality of said enclosure<br />
(which will be affected by both the type and thickness of the wood it is made of)<br />
and whether it boasts an open, semi-open or closed-back design. Special circuitry<br />
and unique modelling technology ensures that all of these factors are<br />
well taken care of in the cabinet models built into your <strong>ToneLab</strong><strong>SE</strong>.<br />
1. TWEED 1X8 (TWD 1X8)<br />
The 8-inch 3.2-ohm Alnico speaker in this cabinet model is the one built into a simple<br />
amp with a 6V6 output valve. You’ve no doubt heard the sound of this amp, but<br />
you might not have noticed what kind of amp it really is. Although you wouldn’t<br />
guess from the size of the speaker itself, the sound has an amazingly broad range.<br />
The lows are deep and warm, and the highs are clean and sparkling, yet it does<br />
not have that irritating sound typical of the 8-inch speakers often used for guitar.<br />
2. TWEED 1X12 (TWD 1X12)<br />
This speaker is the other half of our Tweed 1x12 Amp model. As the name suggests<br />
it is a single 12" speaker, uses an Alnico magnet and made in the USA by<br />
one of the US’s revered names in vintage loudspeakers.<br />
3. TWEED 4X10 (TWD 4X10)<br />
Keeping with the US made Alnico magnet speakers, this cabinet partnered our<br />
TWEED 4x10 modelled amp. It is an open backed cab using four 10" 8 Ohm<br />
speakers, wired in parallel for a total of 2 Ohms impedance. Although originally<br />
intended for bass guitar, this speaker rocks for many different styles.<br />
4. BLACK 2X10 (BLK 2X10)<br />
Although we did not model the amp that goes exactly with this cabinet, we loved<br />
the tone of this mid-60s Fullerton, California made open backed 2x10" ceramic<br />
magnet (of US origin) 35 Watt combo. So here it is. Great for blues, jazz and country.<br />
As with all cabinet models it can be mixed and matched with any amp model to<br />
32
produce some interesting tonal combinations. But for some recommended uses,<br />
please see the following charts.<br />
5. BLACK 2X12 (BLK 2X12)<br />
As you’ve probably guessed by now, this speaker system accompanied the amp that<br />
was modelled for the BLACK 2x12 amp. Featuring two 12" Ceramic magnet speakers,<br />
again made in USA in the mid ’60s. They are 8 Ohm units wired in parallel for a<br />
4 Ohm total load. These speakers have been featured on countless recordings of<br />
many styles of music, but very predominantly Country and Blues based Rock.<br />
6. VOX AC15 (AC15)<br />
This is a 1x12" open backed combo using the famed VOX Blue Alnico speaker,<br />
manufactured by Celestion in Ipswich, England. The one we used was a modern<br />
re-issue that was housed in the VOX AC15TB combo. This speaker, which is 8<br />
Ohms impedance, 15 Watts power handling, is amazingly full-bodied for a 1x12<br />
open back cab, and, of course, helps bring the famous VOX chime to the forefront.<br />
7. VOX AC30 (AC30)<br />
Obviously, double the power – double the speakers. 2x12" VOX Blue Alnicos, wired in<br />
series for 16 Ohms, adds even more of that great VOX tone. This time we modelled<br />
some great sounding originals from way back in the ’60s. As speakers get old their tone<br />
changes, so this configuration adds a different slant on how these speakers sound.<br />
8. VOX AD412 (AD412)<br />
This cabinet is one of VOX’s latest products, and due to the fact we are extremely<br />
proud of it, and that it is without a doubt an exceedingly great sounding cabinet, we<br />
just had to include it with our cabinet models. The cabinet itself features custom<br />
designed Celestion speakers using Neodymium magnets, one of the first, if not the<br />
first, cabinet to use this technology. It also uses some special cabinet acoustic design<br />
technology that is also a first for VOX and 4x12s in general. Use it as a valid tonal<br />
option with any model, but especially the amp head models. We think you will like it!<br />
9. UK H30 4X12 (UK H30)<br />
This is an older, heavy-duty cabinet (with 30 Watt speakers, from the late ’60s)<br />
made by the same famous UK amp company as the UK T75 4x12. Many of these<br />
cabinets have been used on countless classic rock recordings throughout the past.<br />
10. UK T75 4X12 (UK T75)<br />
This 4x12" model is of a famous, UK built, black box loaded with modern, 75 Watt British<br />
speakers. Normally seen stacked, this is probably the biggest selling guitar cabinet<br />
ever and is eminently suitable for most rock styles. How could we not model it?!<br />
REVERB DELAY MODULATION PEDAL CABINET AMP TYPE Amp/Effect<br />
TYPE<br />
11. US V30 4X12 (US V30)<br />
This black beast of a cabinet hails from the same home in California as our<br />
RECTO amp. It uses four UK made “Vintage” named speakers.<br />
33
It is renowned for its deep bass and high-end detail and is extremely popular<br />
amongst today’s “nu-metal” exponents. We think you know what we mean!<br />
WHAT GOES WITH WHAT?<br />
Basically, with your <strong>ToneLab</strong><strong>SE</strong> you can mix any amp model to any cabinet<br />
model, and create many varied tones. But to give you a starting point, here is a<br />
listing of historically correct matches:<br />
AMP MODEL<br />
TWEED 1x12<br />
TWEED 4x10<br />
BLACK 2X12<br />
AC15<br />
AC15TB<br />
AC30<br />
AC30TB<br />
UK BLUES<br />
UK 68P<br />
UK 80’s<br />
UK 90’s<br />
UK MODERN<br />
US HiGAIN<br />
RECTO<br />
BOUTIQUE OD<br />
BOUTIQUE CLN<br />
HISTORICALLY CORRECT CABINET MODEL<br />
TWEED 1x12<br />
TWEED 4x10<br />
BLACK 2x12<br />
VOX AC15<br />
VOX AC15<br />
VOX AC30<br />
VOX AC30<br />
UK H30<br />
UK H30<br />
UK T75<br />
UK T75<br />
UK T75 or US V30<br />
US V30 or UK T75<br />
US V30<br />
UK H30 is a good choice<br />
UK H30 is a good choice<br />
Please Note! The VOX AD412 is so new that there is no historical connection with<br />
any of the modelled amps yet (as of September 2003).<br />
SOME RECOMMENDATIONS<br />
As some of the manufacturers of the original amps that we modelled also used<br />
similar amps with different speaker configurations to make other models, so<br />
can you with your <strong>ToneLab</strong><strong>SE</strong> to approximate these other amps. For instance:<br />
Amp Model Cabinet Model Equivalent Model<br />
BLACK 2x12 BLACK 2x10 Blackface Vibrolux type combo<br />
BLACK 2x12 TWEED 4x10 Blackface Super type combo<br />
TWEED 1x12 BLACK 2x10 Tweed Super type combo<br />
UK BLUES VOX AC30 Early BluesBreaker type combo<br />
VOX AC15 VOX AC30 VOX AC15 Supertwin<br />
Please note that these amps will be approximations only as original power ratings,<br />
output transformers and speaker manufacturer and types, might have<br />
been different in the original products.<br />
Due to the flexibility of your <strong>ToneLab</strong><strong>SE</strong>, mixing and matching all of the amp<br />
and cabinet models can be done with the turn of a switch, without any risk of<br />
blowing the speakers up. Something that cannot be done in real life (unfortunately!).<br />
This capability can lead to some very interesting combinations, some<br />
34
useful, perhaps some not, but only you can decide what is useful to you, as<br />
your tone requirements are unique. Please feel free to explore all combinations<br />
of amps and cabinets. That is the beauty of <strong>ToneLab</strong><strong>SE</strong>.<br />
NOTE: Product names appearing in this <strong>manual</strong> are trademarks of their respective owners,<br />
which are not associated or affiliated with VOX in any way. (except for VOX of course!!)<br />
Names and descriptions of these products are provided only for the purpose of identifying<br />
specific products that were studied by VOX in the course of developing this product.<br />
C. PEDAL EFFECTS<br />
The pedal effects are placed in front of the amp.<br />
(*): This indicates a parameter that you can control from an expression pedal.<br />
PEDAL DRIVE LEVEL TONE MANUAL TYPE ORDER<br />
COMP<br />
<strong>SE</strong>NS LEVEL ATTACK<br />
1.0~10.0 0.0~10.0 1.0~10.0<br />
ACOUSTIC<br />
BODY BASS TREBLE<br />
1.0~10.0 0.0~10.0 0.0~10.0<br />
VOX WAH<br />
CLO<strong>SE</strong> OPEN MANUAL TYPE ORDER<br />
1.0~10.0 1.0~10.0 1.0~10.0 847/848 PrE/PoS<br />
AUTO WAH<br />
<strong>SE</strong>NS POLARITY ATTACK TYPE ORDER<br />
0.0~10.0 uP/dn 1.0~10.0 847/848 PrE/PoS<br />
U-VIBE<br />
SPEED DEPTH MIX<br />
1.00~10.00[Hz] 0.0~10.0 0.0~10.0<br />
BLK/ORG SPEED DEPTH RESO MANUAL TYPE ORDER<br />
PHA<strong>SE</strong> 0.100~10.00[Hz] 0.0~10.0 0.0~10.0 1.0~10.0 bL/Or1/Or2 PrE/PoS<br />
OCTAVE<br />
DIRECT 1OCTAVE 2OCTAVE<br />
0.0~10.0 0.0~10.0 0.0~10.0<br />
RING DIRECT EFFECT FILTER MANUAL<br />
MODULATOR 0.0~10.0 0.0~10.0 1.0~10.0 0.0~10.0<br />
TREBLE<br />
BOOST<br />
TUBE OD<br />
SUPER OD<br />
BOUTIQUE<br />
FAT DIST<br />
ORANGE<br />
DIST<br />
FUZZ<br />
OCTAFUZZ<br />
DRIVE<br />
1.0~10.0<br />
LEVEL<br />
0.0~10.0<br />
TONE<br />
1.0~10.0<br />
1. COMP<br />
Gotta play a clean passage that needs to be nice, smooth and even? Need a hair<br />
more sustain on a lead line? Then, look no further; COMP is the pedal for you.<br />
Modelled on a compressor pedal that is hugely popular due to the percussive<br />
clean sound it can produce - making it perfect for ’80s and ’90s pop and funk<br />
rhythm work. It can also add a singing, mellow sustain to lead lines - clean or dirty.<br />
REVERB DELAY MODULATION PEDAL CABINET AMP TYPE Amp/Effect<br />
TYPE<br />
35
[1] “<strong>SE</strong>NS” 1.0...10.0 Adjusts the sensitivity of the compressor (i.e. when its<br />
“smoothing” effect kicks in). The amount of compression/<br />
sustain will increase the more you turn this control up.<br />
[2] “LEVEL” 0.0...10.0 Adjusts the output level.<br />
[3] “ATTACK” 1.0...10.0 Adjusts the strength of the attack.<br />
2. ACOUSTIC<br />
Wanna go “unplugged” without the hassle of switching guitars and amps? Enter the<br />
acoustic guitar simulator - a clever effect that magically converts an electric guitar’s<br />
sound into that of an acoustic. It works best with a single coil (read: low output)<br />
pickup in the neck position, especially when paired with the BLACK 2x12 amp model.<br />
[1] “BODY” 1.0...10.0 Adjusts the body resonance. You’ll need to adjust the<br />
BASS along with this parameter to keep a balance.<br />
[2] “BASS” 0.0...10.0 Adjusts the bass.<br />
[3] “TREBLE” 0.0...10.0 Adjusts the treble.<br />
3. VOX WAH<br />
This effect is modeled on two legendary VOX wah pedals; the V847 and the V848<br />
Clyde McCoy model. Thanks to their unique “throaty” tone, these are the only wah<br />
pedals many professionals will consider stepping on. When used wisely, this pedal<br />
can either make your guitar cry like a baby or howl like a man possessed!<br />
[2] “CLO<strong>SE</strong>” 1.0...10.0 Adjusts the tone when the wah pedal is closed.<br />
[3] “OPEN” 1.0...10.0 Adjusts the tone when the wah pedal is open.<br />
[4] “MANUAL” 1.0...10.0 * Adjusts the openness (position) of the wah.<br />
[5] “TYPE” 847, 848 Selects either V847 or V848 Clyde McCoy model as the<br />
wah type<br />
[6] “ORDER” PrE(PRE), Selects the connection order. PRE/POST connects the<br />
PoS(POST) wah before/after the Amp Model.<br />
U<strong>SE</strong>FUL TONE HINT: A great tonal trick that’s employed by many guitarists,<br />
including some who are household names, is to find a “sweet spot” within the range<br />
of their Wah pedal and then leave it there. This is often called stuck-Wah (imagine<br />
that!) and, when used tastefully, can be very effective as it produces a very distinctive<br />
sound that will cut through any mix. You can dial in a stuck-Wah “sweet spot”<br />
with your TONE control in a heartbeat. Try it, it’s cool...<br />
4. AUTO WAH<br />
The lazy man’s Wah pedal! Only kidding...this quirky but useful effect allows you to<br />
create an automatic “Wah” effect that varies with your picking dynamics (i.e. how<br />
hard or soft you hit the strings). As in VOX WAH, you can select either V847 or<br />
V848 as the wah type.<br />
[1] “<strong>SE</strong>N<strong>SE</strong>” 0.0...10.0 * Adjusts the sensitivity with which the wah<br />
responds to the volume of the guitar.<br />
[2] “POLARITY” uP(UP), Sets the direction in which the auto wah will operate.<br />
dn(DOWN)<br />
36
[3] “ATTACK” 1.0...10.0 Adjusts the Auto Wah’s response speed.<br />
[5] “TYPE” 847, 848 Selects either V847 or V848 Clyde McCoy model as<br />
the wah type<br />
[6] “ORDER” PrE(PRE),<br />
PoS(POST)<br />
5. U-VIBE<br />
Selects the connection order. PRE/POST connects<br />
the wah before/after the Amp Model.<br />
Modelled on the famous Univox Uni-Vibe - a phase/vibrato effect that was<br />
designed to simulate a rotating speaker and produces a wonderfully seductive and<br />
“watery” tone. Interestingly enough, the guy responsible for this great pedal is also<br />
responsible for the birth of the remarkable Valve Reactor Technology used in the<br />
power amp of your <strong>ToneLab</strong><strong>SE</strong>.<br />
[1] “SPEED” 1.00...10.00 [Hz] Adjusts the speed of the Uni-Vibe effect.<br />
[2] “DEPTH” 0.0...10.0 Adjusts the depth of the Uni-Vibe effect.<br />
[3] “MIX” 0.0...10.0 Adjusts the mixture of direct sound and vibrato.<br />
HINT: If you assign Speed to be controlled by an expression pedal, you’ll be able to<br />
control the vibrato speed just like on a Uni-Vibe.<br />
6. BLK/ORG PHA<strong>SE</strong> (B/O PHAS)<br />
This models three models of phaser; a wide-range four-stage phaser that was<br />
made in Denmark and packaged in a black box, a popular four-stage phaser that<br />
came in a banana-colored box, and a mild-sounding ten-stage phaser that was<br />
likewise banana-colored. Use the TYPE knob to select the model.<br />
[1] “SPEED” 0.100...10.00 [Hz] Adjusts the modulation speed.<br />
[2] “DEPTH” 0.0...10.0* Adjusts the modulation depth.<br />
[3] “RESO” 0.0...10.0 Adjusts the amount of resonance.<br />
[4] “MANUAL” 1.0...10.0* Adjusts the center frequency of the sweep. MAN-<br />
UAL has no effect if DEPTH is set to 10.<br />
[5] “TYPE” bL, Or1, Or2 Selects the type of phaser.<br />
bL: Danish four-stage phaser with a wide range.<br />
Or1: Popular four-stage phaser in a banana-colored<br />
box.<br />
Or2: Sophisticated-sounding ten-stage phaser in<br />
a banana-colored box.<br />
[6] “ORDER” PrE (PRE),<br />
PoS (POST)<br />
7. OCTAVE<br />
Selects the connection order. PRE/POST places<br />
the effect before or after the AMP MODEL.<br />
This effect generates a note one or two octaves lower than the one you’re playing,<br />
adding thickness and “weight” to single note lines.<br />
[1] “DIRECT” 0.0...10.0 Adjusts the level of the original note.<br />
[2] “1OCTAVE” 0.0...10.0 Adjusts the mix level of the note one octave below.<br />
[3] “2OCTAVE” 0.0...10.0 Adjusts the mix level of the note two octaves below.<br />
REVERB DELAY MODULATION PEDAL CABINET AMP TYPE Amp/Effect<br />
TYPE<br />
37
WARNING! Like all pedals of this type, OCTAVE only works with single<br />
notes...chords confuse the heck out of it! NOT a fault - that’s just the way these<br />
pedals are...deal with it, dude!<br />
8. RING MODULATOR (RING MOD)<br />
A ring modulator is an effect that uses an oscillator to generate a sine wave which<br />
is then multiplied with the signal from your guitar to produce harmonics above and<br />
below the frequencies originally produced by your guitar. This creates complex<br />
and unpredictable pitches. A filter is built into the output of this effect to let you<br />
extract just the lower frequencies if desired, and this can generate low sounds that<br />
could not otherwise be produced by a guitar.<br />
If you assign the MANUAL parameter to the expression pedal, you’ll be able to<br />
control the sound in unique ways while you perform.<br />
[1] “DIRECT” 0.0...10.0 * Adjusts the amount of original sound that is mixed<br />
in.<br />
[2] “EFFECT” 0.0...10.0 Adjusts the effect volume.<br />
[3] “FILTER” 1.0...10.0 * Adjusts the filter cutoff frequency.<br />
[4] “MANUAL” 0.0...10.0 * Adjusts the oscillator frequency.<br />
9. TREBLE BOOST (TREB BST)<br />
This pedal effect is modelled after a built-in treble booster that was designed with<br />
the VOX VBM-1 specifically in mind. It is a great way of adding “teeth” to an overdriven<br />
sound.<br />
10. TUBE OD<br />
This model is based on an overdrive pedal that’s housed in a garish, “seasick green”<br />
box and is considered an all-time classic due to the wonderfully warm tones it produces.<br />
11. SUPER OD<br />
This models a yellow overdrive pedal manufactured in Japan, and is popular as a<br />
booster.<br />
12. BOUTIQUE<br />
This models an overdrive unit named after a half-human half-horse creature<br />
appearing in Greek fables. When the gain is lowered, you can use this as a<br />
booster that does not impair the original tonal character of your guitar. Raising the<br />
gain lets you use this as an overdrive that delivers a rich mid-range. The 12 o’clock<br />
position is the standard setting for tone, but feel free to adjust this aggressively.<br />
13. FAT OD<br />
Based on a pedal named after one of the most disliked rodents to ever walk the<br />
planet! The result is a smooth distortion rich in harmonics...nasty but nice.<br />
38
14. ORANGE DIST<br />
This models a classic distortion unit manufactured in Japan and packaged in an<br />
orange box.<br />
15. FUZZ<br />
Retro, rude “n” raw...get the picture!? The name says it all.<br />
16. OCTAFUZZ<br />
This models a legendary fuzz unit that adds a pitch one octave above the original.<br />
To get the best results, be sure to use your front pickup.<br />
[1] “DRIVE” 1.0...10.0 * Adjusts the amount of distortion (boost).<br />
[2] “LEVEL” 0.0...10.0 * Adjusts the output level.<br />
[3] “TONE” 1.0...10.0 * Adjusts the tone.<br />
D. MOD (MODULATION) EFFECTS<br />
This section enables you to add a modulation effect after the cabinet. You can<br />
choose one of eleven types of modulation effect.<br />
(*): This indicates a parameter that you can control from an expression pedal.<br />
MODULATION SPEED DEPTH RESONANCE MANUAL OPTION MIX<br />
CLASSIC CHORUS<br />
SPEED DEPTH<br />
MANUAL MODE<br />
0.100~10.00[Hz] 0.0~10.0 1.0~10.0 1,2,3<br />
STEREO CHORUS<br />
SPEED DEPTH<br />
MANUAL<br />
MIX<br />
0.100~10.00[Hz] 0.0~10.0 1.0~10.0 0.0~10.0<br />
CLASSIC FLANGER<br />
SPEED DEPTH RESONANCE MANUAL OFF<strong>SE</strong>T MIX<br />
0.100~10.00[Hz] 0.0~10.0 0.0~10.0 1.0~10.0 0.0~10.0 0.0~10.0<br />
BI CHORUS<br />
SPEED1 DEPTH RESONANCE SPEED2 MODE MIX<br />
0.100~10.00[Hz] 0.0~10.0 0.0~10.0 0.100~10.00[Hz] S/P1/P2/P3 0.0~10.0<br />
DUO PHA<strong>SE</strong><br />
SPEED1 DEPTH RESONANCE SPEED2 MODE<br />
0.100~10.00[Hz] 0.0~10.0 0.0~10.0 0.100~10.00[Hz] S1/S2/P1/P2/P3<br />
TEXTREM<br />
SPEED DEPTH SPREAD<br />
1.00~10.00[Hz] 0.0~10.0 0.0~10.0<br />
ROTARY<br />
SPEED1 DEPTH SPEED2 ACCEL<br />
0.80~10.0[Hz] 0.0~10.0 0.80~10.0[Hz] 1.0~10.0<br />
PITCH SHIFTER<br />
PITCH FINE TRACKING DIRECT EFFECT<br />
-24~24 -50~50 10~150[ms] 0.0~10.0 0.0~10.0<br />
MOD DELAY<br />
SPEED DEPTH FEEDBACK TIME MODE MIX<br />
0.100~10.00[Hz] 0.0~10.0 0.0~10.0 1.0~10.0 1,2,3 0.0~10.0<br />
FILTRON<br />
ATTACK DEPTH RESONANCE MANUAL POLARITY <strong>SE</strong>NS<br />
1.0~10.0 0.0~10.0 0.0~10.0 1.0~10.0 uP/dn 0.0~10.0<br />
TALK MOD<br />
ATTACK DEPTH TYPE MANUAL POLARITY <strong>SE</strong>NS<br />
1.0~10.0 0.0~10.0 A-E~O-U 1.0~10.0 uP/dn 0.0~10.0<br />
REVERB DELAY MODULATION PEDAL CABINET AMP TYPE Amp/Effect<br />
TYPE<br />
39
1. CLASSIC CHORUS (CL CHORUS) MONO IN/MONO OUT 1<br />
(MODE=1,3) MONO IN/MONO OUT 3 (MODE=2)<br />
This models a chorus unit that has two modes (chorus and vibrato), and is bestknown<br />
for being built into a guitar amp. There’s no parameter to switch between<br />
chorus and vibrato, but you can use the SPEED and DEPTH knobs to create<br />
either of these sounds, giving you an even broader range of possibilities than the<br />
original unit! The output vibrato mode allows you to create vibrato (pitch modulation)<br />
by outputting just the effect sound.<br />
[1] “SPEED” 0.100–10.00 [Hz] * Adjusts the modulation speed.<br />
[2] “DEPTH” 0.0–10.0 * Adjusts the modulation depth.<br />
[4] “MANUAL” 1.0–10.0 * Adjusts the center frequency of the sweep. If<br />
DEPTH is set to 10, MANUAL will not function.<br />
[5] “MODE” 1, 2, 3 Selects the output mode.<br />
1: Mono output.<br />
2: Stereo mode in which the effect is panned<br />
right, and the dry sound panned left.<br />
3: Vibrato mode, in which only the effect sound is<br />
output. Setting MANUAL to 10 will minimize the<br />
delay of the output sound.<br />
2. STEREO CHORUS (ST CHORUS) MONO IN/STEREO OUT 1<br />
A stereo chorus in a yellow case. A sense of stereo is created by inverting the<br />
phase of the effect sound for the right output, producing a feeling of spaciousness<br />
that is somewhat different than the stereo effect of CLASSIC CHORUS.<br />
[1] SPEED 0.100–10.00 [Hz] * Adjusts the modulation speed.<br />
[2] DEPTH 0.0–10.0 * Adjusts the modulation depth.<br />
[3] MANUAL 1.0–10.0 * Adjusts the center frequency of the sweep. If<br />
DEPTH is set to 10, MANUAL will not function.<br />
[6] MIX 0.0–10.0 * Adjusts the mix amount of the effect sound.<br />
3. CLASSIC FLANGER (CL FLANG) MONO IN/MONO OUT 1<br />
A model of a truly classic analogue flanger that “unchained” a highly influential<br />
modern guitarist who many hail as the “godfather of two handed tapping.”<br />
[1] “SPEED” 0.100–10.00 [Hz] * Adjusts the modulation speed.<br />
[2] “DEPTH” 0.0–10.0 * Adjusts the modulation depth.<br />
[3] “RESO” 0.0–10.0 * Adjusts the amount of resonance.<br />
[4] “MANUAL” 1.0–10.0 * Adjusts the center frequency of the sweep. If<br />
DEPTH is set to 10, MANUAL will not function.<br />
[5] “OFF<strong>SE</strong>T” 0.0–10.0 Adjusts the starting position of the LFO. If you<br />
assign “FLN TRIG” to a control pedal, the LFO will<br />
be reset to the starting position specified by OFF-<br />
<strong>SE</strong>T whenever you operate the control pedal. When<br />
you defeat BYPASS, the LFO will start from the position<br />
you specify here. (p.56 Control pedal settings)<br />
40
[6] “MIX” 0.0–10.0 * Adjusts the mix amount of the effect sound.<br />
CONTROL pedal<br />
If you set the FLN TRIG: CONTROL pedal setting<br />
to “FLN TRIG,” the LFO will be reset to the position<br />
specified by OFF<strong>SE</strong>T whenever you operate<br />
the pedal. (p.56 Control pedal settings)<br />
4. BI CHORUS MONO IN/MONO OUT 1 (MODE=S) STEREO IN/<br />
STEREO OUT 1 (MODE=P1, P2, P3)<br />
This is a chorus model unique to <strong>ToneLab</strong><strong>SE</strong>. It provides two chorus units, CHO-<br />
RUS 1 and CHORUS 2, and lets you connect the two units not only in series or in<br />
parallel, but also to synchronize or de-synchronize the two LFOs. It produces a<br />
variety of tones that cover a range from wonderfully spacious sounds to bizarre<br />
flanger-like sounds with complex modulation.<br />
[1] “SPEED 1” 0.100–10.00 [Hz] * Adjusts the modulation speed of CHORUS 1.<br />
[2] “DEPTH” 0.0–10.00 * Adjusts the modulation depth of CHORUS 1/2.<br />
[3] “RESO” 0.0–10.0 * Adjusts the amount of resonance for CHORUS<br />
1/2.<br />
[4] “SPEED 2” 0.100–10.00 [Hz] * Adjusts the modulation speed of CHORUS 2.<br />
NOTE: This will not function if MODE is set to P2 or P3.<br />
[5] “MODE” S/P1/P2/P3 Specifies the connection and LFO for CHORUS<br />
1/2.<br />
S: CHORUS 1/2 are connected in series.<br />
P1: CHORUS 1/2 are connected in parallel.<br />
P2: CHORUS 1/2 are connected in parallel, and<br />
their LFOs are synchronized.<br />
P3: CHORUS 1/2 are connected in parallel, and<br />
their LFOs are synchronized in opposite<br />
phase (Stereo mode).<br />
NOTE: If P2 or P3 is selected, the speed is adjusted by the SPEED 1<br />
knob.<br />
[6] “MIX” 0.0–10.0 * Adjusts the mix amount of the effect sound.<br />
5. DUO PHA<strong>SE</strong> (DUO PHAS) MONO IN/MONO OUT 2 (MODE=S1,<br />
S2) STEREO IN/STEREO OUT 2 (MODE=P1, P2, P3)<br />
This is an amazing phaser that provides two six-stage phasers; PHA<strong>SE</strong>R 1 and<br />
PHA<strong>SE</strong>R 2. They can be connected in series (to make a pseudo-twelve-stage<br />
phaser!) or in parallel, and you can also synchronize or de-synchronize the two<br />
LFOs.<br />
[1] “SPEED 1” 0.100–10.00 [Hz] * Adjusts the modulation speed of PHA<strong>SE</strong>R 1.<br />
[2] “DEPTH” 0.0–10.0 * Adjusts the modulation depth of PHA<strong>SE</strong>R 1/2.<br />
[3] “RESO” 0.0–10.0 * Adjusts the amount of resonance for PHA<strong>SE</strong>R<br />
1/2.<br />
[4] “SPEED 2” 0.100–10.00 [Hz] * Adjusts the modulation speed of PHA<strong>SE</strong>R 2.<br />
NOTE: This will not function if MODE is set to S2, P2, or P3.<br />
REVERB DELAY MODULATION PEDAL CABINET AMP TYPE Amp/Effect<br />
TYPE<br />
41
[5] “MODE” S1, S2, P1, P2,<br />
P3<br />
6. TEXTREM STEREO IN/STEREO OUT 2<br />
This models the popular tremolo circuit that’s built into the BLACK 2x12 model. The<br />
SPREAD setting lets you produce a panning effect that spreads to left and right.<br />
7. ROTARY MONO IN/STEREO OUT 2<br />
Specifies the connection and LFO for PHA<strong>SE</strong>R<br />
1/2.<br />
S1:PHA<strong>SE</strong>R 1/2 are connected in series.<br />
S2:PHA<strong>SE</strong>R 1/2 are connected in series and<br />
their LFOs are synchronized to create a<br />
pseudo-twelve-stage phaser.<br />
P1:PHA<strong>SE</strong>R 1/2 are connected in parallel.<br />
P2:PHA<strong>SE</strong>R 1/2 are connected in parallel, and<br />
their LFOs are synchronized (Stereo mode).<br />
P3:PHA<strong>SE</strong>R 1/2 are connected in parallel, and<br />
their LFOs are synchronized in opposite<br />
phase (Stereo mode).<br />
NOTE: If P2 or P3 is selected, the speed is adjusted by the SPEED 1<br />
knob.<br />
[1] “SPEED” 1.00–10.00 [Hz] * Adjusts the tremolo speed.<br />
[2] “DEPTH” 0.0–10.0 * Adjusts the tremolo depth.<br />
[5] “SPREAD” 0.0–10.0 * Adjusts the left/right spaciousness.<br />
This models a stereo rotary speaker. When you adjust the speed, it will take a certain<br />
amount of time for the specified speed to be reached – just like on an actual<br />
rotary speaker. This is because it takes several seconds for the motor that creates<br />
the rotation to accelerate or decelerate.<br />
[1] “SPEED 1” 0.80–10.0 [Hz] * Adjusts the rotational speed of the speaker. If<br />
you assign “ROT SPD” to the CONTROL<br />
pedal, this will be the SLOW speed. This knob<br />
is effective even if you’re not using the CON-<br />
TROL pedal. (p.56 Control pedal settings)<br />
[2] “DEPTH” 0.0–10.00 * Adjusts the modulation depth.<br />
[4] “SPEED 2” 0.80–10.0 [Hz] * Adjusts the rotational speed of the speaker. If<br />
you assign “ROT SPD” to the CONTROL<br />
pedal, this will be the FAST speed. This knob<br />
will not function if you’re not using the CON-<br />
TROL pedal. (p.56 Control pedal settings)<br />
[5] “ACCEL” 1.0–10.0 * Adjusts the time it takes for the rotational<br />
speed to change. With higher settings, the<br />
change will take more time.<br />
42
CONTROL pedal: ROT SPD:<br />
If you select “ROT SPD” as the CONTROL pedal<br />
setting, the rotation speed will alternate between<br />
SLOW/FAST (SPEED 1/SPEED 2) each time<br />
you press the CONTROL pedal switch. This lets<br />
you control the effect just as on an actual rotary<br />
speaker. (p.56 Control pedal settings)<br />
8. PITCH SHIFTER (PITCH) MONO IN/MONO OUT 1<br />
This is a pitch shifter with a range of two octaves up or down, rivaling sophisticated<br />
rack-mounted signal processors.<br />
PITCH SHIFTER TIPS: If you assign the PITCH knob to an expression pedal,<br />
you can use the pedal to control the pitch change. (p.53 Using the expression<br />
pedal to control the sound)<br />
[1] “PITCH” –24–+24 * Adjusts the pitch in 100-cent units.<br />
[2] “FINE” –50–+50 * Adjusts the pitch in one-cent units.<br />
[4] “TRACKING” 10–150 [ms] Adjusts the tracking of the pitch shifter (i.e., how<br />
closely it will follow). Shorter settings are effective if<br />
the PITCH setting is close to 0, and longer settings<br />
are effective if the PITCH setting is close to +/–24.<br />
While listening to the pitch-shifted sound, adjust<br />
this so that you do not have difficulty playing.<br />
[5] “DIRECT” 0.0–10.0 * Adjusts the level of the direct sound.<br />
[6] “EFFECT” 0.0–10.0 * Adjusts the level of the effect sound.<br />
9. MOD DELAY (MOD DLY) MONO IN/MONO OUT 1 (MODE=1)<br />
MONO IN/MONO OUT 3 (MODE=2) MONO IN/STEREO OUT 1 (MODE=3)<br />
This models an analog delay that lets you add a vibrato effect to the delayed<br />
sound. The actual unit provided 400 ms of delay time, but this simulation extends<br />
this up to 1400 ms while maintaining the same warm sound, and can also be used<br />
as a sub-delay for the DELAY section. The CHORUS/VIBRATO switch of the original<br />
unit has been replaced by a knob with a range of 0.1–10 Hz, giving you even<br />
more versatility than the original.<br />
[1] “SPEED” 0.100–10.00 [Hz] * Adjusts the modulation speed.<br />
[2] “DEPTH” 0.0–10.0 * Adjusts the modulation depth.<br />
[3] “FEEDBACK” 0.0–10.0 * Adjusts the amount of feedback.<br />
[4] “TIME” 1.0–10.0 * Specifies the delay time.<br />
[5] “MODE” 1,2,3 Selects the output method.<br />
1: Mono output.<br />
2: Stereo mode with effect sound from the<br />
right and dry sound from the left.<br />
3: Reverse-phase stereo mode with dry +<br />
effect in the left side and dry - effect in the<br />
right side.<br />
[6] “MIX” 0.0–10.0 * Adjusts the mix amount of the effect sound.<br />
REVERB DELAY MODULATION PEDAL CABINET AMP TYPE Amp/Effect<br />
TYPE<br />
43
10. FILTRON STEREO IN/STEREO OUT 2<br />
This is an envelope controlled filter – a filter that opens and closes according to<br />
the guitar input. By assigning the MANUAL knob to the expression pedal you can<br />
simulate Korg’s TRAVELER pedal. (In this case, set the DEPTH knob to 0.)<br />
[1] “ATTACK” 1.0–10.0 * Adjusts the speed of response.<br />
[2] “DEPTH” 0.0–10.0 * Adjusts the depth of the effect.<br />
[3] “RESO” 0.0–10.0 * Adjusts the amount of resonance.<br />
[4] “MANUAL” 1.0–10.0 * Sets the cutoff frequency. If DEPTH is set to 10,<br />
MANUAL will not function.<br />
[5] “POLARITY”uP (UP), Specifies the direction of movement.<br />
dn (DOWN)<br />
[6] “<strong>SE</strong>NS” 0.0–10.0 * Adjusts the sensitivity of response to the guitar volume.<br />
11. TALK MOD MONO IN/MONO OUT 2<br />
This is an envelope controlled talking modulator. The vocal character will change<br />
according to the input from your guitar.<br />
HINT: If you assign the MANUAL knob to the expression pedal, you’ll be able to<br />
control the vowel sound from the pedal. (In this case, set the DEPTH knob to 0.)<br />
[1] “ATTACK” 1.0–10.0 * Adjusts the speed of response.<br />
[2] “DEPTH” 0.0–10.0 * Adjusts the depth of operation.<br />
[3] “TYPE” A-E–O-U Selects one of the following transitions between vowels.<br />
‘A’-‘E’, ‘A’-‘I’, ‘A’-‘O’, ‘A’-‘U’, ‘E’-‘I’, ‘E’-‘O’, ‘E’-‘U’, ‘I’-‘O’,<br />
‘I’-‘U’, ‘O’-‘U’<br />
[4] “MANUAL” 1.0–10.0 * Adjusts the vocal character. If DEPTH is set to 10,<br />
MANUAL will not function.<br />
[5] “POLARITY”uP (UP), Specifies the direction of change.<br />
dn (DOWN)<br />
[6] “<strong>SE</strong>NS” 0.0–10.0 * Adjusts the sensitivity of response to the guitar volume.<br />
44
E. DELAY EFFECTS<br />
Here you can make settings for a delay effect inserted after the cabinet. You can<br />
choose one of eleven types.<br />
(*): This indicates a parameter that you can control from the expression pedal.<br />
DELAY TIME FEEDBACK TONE DUCKING OPTION MIX<br />
ECHO TIME FEEDBACK TONE LODAMP MIX<br />
PLUS 26~2000[ms] 0.0~10.0 1.0~10.0 0.0~10.0 0.0~10.0<br />
MULTI TIME FEEDBACK TONE MODE MIX<br />
HEAD 1~2000[ms] 0.0~10.0 1.0~10.0 1,2,3,4,5 0.0~10.0<br />
ANALOG TIME FEEDBACK TONE MIX<br />
DELAY 1~2000[ms] 0.0~10.0 1.0~10.0 0.0~10.0<br />
MOD TIME FEEDBACK TONE SPEED MIX<br />
DELAY 3~2000[ms] 0.0~10.0 1.0~10.0 0.100~10.00[Hz] 0.0~10.0<br />
SWEEP TIME FEEDBACK TONE <strong>SE</strong>NS MIX<br />
DELAY 26~2000[ms] 0.0~10.0 1.0~10.0 0.0~10.0 0.0~10.0<br />
STEREO TIME FEEDBACK TONE DUCKING MIX<br />
DELAY 1~4000[ms] 0.0~10.0 1.0~10.0 0.0~10.0 0.0~10.0<br />
CROSS TIME FEEDBACK TONE DUCKING MIX<br />
DELAY 1~4000[ms] 0.0~10.0 1.0~10.0 0.0~10.0 0.0~10.0<br />
TAP 2 TIME FEEDBACK TONE DUCKING MIX<br />
DELAY 1~4000[ms] 0.0~10.0 1.0~10.0 0.0~10.0 0.0~10.0<br />
RHYTHM TIME FEEDBACK TONE DUCKING RHYTHM MIX<br />
DELAY 1~4000[ms] 0.0~10.0 1.0~10.0 0.0~10.0 1,2,..11 0.0~10.0<br />
HOLD TIME FEEDBACK TONE MIX<br />
DELAY 1~8000[ms] 0.0~10.0 1.0~10.0 0.0~10.0<br />
REVER<strong>SE</strong> TIME FEEDBACK TONE MIX<br />
DELAY 26~4000[ms] 0.0~10.0 1.0~10.0 0.0~10.0<br />
1. ECHO PLUS MONO IN/MONO OUT 1<br />
This models one of the most respected analogue tape echo machines ever made.<br />
In the original, the “echo” is produced by a playback head and the exact “delay<br />
time” is set by varying the motor speed. Many professionals prefer these “lo-fi”<br />
units because of the warm, dark echoes they produce.<br />
[1] “TIME” 26–2000 [ms] * Sets the delay time.<br />
[2] “FEEDBACK” 0.0–10.0 * Adjusts the amount of feedback.<br />
[3] “TONE” 1.0–10.0 * Adjusts the tone of the delay sound.<br />
[5] “LODAMP” 0.0–10.0 * Adjusts the amount of low-frequency attenuation.<br />
[6] “MIX” 0.0–10.0 * Adjusts the mix amount of the delay sound.<br />
REVERB DELAY MODULATION PEDAL CABINET AMP TYPE Amp/Effect<br />
TYPE<br />
45
2. MULTI HEAD (MULTI HD) MONO IN/MONO OUT 1<br />
This is a model of a tape echo unit boasting three playback heads. The echo from<br />
each head has its own feedback loop, letting you create warm and complex “multitap”<br />
echo effects.<br />
[1] “TIME” 1–2000 [ms] Sets the delay time.<br />
[2] “FEEDBACK” 0.0–10.0 * Adjusts the amount of feedback.<br />
[3] “TONE” 1.0–10.0 * Adjusts the tone of the delay sound.<br />
[5] “MODE” 1, 2, 3, 4, 5 Specifies the combination of heads that will be<br />
used.<br />
1: Conventional echo.<br />
2: The delayed sound produces a rhythm of<br />
“ta-ta-ta (rest).”<br />
3: The delayed sound produces a rhythm of<br />
“ta (rest) ta-ta.”<br />
4: The delayed sound produces a rhythm of<br />
“ta-ta (rest) ta.”<br />
5: The delayed sound produces a rhythm of<br />
“ta-ta-ta-ta.”<br />
[6] MIX 0.0–10.0 * Adjusts the mix amount of the delay sound.<br />
3. ANALOG DELAY (ANLG DL) MONO IN/MONO OUT 1<br />
This models an analog delay that used a bucket-brigade device (BBD) instead of a<br />
tape mechanism and was known for its compactness and reliability. It is characterized<br />
by a warmly distorted sound.<br />
[1] “TIME” 1–2000 [ms] * Sets the delay time.<br />
[2] “FEEDBACK” 0.0–10.0 * Adjusts the amount of feedback.<br />
[3] “TONE” 1.0–10.0 * Adjusts the tone of the delay sound.<br />
[6] “MIX” 0.0–10.0 * Adjusts the mix amount of the delay sound.<br />
4. MOD DELAY (MOD DLY) MONO IN/MONO OUT 1<br />
This models Korg’s first digital delay, the SDD-3000. You can also use this to produce<br />
chorus or flanger-like effects by setting a short TIME and using the LFO to modulate it.<br />
[1] “TIME” 3–2000 [ms] * Sets the delay time.<br />
[2] “FEEDBACK” 0.0–10.0 * Adjusts the amount of feedback.<br />
[3] “TONE” 1.0–10.0 * Adjusts the tone of the delay sound.<br />
[5] “SPEED” 0.100–10.00 [Hz] * Adjusts the modulation speed.<br />
[6] “MIX” 0.0–10.0 * Adjusts the mix amount of the delay sound.<br />
5. SWEEP DELAY (SWEEP DL) MONO IN/MONO OUT 1<br />
This also models the SDD-3000. Here you can use the envelope of your guitar signal<br />
to control the DELAY TIME, and by setting a short TIME and raising the FEED-<br />
BACK you can produce a distinctive flanger effect. Even with conventional settings<br />
of TIME, you can produce unique effects that would not be possible with an LFO.<br />
46
[1] “TIME” 26–2000 [ms] * Sets the delay time.<br />
[2] “FEEDBACK” 0.0–10.0 * Adjusts the amount of feedback.<br />
[3] “TONE” 1.0–10.0 * Adjusts the tone of the delay sound.<br />
[5] “<strong>SE</strong>NS” 0.0–10.0 * Adjusts the sensitivity at which the effect<br />
responds to the volume of your guitar.<br />
[6] “MIX” 0.0–10.0 * Adjusts the mix amount of the delay sound.<br />
6. STEREO DELAY (ST DL) STEREO IN/STEREO OUT 1<br />
This is Korg’s 24-bit digital delay, the DL8000R. With the exception of the sampling<br />
frequency and wave control of the DELAY TIME, the circuit is essentially identical.<br />
Since this is a full-stereo design, it’s particularly effective to place it after the output<br />
of a stereo MOD or REVERB effect.<br />
7. CROSS DELAY (CROSS DL) STEREO IN/STEREO OUT 3<br />
This is the DL8000R with settings to make the feedback cross over from L->R and<br />
R->L.<br />
8. 2TAP DELAY (2TAP DLY) MONO IN/STEREO OUT 1<br />
This is the DL8000R with two delay taps whose DELAY TIME is skewed by 20 ms<br />
and separately assigned to L and R, turning a mono input into stereo.<br />
[1] “TIME” 1–4000 [ms] Sets the delay time.<br />
[2] “FEEDBACK” 0.0–10.0 * Adjusts the amount of feedback.<br />
[3] “TONE” 1.0–10.0 * Adjusts the tone of the delay sound.<br />
[4] “DUCKING” 0.0–10.0 * Adjusts the sensitivity at which the effect will<br />
“duck” (decrease) in response to the volume of<br />
your guitar.<br />
Ducking: This automatically lowers the volume of<br />
the delay sound when you play your guitar loudly,<br />
allowing your playing to come through.<br />
[6] “MIX” 0.0–10.0 * Adjusts the mix amount of the delay sound.<br />
9. RHYTHM DELAY (RHYTM DL) MONO IN/MONO OUT 1<br />
This provides a DL8000R function in which the TIME of two delay taps is automatically<br />
set according to the RHYTHM you specify.<br />
[1] “TIME” 1–4000 [ms] Sets the delay time.<br />
[2] “FEEDBACK” 0.0–10.0 * Adjusts the amount of feedback.<br />
[3] “TONE” 1.0–10.0 * Adjusts the tone of the delay sound.<br />
[4] “DUCKING” 0.0–10.0 * Adjusts the sensitivity at which the effect will<br />
“duck” (decrease) in response to the volume of<br />
your guitar.<br />
[5] “RHYTHM” 1, 2, ...11 Specifies the two-tap rhythm delay when the<br />
delay time is set to quarter-note timing. For some<br />
settings, only one tap is used.<br />
[6] “MIX” 0.0–10.0 * Adjusts the mix amount of the delay sound.<br />
REVERB DELAY MODULATION PEDAL CABINET AMP TYPE Amp/Effect<br />
TYPE<br />
47
10. HOLD DELAY (HOLD DLY) MONO IN/MONO OUT 1<br />
If you assign “HOLD DLY” to the CONTROL pedal, you’ll be able to hold the delay<br />
sound.<br />
[1] “TIME” 1–8000 [ms] Sets the delay time.<br />
[2] “FEEDBACK” 0.0–10.0 * Adjusts the amount of feedback.<br />
[3] “TONE” 1.0–10.0 * Adjusts the tone of the delay sound.<br />
[6] “MIX” 0.0–10.0 * Adjusts the mix amount of the delay sound.<br />
CONTROL pedal: HOLD DLY: If you select “HOLD DLY” for the CONTROL<br />
pedal, the delay sound will be held from the<br />
moment you turn the pedal on.<br />
11. REVER<strong>SE</strong> DELAY (REVRS DL) MONO IN/MONO OUT 1<br />
This is a digital delay that plays the delay sound backward. You can get some<br />
really cool results by playing long notes in a legato fashion.<br />
[1] “TIME” 1–4000 [ms] Sets the delay time.<br />
[2] “FEEDBACK” 0.0–10.0 * Adjusts the amount of feedback.<br />
[3] “TONE” 1.0–10.0 * Adjusts the tone of the delay sound.<br />
[6] “MIX” 0.0–10.0 * Adjusts the mix balance between the delay<br />
sound and direct sound. With a setting of 10 you<br />
will hear only the delay sound.<br />
F. REVERB EFFECTS<br />
Here you can make settings for the reverb effect that is placed after the cabinet.<br />
You can choose one of eleven types of reverb.<br />
(*): This indicates a parameter that you can control from an expression pedal.<br />
REVERB<br />
TIME<br />
LO<br />
DAMP<br />
HI<br />
DAMP<br />
PRE<br />
DELAY<br />
SHAPE<br />
MIX<br />
SPRING 1<br />
SPRING 2<br />
PLATE 1<br />
PLATE 2<br />
CHAMBER 1<br />
CHAMBER 2<br />
ROOM 1<br />
ROOM 2<br />
HALL 1<br />
HALL 2<br />
GATE<br />
TIME LODAMP HIDAMP PREDELAY MIX<br />
1.0~10.0 0.0~10.0 0.0~10.0 0~100[ms] 0.0~10.0<br />
TIME LODAMP HIDAMP PREDELAY SHAPE MIX<br />
5~500[ms] 0.0~10.0 0.0~10.0 0~100[ms] 1,2 0.0~10.0<br />
1. SPRING 1 MONO IN/STEREO OUT 1<br />
A model of the spring reverb system used in guitar amps – ideal for surf music!<br />
48
2. SPRING 2 MONO IN/STEREO OUT 1<br />
This models a spring reverb that produces a higher-density reverberation.<br />
3. PLATE 1 MONO IN/STEREO OUT 1<br />
This models a type of reverb unit that works by vibrating a metal plate instead of a<br />
spring. It is adjusted to a fairly short reverb time. This reverberation is characterized<br />
by a rapid attack, and is suitable for percussive playing.<br />
4. PLATE 2 MONO IN/STEREO OUT 1<br />
This models a plate reverb that produces a higher-density reverberation.<br />
5. CHAMBER 1 MONO IN/STEREO OUT 1<br />
In past years, recording studios often used a room (echo chamber) that was specially<br />
designed to produce reverberation, and contained a speaker and mic used to<br />
record reverberation. This model simulates a mild-sounding echo chamber.<br />
6. CHAMBER 2 MONO IN/STEREO OUT 1<br />
This models an echo chamber designed to produce a bright sound.<br />
7. ROOM 1 MONO IN/STEREO OUT 1<br />
This models the reverberation of a typical room, with numerous early reflections.<br />
8. ROOM 2 MONO IN/STEREO OUT 1<br />
This models the reverberation of a large room.<br />
9. HALL 1 MONO IN/STEREO OUT 1<br />
This models the reverberation of a concert hall with numerous echoes.<br />
10. HALL 2 MONO IN/STEREO OUT 1<br />
This models a concert hall with smooth and dense reverberation.<br />
[1] “TIME” 1.0–10.0 * Sets the reverb time. The relation between this<br />
setting and the actual length of reverberation will<br />
differ depending on the reverb type.<br />
[2] “LODAMP” 0.0–10.0 * Adjusts the attenuation of the low-frequency range.<br />
[3] “HIDAMP” 0.0–10.0 * Adjusts the attenuation of the high-frequency range.<br />
[4] “PREDELAY” 0–100 [ms] Sets the initial delay before the reverberation<br />
begins. By adjusting this setting you can clarify the<br />
definition of the original sound.<br />
[6] “MIX” 0.0–10.0 * Adjusts the mix amount of the reverb sound.<br />
REVERB DELAY MODULATION PEDAL CABINET AMP TYPE Amp/Effect<br />
TYPE<br />
49
11. GATE MONO IN/STEREO OUT 1<br />
This is a versatile gated reverb, ideal for percussive playing. By setting SHAPE to<br />
2 and MIX to 10 (i.e., effect only) you can create a reverse-playback type of sound.<br />
[1] “TIME” 5–500 [ms] Sets the gate time.<br />
[2] “LODAMP” 0.0–10.0 * Adjusts the attenuation of the low-frequency range.<br />
[3] “HIDAMP” 0.0–10.0 * Adjusts the attenuation of the high-frequency range.<br />
[4] “PREDELAY” 0–100 [ms] Sets the initial delay before the reverberation begins.<br />
[5] “SHAPE” 1,2 Sets the type of gate.<br />
1: Conventional gate.<br />
2: Reverse-playback type gate.<br />
[6] “MIX” 0.0–10.0 * Adjusts the mix balance between the reverb<br />
sound and direct sound. With a setting of 10 you<br />
will hear only the reverb sound.<br />
Mono In / Mono Out 1<br />
Mono In / Mono Out 2 Mono In / Mono Out 3<br />
Mono In / Stereo Out 1<br />
Mono In / Stereo Out 2<br />
Stereo In / Stereo Out 1 Stereo In / Stereo Out 2 Stereo In / Stereo Out 3<br />
50
Tuner (Bypass, Mute)<br />
For your convenience, <strong>ToneLab</strong><strong>SE</strong> contains an automatic chromatic tuner. The frequency<br />
of the middle “A” reference pitch can be adjusted (calibrated) over a range<br />
of 438 Hz–445 Hz.<br />
TUNING PROCEDURE<br />
1. Press and hold the FX ON/OFF (TUNER) button for<br />
about 0.5 seconds. All effects will be bypassed, and<br />
the Auto Chromatic Tuner will operate. (The name display<br />
indicates BYPASS.)<br />
If you are playing a live performance and want to tune<br />
without being heard by the audience, select Silent<br />
Tuning mode as follows before you tune your guitar.<br />
When you press and hold the FX ON/OFF (TUNER)<br />
button for about 1.5 seconds, you will be in Silent Tuning<br />
mode, letting you tune your guitar with the output<br />
muted. (The name display indicates MUTE.)<br />
2. When you play a string on your guitar, the nearest pitch will appear in the bank<br />
display, and a meter will appear in the tuner display (3.8).<br />
Tuner<br />
Meter<br />
Note name#<br />
Pitch is flat<br />
Pedals<br />
Pitch is sharp!<br />
MIDI/DIGITAL<br />
Correct tuning<br />
The note names are displayed as follows.<br />
C C# D D# E F F# G G# A A# B<br />
Factory<br />
settings<br />
Troubleshooting<br />
3. Watch the meter, and tune your guitar.<br />
4. When you’re finished tuning, press the FX ON/OFF (TUNER) button once<br />
again to return to the mode you were in.<br />
HINT: If you’ve started up the tuner from Program Select mode, pressing a program<br />
select pedal will cancel the tuner and change the program at the same time.<br />
Spec.<br />
Program<br />
List<br />
51
CALIBRATING THE TUNER<br />
When you switch <strong>ToneLab</strong><strong>SE</strong> on, the built-in tuner is automatically calibrated to<br />
A=440 Hz (a.k.a. “concert pitch”). If desired, you can recalibrate the tuner in the<br />
range of A = 438 Hz–445 Hz.<br />
• While the tuner is active, the value display (3.10) shows the frequency of the reference<br />
pitch. You can use the ▲, ▼ buttons to adjust (calibrate) this in the range<br />
of 438 Hz–445 Hz.<br />
NOTE: If you’ve recalibrated the tuner, remember that the setting will be automatically<br />
reset to 440 Hz the next time you turn <strong>ToneLab</strong><strong>SE</strong> on.<br />
52
Using the expression pedals<br />
EXPRESSION PEDAL <strong>SE</strong>TTINGS<br />
<strong>ToneLab</strong><strong>SE</strong> provides two expression pedals that you can use to control not only<br />
wah or volume, but a wide variety of effect parameters. For each program, you can<br />
specify which effect will be controlled, and how.<br />
HINT: If you’ve assigned a parameter to an expression pedal, operating the pedal<br />
has the same result as using the knob to edit the program. This means that when<br />
you operate the pedal, the EDIT icon will light. When you write the program, it will<br />
be written with the sound as currently specified by the position of the pedal. However<br />
if the expression target is “--OFF--,” “VOLUME,” “M/PITCH,” “D/INPUT,” or “R/<br />
INPUT,” the program will not be edited by the pedal.<br />
EXPRESSION TARGET QUICK ASSIGN<br />
Here’s a very easy and convenient way to set the expression target.<br />
As an example, use the MODULATION selector to choose PITCH SHIFTER. So<br />
that the effect will be easy to hear, we’ll initialize the PITCH SHIFTER. If PITCH<br />
SHIFTER is already selected, turn the selector to choose a different effect, and<br />
then re-select PITCH SHIFTER.<br />
1. When you’re editing PITCH SHIFTER, turn value knob 1 or use the √, ® buttons<br />
to make the name display show PITCH; the EXPRESSION button will<br />
light. If in this state you press and hold (for one second) the EXPRESSION<br />
button, the name display will indicate COMPLETE. The PITCH parameter has<br />
now been assigned to expression pedal 1, letting you control the amount of<br />
PITCH SHIFT. If you want to make more detailed settings, you can press the<br />
EXPRESSION button and set the minimum value (“EXP1 MIN,” value knob 2)<br />
and maximum value (“EXP1 MAX,” value knob 3) of the target range.<br />
In the same way, whenever the EXPRESSION button is lit during editing, you<br />
can press and hold the CONTROL button for one second to assign expression<br />
pedal 2 to control the parameter that is currently shown in the name display.<br />
NOTE: If you change the effect type of a parameter that is assigned to an expression<br />
target (i.e., to be controlled by one of the expression pedals), the target will be<br />
initialized to a setting of “--OFF--”. (However, “A/*****”, “D/INPUT”, and “R/INPUT”<br />
are exceptions.)<br />
HINT: If you’ve set the PEDAL effect type to “VOX WAH,” the “P/MANUAL” (wah<br />
position) will automatically be assigned to expression 1. If you then set the PEDAL<br />
effect to a different type without making any further settings, the Target, Min, and<br />
Max settings will automatically return to their former settings. (However in the case<br />
of “P/******”, it will be initialized to “--OFF--” instead of returning to its former setting.)<br />
NOTE: When you change the expression target, the MIN and MAX values will be<br />
initialized.<br />
Tuner<br />
Pedals<br />
MIDI/DIGITAL<br />
Factory<br />
settings<br />
Troubleshooting<br />
Spec.<br />
Program<br />
List<br />
53
<strong>SE</strong>TTING THE EXPRESSION TARGET<br />
Here are the items you can set.<br />
When you’ve pressed the EXPRESSION button to make it blink, you’ll be able to<br />
set the following items by turning value knobs 1–6.<br />
“*/######”: EXP 1 expression target (value display indicates E1) Value knob 1<br />
“EXP 1 MIN:” EXP 1 (expression pedal 1) target range (minimum value) Value knob 2<br />
“EXP 1 MAX:” EXP 1 (expression pedal 1) target range (maximum value) Value knob 3<br />
“*/######”: EXP 2 expression target (value display indicates E2) Value knob 4<br />
“EXP 2 MIN:” EXP 2 (expression pedal 2) target range (minimum value) Value knob 5<br />
“EXP 2 MAX:” EXP 2 (expression pedal 2) target range (maximum value) Value knob 6<br />
NOTE: You can set the above items individually for each program. If you switch to a<br />
different program or turn off the power without saving, any changes you’ve made<br />
will be lost.<br />
Using the same example we described earlier when explaining Quick Assign,<br />
here’s how to assign expression pedal 1 to control the PITCH parameter of the<br />
PITCH SHIFTER modulation effect.<br />
1. Use the MODULATION selector to select PITCH SHIFTER. So that the effect<br />
will be easy to hear, we’ll initialize the PITCH SHIFTER. If PITCH SHIFTER is<br />
already selected, turn the selector to choose a different effect, and then reselect<br />
PITCH SHIFTER.<br />
NOTE: If you change the effect type of a parameter that is assigned to an expression<br />
target, the target will be initialized to a setting of “--OFF--”. (However, “A/*****”,<br />
“D/INPUT”, and “R/INPUT” are exceptions.)<br />
HINT: If you’ve set the PEDAL effect type to “VOX WAH,” the “P/MANUAL” (wah<br />
position) will automatically be assigned to expression 1. If you then set the PEDAL<br />
effect to a different type without making any further settings, the target setting will<br />
also automatically return to the former setting.<br />
2. Press the EXPRESSION button to make it blink.<br />
3. Press the ® button or turn value knob 1 to make the value display read “E1”.<br />
4. Use the ▲, ▼ buttons or turn value knob 1 to make the name display read “M/<br />
PITCH”. The PITCH parameter of the PITCH SHIFTER effect has now been<br />
assigned to expression pedal 1.<br />
NOTE: Unlike other parameters, PITCH is not edited when you control it from an<br />
expression pedal. This is so that the pitch will change smoothly even when MIN<br />
and MAX are set to values that are close to each other (i.e., when you’ve made settings<br />
so that the pedal produces only a small amount of pitch change).<br />
54
NOTE: Nothing will be controlled if the target effect is “OFF.”<br />
The expression pedal target is indicated as follows.<br />
“*/###### *: Target category, ######: Target parameter<br />
• Examples<br />
“--OFF--” --- OFF (control nothing)<br />
“VOLUME” --- Volume pedal<br />
“P/DIRECT” --- (*: P (pedal)) DIRECT (mix amount of original sound)<br />
for a pedal effect (e.g., OCTAVE)<br />
“M/SPEED” --- (*: M (modulation)) SPEED of a modulation effect<br />
“D/INPUT” --- (*: D (delay)) Input level of a delay effect<br />
“R/MIX” --- (*: R (reverb)) MIX (mix amount of reverb sound) of a<br />
reverb effect<br />
“A/VRGN A” --- (*: A (amp)) [VR GAIN] (channel A) of an amp model<br />
In addition to the examples we’ve shown here, a wide variety of expression targets<br />
provided for each effect model can be freely assigned to the two expression<br />
pedals.<br />
If desired, you can make more detailed settings.<br />
NOTE: For “--OFF--”, “VOLUME”, “M/PITCH”, “D/INPUT”, and “R/INPUT”, operating<br />
the expression pedal does not edit the parameter.<br />
5. Turn value knob 2 to make the name display read “EXP 1 MIN.” Here you can<br />
specify the PITCH value for when the pedal is at the minimum position. Use<br />
value knob 2 or the ▲, ▼ buttons to adjust the setting.<br />
6. Turn value knob 3 to make the name display read “EXP 1 MAX.” Here you can<br />
specify the PITCH value for when the pedal is at the maximum position. Use<br />
value knob 3 or the ▲, ▼ buttons to adjust the setting.<br />
When you operate the expression pedal, the target parameter will change<br />
within the range you specified here.<br />
In the same way, you can use value knobs 4–6 or the ▲, ▼, √, ® buttons to<br />
make expression target parameter settings for expression pedal 2. (When you<br />
are making EXP2 expression target settings, the value display indicates “E2.”)<br />
NOTE: When you change the expression target, the MIN and MAX values will be<br />
initialized.<br />
7. Press the EXIT switch to return to the mode you were in.<br />
NOTE: The changes you make will not be preserved in internal memory unless you<br />
store the program.<br />
EXPRESSION PEDAL CONTROL INITIALIZATION <strong>SE</strong>TTINGS<br />
“EXP1INIT” Expression pedal 1 initialization setting<br />
“EXP2INIT” Expression pedal 2 initialization setting<br />
If you press the ® button several times while the EXPRESSION button is<br />
blinking, the “EXP1INIT” setting screen will appear.<br />
If you then press the ® button again, the “EXP2INIT” setting screen will appear.<br />
Tuner<br />
Pedals<br />
MIDI/DIGITAL<br />
Factory<br />
settings<br />
Troubleshooting<br />
Spec.<br />
Program<br />
List<br />
55
“EXP1INIT” lets you specify whether the control data for expression pedal 1<br />
(i.e., the position of the pedal) will be maintained when you switch programs.<br />
(“EXP2INIT” does the same for expression pedal 2.)<br />
Use the ▲, ▼ buttons to change the setting.<br />
If this is turned “OFF”; the instant you switch programs, the parameter that is<br />
specified as the expression target will change to the current position of the pedal.<br />
If this is turned “ON”; the parameter will be initialized to the same setting as<br />
when the program was saved (i.e., the control data will be initialized).<br />
Press the EXIT switch to exit this editing operation and return to the mode in<br />
which you were.<br />
NOTE: The “EXP1INIT” and “EXP2INIT” settings are not saved in a program; these<br />
settings apply to all programs in common, and the setting is saved automatically.<br />
CONTROL SWITCH <strong>SE</strong>TTINGS<br />
You can make the following control pedal settings independently for each program.<br />
Press the CONTROL button to make it blink, and use value knob 1 to select the<br />
effect you want to control.<br />
SWITCHING EACH EFFECT ON/OFF<br />
• “I/ON OFF”<br />
• “P/ON OFF”<br />
• “A/ON OFF”<br />
• “C/ON OFF”<br />
• “M/ON OFF”<br />
• “D/ON OFF”<br />
• “R/ON OFF”<br />
External effect insertion on/off<br />
Pedal effect on/off<br />
Amp model on/off<br />
Cabinet effect on/off<br />
Modulation effect on/off<br />
Delay effect on/off<br />
Reverb effect on/off<br />
NOTE: The CONTROL button LEDs indicate the on/off status.<br />
USING TAP TEMPO TO <strong>SE</strong>T A PARAMETER<br />
• “MOD TAP”<br />
• “DLY TAP”<br />
NOTE: The CONTROL button LED will blink at the tempo you specify.<br />
FACTOR VALUE KNOB 2 <strong>SE</strong>TTING<br />
Use TAP TEMPO to set the SPEED parameter of the<br />
modulation effect<br />
Use TAP TEMPO to set the TIME parameter of the delay<br />
effect<br />
If the MODULATION effect’s SPEED parameter or the DELAY effect’s TIME parameter<br />
are assigned to a control pedal, you can set the MODULATION effect’s LFO<br />
SPEED or the DELAY effect’s DELAY TIME by the interval at which you press the control<br />
pedal twice. When you do so, the interval at which you actually press the pedal will<br />
56
e applied to the parameter at a “factor” (i.e., multiple) of 1/6, 1/4, 1/3, 1/2, 2/3, 3/4, 1,<br />
4/3, 3/2, 2, 3, or 4, according to the setting of the FACTOR parameter (value knob 2).<br />
NOTE: The maximum spacing of your taps can be no more than ten seconds.<br />
NOTE: If you’ve assigned a parameter other than MOD TAP or DLY TAP, the FAC-<br />
TOR setting does nothing.<br />
EFFECT CONTROL<br />
• “FLN TRIG”<br />
• “ROT SPD”<br />
• “HOLD DLY”<br />
LFO START TRIGGER of the CLASSIC FLANGER effect<br />
SPEED SW of the ROTARY effect<br />
HOLD of the HOLD DELAY effect<br />
NOTE: If you haven’t selected an applicable effect, nothing will be controlled.<br />
1. Press the CONTROL button to make it blink.<br />
2. To select the control target, use the ▲, ▼ buttons or turn value knob 1.<br />
3. If you’ve selected MOD TAP or DLY TAP, press the ® button or turn value knob<br />
2 to make the name display read “FACTOR”. Here you can specify the proportion<br />
of SPEED or TIME in relation to the interval of your taps. For example if<br />
you set DLY TAP as the target, and FACTOR to “1-4,” the delay time will be set<br />
to 1/4th of the duration between taps.<br />
4. Press the EXIT button to return to the mode you were in.<br />
Tuner<br />
ADJUSTING THE <strong>SE</strong>NSITIVITY OF THE PEDALS<br />
If you notice that advancing the <strong>ToneLab</strong><strong>SE</strong>’s expression pedal does not reach the<br />
full effect or volume even when the Min and Max parameters are set to the minimum<br />
and maximum settings, or that returning the expression pedal does not reach<br />
the minimum effect or volume, you will need to perform the following adjustment so<br />
that <strong>ToneLab</strong><strong>SE</strong>’s expression pedal will be able to reach its full range of operation.<br />
NOTE: When adjusting the sensitivity, you must use your hand to operate the<br />
pedal. Accurate adjustment may not be possible if you use your foot to operate it.<br />
EXPRESSION PEDAL 1<br />
1. Turn the power OFF.<br />
2. While holding down the EXPRESSION button and the CHAIN button, turn the<br />
power on. The name display indicates EXP1 MIN.<br />
3. Slowly return expression pedal 1 toward yourself (pedal<br />
back), and take your hand off the pedal when it stops.<br />
Pedals<br />
MIDI/DIGITAL<br />
Factory<br />
settings<br />
Troubleshooting<br />
Spec.<br />
4. Press the GLOBAL button. The name display indicates EXP1 MAX.<br />
Program<br />
List<br />
57
5. Slowly advance the expression pedal 1 away from yourself (pedal forward),<br />
and take your hand off the pedal when it stops.<br />
NOTE: If you decide to cancel the calibration procedure,<br />
press the EXIT button.<br />
6. Press the GLOBAL button.<br />
The name display will indicate COMPLETE for one second, and then<br />
<strong>ToneLab</strong><strong>SE</strong> will return to normal operation.<br />
If the sensitivity could not be adjusted correctly, the name display will indicate<br />
ERROR, and will then indicate EXP1 MIN. Repeat the procedure from step 3.<br />
NOTE: If you are still unable to adjust the sensitivity after repeated attempts, it is<br />
possible that <strong>ToneLab</strong><strong>SE</strong> has malfunctioned. Please contact your dealer or <strong>Vox</strong><br />
authorized service center.<br />
EXPRESSION PEDAL 2<br />
1. Turn the power OFF.<br />
2. While holding down the CONTROL button and the CHAIN button, turn the<br />
power on. The name display indicates EXP2 MIN. Perform steps 3–6 as<br />
described above to adjust the sensitivity of expression pedal 2.<br />
NOTE: If you are still unable to adjust the sensitivity after repeated attempts, it is<br />
possible that <strong>ToneLab</strong><strong>SE</strong> has malfunctioned. Please contact your dealer or <strong>Vox</strong><br />
authorized service center.<br />
58
Control via MIDI<br />
MIDI stands for Musical Instrument Digital Interface, and is a world-wide<br />
standard for exchanging various types of musical data between electronic<br />
musical instruments and computers. When MIDI cables are used to connect<br />
two or more MIDI devices, performance data can be exchanged between the<br />
devices, even if they were made by different manufacturers.<br />
<strong>ToneLab</strong><strong>SE</strong> can use MIDI to communicate in the following ways with<br />
another MIDI device. You can:<br />
• Operate <strong>ToneLab</strong><strong>SE</strong> to switch programs on an external MIDI device, or switch<br />
<strong>ToneLab</strong><strong>SE</strong> programs from an external MIDI device. →“Program change”<br />
• Operate a connected optional foot controller to control an external MIDI device,<br />
or use an external MIDI device to control <strong>ToneLab</strong><strong>SE</strong>’s volume or effects.<br />
→“Control change”<br />
• Use Sound Editor to edit parameters. →“Parameter change”<br />
• Backup (save) and restore (load) <strong>ToneLab</strong><strong>SE</strong> program data. →“Backing up and<br />
restoring program data”<br />
NOTE: In order to do the above things, you need to use a MIDI cable to connect<br />
<strong>ToneLab</strong><strong>SE</strong> and your external MIDI device, and set the MIDI channels appropriately.<br />
→“Connecting a MIDI device or computer,” “Setting the MIDI channel”<br />
NOTE: When you change the settings described in this section, they will be saved<br />
automatically. When you have finished making settings, simply press the EXIT<br />
switch (3.7) to return to the mode you were in.<br />
NOTE: If your external MIDI device does not recognize certain types of MIDI message,<br />
those messages cannot be used for control. Check the “MIDI implementation<br />
chart” of <strong>ToneLab</strong><strong>SE</strong> and of your external MIDI device.<br />
CONNECTING A MIDI DEVICE OR COMPUTER<br />
If you want to control an external MIDI device from <strong>ToneLab</strong><strong>SE</strong>, connect a MIDI cable<br />
from <strong>ToneLab</strong><strong>SE</strong>’s MIDI OUT jack to the MIDI IN jack of your external MIDI device.<br />
If you want to control <strong>ToneLab</strong><strong>SE</strong> from a MIDI sequencer or other external MIDI<br />
device, connect a MIDI cable from your external MIDI device’s MIDI OUT jack to<br />
<strong>ToneLab</strong><strong>SE</strong>’s MIDI IN jack.<br />
When you connect <strong>ToneLab</strong><strong>SE</strong> with a MIDI sequencer or sound editor, data will<br />
normally be sent in both directions, so you will need to connect MIDI cables from<br />
<strong>ToneLab</strong><strong>SE</strong>’s MIDI OUT jack to the external MIDI device’s MIDI IN jack, and from<br />
the external MIDI device’s MIDI OUT jack to <strong>ToneLab</strong><strong>SE</strong>’s MIDI IN jack.<br />
MIDI IN<br />
MIDI OUT<br />
MIDI interface<br />
MIDI OUT<br />
MIDI IN<br />
To a MIDI sequencer/computer<br />
NOTE: You will need a MIDI interface<br />
in order to connect your computer<br />
with <strong>ToneLab</strong><strong>SE</strong>.<br />
Some USB-MIDI interface<br />
devices may not be able to transmit/receive<br />
the <strong>ToneLab</strong><strong>SE</strong>’s MIDI<br />
exclusive messages.<br />
Tuner<br />
Pedals<br />
MIDI/DIGITAL<br />
Factory<br />
settings<br />
Troubleshooting<br />
Spec.<br />
Program<br />
List<br />
<strong>ToneLab</strong><strong>SE</strong><br />
59
<strong>SE</strong>TTING THE MIDI CHANNEL (GLOBAL “MIDI CH”)<br />
In order to exchange data with an external MIDI device, <strong>ToneLab</strong><strong>SE</strong>’s MIDI channel<br />
must match the MIDI channel of your external MIDI device. Here’s how to set<br />
the MIDI channel.<br />
1. Press the GLOBAL button (3.4).<br />
2. The name display (3.8) will show “MIDI CH.” If a different parameter is<br />
selected, press the √, ® buttons (3.2) to change the display.<br />
3. Use the value knob 3 (2.2) or the ▲, ▼ buttons (3.1) to set <strong>ToneLab</strong><strong>SE</strong>’s MIDI<br />
channel.<br />
4. Set the MIDI channel of your connected external MIDI device.<br />
For details on how to set the MIDI channel of your external MIDI device, refer<br />
to its owner’s <strong>manual</strong>.<br />
PROGRAM CHANGE (GLOBAL “PCHG OUT”)<br />
When you switch programs on <strong>ToneLab</strong><strong>SE</strong>, a program change message is transmitted<br />
from the MIDI OUT jack, causing an external MIDI device to switch programs.<br />
Similarly, when <strong>ToneLab</strong><strong>SE</strong> receives a program change message, its<br />
program will switch automatically. Here’s how you can specify whether a program<br />
change message will be transmitted from the MIDI OUT jack when you switch programs<br />
on <strong>ToneLab</strong><strong>SE</strong>.<br />
NOTE: Program change numbers not used by <strong>ToneLab</strong><strong>SE</strong> will be ignored. For<br />
details on the range of program change numbers used by <strong>ToneLab</strong><strong>SE</strong>, refer to End<br />
of this <strong>manual</strong>.<br />
1. Press the GLOBAL button (3.4).<br />
2. Press the √, ® buttons (3.2) to make the name display (3.8) show “PCHG<br />
OUT.”<br />
3. Specify whether program change messages will be transmitted. Use value<br />
knob 6 (2.2) or the ▲, ▼ buttons (3.1) to make the desired setting.<br />
“OFF”: Program change messages will not be transmitted.<br />
“On”: Program change messages will be transmitted.<br />
CONTROL CHANGE (GLOBAL “CCHG I/O”)<br />
When you operate the EXPRESSION pedal 1, Expression pedal 2, or Control pedal of<br />
the <strong>ToneLab</strong><strong>SE</strong>, control change messages will be transmitted. This means that functions<br />
for the corresponding control change numbers on an external MIDI device can<br />
be controlled in realtime.<br />
Similarly, when <strong>ToneLab</strong><strong>SE</strong> receives control change messages from an external MIDI<br />
device, it will be controlled in the same way as if its own foot controller were operated.<br />
For a list of the functions that can be controlled from an external MIDI device, refer to<br />
step 4.<br />
Here you can specify whether <strong>ToneLab</strong><strong>SE</strong> will transmit and receive control change<br />
messages.<br />
60
1. Press the GLOBAL button (3.4).<br />
2. Press the √, ® buttons (3.2) to make the name display (3.8) read “CCHG I/O.”<br />
3. Specify whether all control change messages will be transmitted or received.<br />
Use value knob 6 (2.2) or the ▲, ▼ buttons (3.1) to make your choice.<br />
“On” allows transmitting and receiving. “OFF” disables transmitting and receiving.<br />
NOTE: If this setting is “OFF,” no control change messages will be transmitted or<br />
received even if you specify individual control change numbers in step 4.<br />
4. Simultaneously press both √, ® buttons (3.2) to access the screen where you<br />
can set control numbers individually. Use the √, ® buttons to select each controller.<br />
The controllers will be selected in the following order.<br />
“EXP1 PDL” Expression pedal 1 control<br />
“EXP2 PDL” Expression pedal 2 control<br />
“CTRL PDL” Control pedal on/off<br />
“VOL PDL”: VOLUME pedal control<br />
“TAP SW”: TAP switch on/off<br />
“PEDAL FX”: PEDAL effect on/off<br />
“MOD FX”: MODULATION effect on/off<br />
“DELAY FX”: DELAY effect on/off<br />
“REVRB FX”: REVERB effect on/off<br />
“INSRT FX” External effect on/off<br />
“A/B CH” Channel A/B<br />
5. For each controller, specify whether <strong>ToneLab</strong><strong>SE</strong> will transmit and receive control<br />
change messages. If you want <strong>ToneLab</strong><strong>SE</strong> to transmit and receive messages for<br />
a controller, specify the control change number. Select a controller, and use<br />
value knob 6 (2.2) or the ▲, ▼ buttons (3.1) to make the desired setting.<br />
“OFF”: Control change messages will not be transmitted or received.<br />
“CC00”–“CC95”: When you operate a controller, messages of the specified<br />
control change number 00–95 will be transmitted. Similarly, <strong>ToneLab</strong><strong>SE</strong> will be<br />
controlled when it receives messages of the same control change number<br />
from an external MIDI device.<br />
6. To return to the screen where you specify transmit or receive for all control<br />
change messages, press both √, ® buttons (3.2) simultaneously.<br />
PARAMETER CHANGE (GLOBAL “SYEX OUT”)<br />
When you operate <strong>ToneLab</strong><strong>SE</strong>’s knobs or buttons to edit the value of a parameter,<br />
system exclusive such as parameter changes are transmitted.<br />
If you want <strong>ToneLab</strong><strong>SE</strong>’s parameters to be transmitted to an external device, turn<br />
the “SYEX OUT” setting “On.” Normally, you will turn “SYEX OUT” on when using<br />
the Sound Editor.<br />
This setting specifies whether <strong>ToneLab</strong><strong>SE</strong> will transmit parameter changes.<br />
Tuner<br />
Pedals<br />
MIDI/DIGITAL<br />
Factory<br />
settings<br />
Troubleshooting<br />
Spec.<br />
Program<br />
List<br />
61
1. Press the GLOBAL button (3.4).<br />
2. Press the √, ® buttons (3.2) to make the name display (3.8) read “SYEX<br />
OUT.”<br />
3. Specify whether parameter change messages will be transmitted. Use value<br />
knob 3 (2.2) or the ▲, ▼ buttons (3.1) to make your choice.<br />
“OFF”: Parameter change messages will not be transmitted.<br />
“On”: Parameter change messages will be transmitted.<br />
NOTE: When <strong>ToneLab</strong><strong>SE</strong> receives parameter changes or other system exclusive<br />
messages, its parameters, modes, or program numbers will change — regardless<br />
of the “SYEX OUT” setting.<br />
BACKING UP AND RESTORING PROGRAM DATA (GLOBAL<br />
“DUMP CUR,” DUMP ALL”)<br />
All of <strong>ToneLab</strong><strong>SE</strong>’s data (including its programs) can be transmitted and received in<br />
the form of system exclusive messages. Exchanging this type of data with an external<br />
device via system exclusive messages is known as a “data dump.” By performing<br />
a data dump, <strong>ToneLab</strong><strong>SE</strong> programs you created can be backed up (saved) on<br />
an external device such as a MIDI data filer or a sequencer that is able to transmit<br />
and receive system exclusive messages. Then when necessary, you can re-transmit<br />
that data back to <strong>ToneLab</strong><strong>SE</strong> to restore it. This provides a way for you to organize<br />
large numbers of programs. You can also use this method to copy program<br />
data between two connected <strong>ToneLab</strong><strong>SE</strong>s.<br />
You can transfer program data in one of two ways; one program at a time, or all programs<br />
at once. When you transmit all programs at once, all of <strong>ToneLab</strong><strong>SE</strong>’s data<br />
will also be transmitted, including Dump settings and MIDI settings.<br />
NOTE: You can transmit data dumps regardless of the “SYEX OUT” setting. In fact, if<br />
you want to transfer program data between two <strong>ToneLab</strong>s, we recommend that you<br />
turn the “SYEX OUT” setting “OFF.” If “SYEX OUT” is “On,” operating the knobs or<br />
other controls may change the parameters of the other <strong>ToneLab</strong><strong>SE</strong> in unintended<br />
ways.<br />
BACKING UP<br />
1. Connect <strong>ToneLab</strong><strong>SE</strong>’s MIDI OUT to the MIDI IN of the device that will receive<br />
the data dump.<br />
2. If you want to transmit only one program, use Program Select Mode to select<br />
the program you want to transmit.<br />
3. Press the GLOBAL button (3.4).<br />
4. Press the √, ® buttons (3.2) to make the name display (3.8) read “DUMP<br />
CUR” or “DUMP ALL.”<br />
“DUMP CUR” (Dump current program data): The data of the currently selected<br />
program will be dumped. If you are editing the program (and have not yet<br />
saved it), the current settings will be transmitted.<br />
62
“DUMP ALL” (Dump all data): All of the <strong>ToneLab</strong><strong>SE</strong>’s data will be dumped.<br />
5. Put the receiving device in a mode in which it can record the data dump.<br />
NOTE: For details, refer to the owner’s <strong>manual</strong> of the device that will receive the<br />
data dump.<br />
6. Press <strong>ToneLab</strong><strong>SE</strong>’s WRITE button (3.6) to begin transmitting. When transmitting<br />
is completed, the display will indicate “COMPLETE,” and you will return to<br />
the screen of step 4. (While “DUMP ALL” is being transmitted, the display will<br />
indicate “<strong>SE</strong>ND.”)<br />
NOTE: While data is being transmitted, do not touch the buttons or knobs of<br />
<strong>ToneLab</strong><strong>SE</strong> or its foot controller, and never turn off the power.<br />
RESTORING<br />
1. Connect the transmitting device’s MIDI OUT to <strong>ToneLab</strong><strong>SE</strong>’s MIDI IN.<br />
2. Set the transmitting MIDI device and <strong>ToneLab</strong><strong>SE</strong> to the same MIDI channel. If<br />
<strong>ToneLab</strong><strong>SE</strong> will be receiving data that was previously transmitted to the external<br />
MIDI device, select the same MIDI channel as was used when transmitting.<br />
3. Transmit the data dump from the external device.<br />
While <strong>ToneLab</strong><strong>SE</strong> is receiving all data, its display will indicate “RECEIVE.”<br />
When reception has been successfully completed, it will indicate “COM-<br />
PLETE.” If an error occurs, the display will indicate “ERROR”; in this case, try<br />
transmitting the data again.<br />
NOTE: For details, refer to the owner’s <strong>manual</strong> of the device that will be transmitting<br />
the data dump.<br />
NOTE: While data is being transmitted, don't touch the <strong>ToneLab</strong><strong>SE</strong>'s buttons, pedals,<br />
or knobs, and never turn off the power.<br />
4. If you received data for a single program, select the save-destination bank and<br />
program, and save the data. (p.22)<br />
NOTE: The program data will not be written into <strong>ToneLab</strong><strong>SE</strong>’s program memory<br />
unless you store it.<br />
If you received data in Manual Mode, settings other than for the amp section will be<br />
overwritten automatically, so you don’t need to store the settings yourself. (Since<br />
the settings of the amp section are determined by the physical positions of the<br />
selectors and controllers, they will not change.)<br />
HINT: If <strong>ToneLab</strong><strong>SE</strong> receives all data, all of its data will be overwritten automatically.<br />
However, the data currently being edited (i.e., the edit buffer) will not be affected.<br />
Tuner<br />
Pedals<br />
MIDI/DIGITAL<br />
Factory<br />
settings<br />
Troubleshooting<br />
Program<br />
List<br />
Spec.<br />
63
Restoring the Factory Preset<br />
Programs<br />
H<br />
ere’s how you can restore <strong>ToneLab</strong><strong>SE</strong>’s programs and all its other settings<br />
to the state in which it was shipped from the factory.<br />
NOTE: Executing this procedure will erase all the programs you created and saved<br />
in <strong>ToneLab</strong><strong>SE</strong>, and will load the factory-set programs. MIDI settings will also be initialized.<br />
If there are any settings you want to keep, you should first use the data<br />
dump function to back them up, or use the “Program sheet” (the fold-out inside the<br />
back cover of this <strong>manual</strong>) to write down your settings.<br />
1. While holding down the three buttons ▲, ▼ (3.1), and EXIT switch (3.7), press<br />
the STANDBY button to turn on the power.<br />
The bank display (5.1) “P” and the LED 1–4 buttons (6.2) will blink, and the<br />
name display (3.8) will ask “RELOAD?” Release the three buttons you were<br />
holding down.<br />
2. If at this point you decide that you really don’t want to execute this operation,<br />
you can press the EXIT switch.<br />
3. Press the WRITE button (3.6). The name display (3.8) will show “LOADING,”<br />
and the factory-set data will begin being reloaded.<br />
When reloading has been completed, the name display will indicate “COM-<br />
PLETE,” and <strong>ToneLab</strong><strong>SE</strong> will automatically switch to Program Select Mode.<br />
NOTE: Never turn off the power while this reload operation is occurring.<br />
64
Troubleshooting<br />
If you suspect a malfunction, please check the following points first. If this does<br />
not resolve the problem, please contact your dealer or <strong>Vox</strong> authorized service<br />
center.<br />
1. The amp isn’t powering up when the STANDBY switch is<br />
“on”<br />
• Is the AC/AC power supply connected to the rear panel ~AC9V jack?<br />
• Is the AC/AC power supply plugged into an AC outlet?<br />
• Is the STANDBY switched on?<br />
• Could the AC/AC power supply be damaged?<br />
2. There’s no sound<br />
• Is your guitar turned up?<br />
• Are both ends of your guitar cable plugged into the correct jacks?<br />
• Is your guitar cable working?<br />
• Could the rear panel OUTPUT LEVEL knob be turned down?<br />
• Check the GAIN, TREBLE, MIDDLE, BASS, VR GAIN, and CH VOLUME settings.<br />
For some amp types, you might not hear any sound if the TREBLE, MID-<br />
DLE, and BASS settings are turned down – just like the circuitry on the original<br />
amp!<br />
If you are using a pedal effect, check the DRIVE [1] and LEVEL [3] settings as<br />
well.<br />
• Could an expression pedal be at the minimum position with a parameter such<br />
as DRIVE, LEVEL, VOLUME, GAIN, or VR GAIN assigned to it?<br />
• Could you have activated the Mute function? Press the FX ON/OFF (TUNER)<br />
pedal to defeat muting.<br />
3. You can't hear any effects even though they're dialed in...<br />
• Are the effect LEDs lit?<br />
If an LED is dark, the corresponding effect is off.<br />
Press the MODE select button to turn on the effect.<br />
• Could the modulation “DEPTH” or the delay/reverb “MIX” be set to a low value?<br />
Press the MODE select button to select an effect and use the value knobs to<br />
adjust the appropriate parameters.<br />
• Could the effect be bypassed?<br />
If so, press the FX ON/OFF pedal to cancel bypass.<br />
Tuner<br />
Pedals<br />
MIDI/DIGITAL<br />
Factory<br />
settings<br />
Troubleshooting<br />
Spec.<br />
Program<br />
List<br />
65
4. You’re using the ACOUSTIC pedal effect and getting nasty<br />
high frequency distortion.<br />
• Could the Drive setting be excessively high?<br />
• Are you using a very high output humbucking pickup?<br />
Either turn down the volume of your guitar, the Amp GAIN or Treble setting for<br />
the pedal.<br />
5. The sound connected to your guitar amp is distorted, or<br />
sounds wrong.<br />
• Could “OUT <strong>SE</strong>L” switch be set to “Ln” (LINE)?<br />
• Could LEVEL be raised excessively?<br />
→Make the correct settings as described in Basic Connections.<br />
66
Specifications<br />
NUMBER OF AMP TYPES: 16<br />
NUMBER OF CABINET TYPES: 11<br />
NUMBER OF EFFECTS<br />
PEDAL TYPES: 16<br />
MODULATION TYPES: 11<br />
DELAY TYPES: 11<br />
REVERB TYPES: 11<br />
NOI<strong>SE</strong> REDUCTION: 1<br />
NUMBER OF PROGRAMS: 96 (24 BANKS x 4 CHANNELS)<br />
AUDIO INPUTS<br />
INPUT x 1<br />
IN<strong>SE</strong>RT RETURN x1<br />
AUDIO OUTPUTS<br />
OUTPUT x 2 (balanced/unbalanced TRS)<br />
IN<strong>SE</strong>RT <strong>SE</strong>ND x1<br />
PHONES x 1<br />
LEVEL knob (adjusts OUTPUT and PHONES)<br />
VALVE<br />
12AX7 (ECC83) x 1<br />
SIGNAL PROCESSING<br />
A/D conversion: 20bit<br />
D/A conversion: 20bit<br />
Sampling frequency: 44.1kHz<br />
TUNER<br />
TUNING RANGE: A0–C7 (27.5Hz–2093Hz)<br />
TUNER CALIBRATION: A = 438Hz–445Hz<br />
OTHER<br />
MIDI IN x 1, MIDI OUT x 1, ~AC9V x 1, STANDBY switch<br />
POWER CONSUMPTION: 18 W<br />
DIMENSIONS (W x D x H): 710 x 249 x 76 (mm)/279.5 x 98.0 x 29.9 (inches)<br />
WEIGHT: 6.2 kg/13.67 lbs.<br />
INCLUDED ITEMS: AC/AC power supply 9VAC 3.0A<br />
* Appearance and specifications of this product are subject to change without<br />
notice.<br />
Tuner<br />
Pedals<br />
MIDI/DIGITAL<br />
Factory<br />
settings<br />
Troubleshooting<br />
Spec.<br />
Program<br />
List<br />
67
Program list<br />
NAME PEDAL Ach-AMP Ach-CABINET MOD DELAY REVERB<br />
IN<strong>SE</strong>RT Bch-AMP Bch-CABINET EXP1 EXP2 CONTROL<br />
1-1 DIARY TUBE OD TWEED 4x10 TWEED 4x10 CLASSIC CHORUS ECHO PLUS CHAMBER 2<br />
OFF<br />
UK '80S UK T75 4x12 M/SPEED VOLUME MOD ON/OFF<br />
1-2 S-R-V TUBE OD BLACK 2x12 BLACK 2x12 CLASSIC CHORUS MULTI HEAD ROOM 1<br />
OFF<br />
UK 68P UK H30 4x12 R/INPUT VOLUME PDL ON/OFF<br />
1-3 SATCH VOX WAH UK '90S UK T75 4x12 CLASSIC FLANGER ANALOG DELAY PLATE 1<br />
OFF<br />
UK '90S UK T75 4x12 P/MANUAL VOLUME DLY ON/OFF<br />
1-4 JIMIROTO U-VIBE BLACK 2x12 BLACK 2x12 CLASSIC FLANGER MULTI HEAD SPRING 2<br />
OFF<br />
UK 68P UK H30 4x12 P/SPEED VOLUME MOD ON/OFF<br />
2-1 TELEBEND COMP TWEED 1x12 TWEED 1x8 PITCH SHIFTER ECHO PLUS PLATE 1<br />
OFF TWEED 4x10 TWEED 1x8 M/PITCH VOLUME REV ON/OFF<br />
2-2 CRUNCH COMP<br />
AC15TB VOX AC15 MOD DELAY ECHO PLUS SPRING 2<br />
OFF<br />
AC30TB VOX AC30 D/TIME VOLUME DLY TAP<br />
2-3 SOLO TUBE OD UK BLUES UK H30 4x12 STEREO CHORUS ECHO PLUS PLATE 2<br />
OFF<br />
UK 68P UK H30 4x12 D/INPUT VOLUME DLY TAP<br />
2-4 BOOMER COMP TWEED 1x12 TWEED 1x12 CLASSIC CHORUS HOLD DELAY SPRING 1<br />
OFF<br />
UK '80S VOX AC15 D/INPUT VOLUME HOLD DLY<br />
3-1 JAZZMAN COMP TWEED 4x10 TWEED 4x10 STEREO CHORUS ECHO PLUS ROOM2<br />
OFF BLACK 2x12 BLACK 2x10 R/MIX VOLUME PDL ON/OFF<br />
3-2 FUNKYMAN VOX WAH TWEED 1x12 TWEED 4x10 FILTRON REVER<strong>SE</strong> DELAY SPRING 2<br />
OFF<br />
AC15 VOX AC15 P/MANUAL VOLUME REV ON/OFF<br />
3-3 FIRE OCTAFUZZ UK '80S UK H30 4x12 DUO PHA<strong>SE</strong> REVER<strong>SE</strong> DELAY ROOM 2<br />
OFF<br />
UK '80S UK H30 4x12 D/INPUT VOLUME PDL ON/OFF<br />
3-4 AXIS OCTAFUZZ AC15 TWEED 1x8 CLASSIC FLANGER REVER<strong>SE</strong> DELAY SPRING 1<br />
OFF<br />
UK 68P UK H30 4x12 D/INPUT VOLUME DLY ON/OFF<br />
4-1 TEXAS T COMP BLACK 2x12 BLACK 2x12 TEXTREM RHYTHM DELAY SPRING 2<br />
OFF<br />
AC30TB VOX AC30 M/SPEED VOLUME MOD ON/OFF<br />
4-2 UK BLUES BOUTIQUE UK BLUES VOX AD412 STEREO CHORUS ANALOG DELAY SPRING 1<br />
OFF<br />
UK BLUES VOX AD412 R/TIME VOLUME REV ON/OFF<br />
4-3 RECTOFLY COMP<br />
RECTO UK T75 4x12 DUO PHA<strong>SE</strong> ECHO PLUS SPRING 1<br />
OFF<br />
RECTO US V30 4x12 M/DEPTH VOLUME MOD TAP<br />
4-4 TALKVOX OCTAVE<br />
UK 68P UK H30 4x12 TALK MOD SWEEP DELAY PLATE 2<br />
OFF UK MODERN UK T75 4x12 M/MANUAL VOLUME PDL ON/OFF<br />
5-1 ACOUS VH ACOUSTIC AC15 TWEED 1x8 BI CHORUS ECHO PLUS CHAMBER 2<br />
OFF BOUTIQUE CL VOX AD412 P/BODY VOLUME REV ON/OFF<br />
5-2 PDL REV TREBLE BOOST AC15TB VOX AC15 MOD DELAY CROSS DELAY HALL 2<br />
OFF<br />
AC30TB VOX AC30 R/TIME VOLUME DLY ON/OFF<br />
5-3 VH TREBLE BOOST UK 68P UK H30 4x12 PITCH SHIFTER ECHO PLUS PLATE 2<br />
OFF<br />
UK 68P UK H30 4x12 M/PITCH VOLUME PDL ON/OFF<br />
5-4 UNCHAIN TUBE OD US HIGAIN UK T75 4x12 CLASSIC FLANGER ECHO PLUS ROOM 2<br />
OFF UK MODERN UK H30 4x12 M/RESO VOLUME FLN TRIG<br />
6-1 ECBADGE FAT DIST UK 68P UK H30 4x12 ROTARY 2 TAP DELAY SPRING 2<br />
OFF<br />
UK 68P UK H30 4x12 M/SPEED1 VOLUME ROT SPD<br />
6-2 SHOW ME ACOUSTIC UK '80S UK T75 4x12 TALK MOD ECHO PLUS ROOM 2<br />
OFF<br />
UK 68P UK H30 4x12 M/MANUAL VOLUME PDL ON/OFF<br />
6-3 TORNADO B/O PHAS<br />
AC15 TWEED 1x8 ROTARY MOD DELAY SPRING 2<br />
OFF<br />
UK 68P UK H30 4x12 M/SPEED1 VOLUME MOD ON/OFF<br />
6-4 FILTRON OCTAVE BOUTIQUE OD VOX AD412 FILTRON STEREO DELAY PLATE 1<br />
OFF<br />
US HIGAIN US V30 4x12 M/DEPTH VOLUME PDL ON/OFF<br />
7-1 MR.CLEAN COMP BOUTIQUE CL VOX AD412 BI CHORUS STEREO DELAY SPRING 2<br />
OFF BLACK 2x12 BLACK 2x12 M/MIX VOLUME PDL ON/OFF<br />
7-2 PDL ECHO COMP<br />
UK 68P UK H30 4x12 CLASSIC CHORUS ECHO PLUS SPRING 1<br />
OFF<br />
UK '80S UK T75 4x12 D/TIME VOLUME DLY TAP<br />
7-3 UCLA COMP BLACK 2x12 BLACK 2x12 STEREO CHORUS ANALOG DELAY SPRING 1<br />
OFF BOUTIQUE OD UK H30 4x12 M/MIX VOLUME DLY TAP<br />
7-4 THRASH AUTO WAH UK MODERN UK T75 4x12 STEREO CHORUS ANALOG DELAY ROOM 2<br />
OFF UK MODERN US V30 4x12 D/MIX VOLUME DLY TAP<br />
8-1 SPACEMOD COMP BOUTIQUE CL VOX AD412 MOD DELAY ECHO PLUS CHAMBER 1<br />
OFF TWEED 4x10 BLACK 2x10 M/MIX VOLUME DLY TAP<br />
8-2 ROTOMAN SUPER OD TWEED 1x12 TWEED 1x12 ROTARY STEREO DELAY SPRING 1<br />
OFF BLACK 2x12 BLACK 2x10 M/SPEED1 VOLUME ROT SPD<br />
8-3 VULGAR TREBLE BOOST US HIGAIN VOX AD412 MOD DELAY STEREO DELAY PLATE 2<br />
OFF<br />
RECTO UK H30 4x12 M/MIX VOLUME DLY ON/OFF<br />
8-4 SPOOKY TREBLE BOOST BOUTIQUE CL VOX AC30 BI CHORUS ECHO PLUS HALL 1<br />
OFF<br />
AC15 VOX AC15 R/INPUT VOLUME MOD ON/OFF<br />
Default select channel<br />
68<br />
On effect
Index<br />
Numerics<br />
1OCTAVE 37<br />
2OCTAVE 37<br />
A<br />
AC15 25<br />
AC15TB 26<br />
AC30 26<br />
AC30TB 27<br />
ACOUSTIC 36<br />
AMP Models 23<br />
ATTACK 36, 37<br />
AUTO WAH 36<br />
automatic chromatic<br />
tuner 51<br />
B<br />
Backing Up 62<br />
BASS 23, 36<br />
BLACK 2x10 (BLK<br />
2X10) 32<br />
BLACK 2x12 (BLK<br />
2X12) 30, 33<br />
BODY 36<br />
BOUTIQUE CL (BTQ<br />
CL) 30<br />
BOUTIQUE OD (BTQ<br />
OD) 30<br />
C<br />
Cabinet 32<br />
CABINET Models 32<br />
Calibrating 52<br />
CC 61<br />
CCHG I/O 60<br />
CH VOLUME 24<br />
CHAIN 21<br />
CLO<strong>SE</strong> 36<br />
COMP 35<br />
Connection 13, 59<br />
Control Change 60<br />
Creating Program 19<br />
D<br />
DELAY 45<br />
DELAY EFFECTS 45<br />
DELAY FX 61<br />
DEPTH 37<br />
DIRECT 37<br />
DUMP ALL 63<br />
DUMP CUR 62<br />
E<br />
Effect On/Off mode 16<br />
EXP PDL 61<br />
expression pedals 53<br />
F<br />
FAT OD 38<br />
FUZZ 39<br />
G<br />
GAIN 24<br />
H<br />
How the original amps<br />
work 24<br />
L<br />
LEVEL 36<br />
M<br />
MASTER VOLUME 24<br />
MIDDLE 23<br />
MIDI 59<br />
MIDI CH 60<br />
MIDI Channel 60<br />
MIX 37<br />
Mix any amp model to<br />
any cabinet model<br />
34<br />
MOD EFFECTS 39<br />
MOD FX 61<br />
N<br />
Naming 21<br />
O<br />
OCTAVE 37<br />
OPEN 36<br />
Orginal tone controls<br />
23<br />
Original Value 22<br />
P<br />
Parameter Change 61<br />
PCHG OUT 60<br />
pedal 36<br />
PEDAL EFFECTS 35<br />
PEDAL FX 61<br />
POLARITY 36<br />
PRE<strong>SE</strong>NCE 23<br />
Program Change 60<br />
Program Select mode<br />
16<br />
R<br />
RECTO 29<br />
RELOAD? 64<br />
RENAME 21<br />
Restoring 63<br />
Restoring the Factory<br />
Preset 64<br />
REVERB EFFECTS<br />
48<br />
REVRB FX 61<br />
S<br />
<strong>SE</strong>NS 36<br />
<strong>SE</strong>N<strong>SE</strong> 36<br />
Silent Tuning mode 51<br />
Sound Editor 2, 61<br />
SPEED 37<br />
Storing 22<br />
SYEX OUT 61<br />
T<br />
TAP SW 61<br />
TREBLE 23, 36<br />
TREBLE BOOST<br />
(TREB BST) 38<br />
TUBE OD 38<br />
Tuner 51<br />
TWEED 1x12 (TWD<br />
1X12) 31, 32<br />
TWEED 4x10 (TWD<br />
4X10) 31, 32<br />
U<br />
UK ’80s 28<br />
UK ’90s 29<br />
UK 68P 28<br />
UK BLUES 28<br />
UK H30 4x12 (UK H30)<br />
33<br />
UK MODERN (UK<br />
MODRN) 29<br />
UK T75 4x12 (UK T75)<br />
33<br />
US HIGAIN (US HI-G)<br />
29<br />
US V30 4x12 (US V30)<br />
33<br />
U-VIBE 37<br />
V<br />
valve cover 10<br />
Valve Reactor 2<br />
VOL PDL 61<br />
VOX AC15 (AC15) 33<br />
VOX AC30 (AC30) 33<br />
VOX AD412 (AD412)<br />
33<br />
VOX WAH 36<br />
VR GAIN 24<br />
W<br />
Wah pedal 36<br />
WRITE 22<br />
69
TOP PANEL:<br />
1.2 1.4<br />
5<br />
1.5 1.3 1.6 1.7 1.8 1.9<br />
4<br />
2<br />
9<br />
1<br />
8.2 8.2<br />
5.2 5.1<br />
4.1 4.2<br />
6.1<br />
2.1<br />
2.2<br />
6<br />
8.1<br />
6.3<br />
6.2<br />
7<br />
8<br />
REAR PANEL:<br />
3<br />
3.8<br />
3.9 3.10<br />
3.1 3.3 3.5 3.4<br />
3.2<br />
3.6 3.7<br />
10 10.1 10.2 11.1 11.2 11 11.4 11.3 11.5<br />
12<br />
12.1<br />
12.2
2003 VOX AM<br />
[VOX Valvetronix]<br />
<strong>ToneLab</strong><strong>SE</strong><br />
MIDI Implementation Chart<br />
Date : 2003. 9.1<br />
Function Transmitted Recognized Remarks<br />
Basic<br />
Channel<br />
Default<br />
Changed<br />
Memorized<br />
Mode Memorized<br />
Messages<br />
Altered<br />
Note<br />
Number: True Voice<br />
Velocity Note On<br />
Note Off<br />
Aftertouch<br />
Polyphonic (Key)<br />
Monophonic (Channel)<br />
Pitch Bend<br />
Control<br />
Change<br />
0–95<br />
Effect Control<br />
Program<br />
Change Variable Range<br />
System Exclusive<br />
Parameter Control<br />
Program Data Dump<br />
System<br />
Common<br />
System<br />
Real Time<br />
Song Position<br />
Song Select<br />
Tune<br />
Clock<br />
Command<br />
Aux<br />
Messages<br />
Local On/Off<br />
All Notes Off<br />
Active Sense<br />
Reset<br />
Notes<br />
*P: Transmitted if GLOBAL “PCHG OUT” is On.<br />
*C: Transmitted and received according to the setting of each controller if GLOBAL “CCHG I/O” is On.<br />
*E: Transmitted if GLOBAL “SYEX OUT” is On. (Responses to Request messages are always transmitted regardless of the “SYEX OUT” setting.)<br />
*1: In addition to messages specifically for this device, Device Inquiry is also supported.<br />
Mode 1: OMNI ON, POLY Mode 2: OMNI ON, MONO : Yes<br />
Mode 3: OMNI OFF, POLY Mode 4: OMNI OFF, MONO : No<br />
Consult your local Korg distributor for more information on MIDI IMPLEMENTATION.
<strong>Owner's</strong> Manual<br />
E 1<br />
2003 VOX AMPLIFICATION LTD. Printed in China