Hydrosphere UK Ltd Complete Products & Services Catalogue
Hydrosphere UK Ltd Complete Products & Services Catalogue
Hydrosphere UK Ltd Complete Products & Services Catalogue

You also want an ePaper? Increase the reach of your titles
YUMPU automatically turns print PDFs into web optimized ePapers that Google loves.
INSTALLATION GUIDE<br />
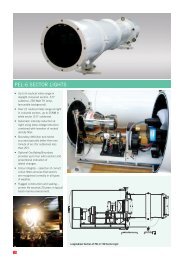
Installation of PEL Sector Lights<br />
Location of Tower<br />
The tower can be located at any<br />
convenient place on the extended<br />
centreline of the required track. Moving<br />
the tower back from the point of closest<br />
approach can help to reduce the<br />
unhelpful effect of the beam becoming<br />
narrower and more intense at the point<br />
closest to the light. Other considerations<br />
are ease of site access for maintenance,<br />
security against unauthorised access,<br />
availability of existing structure, and level<br />
of background lighting in the viewing<br />
direction (considering day and night<br />
separately).<br />
Height of Tower<br />
The best elevation for the PEL Light is<br />
at the same height as the bridge of the<br />
largest vessel. This enables the PEL<br />
Sector Light to be set horizontal. Check<br />
for adequate vertical divergence. The<br />
Sector Light must be visible from all the<br />
required positions. The barrel can be<br />
inclined or declined a few degrees if<br />
necessary. The barrel is exactly parallel<br />
to the centreline of the beam.<br />
Outside in All Weathers<br />
The PEL Light is designed to operate<br />
outside in all climates so no further<br />
protection is necessary. If installed inside<br />
a lighthouse or other building avoid<br />
having the beam pass through a glass<br />
window. This will reduce the intensity<br />
of the beam and could reduce the<br />
boundary sharpness. Allow the barrel<br />
to protrude and seal around it with a<br />
fl exible membrane.<br />
Safe Access for Servicing<br />
The PEL Light is best mounted on a stable<br />
plate 1000 mm above the fl oor of the<br />
servicing platform. The technician needs<br />
to check the alignment of each lamp<br />
whenever the light is serviced, so safe and<br />
comfortable access is essential. The Rear<br />
Can needs to be removed to gain access<br />
– the PEL-3 can hinges down, and the<br />
PEL-6 can slides back on rails for removal.<br />
The front lens of the light must be easily<br />
accessable for inspection and cleaning, as<br />
dirt and grime on this lens will cause the<br />
light output to deteriorate.<br />
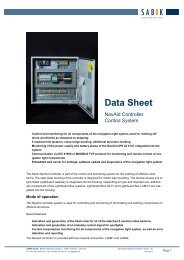
Design of Mounting Plate<br />
PEL-3 Lights (except the 3.5D size) have<br />
a triangular mounting plate as in photo<br />
below left. The PEL-3-3.5D and all PEL-6<br />
lights have two mounting feet to support<br />
the weight of the barrel. Refer to the PEL-<br />
6 dimension drawings for more detail.<br />
Unless the holes in the platform can be<br />
aligned very accurately they should not<br />
be drilled until the PEL Light is positioned<br />
and aligned. Some fi ne adjustment<br />
(azimuth and elevation) is available in the<br />
PEL Sector Light mounting.<br />
The beam would easily pass over the top<br />
of the safety railing.<br />
Operating from Commercial Power<br />
When an alternating-current (commercial<br />
or mains power) source is used, it<br />
is strongly recommended that the<br />
commercial power cable is continued right<br />
to the top of the tower. This is better than<br />
terminating at the base of the tower and<br />
running 12Vdc or 24Vdc cables up the<br />
tower, for the following reasons:<br />
• no significant voltage drop in<br />
the cables<br />
• avoids introducing “inductance”<br />
into the low-voltage circuit<br />
• reduces susceptibility to<br />
lightning damage<br />
In addition, it is strongly recommended<br />
that a battery is inserted between the<br />
power converter and the PEL Sector Light<br />
to provide a measure of autonomy in<br />
the event of a power failure, and further<br />
insulate the PEL Light from mains voltage<br />
spikes. It is well worth making provision<br />
for lifting batteries up to the platform.<br />
Cable lengths between power converter,<br />
battery and PEL Light should be kept as<br />
short as possible – ideally less than 1m.<br />
Vega VPR-39 Power Supply<br />
This is a weatherproof switch-mode<br />
power converter suitable for PEL Sector<br />
Lights operated from commercial power.<br />
It accepts 110Vac or 240Vac input, and<br />
can be set to 13.8Vdc or 27.6Vdc output.<br />
The VPR-39 can be used to power the<br />
PEL Light directly or it can be used as a<br />
charger when a battery is fi tted.<br />
1263<br />
Space to slide back<br />
and lower Rear Can<br />
for service access<br />
PEL-3-7D<br />
Space to access front<br />
lens for cleaning<br />
Safety Railing<br />
1000 mm high<br />
209<br />
Pedestal for PEL-3 Light:<br />
1000 mm high with<br />
top plate 300 mm square<br />
Scale 1:20<br />
300<br />
floor of platform<br />
775<br />
885<br />
Servicing platform 1660 mm long for this light<br />
14