
Create successful ePaper yourself
Turn your PDF publications into a flip-book with our unique Google optimized e-Paper software.
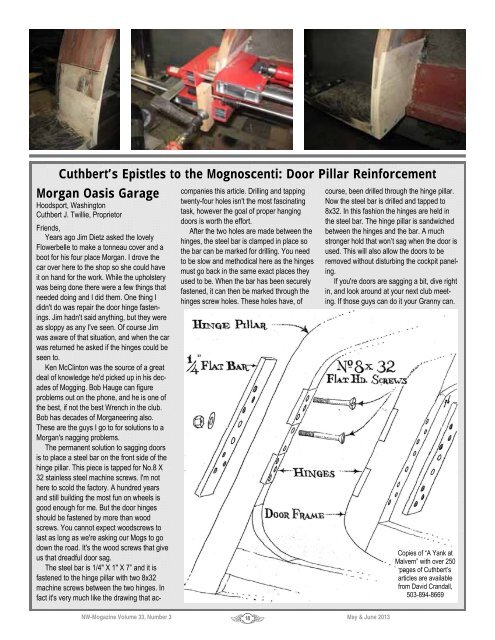
Cuthbert’s Epistles to the Mognoscenti: Door Pillar Reinforcement<br />
Morgan Oasis Garage<br />
Hoodsport, Washington<br />
Cuthbert J. Twillie, Proprietor<br />
Friends,<br />
Years ago Jim Dietz asked the lovely<br />
Flowerbelle to make a tonneau cover and a<br />
boot for his four place Morgan. I drove the<br />
car over here to the shop so she could have<br />
it on hand for the work. While the upholstery<br />
was being done there were a few things that<br />
needed doing and I did them. One thing I<br />
didn't do was repair the door hinge fastenings.<br />
Jim hadn't said anything, but they were<br />
as sloppy as any I've seen. Of course Jim<br />
was aware of that situation, and when the car<br />
was returned he asked if the hinges could be<br />
seen to.<br />
Ken McClinton was the source of a great<br />
deal of knowledge he'd picked up in his decades<br />
of Mogging. Bob Hauge can figure<br />
problems out on the phone, and he is one of<br />
the best, if not the best Wrench in the club.<br />
Bob has decades of Morganeering also.<br />
These are the guys I go to for solutions to a<br />
Morgan's nagging problems.<br />
The permanent solution to sagging doors<br />
is to place a steel bar on the front side of the<br />
hinge pillar. This piece is tapped for No.8 X<br />
32 stainless steel machine screws. I'm not<br />
here to scold the factory. A hundred years<br />
and still building the most fun on wheels is<br />
good enough for me. But the door hinges<br />
should be fastened by more than wood<br />
screws. You cannot expect woodscrews to<br />
last as long as we're asking our Mogs to go<br />
down the road. It's the wood screws that give<br />
us that dreadful door sag.<br />
The steel bar is 1/4" X 1" X 7” and it is<br />
fastened to the hinge pillar with two 8x32<br />
machine screws between the two hinges. In<br />
fact it's very much like the drawing that accompanies<br />
this article. Drilling and tapping<br />
twenty-four holes isn't the most fascinating<br />
task, however the goal of proper hanging<br />
doors is worth the effort.<br />
After the two holes are made between the<br />
hinges, the steel bar is clamped in place so<br />
the bar can be marked for drilling. You need<br />
to be slow and methodical here as the hinges<br />
must go back in the same exact places they<br />
used to be. When the bar has been securely<br />
fastened, it can then be marked through the<br />
hinges screw holes. These holes have, of<br />
NW-Mogazine Volume 33, Number 3 <strong>May</strong> & June 2013<br />
18<br />
course, been drilled through the hinge pillar.<br />
Now the steel bar is drilled and tapped to<br />
8x32. In this fashion the hinges are held in<br />
the steel bar. The hinge pillar is sandwiched<br />
between the hinges and the bar. A much<br />
stronger hold that won’t sag when the door is<br />
used. This will also allow the doors to be<br />
removed without disturbing the cockpit paneling.<br />
If you're doors are sagging a bit, dive right<br />
in, and look around at your next club meeting.<br />
If those guys can do it your Granny can.<br />
Copies of “A Yank at<br />
Malvern” with over 250<br />
pages of Cuthbert’s<br />
articles are available<br />
from David Crandall,<br />
503-894-8669