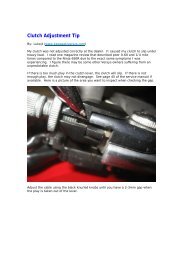
How to Carry Out Your First Oil & Filter Change - Slingshot
How to Carry Out Your First Oil & Filter Change - Slingshot
How to Carry Out Your First Oil & Filter Change - Slingshot

Create successful ePaper yourself
Turn your PDF publications into a flip-book with our unique Google optimized e-Paper software.
By: BikelessAnt<br />
<strong>How</strong> <strong>to</strong> <strong>Carry</strong> <strong>Out</strong> <strong>Your</strong> <strong>First</strong> <strong>Oil</strong> & <strong>Filter</strong> <strong>Change</strong><br />
I was planning <strong>to</strong> just let the dealer do the first oil change but after talking with Gary (BRP) it<br />
seemed getting the lower fairing off would be the most difficult part. It was but only because<br />
I made it that way.<br />
Required Parts:<br />
* 2 quarts your oil of choice<br />
* <strong>Oil</strong> filter Kawasaki Part# 16097-1072<br />
Required Tools:<br />
*17mm wrench/socket for oil plug<br />
* "Cup" type filter or strap wrench for oil filter<br />
* 4mm Hex Allen Wrench<br />
* Flat head screw driver<br />
* Funnel<br />
* Shop/paper <strong>to</strong>wels<br />
* <strong>Oil</strong> catch pan<br />
* Small piece of cardboard, keeps oil off headers while changing oil filter<br />
Access:<br />
You can see the 3 tabs as 3 black circles. There is one right behind the front wheel, and 2 at<br />
the bot<strong>to</strong>m.
<strong>First</strong> Tip: Removing the right side lower (non kickstand side) should give you enough room for<br />
the oil draining and filter removal/installation. I <strong>to</strong>ok the 3 hex bolts out first, then popped off<br />
the push-tabs on the bot<strong>to</strong>m (2) and 1 on the front that hold the lowers <strong>to</strong>gether. The lower<br />
will stay in place because of the tab that goes in<strong>to</strong> the upper fairing. Once you have removed<br />
all hex bolts & push-tabs it's just a matter of swinging the fairing out as if it were a cabinet<br />
door.
To take off the tabs, just grab a flathead. There will be 2 circles on one tab, a little and a big<br />
one. Just put the flathead under the small circle and pop it out, then the big one and it'll<br />
come right out.<br />
After you take off the 3 tabs and the 3 hex bolts on each side, it's simply a matter of fiddling<br />
with the panel lifting the bot<strong>to</strong>m upwards. This is an inside shot of the panel. As you can see,<br />
it is kind of hooked on<strong>to</strong> the upper fairing, so just lift the bot<strong>to</strong>m of the panel <strong>to</strong>wards you and<br />
keep the <strong>to</strong>p connected, then just lower it out.<br />
Changing <strong>Oil</strong>:<br />
Draining <strong>Oil</strong>:<br />
The drain plug is quite easy <strong>to</strong> get <strong>to</strong>, it's located just in front of the muffler on the right side<br />
of the bike (muffler outlet side). It actually protrudes and comes <strong>to</strong> a point which makes<br />
things very easy. Great design and no oil is left <strong>to</strong> drip on any parts. Allow the oil <strong>to</strong> drain.
There is the drain nut on the left and the oil filter on the right. Just take a 17mm and open it<br />
up and whatever you want <strong>to</strong> use for the filter.
Let the oil drain. Make sure you take off the oil cap for an easier flow. If you don't have the<br />
rear stand, then make sure you level the bike so the oil will drain completely.<br />
<strong>Oil</strong> <strong>Filter</strong> Removal:<br />
Also very easy <strong>to</strong> access, the headers curve around it in a way <strong>to</strong> allow easy access with<br />
enough room <strong>to</strong> use a "cup" type filer wrench with a ratchet. Since I was using the side stand<br />
there can be quite a bit of dripping on<strong>to</strong> the headers, use the small piece of cardboard <strong>to</strong> help<br />
keep the oil diverted (see picture below). Make sure the O-ring remains on the oil filter and<br />
double check the mounting surface where the filter attaches is clean.
Here’s what I used <strong>to</strong> direct the oil from the filter so it wouldn't hit the headers.<br />
New <strong>Oil</strong> <strong>Filter</strong> Installation:<br />
Use your finger <strong>to</strong> dip in the new oil and apply a nice coat around the NEW O-ring on the new<br />
oil filter. Then spin the new filter and seat it again the mounting area on the mo<strong>to</strong>r, give it<br />
another 3/4 turn or so until it's snug.<br />
Note: Don't forget <strong>to</strong> reinstall the OIL DRAIN PLUG once you are done. I prefer <strong>to</strong> wait and<br />
put it back in last as it seems <strong>to</strong> allow the oil <strong>to</strong> drain from the <strong>Oil</strong> <strong>Filter</strong> area better.<br />
Torque Specs: Tighten oil filter <strong>to</strong> 17.2 Nm; 13 ft-lbs; or 1.75 kgf-m<br />
Torque Specs: Tighten drain plug <strong>to</strong> 30 Nm; 22 ft-lbs; or 3.0 kgf-m<br />
Adding <strong>Oil</strong>:<br />
Once you have everything fitted (new oil filter & oil drain plug snug) it's time <strong>to</strong> get the funnel<br />
and add 2 quarts of oil in<strong>to</strong> the oil fill opening (right side). The owners manual calls for 2.0<br />
quarts but your amount may vary. Next replace the cap on the oil fill opening, then run the<br />
bike for a few minutes while checking for leaks.<br />
Note: Don't be alarmed if you see and smell a bit of smoke/oil burning some may have<br />
dripped on<strong>to</strong> the headers during the filter draining. Try using the cardboard trick Sileighty<br />
showed in the pictures above. Then check everything is snug one last time and then reinstall
the lower fairing(s). I elected <strong>to</strong> put the hex bolts in first but didn't tighten them fully. Then<br />
once lined up, clip in the 3 push tabs that connect the lowers, finally tighten the hex bolts.<br />
Note: Don't go crazy on tightening the hex bolts fairings are just plastic after all.<br />
Clean up the area where you <strong>to</strong>ok off the filter and put some oil on the new filter's O ring, and<br />
some inside the filter itself and screw it back on. Once it makes contact, screw it 3/4 of a circle<br />
more and you're set. Make sure you put the drain nut back on and add oil. Turn on the bike<br />
and let it run <strong>to</strong> circulate the oil. Once the oil light goes off, you can turn it off again and<br />
check the level. Make sure you check it with the bike level and not on the stand.<br />
Final Note: Check the oil view window after reinstalling the lower fairings. This would have<br />
given the oil enough time <strong>to</strong> cycle thru the oil filter and mo<strong>to</strong>r, then back down and give a<br />
good indication of the oil level. The oil should be between the two oil level fill marks on the oil<br />
view window.<br />
Now you're ready <strong>to</strong> ride again!!!<br />
Hope this helps others that haven't done an oil change or haven't had <strong>to</strong> deal with a full fairing<br />
bike. Let me know if anything seems out of place or any other input you may have.<br />
Good luck.<br />
(Pictures & Captions provided by Sileighty. Much thanks!)
Additional Posts:<br />
Other post on the Ninja 650R & ER-6N Forum (www.ninja650.com) post regarding oil and filter<br />
changes which may assist owners carrying out this task follow.<br />
Falcn: Check the oil level again after running it - the oil filter will fill up and hold some of the<br />
oil.<br />
BikelessAnt: I usually even pour a bit of oil in the filter for piece of mind since there would be<br />
that second of oil pump being "dry".<br />
TeddyT73: Some specs from the service manual for those that want this type of info.<br />
If you have a Torque wrench.<br />
Engine oil drain bolt - tighten <strong>to</strong> 30 Nm; 22 ft-lbs; or 3.0 kgf-m<br />
<strong>Oil</strong> filter - tighten <strong>to</strong> 17.2 Nm; 13 ft-lbs; or 1.75 kgf-m<br />
The official Kawasaki <strong>Oil</strong> <strong>Filter</strong> Wrench is part number 57001-1249. A 1-step 65mm 14 flutes<br />
cup type oil filter wrench will fit just fine and is available at most any au<strong>to</strong> parts s<strong>to</strong>re.<br />
I have a question about the replaceable gasket (Part# 92065-097) that goes on the engine oil<br />
drain bolt before it is replaced and tightened. Did you reuse the original part? If not, what do<br />
they cost? If so, any pointers on preserving it's viability for multiple uses?<br />
I don't recall seeing any mention in the Owner's Manual about the gasket, but it is clearly<br />
referenced in the Service Manual page 2-49 Periodic Maintenance - <strong>Oil</strong> <strong>Change</strong> procedures.<br />
"Replace the drain bolt gasket with a new one." It is also shown in the Exploded view of the<br />
engine lubrication system page 7-2 of the Service Manual.<br />
BikelessAnt: Checked www.ronayers.com on the drain plug gasket/washer, it's listed at 28<br />
cents. So maybe 60 cents or so at the dealer, at that price it's worth the piece of mind <strong>to</strong><br />
replace it every change. If you had <strong>to</strong> you could reuse the old one, I did since I forgot <strong>to</strong> get<br />
one while picking up my oil and filter.<br />
Slieghty: [quote: "The Swamp" Does anyone else's owner's manual indicate oil capacity is<br />
2.5 quarts? Is that a typo?]<br />
I went through some old pictures of the oil changes <strong>to</strong>day and look at what I found.<br />
No typo sir, its only when the engine is completely dry.