Kawasaki Ninja 650R Fairing Vibration.pdf - Slingshot
Kawasaki Ninja 650R Fairing Vibration.pdf - Slingshot
Kawasaki Ninja 650R Fairing Vibration.pdf - Slingshot

Create successful ePaper yourself
Turn your PDF publications into a flip-book with our unique Google optimized e-Paper software.
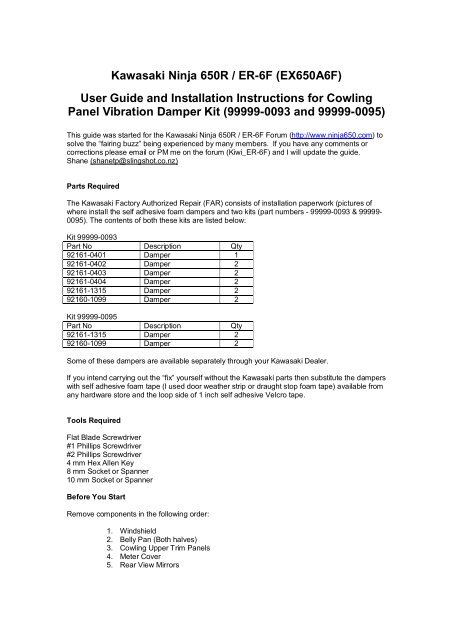
<strong>Kawasaki</strong> <strong>Ninja</strong> <strong>650R</strong> / ER-6F (EX650A6F)<br />
User Guide and Installation Instructions for Cowling<br />
Panel <strong>Vibration</strong> Damper Kit (99999-0093 and 99999-0095)<br />
This guide was started for the <strong>Kawasaki</strong> <strong>Ninja</strong> <strong>650R</strong> / ER-6F Forum (http://www.ninja650.com) to<br />
solve the “fairing buzz” being experienced by many members. If you have any comments or<br />
corrections please email or PM me on the forum (Kiwi_ER-6F) and I will update the guide.<br />
Shane (shanetp@slingshot.co.nz)<br />
Parts Required<br />
The <strong>Kawasaki</strong> Factory Authorized Repair (FAR) consists of installation paperwork (pictures of<br />
where install the self adhesive foam dampers and two kits (part numbers - 99999-0093 & 99999-<br />
0095). The contents of both these kits are listed below:<br />
Kit 99999-0093<br />
Part No Description Qty<br />
92161-0401 Damper 1<br />
92161-0402 Damper 2<br />
92161-0403 Damper 2<br />
92161-0404 Damper 2<br />
92161-1315 Damper 2<br />
92160-1099 Damper 2<br />
Kit 99999-0095<br />
Part No Description Qty<br />
92161-1315 Damper 2<br />
92160-1099 Damper 2<br />
Some of these dampers are available separately through your <strong>Kawasaki</strong> Dealer.<br />
If you intend carrying out the “fix” yourself without the <strong>Kawasaki</strong> parts then substitute the dampers<br />
with self adhesive foam tape (I used door weather strip or draught stop foam tape) available from<br />
any hardware store and the loop side of 1 inch self adhesive Velcro tape.<br />
Tools Required<br />
Flat Blade Screwdriver<br />
#1 Phillips Screwdriver<br />
#2 Phillips Screwdriver<br />
4 mm Hex Allen Key<br />
8 mm Socket or Spanner<br />
10 mm Socket or Spanner<br />
Before You Start<br />
Remove components in the following order:<br />
1. Windshield<br />
2. Belly Pan (Both halves)<br />
3. Cowling Upper Trim Panels<br />
4. Meter Cover<br />
5. Rear View Mirrors
6. Upper Cowling (After disconnecting the turn signal wires and headlamp<br />
connectors)<br />
7. Main Cowling Panels left and right side<br />
8. Main Cowling Inner Panels left and right side<br />
9. Headlight Assembly<br />
The pictures in the Modification section of this guide are taken from <strong>Kawasaki</strong> FAR; it’s a good<br />
place to start. If you have the kits, install them as per the pictures. Unfortunately for some<br />
people (myself included) just installing the kit did not completely eliminate the problem. If you<br />
want to carry out further work and be sure of a complete cure, then follow the suggestions in the<br />
Additional Information section of this guide.<br />
Keep all hardware (hex screws, washers, spacers, nuts and bolts) in order, separated and<br />
labeled, some parts although similar in appearance are in fact of different lengths (bolts) and<br />
thicknesses (washers).<br />
Use care with painted and plastic parts, they are easily damaged. Work inside in a clear and well<br />
lit area. Store items carefully and out of harms way when they are not being worked on.<br />
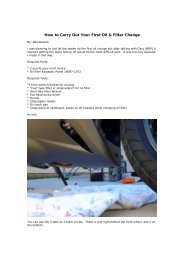
1. Windshield<br />
Remove the four hex screws and clear plastic washers that secure the windshield to the upper<br />
cowling. Tilt the windshield forward to disengage the tang at the front.
2. Belly Pan<br />
Remove the three plastic clips which secure the two halves of the belly pan. First pull the centre<br />
pin to it’s out position using a flat blade screwdriver, use a spanner or another screwdriver shaft<br />
wrapped in a rag to act as a pivot point. Care should be taken not to damage the surrounding<br />
paint. With the centre pin pulled out, the clip can be removed by hand.<br />
Remove the two hex screws and clear plastic washers on each side that secure belly pan to the<br />
left and right main cowling panels. Note these hex screws are longer than all other hex screws<br />
used, take care not to mix. Remove the lower rear hex screw, stepped washer and clear plastic<br />
washer on each side and remove the belly pan. The left and right main cowling panels have<br />
tangs which locate into their respective belly pan halves.
3. Cowling Upper Trim Panels<br />
Remove the two hex screws and clear plastic washers on each side that secure the left and right<br />
cowling upper trim panels. Note these washers are thicker than all other washers used, take care<br />
not to mix. The left and right cowling upper trim panels have a tang which locates into the meter<br />
cover.<br />
4. Meter Cover<br />
Remove the two #1 phillips screws and clear plastic washers on each of the meter; these secure<br />
the meter cove to the upper cowling. Pull the meter cover rearward to disengage it from the<br />
upper cowling.
5. Rear View Mirrors<br />
Remove the two 10mm nuts on each side that secure the mirror assemblies to the frame. Note<br />
there is rubber gaskets each side of the upper cowling. Remove the two #1 phillips screws which<br />
connect the centre cowling to the left and right main cowlings.<br />
6. Upper Cowling<br />
Disconnect the two headlight connectors from the headlight assembly. Open the tabs on each<br />
side that secure the wiring to the turn signals.
Disconnect the turn signal plugs on each side, these connectors are located under the inner<br />
panels between the main cowling and its respective inner panel. Squeeze the locking tang on the<br />
side of the connector, and at the same time gently pull the plug halves apart.<br />
Thread the looms on each side back through the loops and allow them to dangle loose.<br />
Remove the two #1 phillips screws and clear plastic washers on each of the left and right main<br />
cowlings. These are located above the front wheel. Note the upper cowling and headlight<br />
assembly is now only secured to the bike by tangs in the left and right main cowlings and the<br />
mirror mounting brackets. Support the upper cowling and headlight assembly until you<br />
remove it.<br />
Ease apart the upper cowling and the left and right main cowlings until the tangs in the left and<br />
right main cowlings have disengaged. Lift the upper cowling clear.
To assist in providing some play in the left and right main cowlings loosen or remove the rear hex<br />
screws on each side of the left and right main cowlings.<br />
7. Main Cowling<br />
Remove the rear hex screw, stepped washer and clear plastic washer on each side and remove<br />
the left and right main cowling panel. The left and right main cowling panels have a pin which<br />
pushes through a rubber grommet in the frame.<br />
8. Main Cowling Inner Panels<br />
Remove the three #2 phillips head self tapping screws on each side of the left and right main<br />
cowling panel.
9. Headlight Assembly<br />
Remove the four 8 mm bolts that secure the headlight assembly to the upper cowling. Note: Do<br />
not touch any other bolt, these are used for headlight adjustment.<br />
10. Modification<br />
Using the following photos as a guideline, install the foam dampers in the positions indicated:
11. Reassembly<br />
Reassemble the cowling in the reverse order of disassembly.<br />
Use caution when tightening inner panel screws and headlight bolts. The cowling brackets are<br />
thin and can break easily.<br />
Do not over-tighten phillips or hex head bolts, insert screws gently as the captured nuts are<br />
rubber mounted and can push through requiring disassembly to refit.<br />
The rubber mounted captured nuts can turn this sometimes makes screw starting difficult, gently<br />
hold the captured with your fingers until started.<br />
Allow at least a couple of hours to carry out this work.<br />
12. Additional Information<br />
Unfortunately from my experience and a number of other forum members just installing the<br />
<strong>Kawasaki</strong> Kit has not completely solved the “fairing buzz”. Additional work is required to<br />
completely eliminate the problem.<br />
Following are posts from the forum detailing areas where additional dampers or tape can be<br />
installed. Some members including myself have use weather strip or draught stop which is a<br />
adhesive backed foam tape available from most hardware stores and the loop side of self<br />
adhesive Velcro tape.<br />
As of mid June 2006 there are posts on <strong>Kawasaki</strong> <strong>Ninja</strong> <strong>650R</strong> / ER-6F Forum<br />
(http://www.ninja650.com) indicating that another kit P/N 99999-0097 is available. What this kit is<br />
or consists of is unknown.<br />
It may help to read the posts in reverse, the latest information is at the end.
Posted: Fri Mar 03, 2006 4:21 am (Methuselah)<br />
Firstly, the lower cowl was NOT vibrating at all, and there was no need to bend the bracket. The<br />
bracket fits nicely on the INSIDE of both fairing segments, so from inside to outside the order is<br />
Bracket-Top <strong>Fairing</strong>-Bottom-Cowl.<br />
1. The "horizontal dash" pieces have three vertical support tabs underneath that buzz and rattle<br />
(mainly around the 2K / 4K frequency.) I could see chafe marks on the underside of the dash and<br />
abrasion patches on top where it meets the underside of the fairing lip. Added pieces over the<br />
tabs only . . . presses up against the outside fairing now.<br />
2. The vertical "side cover" inside the fairing (part 14091-0596) was making contact with a 1/4"<br />
slightly raised section just before the bottom corner of the indicator housing / bracket. Added a<br />
strip there. When the cover is replaced, the mouse pad-sliver starts where the cover lip ends to<br />
make space for the indicator housing anyway. (There is also some rattle buzz inside the flicker<br />
unit I didn't solve)<br />
3. The fairing "nose" which goes all around the headlights had the loudest, angry buzz at the 4K<br />
mark. This segment is actually quite loose-fitting in that you can see background light almost all<br />
the way around. The nose of the gray V-shaped instrument "dash-cover" (part 55028-0081) has<br />
two small tabs that slot under the fairing ridge to hold it down. In addition, the windscreen nose<br />
slots in there as well. When you hold the screen as some have reported, this action often lifts the<br />
screen and instrument cover off the headlight assembly, solving the buzz. I decided to simply<br />
keep it all lifted up, inserting two 3-inch long sections under the fairing nose plastic that encircles<br />
the headlight - roughly above each of the headlight bulbs.<br />
I also added two bits under the place where the tabs were chaffing.<br />
There were three other vibration patches visible between the "instrument dash" and the fairing it<br />
rested on (pics will help, I know ). There was also a Z-shaped tab on the underside of this dash<br />
that did NOT make contact with anything - so I really don't know what it was for. It nestles close to<br />
the top of the headlight assembly, so I added some tape there to prevent any left-right movement.<br />
This made a very snug fit, which was further enhanced by two strips towards the top of the V,<br />
where it rested on the fairing tray. (yes, it bulged up slightly, but is hard to see, especially with the<br />
screen attached.)<br />
I didn't do anything with the windscreen other than put it back on.
Posted: Sun Mar 12, 2006 12:05 pm (Kiwi_ER-6F)<br />
Very possibly there is more than one part vibrating, my worst one was up the front and holding<br />
the windscreen appeared to affect it, but not remove it.<br />
After another ride yesterday (Saturday) the buzz still remains. I was determined to fix it so I went<br />
for a number of rides around the suburb I live in, each time removing another item until "bingo"<br />
with the headlight assembly removed the noise stopped.<br />
I then fitted a strip of adhesive foam (door draught stop) around the headlight assembly following<br />
the contours of the lamp where it would touch the plastic nose trim but far enough back so as not<br />
to be visible with the assemble fitted. The draught stop is exterior quality so won't disintegrate<br />
with moisture and starts and ends at the foam <strong>Kawasaki</strong> have already fitted in the V of the lamp<br />
assembly.<br />
The headlight assembly is now completely cushioned against the nose fairing and I can't hear any<br />
noise in the 4000-5000 rpm range except the intake and exhaust growl.<br />
The white draught stop is just visible between the lamp and the fairing but not at all noticeable.<br />
Posted: Fri Mar 24, 2006 7:50 am (TGM65)<br />
I got some 3/16" neoprene (rubber) washers at Home Depot and put them on ALL of the bolts<br />
that hold the upper fairing on, including the separate "top" sections of the fairing on each side of<br />
the gas tank. Where it was possible, I put washers on both sides of the fairing (inside and<br />
outside) to separate the fairing slightly from the mounting points. Buzzing gone!<br />
Posted: Fri Mar 10, 2006 8:38 pm (Kiwi_ER-6F)<br />
Anyway I think the problem lies in the way the upper fairings lock into the centre headlight fairing.<br />
Basically there is only four screws securing all this, two at the front (underside) and two at the<br />
rear each side. The fairings locate and lock together with three tab like moldings (male in the side
fairing and female (indents) or holes in the headlight fairing.<br />
I have wrapped the three tabs on each side with fiberglass tape so there is no plastic to plastic<br />
contact. I have also removed the headlight assembly and run some tape around the inside of the<br />
fairing where the headlight might touch the fairing and buzz. All this is hidden from view.<br />
Result is the buzz has gone. I need to try it on the road but as it running and revving in the garage<br />
all I can here is the exhaust and induction growl.<br />
Posted: Fri Apr 07, 2006 4:43 pm (Mark)<br />
I started this thread stating I fixed the buzz, but I didn't.<br />
I called the dealer Saturday, he called <strong>Kawasaki</strong> on Monday, the kit came today. I told the dealer I<br />
wanted to put the kit on, and he told me if I did install it I was on my own. I told him I had the<br />
fairing off something like 15 to 20 times, so I figured I have probably done it more than his<br />
mechanic (who later told me he has yet to work on a <strong>Ninja</strong> 650)<br />
I took my time, <strong>Kawasaki</strong>'s instructions were clear and concise. The neoprene dampers are very<br />
high quality. I also really, really wanted to see for myself where the friggin buzz was coming from,<br />
so just getting a quiet bike back from the dealer was not enough for me.<br />
So, the biggest culprit? The inner panel that attaches to the main cowling, right where the turn<br />
signal is. The turn signal had multiple scratch/abrasions right where it meets up with the inner<br />
panel. The right one was worse than the left, by far. After putting on all the dampers, the fairing<br />
buttons down a little tighter, and I like that.<br />
Posted: Wed May 03, 2006 4:35 pm (Mark)<br />
I put a little sticky foam tape on each of the three posts on the top/side fairings that the inner<br />
panels sit on when you bolt them on. No buzz, at all, at any RPM. It seems like the posts pushed<br />
into the piece of foam at the edge of the panels, and were contacting the plastic.<br />
Posted: Tue May 02, 2006 8:24 pm (Kiwi_ER-6F)<br />
Even with the kit fitted I can still hear some buzz, I intend to fit further dampers and anti-chaff<br />
strips when time permits. One I have already fitted where I could see chaff marks is on the inner<br />
side of both L/H & R/H main cowlings where the forward wiring hoop (for the indicator wiring) is<br />
chaffing.<br />
Posted: Wed May 03, 2006 8:52 pm (Kiwi_ER-6F)<br />
I mentioned in my last post and after riding about 1700 km over the last weekend I still have a<br />
slight buzz in the 4000-5000 range (although not as bad as before I installed the kit).<br />
I decided to remove upper cowling again and have a look for chaffing marks. Here's where they<br />
are:<br />
1. Both sides on the L/H & R/H main cowling just forward of where the lower attachment screws<br />
(above the front wheel) for the upper cowling are located. The upper cowling has small raised<br />
areas that are designed to contact the L/H & R/H main cowlings, these are chaffing so I have<br />
placed thin fiberglass tape over the chafes. I have also taped these raised areas up top as well.<br />
2. Chaffing is evident on most of the lugs (three each side) which locate the L/H & R/H main<br />
cowlings to the upper cowling. I have placed fiberglass tape on the lugs and inside the recesses<br />
for the forward lugs on the upper cowling.<br />
3. Headlight assy, no chaffing evident but I placed foam strip around the lens, on the black<br />
portion so it can't be seen.<br />
4. Noticed the windshield was chaffing against the meter cover, there is already one small
damper at the top (each side, there from manufacture) of the meter cover so I have added clear<br />
prop tape ( a thick clear weather resistant tape we use on aircraft prop heater elements) down<br />
each side and a couple of small strips at the bottom. This separates the windshield from the<br />
meter cover.<br />
Posted: Mon May 15, 2006 1:04 pm (Darklogic)<br />
Well, I did have it stripped down again this weekend. This time I did the search systematically,<br />
revving to 4K rpm and listening for the buzz and then going out for a short ride with the bike in<br />
various stages of undress so that I could listen while riding. I removed piece after piece until only<br />
the headlight assembly and upper cowling remained. The buzz was still there, as angry as ever.<br />
After some experimentation, I found that the upper cowling directly underneath the headlight<br />
seemed to be making the noise. It seemed that the insulation I'd done there was not good<br />
enough.<br />
I took some soft rubber strip a few millimetres wide (dunno what it is used for - found it in the<br />
hardware store; neoprene would work well too, as this was quite similar to neoprene in terms of<br />
weight and compressibility) and using double sided tape, stuck it to the bottom part of the upper<br />
cowling assembly just below the headlight. For good measure, I added some to the top part too,<br />
as indicated in the picture below.<br />
The key to eliminating the buzz in my case was to ensure that the rubber that I put onto the<br />
cowling just below the headlight protruded a couple of millimetres so that when the headlight was<br />
put back in place and mounted using the bolts, it sandwiched the rubber between the headlight<br />
and the cowling. The following picture shows the rubber protruding enough to create a<br />
reasonable damping effect:
Remount everything, and hey presto! the buzz is gone.<br />
As Shane pointed out earlier, the cabling for the instruments and lights runs quite close to the<br />
meter cover. I cable tied it so that there was no chance of it touching the meter cover. There's a<br />
hole in the mounting assembly just below the cable that you can use to pass a cable tie through.<br />
In the pic below, the cable tie I added is in the bottom middle of the image:<br />
So, for the record, I think that the rubber on the bottom part of the cowling underneath the<br />
headlight did the trick. The two others are superfluous. Anyway, thanks to Shane and all the<br />
others for the help and comments.
Posted: Wed May 17, 2006 10:15 am (Kiwi_ER-6F)<br />
Upper Cowling - Item No. 55028A/B - This is the front centre fairing which holds the headlight<br />
assembly & Mirrors (Item No. 56001 & 56001A).<br />
L/H & R/H Main Cowlings - L/H Item No. 55028E/F & R/H Item No. 55028G/H - These are the<br />
large main fairings on each side of the motorcycle.<br />
L/H & R/H Cowling Upper Trim Panels - L/H Item No. 55028C & R/H Item No. 55028D - These<br />
are the horizontal side fairings on top of the Main Cowlings.<br />
L/H & R/H Main Cowling Inner Panels - L/H Item No. 14091 & R/H Item No. 14091A - Cover<br />
panels located on the inside of the Main Cowlings covering the back of the indicators.<br />
Meter Cover - Item No. 55028 - Covers the instrument cluster, underneath the windshield (Item<br />
No. 39154)<br />
Belly Pan - A fairing in two halves which connects to the lower edge of the Main Cowlings,<br />
covering the exhaust, lower crankcase & oil filter.
Posted: Sat Jun 17, 2006 10:24 am (Kiwi_ER-6F)<br />
BikelessAnt wrote:<br />
Has anyone else seen the 99999-097 part number for the fairing buzz damping kit?<br />
Then this would be FDM #2? Would like to verify then place the info in the FAQ thread.<br />
To clarify things for those who are following this thread. The original <strong>Kawasaki</strong> Factory Authorized<br />
Repair (FAR) paperwork had only one kit part number mentioned - 99999-0093, later paperwork<br />
had two kit part numbers - 99999-0093 & 99999-0095. The contents of both these kits make up<br />
the original FAR and are just a collection of self adhesive dampers and the paperwork.<br />
What I am trying to say is that as far as I can see the FAR itself doesn't have a number as such,<br />
only a title - EX650A6F Installation Instructions for Cowling Panel <strong>Vibration</strong> Damper Kit (99999-<br />
0093 & 99999-0095). The two kits required to carry out the repair are: P/N 99999-0093 & P/N<br />
99999-0095.<br />
What we need is copy or scan of the latest paperwork so we can see what Kit P/N 99999-0097<br />
actually is. It may be another (additional) FAR, it may be just the P/N of the original FAR with the<br />
two kits (ie: no changes, the FAR now has a P/N). Until I can view a copy I can't tell.<br />
Please if someone can get a copy please PM or email me so I can update the guide.<br />
Posted: Fri Jun 30, 2006 3:37 pm (dongarii)<br />
I have completed eliminated the buzz and all RPM. The faring kit from <strong>Kawasaki</strong> only eliminated<br />
part but not all. Here is what I did to eliminate the remaining buzz. It comes from multiple areas.<br />
1. Get some 1/4" insulation from your local hardware store.<br />
2. Take all the fairings, windshield, dash, headlight assembly, etc apart as indicated in the faring<br />
removal directions from the damping kit from <strong>Kawasaki</strong>.<br />
3. Headlight assembly vibrates against the nose faring. Completely surround the open where the<br />
headlight fits into the faring with the insulation. I placed it on the faring so not to be seen but will<br />
press against the headlight assembly when screwed into the faring. This is the biggest buzz area<br />
but there are others.<br />
4. The side-marker vibrates against the inner faring. There is not enough damping material there<br />
put some extra insulation there on top of the original damping material. Make sure to run it the<br />
length of the sidelight and a little more. This eliminates this buzz.<br />
5. There is a hoop wire holder towards the front of the inner faring. It sits on top of the inner<br />
faring. This vibrates on the main upper faring. Place insulation to prevent this from vibrating.<br />
6. The upper dash will have 3 strips of damping material on each of the V shape sides. Place an<br />
additional piece of insulation on top of the damping material that is at the widest part of the V on<br />
both sides. When you install the windshield, the windshield will press against the upper dash and<br />
stop it from vibrating on the nose faring.<br />
7. I also placed additional insulation on the upper faring where the left and right horizontal covers<br />
touch the underside of the upper faring.<br />
Start the baby up and rev it up to 4000-4200 RPM and enjoy the quiet sound of the motor.
Posted: Tue Jul 11, 2006 10:28 am (Kiwi_ER-6F)<br />
I've been following this thread (and any others relating to the infamous fairing buzz) since the<br />
start. My bike buzz started at about 600-700 kms. It was bad! At its worst I could hear it over the<br />
engine and wind noise at 120 km/hr. I tried some fixes myself, tape, foam strip etc. Things<br />
improved but never fully. I obtained the <strong>Kawasaki</strong> kit and followed it to the letter, results were<br />
about the same as my own attempts probably because the kit only addressed issues I had<br />
already identified.<br />
I have since tried further mods, more dampers from <strong>Kawasaki</strong> under the windshield between it<br />
and the instrument cover, tape on chaff marks, more foam tape etc... Each and every time there<br />
was less buzz but it would come back.<br />
The kit address the big buzz but will not remove all of it, the problem is that as time goes on and<br />
more miles are covered the buzz increases again.<br />
My last attempt (probably 5th time I have completely removed the fairings) has finally fixed the<br />
buzz, no buzz! None what-so-ever!!!<br />
It's great, all I hear is engine and induction noise, even when I pass thru the dreaded 4000-5000<br />
rpm zone, even in that zone at lower speeds when there is less wind noise.<br />
Fortunately I have a silver bike and the chaffs show up as black marks, I used the loop (wooley)<br />
side of self adhesive velcro and self adhesive foam tape (draft stop).<br />
Places I have put stuff:<br />
Completely around the headlight cutout of the upper cowling, as close to the edge as possible<br />
and especially in the V.<br />
Around the headlight assy.<br />
Around the three protrusions (tabs) which locate the upper cowling to the L/H & R/H main<br />
cowlings.<br />
On the underside of the upper cowling where the instrument cover and windshield touches.<br />
A number of other chaffs on the L/H and R/H main cowlings where they touch other parts and the<br />
lower cowlings.<br />
I have now covered 500 kms, with no noise. I can't believe how much this actually irritated me<br />
until it went away.<br />
Posted: Tue Jul 11, 2006 6:09 pm (Kiwi_ER-6F)<br />
OK, now I have some more time I'll fully list all the places I have found chaffing:<br />
1. Headlight assembly and upper cowling, I believe this is the major cause of the buzz. I found<br />
chaffing along the lower edge of this fairing where it rubs against the headlight. I have placed<br />
adhesive backed foam tape (draft stop) completely around the edge of the headlight aperture and<br />
around the headlight itself, if you use light foam strip it will compress a lot.<br />
2. With the upper cowling off the bike and headlight assy removed slide in the instrument cover,<br />
you'll see where it touches the upper cowling, I have fitted dampers as per the <strong>Kawasaki</strong> kit to the<br />
underside of the instrument cover, on the upper cowling I have fitted Velcro over the upper<br />
headlight mounting posts, at the front where the tabs of the instrument cover slide in I have also<br />
fitted Velcro.<br />
3. On the upper cowling where the tab at the front of the windshield fits I have placed Velcro.
Cut the Velcro down the middle to make narrow strips if needed.<br />
4. At the back of the instrument cover where it touches the upper cowling I fitted another small<br />
strip of Velcro.<br />
5. The L/H and R/H main cowlings locate into the upper cowling using three tabs. The front is C<br />
shaped and fits in a socket, this was chaffing so I have fitted Velcro around the inside of the<br />
socket. The second tab slides thru a hole, this is covered in Velcro and the rear tab is small and<br />
round, this is also covered in Velcro.<br />
With these covered the fit of the cowlings is not good so a little force (gentle) is needed to make<br />
everything line up during assy.<br />
6. On the L/H and R/H main cowling inner panels I fitted dampers as per the <strong>Kawasaki</strong> FAR and<br />
fitted a small foam strip between the front indicator wiring hoop and the fairing.<br />
7. L/H & R/H Cowling Upper Trim Panels had chaffs at the back so some Velcro fitted there, also<br />
I noticed that even with the FAR dampers fitted the support tabs on the L/H & R/H main cowling<br />
for the Trim Panels caused fretting, I wrapped the tabs with Velcro.<br />
8. Look for chaffing marks on the L/H & R/H Main Cowlings I found a couple of random spots so<br />
these all got some Velcro.