14GT15 14GT20
14GT15 14GT20
14GT15 14GT20

You also want an ePaper? Increase the reach of your titles
YUMPU automatically turns print PDFs into web optimized ePapers that Google loves.
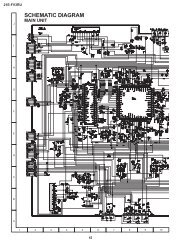
<strong>14GT15</strong><br />
<strong>14GT20</strong><br />
No. Adjusting point Adjusting procedure/conditions Waveform and others<br />
1<br />
SUB-TINT (I 2 C<br />
BUS CON-<br />
TROL)<br />
NTSC CHROMA ADJUSTMENT<br />
1. Receive the "NTSC3.58 Colour Bar" signal<br />
through AV in.<br />
2. Connect the oscilloscope to TP853 (Pin (5) of<br />
P882) BLUE-OUT.<br />
» Range : 100mV/div. (AC)(Use Probe 10:1)<br />
» Sweep time : 10 µsec/div.<br />
(SAME LEVEL)<br />
3. Call the "SUB-TINT" mode in service mode. Adjust<br />
the "SUB-TINT" bus data to obtain the waveform<br />
shown as Fig. 9.<br />
4. Clear the SERVICE mode.<br />
W Y Cy G Mg R B<br />
Fig. 9<br />
PROTECTOR OPERATION CHECKING<br />
No. Adjusting point Adjusting procedure/conditions Waveform and others<br />
1 BEAM PRO-<br />
TECTOR<br />
1. Receive "Monoscope Pattern" signal.<br />
2. Set CONTRAST MAX.<br />
3. Set BRIGHT MAX.<br />
4. During the Collector & Emitter of Q883/5/7 short,<br />
make sure the protector ON and switch to standby<br />
mode.<br />
* Select one of Q883/5/7 to do<br />
each short test.<br />
2<br />
3<br />
H, V PROTEC-<br />
TOR<br />
Other<br />
protectors<br />
1. Receive "Monoscope Pattern" signal.<br />
2. Connect output of Bias Box to D607 cathode<br />
(R606 side).<br />
3. Set voltage of Bias Box to 18V and make sure<br />
the protector is not work.<br />
4. Set voltage of Bias Box to 27V, and make sure<br />
the protector is work.<br />
1. Once finish rectified Electrolytic Capacitor short<br />
testing in +B line, check all possible damaged<br />
components on +B line.<br />
(Use random selected set for inspection)<br />
No. Adjusting point Adjusting procedure/conditions Waveform and others<br />
1<br />
VIDEO AND<br />
AUDIO<br />
OUTPUT<br />
CHECK<br />
A/V INPUT AND OUTPUT CHECKING<br />
1. Receive the "PAL Color Bar" signal (100% White<br />
Color Bar, Sound 400 Hz 100% Mod.)<br />
2. Terminate the Video output with a 75 ohm impedance.<br />
Make sure the output is as specified (1.0<br />
Vp-p ±3 dB).<br />
3. Terminate the Audio output with a 10k ohm impedance.<br />
Make sure the output is as specified<br />
(1.76 Vp-p ±3 dB).<br />
2<br />
VIDEO AND<br />
AUDIO INPUT<br />
CHECK<br />
1. Using the TV/AV key on the remote controller,<br />
make sure that the modes change in order of TV,<br />
AV1, AV2 & TV again and the video & audio output<br />
are according to the input terminal for each<br />
mode.<br />
16