14GT15 14GT20
14GT15 14GT20
14GT15 14GT20

You also want an ePaper? Increase the reach of your titles
YUMPU automatically turns print PDFs into web optimized ePapers that Google loves.
<strong>14GT15</strong><br />
<strong>14GT20</strong><br />
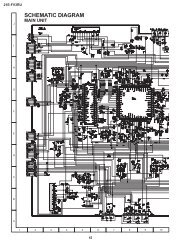
CUT-OFF, BACKGROUND AND SUB-CONTRAST ADJUSTMENT<br />
No. Adjusting point Adjusting procedure/conditions Waveform and others<br />
1<br />
CRT CUTOFF<br />
ADJUSTMENT<br />
(I 2 C BUS<br />
CONTROL)<br />
1. Switch TV to VIDEO mode,BLUE BACK OFF, with<br />
NO VIDEO signal.<br />
2. Press R/C to set Picture Normal condition.<br />
3. Connect the oscilloscope to Red OUT from<br />
IC801.(TP851)<br />
3.0Vdc<br />
Range : 1 V/Div (DC)<br />
Sweep : 5 msec/Div<br />
4. Adjust SCREEN VR ,so that the tip of signal reach<br />
3.0 Vdc + 0.1 Vdc.<br />
0<br />
1 V<br />
2<br />
SUB-BRIGHT-<br />
NESS<br />
ADJUSMENT<br />
(I 2 C BUS<br />
CONTROL)<br />
1. Call " SUB-BRI" in service mode. (Receive Crosshatch<br />
pattern with 5 black level windows)<br />
2. Adjust the " SUB BRIGHT " bus data in order that<br />
the line 1, 2 and 3 have the same darkness<br />
whereas line 4 is slightly brighter than line 1, 2<br />
and 3 and finally line 5 will be the brighter than<br />
line 4.<br />
1 2 3 4 5<br />
1, 2, 3 are in same black level.<br />
3 WHITE BAL-<br />
ANCE SERV-<br />
ICE MODE<br />
1. Receive the "WHITE" pattern with BURST signal.<br />
2. Press R/C to set Picture NORMAL condition.<br />
3. Connect the DC miliammeter between TP602 (-)<br />
* 12300°K X : 0.272<br />
Y : 0.275<br />
ADJ. (I 2 C BUS<br />
CONTROL)<br />
and TP603 (+).<br />
4. Check Beam current should be around 800 µA.<br />
5. Set it to service mode and adjust the " WPG"<br />
(WhitePoint-G), "WPB" (White Point-B) data to<br />
have a colour temperature of 12,300°K ( white ).<br />
* Note .<br />
6. Receive "WHITE" pattern, with BURST signal, and<br />
set Brightness Y by generator, to **10cd/m 2<br />
Minolta CA-100) by reducing Luminate Y signal.<br />
7. Adjust "CUT-R" & "CUT-G" to get 12,300°K . Then<br />
go back normal mode. (High Bright)** to check<br />
colour temperature. If out of range, back to 1.<br />
(MINOLTA COLOUR ANALYZER<br />
CA-100)<br />
*Note: Above Data can be UP/<br />
DOWN by Volume key.<br />
Note: This adjustment must be done after<br />
warming up the unit for 30 minutes or<br />
longer with a beam current over 500µA).<br />
* Adjust DRI-GC/GW, DRI-BC/BW as following<br />
data, after finishing DRI-GS and DRI-BS: DRI-<br />
GC=DRI-GW="DRI-GS"-7:DRI-BW="DRI-BS"-<br />
7:DRI-RC=25:DRI-BC=DRI-BS:DRI-RW=32<br />
** Low=10cd/m 2 :High=200cd/m 2<br />
4<br />
Maximum<br />
beam check<br />
1. Receive the "Monoscope Pattern" signal.<br />
2. Press R/C to set Picture NORMAL condition.<br />
3. Connect the DC miliammeter between TP603 (+)<br />
and TP602 (–).<br />
(Full Scale: 3 mA Range)<br />
4. Beam current must be within 800 ± 100 µA.<br />
14