Nexus Wiring Diagrams - Klaxon Signals Ltd.
Nexus Wiring Diagrams - Klaxon Signals Ltd.
Nexus Wiring Diagrams - Klaxon Signals Ltd.

You also want an ePaper? Increase the reach of your titles
YUMPU automatically turns print PDFs into web optimized ePapers that Google loves.
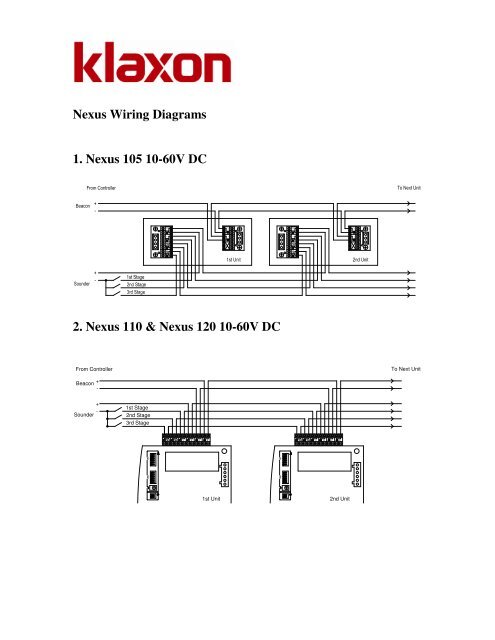
<strong>Nexus</strong> <strong>Wiring</strong> <strong>Diagrams</strong><br />
1. <strong>Nexus</strong> 105 10-60V DC<br />
2. <strong>Nexus</strong> 110 & <strong>Nexus</strong> 120 10-60V DC<br />
From Controller<br />
To Next Unit<br />
Beacon<br />
+<br />
-<br />
Sounder<br />
+<br />
-<br />
1st Stage<br />
2nd Stage<br />
3rd Stage<br />
<br />
<br />
<br />
<br />
<br />
<br />
<br />
<br />
<br />
<br />
<br />
<br />
<br />
<br />
<br />
<br />
1st Unit<br />
2nd Unit
3. <strong>Nexus</strong> 105 110/230V AC<br />
From Controller<br />
To Next Unit<br />
Beacon<br />
L<br />
N<br />
<br />
<br />
<br />
<br />
<br />
<br />
1st Unit<br />
2nd Unit<br />
Sounder<br />
L<br />
N<br />
4. <strong>Nexus</strong> 110 & <strong>Nexus</strong> 120 110/230V AC<br />
From Controller<br />
To Next Unit<br />
Beacon L<br />
Sounder L<br />
Common N<br />
2nd Stage<br />
3rd Stage<br />
<br />
<br />
<br />
<br />
<br />
<br />
<br />
<br />
<br />
<br />
<br />
<br />
<br />
<br />
<br />
<br />
<br />
<br />
<br />
<br />
<br />
<br />
<br />
<br />
<br />
<br />
1st Unit<br />
2nd Unit<br />
5. General<br />
a) When using an 110V AC supply rather than 230V connect Live to<br />
terminals marked 110V instead of terminals marked 230V.<br />
b) <strong>Nexus</strong> 105 AC model does not have provision for multi-stage<br />
signalling.<br />
c) Connections for optional Xenon and LED beacons are the same.<br />
d) These wiring diagrams should be used in conjunction with the<br />
installation guide supplied with the products. The installation guide<br />
provides full details of the product specification, installation and<br />
controls.