

reprap-granule-extruder-tudelft1
reprap-granule-extruder-tudelft1
reprap-granule-extruder-tudelft1

You also want an ePaper? Increase the reach of your titles
YUMPU automatically turns print PDFs into web optimized ePapers that Google loves.
4 | From <strong>granule</strong> to extrusion<br />
Power supply<br />
Power supply<br />
+ 12v Gnd<br />
+ 12v Gnd<br />
Motor<br />
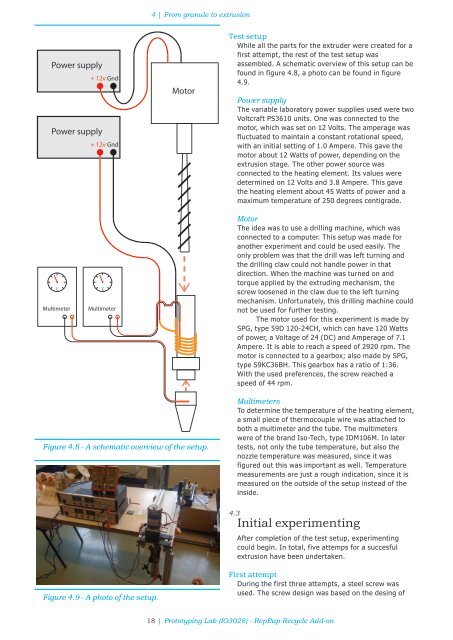
Test setup<br />
While all the parts for the <strong>extruder</strong> were created for a<br />
first attempt, the rest of the test setup was<br />
assembled. A schematic overview of this setup can be<br />
found in figure 4.8, a photo can be found in figure<br />
4.9.<br />
Power supply<br />
The variable laboratory power supplies used were two<br />
Voltcraft PS3610 units. One was connected to the<br />
motor, which was set on 12 Volts. The amperage was<br />
fluctuated to maintain a constant rotational speed,<br />
with an initial setting of 1.0 Ampere. This gave the<br />
motor about 12 Watts of power, depending on the<br />
extrusion stage. The other power source was<br />
connected to the heating element. Its values were<br />
determined on 12 Volts and 3.8 Ampere. This gave<br />
the heating element about 45 Watts of power and a<br />
maximum temperature of 250 degrees centigrade.<br />
o<br />
C<br />
Multimeter<br />
o<br />
C<br />
Multimeter<br />
Motor<br />
The idea was to use a drilling machine, which was<br />
connected to a computer. This setup was made for<br />
another experiment and could be used easily. The<br />
only problem was that the drill was left turning and<br />
the drilling claw could not handle power in that<br />
direction. When the machine was turned on and<br />
torque applied by the extruding mechanism, the<br />
screw loosened in the claw due to the left turning<br />
mechanism. Unfortunately, this drilling machine could<br />
not be used for further testing.<br />
The motor used for this experiment is made by<br />
SPG, type 59D 120-24CH, which can have 120 Watts<br />
of power, a Voltage of 24 (DC) and Amperage of 7.1<br />
Ampere. It is able to reach a speed of 2920 rpm. The<br />
motor is connected to a gearbox; also made by SPG,<br />
type S9KC36BH. This gearbox has a ratio of 1:36.<br />
With the used preferences, the screw reached a<br />
speed of 44 rpm.<br />
Figure 4.8 - A schematic overview of the setup.<br />
Multimeters<br />
To determine the temperature of the heating element,<br />
a small piece of thermocouple wire was attached to<br />
both a multimeter and the tube. The multimeters<br />
were of the brand Iso-Tech, type IDM106M. In later<br />
tests, not only the tube temperature, but also the<br />
nozzle temperature was measured, since it was<br />
figured out this was important as well. Temperature<br />
measurements are just a rough indication, since it is<br />
measured on the outside of the setup instead of the<br />
inside.<br />
4.3<br />
Initial experimenting<br />
After completion of the test setup, experimenting<br />
could begin. In total, five attemps for a succesful<br />
extrusion have been undertaken.<br />
Figure 4.9 - A photo of the setup.<br />
First attempt<br />
During the first three attempts, a steel screw was<br />
used. The screw design was based on the desing of<br />
18 | Prototyping Lab (IO3028) - RepRap Recycle Add-on