Unicenter CA-Scheduler Job Management for VSE User Guide
Unicenter CA-Scheduler Job Management for VSE User Guide Unicenter CA-Scheduler Job Management for VSE User Guide
4.10 Controlling Jobs Enter RELE CANC CP PURG REST RUN SUB To Issue This Command RELEASE JOB CANCEL JOB CANCEL/POST JOB PURGE JOB RESTART JOB RUN JOB SUBMIT JOB Optional keywords are not allowed if you use the preceding command abbreviations. If you need to use optional keywords, issue the command through the Online Monitoring panel. 4.10.1 Running Jobs With The ADD Command ADD allows you to run a single execution of a job today whether it is defined to the database. You can use this command to add a job to today's workload if the job: ■ ■ Is not in the database Is in the database with different keyword values and if you only want to run the job on a "one-time" basis. An ADDed job will only exist on the tracking file for one day (unless it becomes backlogged); the only trace or record of it in the database will be history records. If you are in doubt as to whether the job being added will ever need to be run again, we recommend that you define the job to the database and define a non-auto-selected schedule for it. Then you can issue a RUN command for the schedule whenever you need this job. 4-36 Unicenter CA-Scheduler User Guide
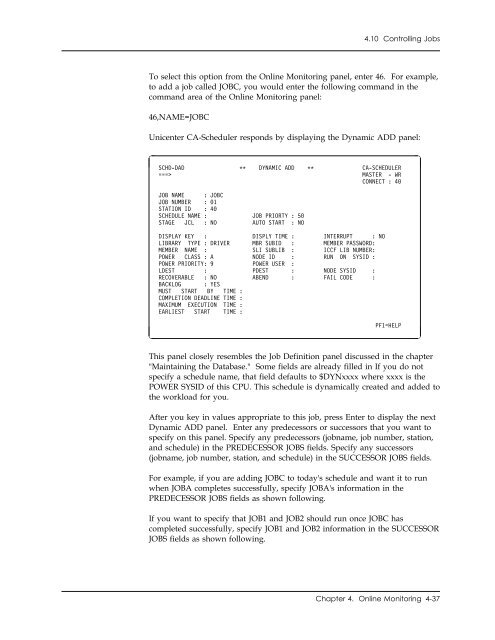
4.10 Controlling Jobs To select this option from the Online Monitoring panel, enter 46. For example, to add a job called JOBC, you would enter the following command in the command area of the Online Monitoring panel: 46,NAME=JOBC Unicenter CA-Scheduler responds by displaying the Dynamic ADD panel: SCHD-DAD DYNAMIC ADD CA-SCHEDULER ===> MASTER - WR CONNECT : 4 JOB NAME : JOBC JOB NUMBER : 1 STATION ID : 4 SCHEDULE NAME : JOB PRIORTY : 5 STAGE JCL : NO AUTO START : NO DISPLAY KEY : DISPLY TIME : INTERRUPT : NO LIBRARY TYPE : DRIVER MBR SUBID : MEMBER PASSWORD: MEMBER NAME : SLI SUBLIB : ICCF LIB NUMBER: POWER CLASS : A NODE ID : RUN ON SYSID : POWER PRIORITY: 9 POWER USER : LDEST : PDEST : NODE SYSID : RECOVERABLE : NO ABEND : FAIL CODE : BACKLOG : YES MUST START BY TIME : COMPLETION DEADLINE TIME : MAXIMUM EXECUTION TIME : EARLIEST START TIME : PF1=HELP This panel closely resembles the Job Definition panel discussed in the chapter "Maintaining the Database." Some fields are already filled in If you do not specify a schedule name, that field defaults to $DYNxxxx where xxxx is the POWER SYSID of this CPU. This schedule is dynamically created and added to the workload for you. After you key in values appropriate to this job, press Enter to display the next Dynamic ADD panel. Enter any predecessors or successors that you want to specify on this panel. Specify any predecessors (jobname, job number, station, and schedule) in the PREDECESSOR JOBS fields. Specify any successors (jobname, job number, station, and schedule) in the SUCCESSOR JOBS fields. For example, if you are adding JOBC to today's schedule and want it to run when JOBA completes successfully, specify JOBA's information in the PREDECESSOR JOBS fields as shown following. If you want to specify that JOB1 and JOB2 should run once JOBC has completed successfully, specify JOB1 and JOB2 information in the SUCCESSOR JOBS fields as shown following. Chapter 4. Online Monitoring 4-37
- Page 157 and 158: 3.11 Deleting Job Records SCHD-JM
- Page 159 and 160: 3.12 Analyzing Jobs 3.12 Analyzing
- Page 161 and 162: 3.12 Analyzing Jobs To display a fu
- Page 163 and 164: 3.13 Automatic Console Replies for
- Page 165 and 166: 3.13 Automatic Console Replies for
- Page 167 and 168: 3.13 Automatic Console Replies for
- Page 169 and 170: 3.14 Summary of Job Maintenance 3.1
- Page 171: 3.14 Summary of Job Maintenance To
- Page 174 and 175: 4.1 Online Monitoring Panel 4.1 Onl
- Page 176 and 177: 4.1 Online Monitoring Panel This ch
- Page 178 and 179: 4.2 Displaying Status Schedules and
- Page 180 and 181: 4.2 Displaying Status The table fol
- Page 182 and 183: 4.2 Displaying Status To Restrict T
- Page 184 and 185: 4.2 Displaying Status 4.2.4.1 Defau
- Page 186 and 187: 4.2 Displaying Status SCHD-CP SCHE
- Page 188 and 189: 4.2 Displaying Status If the schedu
- Page 190 and 191: 4.2 Displaying Status or backlogged
- Page 192 and 193: 4.2 Displaying Status The last two
- Page 194 and 195: 4.2 Displaying Status WAITING FOR S
- Page 196 and 197: 4.3 Handling Messages If your messa
- Page 198 and 199: 4.4 Handling Predecessor Conditions
- Page 200 and 201: 4.5 Handling Global Parameters 4.5.
- Page 202 and 203: 4.7 Displaying Data Set Mask Names
- Page 204 and 205: 4.9 Controlling Schedules 4.9 Contr
- Page 206 and 207: 4.10 Controlling Jobs 4.10 Controll
- Page 210 and 211: 4.10 Controlling Jobs SCHD-DADP D
- Page 212 and 213: 4.11 Summing Up To Specify Abbrevia
- Page 214 and 215: 4.11 Summing Up This Command Affect
- Page 216 and 217: The criteria language uses three ty
- Page 218 and 219: 5.1 Criteria Vocabulary job. Normal
- Page 220 and 221: 5.1 Criteria Vocabulary Example SCD
- Page 222 and 223: 5.1 Criteria Vocabulary Given the e
- Page 224 and 225: 5.2 Calendar Mechanisms 5.2 Calenda
- Page 226 and 227: 5.2 Calendar Mechanisms 5.2.2.1 Wor
- Page 228 and 229: 5.2 Calendar Mechanisms Suppose you
- Page 230 and 231: 5.2 Calendar Mechanisms datetable o
- Page 232 and 233: 5.2 Calendar Mechanisms The panel f
- Page 234 and 235: 5.3 Some Examples 5.3 Some Examples
- Page 236 and 237: 5.3 Some Examples Example 7 A payro
- Page 238 and 239: 5.3 Some Examples ■ ■ If the la
- Page 240 and 241: 5.4 What Is Wrong with These Exampl
- Page 242 and 243: 5.4 What Is Wrong with These Exampl
- Page 245 and 246: Chapter 6. Tips This topic of the m
- Page 247 and 248: 6.1 Commonly Asked Questions 6.1.1.
- Page 249 and 250: 6.1 Commonly Asked Questions Keep i
- Page 251 and 252: 6.1 Commonly Asked Questions 6.1.2.
- Page 253 and 254: 6.1 Commonly Asked Questions To all
- Page 255 and 256: 6.1 Commonly Asked Questions For de
- Page 257 and 258: 6.1 Commonly Asked Questions use of
4.10 Controlling <strong>Job</strong>s<br />
To select this option from the Online Monitoring panel, enter 46. For example,<br />
to add a job called JOBC, you would enter the following command in the<br />
command area of the Online Monitoring panel:<br />
46,NAME=JOBC<br />
<strong>Unicenter</strong> <strong>CA</strong>-<strong>Scheduler</strong> responds by displaying the Dynamic ADD panel:<br />
<br />
SCHD-DAD DYNAMIC ADD <strong>CA</strong>-SCHEDULER<br />
===> MASTER - WR<br />
CONNECT : 4<br />
<br />
<br />
JOB NAME : JOBC<br />
JOB NUMBER : 1<br />
STATION ID : 4<br />
SCHEDULE NAME :<br />
JOB PRIORTY : 5<br />
STAGE JCL : NO AUTO START : NO<br />
DISPLAY KEY : DISPLY TIME : INTERRUPT : NO<br />
LIBRARY TYPE : DRIVER MBR SUBID : MEMBER PASSWORD:<br />
MEMBER NAME : SLI SUBLIB : ICCF LIB NUMBER:<br />
POWER CLASS : A NODE ID : RUN ON SYSID :<br />
POWER PRIORITY: 9 POWER USER :<br />
LDEST : PDEST : NODE SYSID :<br />
RECOVERABLE : NO ABEND : FAIL CODE :<br />
BACKLOG : YES<br />
MUST START BY TIME :<br />
COMPLETION DEADLINE TIME :<br />
MAXIMUM EXECUTION TIME :<br />
EARLIEST START TIME :<br />
PF1=HELP<br />
<br />
This panel closely resembles the <strong>Job</strong> Definition panel discussed in the chapter<br />
"Maintaining the Database." Some fields are already filled in If you do not<br />
specify a schedule name, that field defaults to $DYNxxxx where xxxx is the<br />
POWER SYSID of this CPU. This schedule is dynamically created and added to<br />
the workload <strong>for</strong> you.<br />
After you key in values appropriate to this job, press Enter to display the next<br />
Dynamic ADD panel. Enter any predecessors or successors that you want to<br />
specify on this panel. Specify any predecessors (jobname, job number, station,<br />
and schedule) in the PREDECESSOR JOBS fields. Specify any successors<br />
(jobname, job number, station, and schedule) in the SUCCESSOR JOBS fields.<br />
For example, if you are adding JOBC to today's schedule and want it to run<br />
when JOBA completes successfully, specify JOBA's in<strong>for</strong>mation in the<br />
PREDECESSOR JOBS fields as shown following.<br />
If you want to specify that JOB1 and JOB2 should run once JOBC has<br />
completed successfully, specify JOB1 and JOB2 in<strong>for</strong>mation in the SUCCESSOR<br />
JOBS fields as shown following.<br />
Chapter 4. Online Monitoring 4-37


