Unicenter CA-Scheduler Job Management for VSE User Guide
Unicenter CA-Scheduler Job Management for VSE User Guide Unicenter CA-Scheduler Job Management for VSE User Guide
4.2 Displaying Status WAITING FOR START TIME The job or schedule is waiting for its early start time. It will not be available for processing until then unless it is forced using the FORCE command. WAITING NON-CPU START This is a non-CPU job that was defined as AUTO START=NO. It is now available and must be manually started using the online START command. WAITING PRE-CPU JOB All of this job's predecessors have been satisfied except the same job at a pre-CPU station. It will not be submitted at the CPU station until it has ended at all of the pre-CPU stations in its path. WAITING USER SUBMIT Unicenter CA-Scheduler tried to release the JCL for a job and failed because the JCL has not yet been manually submitted to the RDR queue. The job must be manually submitted with DISP=H specified on the JECL job card. Unicenter CA-Scheduler will try at regular intervals to release the job. This status will only be seen for jobs defined with LIBTYPE = RDRQ. 4-22 Unicenter CA-Scheduler User Guide
4.3 Handling Messages 4.3 Handling Messages 4.3.1 Displaying Messages The following subtopics explain how to display messages when they are sent to you and how you go about sending messages to other users. When MSG PENDING appears on the panel, go to the Online Monitoring panel and enter 2. This will display system and user messages that have been sent to your userid. After you display the messages, they are deleted. Undisplayed messages are deleted at autoscan if they are more than two hours old (unless the MSGHOLD generation option on the CAIJGEN macro was changed). This is a sample display: SCHD-CP SCHEDULER COMMAND PROCESSOR CA-SCHEDULER ===> MASTER - WR CONNECT : 4 MESSAGE FOR JOB=JOB5 IN SCHEDULE=ARDAILY AT STATION=4 CACM4 JCL IS NOT IN READER QUEUE PF1=HELP 4.3.2 Sending Messages Messages that have been sent to the Unicenter CA-Scheduler mailbox can be viewed through the Reporting Facility panel. Now that you know how to receive messages, you will learn how you can send them to others. To send messages to another userid, go to the Online Monitoring panel and enter 3, followed by the following two keywords: User= Text= Name the user who is to receive the message (1- to 8-character defined userid). To send the message to all defined users, specify USER=ALL. To send a message to the master console, specify USER=OPERATOR. Give the text of the message (no more than 64 characters). Enclose the message in single quotes if it contains blanks, commas, or other delimiters. For example, you could send the following valid message: 3,U=JOHN,T='PLEASE MOUNT THAT TAPE NOW' Chapter 4. Online Monitoring 4-23
- Page 143 and 144: 3.9 Defining Jobs For These Message
- Page 145 and 146: 3.9 Defining Jobs To Separate All J
- Page 147 and 148: 3.9 Defining Jobs 3.9.4.6 Defining
- Page 149 and 150: 3.10 Displaying and Updating a Job
- Page 151 and 152: 3.10 Displaying and Updating a Job
- Page 153 and 154: 3.10 Displaying and Updating a Job
- Page 155 and 156: 3.11 Deleting Job Records 3.11 Dele
- Page 157 and 158: 3.11 Deleting Job Records SCHD-JM
- Page 159 and 160: 3.12 Analyzing Jobs 3.12 Analyzing
- Page 161 and 162: 3.12 Analyzing Jobs To display a fu
- Page 163 and 164: 3.13 Automatic Console Replies for
- Page 165 and 166: 3.13 Automatic Console Replies for
- Page 167 and 168: 3.13 Automatic Console Replies for
- Page 169 and 170: 3.14 Summary of Job Maintenance 3.1
- Page 171: 3.14 Summary of Job Maintenance To
- Page 174 and 175: 4.1 Online Monitoring Panel 4.1 Onl
- Page 176 and 177: 4.1 Online Monitoring Panel This ch
- Page 178 and 179: 4.2 Displaying Status Schedules and
- Page 180 and 181: 4.2 Displaying Status The table fol
- Page 182 and 183: 4.2 Displaying Status To Restrict T
- Page 184 and 185: 4.2 Displaying Status 4.2.4.1 Defau
- Page 186 and 187: 4.2 Displaying Status SCHD-CP SCHE
- Page 188 and 189: 4.2 Displaying Status If the schedu
- Page 190 and 191: 4.2 Displaying Status or backlogged
- Page 192 and 193: 4.2 Displaying Status The last two
- Page 196 and 197: 4.3 Handling Messages If your messa
- Page 198 and 199: 4.4 Handling Predecessor Conditions
- Page 200 and 201: 4.5 Handling Global Parameters 4.5.
- Page 202 and 203: 4.7 Displaying Data Set Mask Names
- Page 204 and 205: 4.9 Controlling Schedules 4.9 Contr
- Page 206 and 207: 4.10 Controlling Jobs 4.10 Controll
- Page 208 and 209: 4.10 Controlling Jobs Enter RELE CA
- Page 210 and 211: 4.10 Controlling Jobs SCHD-DADP D
- Page 212 and 213: 4.11 Summing Up To Specify Abbrevia
- Page 214 and 215: 4.11 Summing Up This Command Affect
- Page 216 and 217: The criteria language uses three ty
- Page 218 and 219: 5.1 Criteria Vocabulary job. Normal
- Page 220 and 221: 5.1 Criteria Vocabulary Example SCD
- Page 222 and 223: 5.1 Criteria Vocabulary Given the e
- Page 224 and 225: 5.2 Calendar Mechanisms 5.2 Calenda
- Page 226 and 227: 5.2 Calendar Mechanisms 5.2.2.1 Wor
- Page 228 and 229: 5.2 Calendar Mechanisms Suppose you
- Page 230 and 231: 5.2 Calendar Mechanisms datetable o
- Page 232 and 233: 5.2 Calendar Mechanisms The panel f
- Page 234 and 235: 5.3 Some Examples 5.3 Some Examples
- Page 236 and 237: 5.3 Some Examples Example 7 A payro
- Page 238 and 239: 5.3 Some Examples ■ ■ If the la
- Page 240 and 241: 5.4 What Is Wrong with These Exampl
- Page 242 and 243: 5.4 What Is Wrong with These Exampl
4.3 Handling Messages<br />
4.3 Handling Messages<br />
4.3.1 Displaying Messages<br />
The following subtopics explain how to display messages when they are sent<br />
to you and how you go about sending messages to other users.<br />
When MSG PENDING appears on the panel, go to the Online Monitoring<br />
panel and enter 2. This will display system and user messages that have been<br />
sent to your userid. After you display the messages, they are deleted.<br />
Undisplayed messages are deleted at autoscan if they are more than two hours<br />
old (unless the MSGHOLD generation option on the <strong>CA</strong>IJGEN macro was<br />
changed).<br />
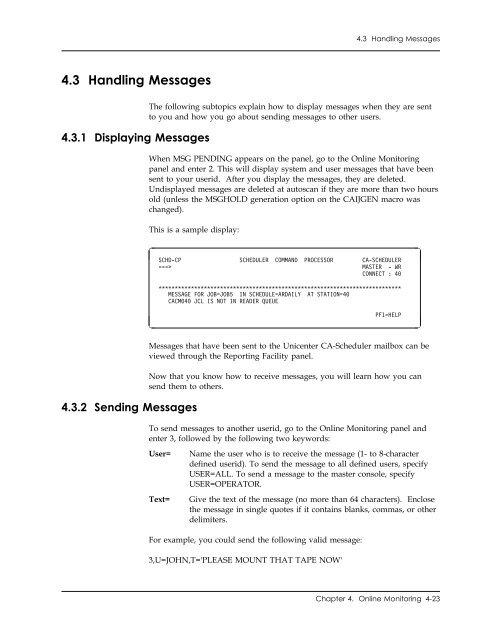
This is a sample display:<br />
<br />
SCHD-CP SCHEDULER COMMAND PROCESSOR <strong>CA</strong>-SCHEDULER<br />
===> MASTER - WR<br />
CONNECT : 4<br />
<br />
<br />
<br />
MESSAGE FOR JOB=JOB5 IN SCHEDULE=ARDAILY AT STATION=4<br />
<strong>CA</strong>CM4 JCL IS NOT IN READER QUEUE<br />
PF1=HELP<br />
<br />
4.3.2 Sending Messages<br />
Messages that have been sent to the <strong>Unicenter</strong> <strong>CA</strong>-<strong>Scheduler</strong> mailbox can be<br />
viewed through the Reporting Facility panel.<br />
Now that you know how to receive messages, you will learn how you can<br />
send them to others.<br />
To send messages to another userid, go to the Online Monitoring panel and<br />
enter 3, followed by the following two keywords:<br />
<strong>User</strong>=<br />
Text=<br />
Name the user who is to receive the message (1- to 8-character<br />
defined userid). To send the message to all defined users, specify<br />
USER=ALL. To send a message to the master console, specify<br />
USER=OPERATOR.<br />
Give the text of the message (no more than 64 characters). Enclose<br />
the message in single quotes if it contains blanks, commas, or other<br />
delimiters.<br />
For example, you could send the following valid message:<br />
3,U=JOHN,T='PLEASE MOUNT THAT TAPE NOW'<br />
Chapter 4. Online Monitoring 4-23


