Owner's Manual - CMA Dishmachines
Owner's Manual - CMA Dishmachines
Owner's Manual - CMA Dishmachines

Create successful ePaper yourself
Turn your PDF publications into a flip-book with our unique Google optimized e-Paper software.
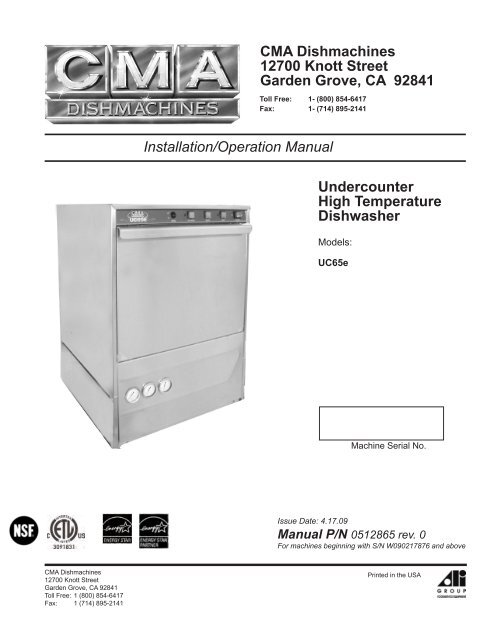
<strong>CMA</strong> <strong>Dishmachines</strong><br />
12700 Knott Street<br />
Garden Grove, CA 92841<br />
Toll Free: 1- (800) 854-6417<br />
Fax: 1- (714) 895-2141<br />
Installation/Operation <strong>Manual</strong><br />
Undercounter<br />
High Temperature<br />
Dishwasher<br />
Models:<br />
UC65e<br />
UC65e<br />
Machine Serial No.<br />
Issue Date: 4.17.09<br />
<strong>Manual</strong> P/N 0512865 rev. 0<br />
For machines beginning with S/N W090217876 and above<br />
<strong>CMA</strong> <strong>Dishmachines</strong><br />
12700 Knott Street<br />
Garden Grove, CA 92841<br />
Toll Free: 1 (800) 854-6417<br />
Fax: 1 (714) 895-2141<br />
Printed in the USA
For future reference, record your dishwasher information in the box below.<br />
Model Number__________________________ Serial Number_______________________<br />
Voltage________________Hertz_____________ Phase__________________<br />
Service Agent __________________________________ Tel:______________________<br />
Parts Distributor _________________________________ Tel:______________________<br />
National Service Department<br />
<strong>CMA</strong> <strong>Dishmachines</strong><br />
12700 Knott Avenue<br />
Garden Grove, CA 92841<br />
Toll-free: 1 (800) 854-6417<br />
Fax: 1 (714) 895-2141<br />
ATTENTION:<br />
The model no., serial no., voltage, Hz<br />
and phase are needed to identify your<br />
machine and to answer questions.<br />
The machine data plate is located<br />
on the lower front panel.<br />
Please have this information ready<br />
if you call for service assistance.<br />
COPYRIGHT © 2009 All rights reserved<br />
Printed in the USA
Revision History<br />
• The Revision History can contain part number changes, new instructions, or<br />
information that was not available at print time.<br />
Revision History<br />
• We reserve the right to make changes to these instructions without notice and without<br />
incurring any liability by making the changes..<br />
• Equipment owners may request a revised manual, at no charge, by calling<br />
<strong>CMA</strong> <strong>Dishmachines</strong> at 1 (800) 854-6417.<br />
Revision Revised Serial Number Revision<br />
Date Pages Effectivity Description<br />
4.17.09 All W090217876 Released First Edition<br />
i
Model Description<br />
Model Description<br />
UC65e<br />
High temperature hot water sanitizing dishwasher with built-in 40°F/22°C rise booster heater.<br />
208-240VAC/60/1<br />
ii
Table of Contents<br />
Table of Contents<br />
Model UC65e Undercounter Dishwasher<br />
Revision History...................................................................................................................i<br />
Model Descriptions..............................................................................................................ii<br />
Installation...............................................................................................1<br />
Receiving.....................................................................1<br />
Electrical Connections.................................................2<br />
Water Connections......................................................4<br />
Drain Connections.......................................................5<br />
Initial Start-up..........................................................................................6<br />
Booster Fill Switch.......................................................6<br />
Assembly .......................................................8<br />
Chemical Dispensing Pumps......................................9<br />
Priming...............................10<br />
Adjusting............................11<br />
Operation................................................................................................................ 13<br />
Normal Wash Mode.....................................................13<br />
Saf-T-Temp..................................................................14<br />
Cleaning and Maintenance........................................................................15<br />
Cleaning......................................................................15<br />
Maintenance................................................................18<br />
Troubleshooting...........................................................19<br />
Electrical Schematic.............................................................................................. 21<br />
Timer Chart............................................................................................. 22<br />
Fill/Drain Timer -Theory of Operation......................................................... 23<br />
iii
Blank Page<br />
This Page<br />
Intentionally<br />
Left Blank<br />
iv
Installation<br />
Receiving<br />
NOTE:<br />
The installation of your dishwasher must be performed by qualified service personnel.<br />
Problems due to improper installation are not covered by the Warranty.<br />
1. Inspect the outside of the dishwasher carton for signs of damage.<br />
2. Remove the carton and inspect the dishwasher for damage.<br />
3. Check for any accessories that may have shipped with your dishwasher.<br />
4. Move the dishwasher near its permanent location.<br />
CAUTION:<br />
Be careful when lifting and moving the dishwasher to prevent damage to the machine.<br />
NOTE:<br />
The installation of the dishwasher must comply with local health codes.<br />
5. Compare the installation site utility connections with the dishwasher utility connections and<br />
make sure that they are the same.<br />
6. The dishwasher can be installed as a free-standing unit or under a built-in counter-top.<br />
The typical counter-top height in most locations is 34" [86cm].<br />
7. Under counter installations should provide storage space for the dishwasher chemical supply<br />
containers. Containers must not be<br />
placed higher than 10" [25cm] above the floor.<br />
8. Chemical supply containers should be placed as<br />
close as close to the machine as possible.<br />
9. Place the dishwasher in its permanent location.<br />
10. The dishwasher has 4 adjustable feet for<br />
leveling.<br />
11. Level the dishwasher front-to-back and<br />
side-to-side.<br />
34"<br />
[86cm]<br />
Min.<br />
Counter-top<br />
Wall<br />
Floor<br />
3" [8cm] Min.<br />
1
Installation<br />
Electrical Connections<br />
WARNING:<br />
Electrocution or serious injury may result when working on<br />
an energized circuit.<br />
Disconnect power at the main breaker or service disconnect<br />
switch before working on the circuit.<br />
Lock-out and tag the breaker to indicate that work is being<br />
performed on the circuit.<br />
ATTENTION<br />
A qualified electrician must connect the main incoming power to the dishwasher in accordance<br />
with all local codes and regulations or in the absence of local codes in accordance with the<br />
National Electrical Code<br />
VERIFY THE CORRECT VOLTAGE IS SUPPLIED TO THE MACHINE<br />
THE CORRECT SUPPLY VOLTAGE IS 115/208-240VAC/60/1.<br />
(See the diagram on next page.)<br />
Main Terminal Block<br />
The Main Terminal Block (MTB) is located on the left-rear corner<br />
of the electrical panel.<br />
2
Installation<br />
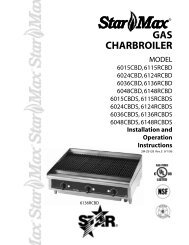
1. Refer to the connection diagram on the preceding page and the photo below:<br />
2. Machines require a 3-wire plus ground supply which includes a current carrying neutral.<br />
3. Power connections are made at the Main Terminal Block (MTB).<br />
Electrical Connections<br />
4. The MTB is located on the left-rear corner of the electrical panel behind the front access panel.<br />
(See the illustration on the previous page.)<br />
NOTE:<br />
Provide a 3 foot service loop in the power cable at the back of the dishwasher for service.<br />
To Connect Main Power to the Dishwasher:<br />
1. Remove the lower front access panel of the dishwasher.<br />
2. Locate the electrical mounting panel on the right-side of the machine.<br />
Remove the retaining nut at the top of the panel that holds the panel in place.<br />
3. Lower the panel and pull it forward to gain access the MTB.<br />
4. Feed the power cable through the cable hole located<br />
on the right side, as viewed from the front of the machine,<br />
into the interior of the machine.<br />
5. Make sure the cable passes through the cable mounting<br />
bracket located near the front-center of the<br />
base and secure the cable with a cable connector.<br />
6. Connect the ground wire to the base of the dishwasher<br />
with the ground screw provided next to the<br />
cable mounting bracket.<br />
7. Feed the remaining cable wires to the Main Terminal<br />
Block and connect according to the connection<br />
diagram to the right.<br />
SINGLE PHASE POWER CONNECTION<br />
115/208-240VAC/60/1<br />
GRD<br />
L1 L2 N<br />
208-240<br />
VAC<br />
115VAC<br />
HOW TO CONNECT POWER<br />
Cable Bracket<br />
L1<br />
To Main Terminal Block L2<br />
N<br />
From Rear of Machine<br />
GRD<br />
1. Check the data plate on the front of the<br />
dishwasher for the voltage of the machine.<br />
2. Remove the lower-front access panel.<br />
3. Lower the electrical component bracket.<br />
4. Feed the power cable from the rear of the<br />
dishwasher to the center of the machine<br />
and through the cable bracket.<br />
5. Connect the ground wire to the base of the<br />
dishwasher using the ground screw located<br />
near the bracket.<br />
6. Feed the power leads to the terminal block.<br />
7. Connect L1, L2 and a currrect-carrying<br />
neutral to the Main Terminal Block.<br />
8. Main Power connections are complete.<br />
Route the supply cable through the cable bracket.<br />
3
Installation<br />
Water Connections<br />
Note<br />
Plumbing connections must comply with national, local plumbing and sanitary codes.<br />
IMPORTANT<br />
Make sure that the flexible water supply and drain hoses are not kinked.<br />
1. All models have a 6 ft. flexible hot water fill hose with a 3/4" GHT connector.<br />
2. A 1/2" or larger main incoming supply line should be installed to the dishwasher.<br />
3. A 1/2" or larger shut-off valve should be installed in the water supply line as close to the<br />
dishwasher as possible for service.<br />
4. The hot water supply must provide a minimum of 140°F/60°C, measured at the dishwasher for<br />
the 40°F/ 22°C rise booster.<br />
5. For the 70°F/39°C rise booster the hot water supply must provide a minimum of 110°F/43°C<br />
measured at the dishwasher.<br />
4
Installation<br />
Drain Connections<br />
ATTENTION<br />
Do not connect the drain hose to a disposer. The dishwasher will not drain correctly.<br />
1. The dishwasher has a 6ft. 3/4" I.D. drain hose. The maximum drain height<br />
connection must not exceed 3 ft.[9 m].<br />
The recommended drain height is 17" [.4 m] or less above the floor.<br />
2. The drain hose is secured to the rear of the machine by a clamp to maintain a<br />
goose-neck bend in the drain hose.<br />
DO NOT REMOVE THE DRAIN HOSE RETAINING CLAMP.<br />
DO NOT STRETCH THE DRAIN HOSE.<br />
3. Install the drain hose to a "WYE" drain fitting. Connection to a "TEE" fitting will<br />
prevent the dishwasher from draining completely.<br />
4. The maximum drain flow is 8 U.S. gpm/7 Imp. gpm/30 L.P.M.<br />
5. Make sure the drain hose does not kink. Kinks will prevent the dishwasher<br />
from draining completely, and the dishwasher will overflow out the front door.<br />
NOTE:<br />
DO NOT CONNECT THE DRAIN HOSE TO A DISPOSER.<br />
THE DISHWASHER WILL NOT DRAIN CORRECTLY.<br />
The dishwasher flexible drain hose<br />
must be connected to a WYE fitting.<br />
Do not connect the dishwasher<br />
flexible drain hose to a TEE fitting.<br />
5
Initial Start-Up<br />
Filling the Booster<br />
Booster Fill Switch<br />
The booster heater is filled using the Booster Fill Switch. It is located behind the lower front access panel<br />
and on the left-side of the bracket that holds the chemical dispensing pumps (see the photos below).<br />
Fill the booster heater:<br />
ATTENTION<br />
VERIFY THE CORRECT VOLTAGE IS SUPPLIED TO THE MACHINE<br />
THE CORRECT SUPPLY VOLTAGE IS 115/208-240VAC/60/1.<br />
(Refer to the diagram on page 3.)<br />
Note:<br />
The dishwasher contains a built-in booster heater that was drained prior to shipment<br />
and must be filled with water before operating the dishwasher.<br />
1. Make sure that the dishwasher power switch is OFF.<br />
2. Remove the lower front access panel.<br />
3. Locate the booster fill switch. It is in the left-center of the electrical component panel.<br />
4. Make sure the Booster Fill Switch is in the middle position, (OFF).<br />
5. Turn the water supply and the main power supply on.<br />
DO NOT TURN THE DISHWASHER POWER SWITCH ON.<br />
A) Identify the booster fill switch.<br />
RINSE<br />
WASH<br />
TEMPERATURE<br />
ON<br />
OFF<br />
BOOSTER<br />
FILL<br />
Booster Fill Switch<br />
A<br />
6
Initial Start-Up<br />
Filling the Booster (continued)<br />
B) Press and hold the Booster Fill Switch down to the BOOSTER FILL<br />
position until you hear the water spraying inside the dishwasher wash tank,<br />
then release the switch.<br />
RINSE<br />
WASH<br />
TEMPERATURE<br />
ON<br />
OFF<br />
BOOSTER<br />
FILL<br />
B<br />
C) Push the switch up to the ON position and release.<br />
The booster tank is filled.<br />
RINSE<br />
WASH<br />
TEMPERATURE<br />
ON<br />
OFF<br />
BOOSTER<br />
FILL<br />
C<br />
7
Initial Start-up<br />
Check List<br />
1. Remove any protective film from dishwasher. Check the interior for foreign material.<br />
2. Make sure that the dishwasher is permanently located.<br />
3. Make sure that all utility connections are complete.<br />
4. Make sure that the flexible drain hose and the hot water fill hose are not kinked.<br />
5. Make sure that the chemical supply containers are full and that the chemical pick-up tubes<br />
are installed in the proper containers.<br />
6. Make sure that the sump filter is in place.<br />
7. Make sure that the overflow tube is installed and firmly seated in the sump.<br />
8. Make sure that the spray arms are in place and that they spin freely.<br />
9. Fully close the dishwasher door.<br />
10. Turn hot water supply on and check for leaks in the main water supply piping connected<br />
to the dishwasher.<br />
IMPORTANT<br />
During the initial fill, the flowing pressure of the incoming water<br />
is set to 20-22 PSI.<br />
Install the scrap screen, overflow tube, and spray arms.<br />
Make sure the spray arms turn freely.<br />
8
Initial Start-up<br />
Chemical Dispensing Pumps<br />
ATTENTION<br />
Contact a local chemical supplier for detergent and rinse-aid chemicals. The detergent should be a<br />
non-chlorinated liquid detergent. The chemical dispensing pumps are adjusted by the chemical supplier.<br />
1. The dishwasher is equipped with a built-in detergent dispensing pump and rinse-aid dispensing<br />
pump. (See the photographs below.)<br />
2. The pumps are located on the lower panel behind the lower-front access panel.<br />
3. Each pump is equipped with 6 feet [1.8 m] of pick-up supply tubing, a stiffener tube, and a strainer.<br />
4. A red label marked DETERGENT is attached to the detergent pump inlet tubing.<br />
5. A blue label marked RINSE-AID is attached to the rinse-aid pump inlet tubing.<br />
6. The detergent enters the wash tank compartment through a fitting at the right rear of the wash<br />
compartment (see the illustration on the next page).<br />
7. The detergent supply should be a non-chlorinated liquid detergent.<br />
8. The rinse-aid enters the final rinse piping through a fitting located on the upper-left rear side of the<br />
dishwasher. The fitting is located near the vacuum breaker (see the illustration on the next page).<br />
RINSE<br />
TEMPERATURE<br />
WASH<br />
ON<br />
OFF<br />
BOOSTER<br />
FILL<br />
Detergent<br />
Pump<br />
Rinse-aid<br />
Pump<br />
The dispensing pumps are located behind the<br />
lower-front access panel.<br />
A stiffener tube, strainer and pick-up<br />
tubing are supplied with the built-in<br />
detergent and rinse-aid pumps.<br />
9. The chemical supplier will choose the appropriate liquid rinse-aid.<br />
10. Your chemical supplier should adjust the dispensers for the supplied product.<br />
11. Place the chemical supply containers as close to the dishwasher as possible.<br />
12. Do not elevate the chemical containers above the finished floor.<br />
9
Initial Start-up<br />
Chemical Dispensing Pumps (continued)<br />
Chemical Injection Points<br />
The illustrations below show the location of the detergent and the rinse-aid injection points.<br />
Detergent<br />
Injection Point<br />
Rinse-aid<br />
Injection<br />
Point<br />
Detergent enters the wash tank compartment through a<br />
fitting on the rear wall of the wash tank compartment.<br />
The rinse-aid enters the final rinse piping at the top-rear of<br />
the dishwasher near the vacuum breaker.<br />
10
Initial Start-up<br />
Chemical Dispensing Pumps<br />
Priming the Chemical Dispensing Pumps<br />
The chemical dispensing pumps must be primed before the dishwasher is operated. A 2-position PRIME<br />
switch is located on the front control panel to do this. The Detergent dispensing pump is primed when<br />
the Prime switch is pushed UP to the DET position. The Rinse-aid dispensing pump is primed when the<br />
Prime switch is pushed DOWN to the R/A position (see below).<br />
DET<br />
R/A<br />
PRIME<br />
EXT. WASH<br />
DRAIN<br />
START<br />
ON<br />
POWER<br />
OFF<br />
Chemical Dispenser Prime Switch<br />
1. Make sure the chemical containers are full and the correct pick-up tubes are in the containers.<br />
2. Turn the dishwasher power switch ON. The switch will illuminate and the dishwasher will fill with<br />
water.<br />
3. Once the fill is complete, open the dishwasher door, then push and hold the prime push button UP<br />
to the DET (detergent) position until detergent is observed entering at the right-rear of the wash<br />
tank compartment.<br />
4. Push and hold the prime push button DOWN to the R/A (rinse-aid) position for 30-seconds.<br />
Release the push button.<br />
5. Close the door.<br />
11
Initial Start-up<br />
Chemical Dispensing Pumps<br />
Adjusting the Chemical Dispenser Pumps<br />
The amount of detergent and rinse-aid that are dispensed during the dishwasher cycle are controlled by<br />
adjustable cams on the timer assembly. Variables such as the type of chemicals used and the hardness<br />
of the water supply often require that the timer cam settings must be changed. It is recommended that<br />
the chemical supplier make these adjustments.<br />
(Refer to the illustration below).<br />
Note:<br />
Only the Detergent and the Rinse-aid cams are adjustable. Do not attempt to adjust any other timer cam.<br />
To adjust the chemical dispensing pump timer cams:<br />
1. Remove the lower-front access panel. The timer assembly is located on the right-side of the<br />
electrical component panel.<br />
2. Make sure the dishwasher power is OFF.<br />
3. The detergent timer cam has 2 halves. Hold the stationary right-half of the cam and turn the<br />
left-half of the cam counter-clockwise to increase the amount of detergent that is dispensed.<br />
Turn the left-half clockwise to decrease the detergent dispensed.<br />
4. The rinse-aid timer cam has 2 halves. Hold the stationary left-half of the cam and turn the right-half<br />
of the cam counter-clockwise to decrease the amount of rinse-aid that is dispensed.<br />
Turn the right-half clockwise to increase the amount of rinse-aid dispensed.<br />
HOMING<br />
CAM<br />
WASH<br />
PUMP<br />
DRAIN<br />
PUMP<br />
RINSE<br />
VALVE<br />
DET.<br />
PUMP<br />
RINSE<br />
AID<br />
PUMP<br />
EXTEND<br />
WASH<br />
SAFE-T<br />
TEMP<br />
CCW<br />
CW<br />
+ -<br />
D E T E R G E N T<br />
-<br />
R<br />
I N S E A I D<br />
+<br />
12
Operation<br />
Normal Wash Mode<br />
Follow the instructions below to operate the dishwasher in a Normal Wash Mode. A Safe-T-Temp feature<br />
holds the dishwasher in a wash mode if the booster heater temperature is below 180ºF/82ºC.<br />
1. Turn the main power on at the main circuit breaker.<br />
2. Install the sump filter, overflow tube and spray arms.<br />
3. Make sure the flexible drain hose and the flexible fill hose are not kinked,<br />
then turn the water supply on.<br />
4. Close the dishwasher front door.<br />
5. Push the dishwasher Power Switch to the ON position.The power switch will illuminate and the<br />
machine will fill with water.<br />
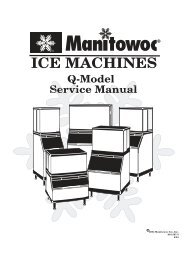
6. Check the pressure gauge as the machine fills and make sure the incoming water pressure is<br />
between 20-22 psi.<br />
7. Wait 15-minutes for the WASH temperature gauge to indicate a minimum of 150ºF/66ºC.<br />
ATTENTION<br />
At the beginning of the day, run 2 empty cycles before checking the final rinse<br />
operating temperature. The first cycle will take longer than normal because the<br />
water temperature in the booster is low.<br />
8. Load soiled wares into the dish rack. Place plates, glasses, cups and bowls in a peg rack.<br />
Place utensils in a single layer in a flat-bottom rack. Place pots and pans in a flat-bottom rack.<br />
Do not overload the dish racks.<br />
9. Slide 1 dish rack into the wash compartment making sure that wares do not interfere with the<br />
rotating spray arms. Do not wash more than 1 dish rack at a time.<br />
10. Close the front door fully, then press and hold the START BUTTON for 1-second. The green<br />
in-cycle light will illuminate and the wash cycle will begin. The wash cycle time runs for<br />
approximately 1-1/2 minutes. (continued on next page)<br />
20<br />
10<br />
0<br />
20-22 PSI 150°F/66°C 180-195°F<br />
82-91°C<br />
30<br />
40<br />
PSI<br />
50<br />
CHAMPION INDUSTRIES, INC.<br />
WINSTON-SALEM,NC<br />
60<br />
60<br />
40<br />
80<br />
20<br />
100<br />
120<br />
40 60<br />
140<br />
20<br />
80<br />
0<br />
100<br />
220<br />
160<br />
180<br />
200<br />
60<br />
40<br />
80<br />
20<br />
100<br />
120<br />
40 60<br />
140<br />
20<br />
80<br />
0<br />
100<br />
220<br />
160<br />
180<br />
200<br />
Final Rinse<br />
Pressure<br />
Wash<br />
Temperature<br />
Final Rinse<br />
Temperature<br />
The pressure and temperature gauges are located on the lower-left corner<br />
of the lower-front access panel.<br />
13
Operation<br />
Normal Wash Mode (continued)<br />
11. Opening the door when the dishwasher is in-cycle will stop the dishwasher. The cycle will resume<br />
automatically when the dishwasher door is closed fully.<br />
12. The final rinse cycle begins at the end of the wash cycle and runs for approximately 15-seconds Check the<br />
RINSE temperature gauge during the final rinse and make sure that it indicates a minimum of 180ºF/82ºC.<br />
The acceptable range of operation is180-195ºF/82-91ºC.<br />
13. At the end of the rinse cycle, the in-cycle light will go out. Open the door and remove the clean<br />
rack of wares. Repeat steps 8-12 for additional dish racks.<br />
14. Refer to the Cleaning Instructions, "After Each Meal Period or every 8 Hours of Operation", on<br />
page 15 for the procedures to drain and clean the dishwasher.<br />
Safe-T-Temp Mode<br />
The final rinse water temperature must be a minimum of 180ºF/82ºC during the final rinse cycle to ensure that all<br />
wares are sanitized. If for any reason, the hot water temperature in the booster tank cannot provide this temperature,<br />
the dishwasher will enter a Safe-T-Temp Mode of operation and extend the cycle time.<br />
The Safe-T-Temp changes the Normal Operation Mode as described below:<br />
1. The Safe-T-Temp constantly monitors the water temperature inside final rinse booster.<br />
2. If the temperature inside the booster heater falls below 180ºF/82ºC then the Safe-T-Temp<br />
will extend the wash cycle time until the booster heater water temperature reaches the proper<br />
temperature.<br />
3. The in-cycle light will remain illuminated during the Safe-T-Temp Mode.<br />
4. The RINSE water temperature gauge must be monitored to ensure that a minimum of<br />
180ºF/82ºC is maintained during the rinse cycle.<br />
5. The temperature range for the final rinse water is180-195ºF/82-91ºC.<br />
6. An extraordinarily long wash cycle may indicate a low incoming water temperature or a<br />
problem with the booster heater operation.<br />
DO NOT REMOVE WARES UNTIL THE FINAL RINSE CYCLE HAS<br />
SANITIZED THE WARES AND THE GREEN CYCLE LIGHT GOES OUT.<br />
Extended Wash Mode<br />
The Extended Wash Mode is used to wash heavily soiled items such as pots, pans and other wares that<br />
require more washing time than the standard 100-second Normal Wash Mode.<br />
The dishwasher will remain in the Extended Wash Mode until the operator exits the mode.<br />
1. Load a dish rack into the dishwasher, close the door.<br />
2. Press and hold the START button for 1-second then release.<br />
3. The green in-cycle light will illuminate and the dishwasher will begin a normal wash cycle.<br />
4. Press the EXT WASH button to place the dishwasher in the Extended Wash Mode.<br />
5. The green extended wash light will illuminate indicating that the machine is in the<br />
Extended Wash Mode.<br />
6. The dishwasher will continue to wash until the operator presses the EXT WASH button again.<br />
7. Press the EXT WASH button. The green extended wash light will go out indicating that<br />
the dishwasher has returned to the Normal Wash Mode.<br />
8. The dishwasher will finish the wash cycle and perform a final rinse of the wares.<br />
14
Cleaning and Maintenance<br />
Cleaning<br />
After Each Meal Period or every 8 Hours of Operation.<br />
1. Press the lighted power switch to the OFF position. The power switch light will go out.<br />
2. Open the door and remove the overflow tube from the wash tank sump.<br />
3. Inspect and clean the overflow tube rubber seal<br />
4. Close the door.<br />
5. Push and hold the drain switch until all of the water has drained.<br />
6. Remove the sump filter carefully to keep the soil or waste particles from falling into the sump.<br />
7. Clean the sump filter by rinsing with clean water.<br />
Be sure to back-flush the filter.<br />
Do not strike the filter against solid objects.<br />
8. Check the sump for foreign material and clean as required.<br />
9. Replace sump flter and the overflow tube.<br />
10. Make sure that spray arms turn freely.<br />
11. Check the chemical containers and refill as required.<br />
12. Close the door and turn the ON/OFF switch to ON and return to normal operation mode.<br />
Overflow<br />
Tube<br />
Heating<br />
Element<br />
Overflow<br />
Seal<br />
Sump<br />
Filter<br />
Sump<br />
15
Cleaning and Maintenance<br />
Cleaning<br />
At the End of the Day<br />
1. Perform Steps 1-8 on the previous page.<br />
2. Remove the upper and lower rinse and wash spray arms. The spray arms are interchangeable.<br />
3. Unscrew the rinse arm pin (A). Remove the rinse arm assemblies<br />
4. Clean the final rinse arm nozzles using a small paper clip (B).<br />
5. Remove the rinse arm end plugs (C) if necessary, and flush the rinse arm with clean water.<br />
6. Re-install the rinse arm end plugs if they were removed.<br />
7. Remove the wash spray arms and flush with clean water.<br />
8. DO NOT USE STEEL WOOL TO CLEAN THE INTERIOR OF THE MACHINE.<br />
9. Contact the chemical supplier for de-liming if required (see next page).<br />
10. Wipe the interior and exterior of the machine with a soft cloth and a mild detergent.<br />
DO NOT HOSE THE EXTERIOR OF THE MACHINE WITH WATER.<br />
11. Reassemble the dishwasher and leave the door open to allow overnight drying.<br />
End<br />
Plug<br />
C<br />
Paper Clip<br />
B<br />
Rinse Arm Pin<br />
A<br />
Wash Spray arm<br />
D<br />
16
Cleaning and Maintenance<br />
De-liming<br />
Minerals accumulate on the interior surfaces of the dishwasher. The deposits have a white haze<br />
and, in cases of heavy accumulation, may appear as a granular solid. The generic name for mineral<br />
deposits is lime. The removal of lime deposits is called de-liming. Your dishwasher should be delimed<br />
regularly; how often will depend on the mineral content of your water.<br />
Inspect your machine interior for lime deposits. If deliming is required, a de-liming agent should be<br />
used for best results in accordance with the chemical supplier's instructions.<br />
Danger:<br />
Death or serious injury may result when de-liming solution is mixed with sodium hypochlorite<br />
(chlorine bleach) sanitizing agent. Mixing may cause hazardous gases to form.<br />
De-liming solution and other acids must never be mixed with chlorine, iodine, bromine, or fluorine.<br />
Caution:<br />
Skin contact with de-liming solutions can cause severe irritation and possible chemical burns.<br />
Always wear protective clothing and googles when handling chemicals.<br />
Attention:<br />
Contact your chemical supplier for specific safety procedures and instructions for the use of<br />
the de-liming solution supplied for the dishwasher.<br />
De-liming solution or other chemicals are not supplied by the dishwasher manufacturer.<br />
Overflow<br />
Tube<br />
Heating<br />
Element<br />
Overflow<br />
Seal<br />
Sump<br />
Filter<br />
Sump<br />
17
Cleaning and Maintenance<br />
Maintenance<br />
Follow the maintenance schedules below to keep the dishwasher operating most efficiently.<br />
Daily Maintenance<br />
1. Check all of the wash arm and rinse arm spray jets and clean as necessary.<br />
2. Make sure that the water supply is on and that the drain is not clogged.<br />
3. Check the temperature gauges and/or displays to ensure that they are operating.<br />
4. Make sure that dish racks are in good condition.<br />
5. Check the chemical containers and refill as required.<br />
6. Follow the cleaning procedures given above.<br />
Weekly Maintenance<br />
1. Perform Steps 1-5 in the Daily Maintenance.<br />
2. Inspect water lines for leaks.<br />
3. Check for water leaks underneath the dishwasher.<br />
4. Make sure the flexible water fill and drain hoses are not kinked.<br />
5. Make sure that the dishwasher is level.<br />
6. Clean accumulated lime deposits from the wash tank heating element.<br />
7. Inspect the scrap screen and replace it if damaged.<br />
8. Check the spray arms and replace or repair if damaged.<br />
9. Clean the chemical dispenser pick-up tubing for the detergent and rinse-aid pumps.<br />
To clean the pick-up tubing:<br />
1. Remove the pick-up tubes from their containers.<br />
2. Place each tube in a separate container of hot water.<br />
3. Press and hold the PRIME button up in the DET position until water flows into the wash tank<br />
compartment.<br />
4. Press and hold the PRIME button down in the RINSE position until water flows into the wash<br />
tank compartment.<br />
5. Return the pick-up tubes to their containers.<br />
6. Run 3 empty dishwasher cycles to flush any chemicals from the dishwasher wash<br />
compartment.<br />
7. Push and hold the chemical prime button to prime the chemical pumps.<br />
18
Troubleshooting<br />
Troubleshooting<br />
Follow the troubleshooting guide below in the event that your dishwasher does not operate as<br />
expected. Perform the basic checks below before calling an authorized service agent:<br />
1. Make sure that the main water supply is turned on.<br />
2. Make sure that the main power is turned on.<br />
3. Make sure that the flexible water fill and drain hoses are not kinked.<br />
Condition Cause Solution<br />
Dishwasher will not run.<br />
Low or no water.<br />
Door not closed.<br />
Main power OFF.<br />
Dishwasher OFF.<br />
Main water supply off.<br />
PRV setting incorrect<br />
Solenoid strainer clogged.<br />
Solenoid valve defective.<br />
Close door completely.<br />
Check breaker on panel.<br />
Turn dishwasher ON.<br />
Open supply valve.<br />
Adjust the PRV setting<br />
Clean strainer.<br />
Contact Service Agent.<br />
Chemicals won’t feed into<br />
dishwasher.<br />
Chemical supply low.<br />
Pick-up tube clogged<br />
Supply tubing damaged.<br />
Supply tubing kinked.<br />
Refill chemical container.<br />
Clean/replace tube.<br />
Replace tubing.<br />
Straighten tubing.<br />
Poor wash results.<br />
Wares incorrectly loaded.<br />
in dishrack.<br />
Reposition wares or<br />
reduce amount of wares.<br />
Clogged sump filter.<br />
Clogged spray arms.<br />
Detergent injector not<br />
feeding.<br />
Thermostat defective.<br />
Clean sump filter.<br />
Clean spray arms.<br />
Replace squeeze tube or<br />
clean tubing and pick-up<br />
tube.<br />
Contact Service Agent.<br />
Detergent motor defective.<br />
Water temperature low.<br />
Contact Service Agent<br />
Contact Service Agent<br />
Dishwasher stays in<br />
wash cycle.<br />
Safe-T-Temp extends wash<br />
mode to allow final rinse<br />
water booster temperature<br />
to reach 180˚F/82˚C.<br />
Dishwasher is operating in<br />
the Extended Wash Mode.<br />
Contact Service Agent<br />
because booster<br />
thermostat is defective.<br />
Press the Extended Wash<br />
button 1 time. The Extended<br />
Wash Indicator light will go<br />
out, the wash cycle will<br />
resume where it left off and<br />
perform a final rinse cycle.<br />
19
Blank Page<br />
This Page<br />
Intentionally<br />
Left Blank<br />
20
Model UC65e - Electrical Schematic<br />
TO CUSTOMERS DISCONNECT SWITCH<br />
PER LOCAL ELECTRICAL CODE<br />
115-208/230V/1PH 60HZ<br />
L1 L2 N<br />
GND<br />
1<br />
1<br />
PS<br />
1L1<br />
BFS<br />
L1<br />
TT<br />
TS<br />
3 4<br />
5<br />
1L2<br />
L2<br />
WHTR<br />
10<br />
POL<br />
7<br />
1<br />
25<br />
CPS<br />
1<br />
8<br />
1<br />
DOOR<br />
SWITCH<br />
6<br />
HC1<br />
EXT. WASH SWITCH<br />
11<br />
START SWITCH<br />
13<br />
DRAIN<br />
SWITCH<br />
19<br />
9<br />
EWL<br />
N<br />
HC1 1H2<br />
1H1<br />
1HTR<br />
BOOSTER HEAT<br />
208/230 VAC<br />
4 kW<br />
SR1<br />
26<br />
SR1-2<br />
WPR<br />
23<br />
WP<br />
12<br />
SR<br />
6<br />
2<br />
1<br />
3<br />
HOMING<br />
CAM<br />
2 2<br />
13<br />
15 16<br />
3 3<br />
EXT. WASH SAFETY<br />
CAM TEMP<br />
CAM<br />
TM<br />
CL<br />
DIAGRAM STATE<br />
END OF CYCLE<br />
POWER-OFF<br />
DOOR-OPENED<br />
MINIMUM CIRCUIT AMPACITY<br />
30 AMPS<br />
MAXIMUM OVERCURRENT<br />
PROTECTION 30 AMPS<br />
6<br />
27<br />
1<br />
2<br />
3<br />
3<br />
2<br />
1<br />
2<br />
2<br />
WASH PUMP<br />
DRAIN PUMP<br />
FILL/RINSE<br />
DETERGENT<br />
R/A<br />
TIMER<br />
17<br />
19<br />
7<br />
8<br />
9<br />
WPR<br />
DP<br />
RV<br />
DEP<br />
RAP<br />
BFS<br />
BS<br />
BT<br />
CL<br />
CPS<br />
DEP<br />
DP<br />
EWL<br />
EWS<br />
GND<br />
HC1<br />
1HTR<br />
POL<br />
PS<br />
RAP<br />
RV<br />
SR<br />
TM<br />
TS<br />
TT<br />
WHTR<br />
WPR<br />
BOOSTER FILL SWITCH<br />
BOOSTER SAFETY THERMOSTAT<br />
BOOSTER THERMOSTAT<br />
CYCLE LIGHT<br />
CHEMICAL PRIME SWITCH<br />
DETERGENT PUMP<br />
DRAIN PUMP<br />
EXTENDED WASH LIGHT<br />
EXTENDED WASH SWITCH<br />
GROUND<br />
BOOSTER CONTACTOR<br />
BOOSTER HEATER<br />
POWER ON LIGHT<br />
POWER ON SWITCH<br />
RINSE AID PUMP<br />
RINSE VALVE<br />
START RELAY<br />
TIMER MOTOR<br />
TANK HEAT SAFETY THERMOSTAT<br />
TANK HEAT THERMOSTAT<br />
WASH TANK HEATER<br />
WASH PUMP RELAY<br />
10<br />
1L1<br />
1<br />
DOOR<br />
HOT SW<br />
RINSE<br />
DRAIN<br />
FILL TIMER MODULE<br />
SW. PWR.<br />
10<br />
N<br />
19<br />
Model UC 65e<br />
HIGH TEMP UNDERCOUNTER<br />
DATE<br />
25-FEB-09<br />
NUMBER/REV<br />
UC65e/0512867/REVA<br />
1 BT<br />
BS<br />
22<br />
HC1<br />
N<br />
21<br />
21
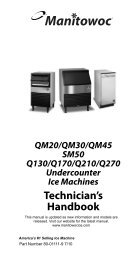
Timer Chart - Model UC65e<br />
TIMING CHART<br />
6<br />
TIME (SEC.) 0 10 20 30 40 50 60 70 80 90 100 110 120<br />
1 HOMING CAM<br />
2 WASH PUMP<br />
3 DRAIN PUMP<br />
4 RINSE VALVE<br />
5 DET PUMP<br />
6 RINSE AID PUMP<br />
7 EXTENDED WASH<br />
8 SAFE-T-TEMP<br />
<strong>CMA</strong> <strong>Dishmachines</strong><br />
UC65e<br />
DRAWING NO.<br />
05CTIME<br />
22
Drain<br />
Theory of Operation - Fill/Drain Timer<br />
Fill/Drain Timer - Theory of Operation<br />
The Fill/Frain Timer provides both automatic fill and semi-automatic drain functions for the<br />
dishwasher. It is located on the back of the electrical component panel and it operates as follows:<br />
Fill<br />
1. Main power, (115VAC), must be present at the Hotline and Neutral terminals of the fill/drain timer.<br />
2. Turning the machine ON/OFF switch ON, sends 115VAC to the "SW Power" terminals which<br />
activates the initial fill.<br />
3. The rinse valve is activated for 70-seconds.<br />
4. The drain pump also operates for the same amount of time. This prevents any overflow conditions<br />
if the wash tank had not been drained previously.<br />
5. If the door is opened during the fill cycle, then all functions are suspended and will continue from<br />
where they left off once the door is closed.<br />
6. To prevent false fills due to brief power interruptions, the following safety measures are built into the<br />
operation of the Fill/Drain Timer:<br />
a. Power must be present at the Hotline and Neutral terminals for 5-seconds<br />
before the signal from turning the machine ON/OFF switch ON is accepted.<br />
b. A fill will not happen unless the machine ON/OFF switch is OFF for 5-seconds<br />
before being switched ON without interruption.<br />
SwPower<br />
Door SW<br />
Fill<br />
Hotline<br />
Neutral<br />
Fill/Drain Timer<br />
(shown enlarged)<br />
23
Blank Page<br />
This Page<br />
Intentionally<br />
left Blank<br />
25