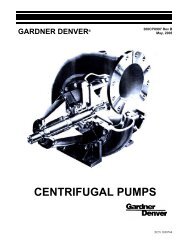
2045 LX Centrifugal Pump - QUINCIE Oilfield Products
2045 LX Centrifugal Pump - QUINCIE Oilfield Products
2045 LX Centrifugal Pump - QUINCIE Oilfield Products

Create successful ePaper yourself
Turn your PDF publications into a flip-book with our unique Google optimized e-Paper software.
<strong>2045</strong> <strong>LX</strong> <strong>Centrifugal</strong> <strong>Pump</strong>
<strong>2045</strong> <strong>LX</strong> <strong>Centrifugal</strong> <strong>Pump</strong><br />
<strong>LX</strong> PUMP ASSEMBLY<br />
1
<strong>2045</strong> <strong>LX</strong> <strong>Centrifugal</strong> <strong>Pump</strong><br />
DISASSEMBLY OF <strong>LX</strong> PUMP<br />
To disassemble pump, first remove nuts (12)<br />
where indicated around entire perimeter of<br />
pump housing.<br />
2
<strong>2045</strong> <strong>LX</strong> <strong>Centrifugal</strong> <strong>Pump</strong><br />
DISASSEMBLY OF <strong>LX</strong> PUMP<br />
After (12) nuts are removed, entire rotating<br />
assembly may be pulled out of volute as shown<br />
above, using the push bolt holes as necessary.<br />
Note: Due to cement build up between Volute and<br />
pump housing it is sometimes difficult to remove<br />
rotating assembly.<br />
3
<strong>2045</strong> <strong>LX</strong> <strong>Centrifugal</strong> <strong>Pump</strong><br />
DISASSEMBLY OF <strong>LX</strong> PUMP<br />
Remove Impeller retaining bolt.<br />
4
<strong>2045</strong> <strong>LX</strong> <strong>Centrifugal</strong> <strong>Pump</strong><br />
DISASSEMBLY OF <strong>LX</strong> PUMP<br />
Use puller to remove impeller from shaft.<br />
5
<strong>2045</strong> <strong>LX</strong> <strong>Centrifugal</strong> <strong>Pump</strong><br />
DISASSEMBLY OF <strong>LX</strong> PUMP<br />
Remove pipe nipple from stuffing box.<br />
6
<strong>2045</strong> <strong>LX</strong> <strong>Centrifugal</strong> <strong>Pump</strong><br />
DISASSEMBLY OF <strong>LX</strong> PUMP<br />
After Impeller and pipe nipple are removed,<br />
remove Impeller key from shaft with proper tool<br />
being careful not to damage shaft.<br />
Note: This key is specific finish tolerances. Check<br />
for burrs, wear, nonconformance to shaft keyway.<br />
Replace if needed.<br />
7
<strong>2045</strong> <strong>LX</strong> <strong>Centrifugal</strong> <strong>Pump</strong><br />
DISASSEMBLY OF <strong>LX</strong> PUMP<br />
Remove back head.<br />
8
<strong>2045</strong> <strong>LX</strong> <strong>Centrifugal</strong> <strong>Pump</strong><br />
DISASSEMBLY OF <strong>LX</strong> PUMP<br />
Remove two bolts from Packing Gland.<br />
9
<strong>2045</strong> <strong>LX</strong> <strong>Centrifugal</strong> <strong>Pump</strong><br />
DISASSEMBLY OF <strong>LX</strong> PUMP<br />
Remove packing gland (follower). This will give access to<br />
seals and lantern gland which may be removed from<br />
stuffing box at this time.<br />
Check all parts for wear.<br />
Caution: Take care when removing seals to prevent<br />
damage to seals and lantern gland.<br />
10
<strong>2045</strong> <strong>LX</strong> <strong>Centrifugal</strong> <strong>Pump</strong><br />
DISASSEMBLY OF <strong>LX</strong> PUMP<br />
Before proceeding further with disassembly,<br />
remove this grease fitting.<br />
11
<strong>2045</strong> <strong>LX</strong> <strong>Centrifugal</strong> <strong>Pump</strong><br />
DISASSEMBLY OF <strong>LX</strong> PUMP<br />
Remove Slinger locking screw.<br />
12
<strong>2045</strong> <strong>LX</strong> <strong>Centrifugal</strong> <strong>Pump</strong><br />
DISASSEMBLY OF <strong>LX</strong> PUMP<br />
Remove slinger.<br />
13
<strong>2045</strong> <strong>LX</strong> <strong>Centrifugal</strong> <strong>Pump</strong><br />
DISASSEMBLY OF <strong>LX</strong> PUMP<br />
Remove these bolts (4).<br />
Pick pump up and bump Impeller end of shaft<br />
against a heavy block of wood. This will<br />
remove shaft, bearings, and rear bearing<br />
retainer as an assembly.<br />
14
<strong>2045</strong> <strong>LX</strong> <strong>Centrifugal</strong> <strong>Pump</strong><br />
DISASSEMBLY OF <strong>LX</strong> PUMP<br />
Rear bearing retainer, shaft and both bearings should<br />
slip out of the pump housing as an assembly. If the<br />
front bearing becomes disengaged from shaft and<br />
remains in the housing, it may be removed with the<br />
proper tooling.<br />
15
<strong>2045</strong> <strong>LX</strong> <strong>Centrifugal</strong> <strong>Pump</strong><br />
DISASSEMBLY OF <strong>LX</strong> PUMP<br />
Remove internal snap ring from rear<br />
bearing retainer.<br />
16
<strong>2045</strong> <strong>LX</strong> <strong>Centrifugal</strong> <strong>Pump</strong><br />
DISASSEMBLY OF <strong>LX</strong> PUMP<br />
Remove shaft and bearing(s) from rear bearing<br />
retainer.<br />
17
<strong>2045</strong> <strong>LX</strong> <strong>Centrifugal</strong> <strong>Pump</strong><br />
DISASSEMBLY OF <strong>LX</strong> PUMP<br />
Remove nut and lock from rear of shaft.<br />
Bearing may be pressed off at this time.<br />
18
<strong>2045</strong> <strong>LX</strong> <strong>Centrifugal</strong> <strong>Pump</strong><br />
DISASSEMBLY OF <strong>LX</strong> PUMP<br />
Remove rear seal.<br />
19
<strong>2045</strong> <strong>LX</strong> <strong>Centrifugal</strong> <strong>Pump</strong><br />
DISASSEMBLY OF <strong>LX</strong> PUMP<br />
Check this area inside<br />
shaft for wear.<br />
Hydraulic<br />
Motor Shaft<br />
Severe wear may occur to pump shaft at a point where<br />
splines of hydraulic motor contact shaft splines. Since it may not<br />
be possible to see this wear from the outside of shaft, the internal<br />
splines in shaft should be cleaned thoroughly with solvent and<br />
then inspected under a strong light. If the wear in this area<br />
exceeds .030, shaft should be discarded and no attempt to reuse<br />
or repair should be made.<br />
When splines become worn beyond the .030 limit, it becomes<br />
difficult and sometimes impossible to disengage hydraulic motor<br />
from pump shaft. If this occurs, the only solution is to cut motor<br />
shaft or splined end of pump shaft off with a torch.<br />
20
<strong>2045</strong> <strong>LX</strong> <strong>Centrifugal</strong> <strong>Pump</strong><br />
ASSEMBLY OF <strong>LX</strong> PUMP<br />
Reassembly of pump<br />
should begin with the<br />
replacement of seal in rear<br />
bearing cover. Seal lip<br />
should face to the rear of<br />
housing away from rear<br />
bearing. This prevents any<br />
foreign material from<br />
entering rear bearing<br />
assembly.<br />
21
<strong>2045</strong> <strong>LX</strong> <strong>Centrifugal</strong> <strong>Pump</strong><br />
ASSEMBLY OF <strong>LX</strong> PUMP<br />
Lock Nut<br />
Rear Bearing<br />
(Outboard Bearing)<br />
Install rear bearing<br />
and lock nut.<br />
22
<strong>2045</strong> <strong>LX</strong> <strong>Centrifugal</strong> <strong>Pump</strong><br />
ASSEMBLY OF <strong>LX</strong> PUMP<br />
Insert the shaft and<br />
rear bearing into<br />
bearing cover.<br />
23
<strong>2045</strong> <strong>LX</strong> <strong>Centrifugal</strong> <strong>Pump</strong><br />
ASSEMBLY OF <strong>LX</strong> PUMP<br />
Install front<br />
(inboard) bearing<br />
snap ring.<br />
Install rear<br />
(outboard)<br />
bearing retaining<br />
ring.<br />
24
<strong>2045</strong> <strong>LX</strong> <strong>Centrifugal</strong> <strong>Pump</strong><br />
ASSEMBLY OF <strong>LX</strong> PUMP<br />
Install front<br />
(inboard) bearing.<br />
25
<strong>2045</strong> <strong>LX</strong> <strong>Centrifugal</strong> <strong>Pump</strong><br />
ASSEMBLY OF <strong>LX</strong> PUMP<br />
When shaft, bearings<br />
and rear bearing cover<br />
have been assembled,<br />
stand this assembly<br />
upright and install pump<br />
housing.<br />
26
<strong>2045</strong> <strong>LX</strong> <strong>Centrifugal</strong> <strong>Pump</strong><br />
ASSEMBLY OF <strong>LX</strong> PUMP<br />
Bolt rear bearing cover to pump<br />
housing, but do not tighten bolts<br />
(qty. 4, P/N 17519) at this time.<br />
27
<strong>2045</strong> <strong>LX</strong> <strong>Centrifugal</strong> <strong>Pump</strong><br />
ASSEMBLY OF <strong>LX</strong> PUMP<br />
Install slinger but do<br />
not tighten lock screw<br />
at this time.<br />
28
<strong>2045</strong> <strong>LX</strong> <strong>Centrifugal</strong> <strong>Pump</strong><br />
ASSEMBLY OF <strong>LX</strong> PUMP<br />
ANY PUMP THAT IS<br />
PACKED WITH THREE<br />
SEALS AND HAS THE<br />
PACKING GLAND (follower)<br />
WITH THE .625<br />
DIMENSIONS INDICATED<br />
BY DOTTED LINES (LEFT)<br />
SHOULD BE MODIFIED TO<br />
THE .125 DIMENSION AND<br />
A 4 TH SEAL ADDED AS<br />
SHOWN ON PAGE 30.<br />
29
<strong>2045</strong> <strong>LX</strong> <strong>Centrifugal</strong> <strong>Pump</strong><br />
ASSEMBLY OF <strong>LX</strong> PUMP<br />
Modify as<br />
per 29781<br />
Add one<br />
seal.<br />
Turn this seal around<br />
to position shown.<br />
Install seals (4) lantern gland and modified<br />
packing gland into stuffing box in<br />
backhead as indicated above.<br />
Note: Lubricate O.D. of seals before installation<br />
and observe placement of number (3)<br />
seal as the lip on this seal must face rear of<br />
pump.<br />
Item Req’d Part. No. Description<br />
1 1 29781 Gland, Packing Modified<br />
2 1 29782 Gland, Lantern<br />
3 4 5826 Oil Seal, Solid Packing<br />
30
<strong>2045</strong> <strong>LX</strong> <strong>Centrifugal</strong> <strong>Pump</strong><br />
TYPICAL INSTALLATION OF<br />
CENTRIFUGAL PUMP<br />
PACKING<br />
TUL29909<br />
I. REMOVE ALL WORN PACKING RINGS FROM THE STUFFING BOX AND CLEAN SAME<br />
THROUGHLY.<br />
2. CHECK ALL BEARINGS PER THE MANUFACTURERS SPECIFICATIONS AND REPLACE<br />
SAME IF NECESSARY. CHECK THE SHAFT AND REPLACE IF NECESSARY.<br />
3. LUBRICATE THE 2 PRIMARY SEAL RINGS. INSTALL AND SEAT EACH SEAL RING<br />
SEPARATELY, WITH ALL SEAL LIPS FACING TOWARD THE IMPELLER I STAGGERING THE<br />
SPLITS AT THE 12 O'CLOCK AND THE 3 O'CLOCK POSITIONS SO THAT THERE IS NO<br />
DIRECT LEAKAGE PATH ESTABLISHED.<br />
4. LUBRICATE AND INSTALL THE 2 PIECE PLASTIC LANTERN RING.<br />
5. LUBRICATE THE 2 SECONDARY SEAL RINGS. INSTALL AND SEAT EACH SEAL RING<br />
SEPARATELY AND AGAIN STAGGERING THE SPLITS AS FOLLOWS:<br />
(a) THE 1 ST SECONDARY SEAL RING OF THIS SERIES MUST BE INSTALLED WITH<br />
THE LIPS FACING AWAY FROM THE IMPELLER WITH SPLITS AT THE 6 O'CLOCK<br />
POSITION. THE REVERSE POSITION OF THIS SEAL WILL PREVENT AIR FROM<br />
BEING DRAWN THRU THE GLAND, AND THUS CAUSING THE LOSS OF PRIME.<br />
(b) THE 2 ND SECONDARY SEAL RING OF THIS SERIES MUST BE INSTALLED WITH THE<br />
SEAL LIPS FACING THE IMPELLER, AND WITH THE SPLIT AT THE 9 O'CLOCK POSITION.<br />
7. LUBRICATE, INSTALL AND SEAT THE SPLIT COMPRESSION PACKING RING WITH THE<br />
SPLIT AT THE 12 O'CLOCK POSITION.<br />
8. TO PROPERLY PRELOAD THIS COMBINATION SET, BOTTOM OUT THE FLAT SIDE OF THE<br />
GLAND AGAINST THE FACE OF THE STUFFING BOX.<br />
31
<strong>2045</strong> <strong>LX</strong> <strong>Centrifugal</strong> <strong>Pump</strong><br />
ASSEMBLY OF <strong>LX</strong> PUMP<br />
32
<strong>2045</strong> <strong>LX</strong> <strong>Centrifugal</strong> <strong>Pump</strong><br />
ASSEMBLY OF <strong>LX</strong> PUMP<br />
Install Packing in stuffing box area of<br />
backhead as directed on page 31.<br />
33
<strong>2045</strong> <strong>LX</strong> <strong>Centrifugal</strong> <strong>Pump</strong><br />
ASSEMBLY OF <strong>LX</strong> PUMP<br />
Install Packing Gland (Follower).<br />
Install Packing gland bolts and<br />
tighten to 60 Nm ± 10<br />
A light coating of chassis lube<br />
should be applied to the I.D. of<br />
seal assembly at this time.<br />
34
<strong>2045</strong> <strong>LX</strong> <strong>Centrifugal</strong> <strong>Pump</strong><br />
ASSEMBLY OF <strong>LX</strong> PUMP<br />
Cover the seal area of<br />
the shaft with a light<br />
coating of chassis lube<br />
and install backhead<br />
gasket and O-ring.<br />
35
<strong>2045</strong> <strong>LX</strong> <strong>Centrifugal</strong> <strong>Pump</strong><br />
ASSEMBLY OF <strong>LX</strong> PUMP<br />
Install backhead assembly as shown above using guide pin for<br />
proper alignment.<br />
Caution: Be extremely careful when the #3 seal contacts shaft<br />
as the lip on this seal points in the opposite direction of the<br />
other three (3) seals. and serious damage can result to seal lip<br />
or compression spring may become disengaged.<br />
36
<strong>2045</strong> <strong>LX</strong> <strong>Centrifugal</strong> <strong>Pump</strong><br />
ASSEMBLY OF <strong>LX</strong> PUMP<br />
Install Impeller Key at this time.<br />
Caution: This Key is special and a<br />
standard Woodruff Key will not fit.<br />
37
<strong>2045</strong> <strong>LX</strong> <strong>Centrifugal</strong> <strong>Pump</strong><br />
ASSEMBLY OF <strong>LX</strong> PUMP<br />
Install Impeller over shaft and<br />
key, being very careful that key<br />
does not become disengaged<br />
from shaft.<br />
38
<strong>2045</strong> <strong>LX</strong> <strong>Centrifugal</strong> <strong>Pump</strong><br />
ASSEMBLY OF <strong>LX</strong> PUMP<br />
Install impeller lock and bolt as<br />
shown above and torque bolt to:<br />
200 ± 15 lb. ft./280 ± 20 Nm<br />
Install set screw as shown<br />
above.<br />
39
<strong>2045</strong> <strong>LX</strong> <strong>Centrifugal</strong> <strong>Pump</strong><br />
ASSEMBLY OF <strong>LX</strong> PUMP<br />
Entire rotating assembly may<br />
now be inserted into volute.<br />
Use mounting pedestals for<br />
proper alignment.<br />
Install housing nuts and torque<br />
to 150 ± 20 lb. ft.l200 ± 25 Nm.<br />
40
<strong>2045</strong> <strong>LX</strong> <strong>Centrifugal</strong> <strong>Pump</strong><br />
ASSEMBLY OF <strong>LX</strong> PUMP<br />
Screw Lube pipe with cap into backhead.<br />
41
<strong>2045</strong> <strong>LX</strong> <strong>Centrifugal</strong> <strong>Pump</strong><br />
ASSEMBLY OF <strong>LX</strong> PUMP<br />
Install grease zerk (P/N 17516).<br />
42
<strong>2045</strong> <strong>LX</strong> <strong>Centrifugal</strong> <strong>Pump</strong><br />
IMPORTANT!!!<br />
THIS PROCEDURE MUST BE<br />
DONE FOR PUMP TO OPERATE<br />
TO DESIGN.<br />
For proper pump performance and long life, it is extremely<br />
important that these adjustments be made with care as this<br />
will assure the proper .030 clearance between the Impeller<br />
and Volute.<br />
Measure this distance<br />
Turn all adjusting screws<br />
counter clockwise until they are<br />
flush with front face of rear<br />
bearing retainer housing. Drive<br />
bearing retainer forward until<br />
Impeller contacts Volute. Turn<br />
adjusting screws clockwise until<br />
they contact pump housing.<br />
Turn each adjusting screw 1/4<br />
turn. Continue in this manner<br />
until the initial distance<br />
plus .030 is reached. Torque<br />
retainer bolts to:<br />
75 ± 10 lb. ft. / 100 ± 15 Nm<br />
Re-measure distance between pump housing and rear bearing retainer as it<br />
sometimes will change when retainer bolts are torqued.<br />
Some early pumps will have two (2) adjusting screws and<br />
two (2) retainer bolts while later models may have four (4)<br />
adjusting screws and four (4) retainer bolts. This does not<br />
affect adjusting procedure.<br />
43
<strong>2045</strong> <strong>LX</strong> <strong>Centrifugal</strong> <strong>Pump</strong><br />
ASSEMBLY OF <strong>LX</strong> PUMP<br />
After pump has been installed and adjusted, adjust<br />
slinger toward rear of pump until it contacts front<br />
bearing and tighten lock screw.<br />
44
<strong>2045</strong> <strong>LX</strong> <strong>Centrifugal</strong> <strong>Pump</strong><br />
ASSEMBLY OF <strong>LX</strong> PUMP<br />
After pump has been overhauled remove pipe plug in<br />
bottom of pump housing and install grease fitting.<br />
Remove pipe plug on side of housing. <strong>Pump</strong> NGL-1 or<br />
NGL-2 chassis lube into housing until it starts to come out<br />
of hole in side of housing where pipe plug was removed.<br />
While grease is being pumped into housing, pump should<br />
be turning as this will distribute lube to bearing and<br />
prevent over filling.<br />
45
<strong>2045</strong> <strong>LX</strong> <strong>Centrifugal</strong> <strong>Pump</strong><br />
<br />
<br />
<br />
<br />
<br />
<br />
<br />
GARDNER DENVER DESIGN FEATURES GIVE<br />
LONG LIFE & EASY MAINTENANCE.<br />
The <strong>2045</strong> <strong>LX</strong> features two flow dividers resulting in<br />
three throats positioned 120 degrees apart which<br />
allows for a balance of thrust and forces and low<br />
radial loads, shortened flow path, development of<br />
full pressure at 1/3 revolution of impeller,<br />
distribution of wear at three points, prevention of air entrapment and vapor lock,<br />
reduction of shear and improvement of viscosity handling characteristics.<br />
The GD <strong>2045</strong> <strong>LX</strong> drive system has a mounting adapter bracket predrilled to accept a<br />
direct drive SAE “C” two, or four bolt hydraulic motor, and in conjunction with our<br />
internal splined shaft eliminates down time due to misalignment.<br />
Simplistic construction requires less assembly time and less spare parts inventory.<br />
The impeller design is fully open and ideally suited for handling fluids containing<br />
suspended solids. Impeller is available in an 8-vane pattern with a clockwise rotation.<br />
The frame is available in two versions, economical cast iron and steel fabricated.<br />
The GD <strong>2045</strong> <strong>LX</strong> offers two packing choices. Solid lip seals provide efficient service<br />
with a minimum amount of attention. Split compression type packing is available for<br />
more severe service conditions and can easily be replaced without dismantling the<br />
pump.<br />
Bearings provide maximum radial and thrust load capacity and are protected by a<br />
water slinger.<br />
46
<strong>2045</strong> <strong>LX</strong> <strong>Centrifugal</strong> <strong>Pump</strong><br />
<strong>2045</strong> <strong>LX</strong> Parts List<br />
Ref<br />
No. Name of Part Qty. Part No.<br />
Ref<br />
No. Name of Part Qty. Part No.<br />
1 GASKET DISCHARGE 1 35193 18 BEARING LOCK NUT 1 61117<br />
2 SET SCREW 1 28775 19 OIL SEAL, OUTBOARD 1 62961<br />
3 IMPELLER BOLT (Hex Design) 1 56102 20 GASKET SUCTION 1 35264<br />
4<br />
IMPELLER LOCK WITH ROLL<br />
PIN<br />
1 56103 21 VOLUTE 1 5620LR<br />
5<br />
SPLIT LIP SEAL PACKING<br />
MODIFIED VOLUTE/NO PED-<br />
4 29795 21A*<br />
RING<br />
ESTALS WITH EX DRAIN<br />
1 5620LR-SP<br />
5A OIL SEAL SOLID PACKING 3 or 4 5826 22 1” PIPE PLUG 2 17520<br />
6 LANTERN GLAND, 2 PIECE 1 29797 * 1/2” PIPE PLUG 1 16125<br />
6A LANTERN GLAND, SOLID 1 29782 23 GASKET, BACKHEAD 1 24766<br />
7<br />
SQUARE COMPRESSION PKG.<br />
RING<br />
1 29796 24 IMPELLER, 8 VANE 1 74814<br />
8 PACKING FOLLOWER, 2 PIECE 1 TUL29811 25 O-RING BACKHEAD 1 17449<br />
8A PACKING FOLLOWER, SOLID 1 29781 26 BACKHEAD 1 26081<br />
9 KEEPER 2 29812 27 LUBE PIPE WITH CAP 1 14724<br />
10<br />
HEX BOLT (Pkg. Follower/<br />
28 RETAINING SCREW,<br />
1 17522<br />
2 103284<br />
Backhead)<br />
SLINGER/SHAFT<br />
11<br />
BEARING, INBOARD SINGLE<br />
ROW<br />
1 TUL52480 29 SLINGER, 2 PIECE 1 29810<br />
12 RETAINING RING, INBOARD 1 52481 30 FRAME, CAST 1 TUL62960<br />
13 IMPELLER KEY 1 26083 31 HEX BOLT, FRAME/VOLUTE 12 17515<br />
14<br />
SHAFT, INTERNAL SPLINED 1 61088 32 HEX BOLT, BEARING<br />
DRIVE<br />
COVER/FRAME<br />
4 17519<br />
15 GREASE ZERK 1 17516 33 THRUST AJUSTMENT<br />
4 26029<br />
SCREW<br />
16 RETAINING RING, OUTBOARD<br />
1 26035 34 BEARING COVER & MOTOR 1 26084<br />
BRACKET<br />
17 BEARING, OUTBOARD Double 1 61116<br />
row<br />
* These items not shown on this assembly drawing.<br />
47
<strong>2045</strong> <strong>LX</strong> <strong>Centrifugal</strong> <strong>Pump</strong><br />
GARDNER DENVER PRODUCT WARRANTY<br />
GENERAL PROVISIONS AND<br />
LIMITATIONS<br />
Gardner Denver (the "Company") warrants to each<br />
original retail purchaser ("Purchaser") of its new<br />
products, assemblies or parts from the Company or<br />
its authorized distributors that such products are, at<br />
the time of delivery to the Purchaser, made with good<br />
material and workmanship. No warranty is made with<br />
respect to:<br />
1. Any product which has been repaired or altered<br />
in such a way, in the Company's judgment, as to<br />
affect the product adversely.<br />
2. Any product which has, in the Company's<br />
judgment, been subject to negligence, accident,<br />
or improper storage, improper installation,<br />
operation or application. (Examples: overpressure,<br />
sand-outs, cavitation, corrosion,<br />
erosion or degradation).<br />
3. Any product which has not been operated or<br />
maintained in accordance with the<br />
recommendations of the Company.<br />
4. Components or accessories manufactured,<br />
warranted and serviced by others.<br />
Any reconditioned or prior owned product.<br />
Claims for items described in (4) above should be<br />
submitted directly to the manufacturer.<br />
WARRANTY PERIOD<br />
The Company's obligation under this warranty is<br />
limited to repairing or, at its option, replacing, during<br />
normal business hours at an authorized service<br />
facility of the Company, any part or assembly which<br />
in the Company’s judgment proved to have<br />
unsatisfactory material or workmanship within the<br />
applicable Warranty Period as follows.<br />
Except for the products or components listed below,<br />
and subject to the limitations and restrictions set<br />
forth in the “Disclaimer” section set forth below, the<br />
Warranty Period for all products is 1,250 hours of<br />
operation or three (3) months after start-up, not to<br />
exceed 120 days after delivery to Purchaser,<br />
whichever occurs first. The exceptions are as<br />
follows:<br />
1. Power end is warranted for twelve (12) months<br />
from date of start-up or eighteen (18) months<br />
from date of delivery to the Purchaser, whichever<br />
occurs first.<br />
2. Forged steel fluid cylinders are warranted for<br />
materials and workmanship for 6 months from<br />
the date of installation or 18 months from the date<br />
of delivery to the purchaser, which ever occurs first.<br />
3. Repairs are warranted for 90 days from the date of<br />
delivery, for the workmanship and materials of the<br />
new parts installed.<br />
4. Weld repaired fluid ends and weld repaired<br />
components are not warranted.<br />
5. Expendable fluid end parts, including, but not<br />
limited to, valves, valve parts, packing, liners and<br />
pistons, are not covered by this warranty due to<br />
variable abrasive nature of material pumped.<br />
PRESERVATION ASSEMBLIES DESTINED<br />
FOR STORAGE<br />
In order for warranty acceptance any pump assembly<br />
not immediately installed or destined to be in storage<br />
or in transit for extended periods of time must be<br />
prepared for storage as defined in the Company’s Long<br />
Term Storage Procedure. This includes but is not<br />
limited to:<br />
Drain and thoroughly clean inside power end crankcase.<br />
Spray rust inhibiting oil on all bearing, machined and inside<br />
surfaces of the power end.<br />
Induce clean gear oil into any circulating pump, filter, heat<br />
exchanger and piping.<br />
Remove valves, seats and plungers from the fluid end.<br />
Thoroughly clean and dry these parts and all internal<br />
surfaces. Coat all cylinder bores, valve covers and<br />
reusable expendable parts with rust preventative.<br />
Flush all water, and contaminants from pump, tanks, hoses<br />
and spray nozzles. Spray all components with a rust<br />
inhibiting oil.<br />
Rotate pump every 30 days to insure bearings are oiled.<br />
At the expense of the Purchaser, any product properly<br />
preserved must be inspected by an authorized agent of<br />
the Company, prior to the Company, granting any<br />
extended warranty beyond that stated in this warranty.<br />
LABOR TRANSPORTATION AND INSPECTION<br />
The Company will provide labor, by Company<br />
representative or authorized service personnel, for<br />
repair or replacement of any product or part thereof<br />
which in the Company's judgment is proved not to be<br />
as warranted.<br />
Labor shall be limited to the amount specified in the<br />
Company's labor rate schedule. Labor costs in excess<br />
48
<strong>2045</strong> <strong>LX</strong> <strong>Centrifugal</strong> <strong>Pump</strong><br />
GARDNER DENVER PRODUCT WARRANTY<br />
of the Company rate schedules caused by, but not<br />
limited to, location or inaccessibility of the equipment,<br />
or labor provided by unauthorized service personnel<br />
is not provided for by this warranty.<br />
All costs of transportation of product or parts claimed<br />
not to be as warranted and, of repaired or replacement<br />
parts to or from such service facility shall be borne by<br />
the Purchaser. The Company may require the return<br />
of any part claimed not to be as warranted to one of<br />
its facilities as designated by the Company,<br />
transportation prepaid by the Purchaser, to establish<br />
a claim under this warranty.<br />
Replacement parts provided under the terms of this<br />
warranty are warranted for the remainder of the<br />
Warranty Period of the product upon which installed<br />
to the same extent as if such parts were original<br />
components.<br />
The Company may request a root cause analysis be<br />
performed in-order to identify if a request for warranty<br />
claim meets the requirements of this warranty.<br />
DISCLAIMER<br />
Except as to title, the foregoing warranty is the sole<br />
and exclusive warranty of the Company. The<br />
Company hereby extends other manufactures’<br />
warranty or guaranties, if any given to Company by<br />
such manufacturer, but only to the extent the<br />
Company is able to enforce such warranty or<br />
guaranties. The Company has not authorized any<br />
party to make any representation or warranty other<br />
than as expressly set forth herein. SELLER HEREBY<br />
DISCLAIMS AND EXCLUDES ANY OTHER EXPRESS,<br />
IMPLIED OR STATUTORY WARRANTIES, ARISING BY<br />
OPERATION OF LAW OR OTHERWISE, INCLUDING,<br />
WITHOUT LIMITATION, ANY WARRANTIES OF<br />
MERCHANTABILITY OR FITNESS FOR A<br />
PARTICULAR PURPOSE. COMPANY MAKES NO<br />
WARRANTIES OR REPRESENTATIONS OF ANY KIND<br />
WHATSOEVER (EXPRESS, IMPLIED OR STATUTORY),<br />
OF LAW OR OTHERWISE, ON ANY EQUIPMENT,<br />
COMPONENT PARTS OR ACCESSORIES SOLD<br />
HEREUNDER WHICH, ARE NOT MANUFACTURED BY<br />
COMPANY.<br />
NOTWITHSTANDING ANYTHING HEREIN TO THE<br />
CONTRARY, THE FOREGOING WARRANTY SHALL<br />
BE THE SOLE AND EXCLUSIVE REMEDY AVAILABLE<br />
TO THE PURCHASER.<br />
UNDER NO CIRCUMSTANCES, WHETHER IN<br />
CONTRACT, TORT OR OTHERWISE, SHALL THE<br />
COMPANY’S TOTAL LIABILITY ARISING IN<br />
CONNECTION WITH ANY PURCHASE ORDER EXCEED<br />
THE AMOUNT OF ANY SALES OR OTHER PROCEEDS<br />
RECEIVED PURSUANT THERETO. IN ADDITION,<br />
UNDER NO CIRCUMSTANCES, WHETHER IN<br />
CONTRACT, TORT OR OTHERWISE, SHALL THE<br />
COMPANY BE LIABLE FOR LIQUIDATED, SPECIAL,<br />
INDIRECT, INCIDENTAL, EXEMPLARY, OR<br />
CONSEQUENTIAL DAMAGES, EXPENSES OR COSTS,<br />
INCLUDING, WITHOUT LIMITATION, LOST PROFITS OR<br />
FACILITY DOWNTIME, HOWEVER CAUSED AND EVEN<br />
IF THE POTENTIAL OF SUCH DAMAGES WAS<br />
DISCLOSED AND/OR KNOWN.<br />
No statement, representation, agreement, or<br />
understanding, oral or written, made by any agent,<br />
distributor, representative, or employee of the<br />
Company which is not contained in this Warranty will<br />
be binding upon the Company unless made in writing<br />
and executed by an officer of the Company.<br />
This warranty shall not be effective as to any claim<br />
which is not presented within 30 days after the date<br />
upon which the product is claimed not to have been as<br />
warranted. Any action for breach of this warranty must<br />
be commenced within one year after the date upon<br />
which the cause of action occurred.<br />
Any adjustment made pursuant to this warranty shall<br />
not be construed as an admission by the Company that<br />
any product was not as warranted.<br />
WARRANTY REQUESTS<br />
<strong>Products</strong> to be returned for warranty analysis shall be<br />
approved for return in writing by the Company prior to<br />
shipment. All requests for product return shall be submitted<br />
by email. Facsimile or letter to:<br />
Warranty Department c/o<br />
Gardner Denver Petroleum <strong>Pump</strong>s<br />
4747 South 83 rd East Avenue<br />
Tulsa, Oklahoma 74145<br />
Email: CCR.QAR@gardnerdenver.com<br />
Facsimile: (918) 664-6225<br />
49
<strong>2045</strong> <strong>LX</strong> <strong>Centrifugal</strong> <strong>Pump</strong><br />
GARDNER DENVER CENTRIFUGAL<br />
PUMP APPLICATIONS<br />
OILFIELD:<br />
BLENDERS<br />
MIXERS<br />
CIRCULATION<br />
SUPERCHARGING<br />
DESANDING<br />
TRANSFER<br />
WATER FLOOD<br />
DISPOSAL WELLS<br />
WASHDOWN<br />
INDUSTRIAL:<br />
SLURRY<br />
DESANDING<br />
MIXING<br />
TRANSFER<br />
FOOD PROCESSING<br />
CHEMICAL PROCESSING<br />
IRRIGATION<br />
MINING<br />
OTHER GARDNER DENVER SERVICES<br />
OVERHAUL AND/OR REWORK OF:<br />
Damaged or worn out frac power frames, fluid<br />
ends, crossheads, or pressure headers,<br />
mudpumps, centrifugal and slurry pumps and<br />
5- to 8- stage centrifugal pumps, heat<br />
exchanger tube bundle welding & refacing, etc.<br />
Our specialty – Turn around work.<br />
MISCELLANEOUS MACHINING<br />
MILLING & BORING<br />
TURNING (TO 42” DIA.)<br />
FABRICATION<br />
WELDING<br />
COMPLETE FIXTURE & TOOLING<br />
DEPARTMENT<br />
HYDROSTATIC & DESTRUCTIVE TEST<br />
FACILITY<br />
SHOT PEENING & STRESS RELIEVING<br />
75,000 P.S.I. AUTOFRETTAGE FACILITY<br />
OTHER GARDNER DENVER<br />
PRODUCTS<br />
HIGH PRESSURE TRIPLEX PUMPS FOR<br />
ACIDIZING & FRACTURING<br />
FEATURES:<br />
STEEL FABRICATED POWER FRAME<br />
SOLID ONE-PIECE CONNECTING ROD<br />
PRECISION GROUND CROSSHEADS<br />
FORGED ALLOW STEEL CRANKSHAFT<br />
HIGH-GRADE ALLOY STEEL GEARS<br />
FOUR MAIN ROLLER BEARINGS<br />
ORIFICED LUBRICATION SYSTEM<br />
LIGHTWEIGHT ALUMINUM COVERS<br />
INTERCHANGEABLE PARTS/STOCK<br />
HIGH PRESSURE FLUID ENDS<br />
FROM SOLID STEEL FORGINGS<br />
FEATURES:<br />
UNIFORMITY OF ALL INTERNAL<br />
SURFACES<br />
ALL CORNERS CENEROUSLY<br />
REDIUSED<br />
ALL BORES HAND POLISHED<br />
SHOT PEENED<br />
<br />
<br />
<br />
<br />
AUTORETTAGE CAPABILITY<br />
CUSTOM DESIGNS MADE ON<br />
CONTRACT, BASED UPON RECEIPT OF<br />
SPECIFICATIONS AND DRAWINGS<br />
STANDARD REPLACEMENT CAN BE<br />
PROVIDED FOR MOST PUMPS ON THE<br />
MARKET<br />
SPECIAL MATERIALS AND/OR<br />
SPECIFIC MODIFICATIONS MAY BE<br />
INCORPORATED INTO MOST<br />
STANDARD DESIGNS.<br />
50
<strong>2045</strong> <strong>LX</strong> <strong>Centrifugal</strong> <strong>Pump</strong><br />
MAINTAIN PUMP RELIABILITY AND<br />
PERFORMANCE WITH<br />
GENUINE GARDNER DENVER<br />
PARTS AND SUPPORT SERVICES<br />
For the location of your local authorized Gardner Denver distributor, refer to<br />
the yellow pages of your phone directory or contact:<br />
Factory (Tulsa): Service Center (Odessa): Service Center (Ft.<br />
Worth):<br />
Gardner Denver Well<br />
Servicing <strong>Pump</strong>s<br />
4747 South 83 rd East Ave.<br />
Tulsa, Oklahoma 74145<br />
Chaparral<br />
2121 West 44 th Street<br />
Odessa, TX 79768<br />
Geoquip<br />
7533 Kathy Lane<br />
Ft. Worth, Texas<br />
76126<br />
Phone: (918) 664-1151<br />
(800) 637-8099<br />
Phone: (432) 366-5433<br />
(800) 368-1134<br />
Phone: (817) 249-6400<br />
(800) 824-0271<br />
Fax: (918) 664-6225 Fax: (432) 363-9940 Fax: (817) 249-6383<br />
Gardner Denver ® genuine pump parts are manufactured to design tolerances and<br />
are developed for optimum dependability. Design and material innovations are the<br />
result of years of experience with hundreds of different pump applications. Reliability<br />
in materials and quality assurance is incorporated in our genuine replacement parts.<br />
Gardner Denver supports your needs with these services:<br />
Large inventory of genuine parts in stock and ready to ship.<br />
Trained parts specialists to assist you in selecting the correct replacement parts.<br />
Repair and maintenance kits designed with the necessary parts to simplify servicing<br />
your pump.<br />
Authorized service technicians are factory trained and skilled in pump maintenance<br />
and repair. They are ready to respond and assist you by providing fast, expert<br />
maintenance and repair services.<br />
<br />
<br />
<br />
INSTRUCTIONS FOR ORDERING REPAIR PARTS<br />
When ordering parts, specify <strong>Pump</strong> MODEL and SERIAL NUMBER (see nameplate<br />
on unit).<br />
All orders for Parts should be placed with the Tulsa or Ft. Worth facility.<br />
Specify exactly the number of parts required.<br />
51
Drilling & Production <strong>Pump</strong>s<br />
Gardner Denver <strong>Pump</strong> Division<br />
1800 Gardner Expressway<br />
Quincy, IL 62301<br />
Phone: 217-222-5400<br />
Fax: 217-223-1581<br />
Drilling & Production After-Market<br />
Gardner Denver <strong>Pump</strong> Division<br />
2200 South Prospect<br />
Oklahoma City, OK 73129<br />
Phone: 405-677-5736<br />
Fax: 405-677-5807<br />
Well Service <strong>Pump</strong>s<br />
Gardner Denver <strong>Pump</strong> Division<br />
4747 South 83rd East Avenue<br />
Tulsa, OK 74145<br />
Phone: 918-664-1151<br />
Fax: 918-447-6487<br />
GEOQUIP SERVICE CENTER<br />
After-Market & Repair Facility<br />
Gardner Denver <strong>Pump</strong> Division<br />
7533 Kathy lane<br />
Fort Worth, TX 76126<br />
Phone: 817-249-6400<br />
Fax: 817-249-6383<br />
CHAPARRAL SERVICE CENTER<br />
After-Market & Repair Facility<br />
Gardner Denver <strong>Pump</strong> Division<br />
2121 West 44th Street<br />
Odessa, TX 79764<br />
Phone: 432-366-5433<br />
Fax: 432-363-9940