

Winter 2009 - Metal Clay Today
Winter 2009 - Metal Clay Today
Winter 2009 - Metal Clay Today

You also want an ePaper? Increase the reach of your titles
YUMPU automatically turns print PDFs into web optimized ePapers that Google loves.
is excited to present...<br />
COPPER<br />
30 Minute Firing Time!<br />
A short firing time allows instructors to<br />
easily teach one-day classes and students<br />
can take their pieces home the same day.<br />
No Activated Carbon or Firing Pan Required!<br />
With Art <strong>Clay</strong> Copper there’s no need to deal<br />
with the messy handling or clean-up of activated carbon.<br />
Use Your Paragon SC-2 Kiln Without Worries!<br />
Since the SC-2 Kiln is not recommended for long<br />
hold times at high temperatures, the 30 minute<br />
firing time of Art <strong>Clay</strong> Copper is perfect for the SC-2.<br />
Under 10% Shrinkage!<br />
Art <strong>Clay</strong> Copper shrinks a little less than 10%<br />
during the firing process.<br />
www.artclayworld.com ~ info@artclayworld.com ~ 708-857-8800 ~ US Toll Free 866-381-0100<br />
2 <strong>Metal</strong><strong>Clay</strong><strong>Today</strong>.com • <strong>Winter</strong> <strong>2009</strong>
Publisher’s Notepad<br />
Dear Readers,<br />
Happy Holidays! May Peace and Prosperity be yours during this wonderful Season of Giving<br />
and throughout the coming year.<br />
What a great year <strong>2009</strong> has been for both Arli and me. Since launching <strong>Metal</strong> <strong>Clay</strong> <strong>Today</strong>,<br />
we have been privileged to meet, work with and enjoy the company of many gifted artisans<br />
whose work is awe inspiring. We’re looking forward to 2010 with enthusiasm because it is<br />
promising to be a year of growth and many adventures in metal clay.<br />
Did you know that part of our Mission Statement includes the promotion of <strong>Metal</strong> <strong>Clay</strong><br />
Artisans and their work? So with that in mind, we will soon be launching a beta or test<br />
program for <strong>Metal</strong> <strong>Clay</strong> Artists. Think of it as the cyberspace version of an Artists Cooperative<br />
(co-op) where each <strong>Metal</strong> <strong>Clay</strong> Artists can promote and sell their works of art. Only instead<br />
of charging the usual percentage or split there will be a small monthly fee. This fee will be<br />
used to cover the cost of tech support, advertising, etc. Each member Artist will keep their<br />
entire commission. Artists enrolled in the program will have their own web address and will<br />
have space to list upcoming classes or shows and a place for their bio. If this sounds like<br />
something you would be interested in, then we need to hear from you. We are looking for<br />
beta testers to help us work out the kinks. Email us at editor@metalclaytoday.com with your<br />
name and email address.<br />
In this issue we are starting a new feature. It’s dedicated to the Guilds, Societies and other<br />
forms of social networking available. <strong>Today</strong>’s issue introduces you to our own group, the<br />
<strong>Metal</strong> <strong>Clay</strong> Alchemists of San Diego County, and in the coming years we hope to showcase<br />
other Guilds and Societies from all over the world. Of course, it will be up to the Guild<br />
leaders, Presidents or their media chairs to get the information to us about their groups.<br />
Who knows, maybe someday a <strong>Metal</strong> <strong>Clay</strong> Enthusiast could plan a vacation around the<br />
Guilds whose meetings they want to attend!<br />
Check out this issue’s challenge. It’s call the Spirit of Giving. And speaking of giving, we<br />
would like to thank every Artist whose contributions have graced the pages of <strong>Metal</strong> <strong>Clay</strong><br />
<strong>Today</strong>. We truly couldn’t have done it without you!<br />
Wishing you all the Joys of the Season.<br />
<strong>Clay</strong>fully yours,<br />
Tes Shea<br />
Co-Publisher,<br />
Webmaster/Editor<br />
<strong>Metal</strong> <strong>Clay</strong> <strong>Today</strong><br />
<strong>Winter</strong> <strong>2009</strong> • <strong>Metal</strong><strong>Clay</strong><strong>Today</strong>.com 3
January 2010<br />
Volume 1, Issue 2<br />
Artist Showcase<br />
Alex Daini<br />
6 creatively mixes porcelain with Silver <strong>Clay</strong><br />
Rising Star<br />
Vickie Hallmark<br />
8 whose work is for the birds, so to speak<br />
10<br />
It’s here... it’s here!<br />
New Copper <strong>Clay</strong> that works as easily as Silver<br />
12<br />
Zentangles<br />
A guide to adding silver to glass<br />
14<br />
Tubular<br />
A step-by-step for paper-type metal clay<br />
4 <strong>Metal</strong><strong>Clay</strong><strong>Today</strong>.com • <strong>Winter</strong> <strong>2009</strong>
Carpe Beadum<br />
Meet the entrants and the winners<br />
of <strong>Metal</strong> <strong>Clay</strong> <strong>Today</strong>’s first Challenge. 24<br />
— Features —<br />
3 Publisher’s Notepad<br />
18 Tips ‘N Tricks<br />
20 Best of the Blogs<br />
21 Trends, Forecasts and Predictions<br />
23 <strong>Metal</strong> <strong>Clay</strong> <strong>Today</strong>’s new Challenge<br />
27 Guild News<br />
31-33 Book & Product Reviews<br />
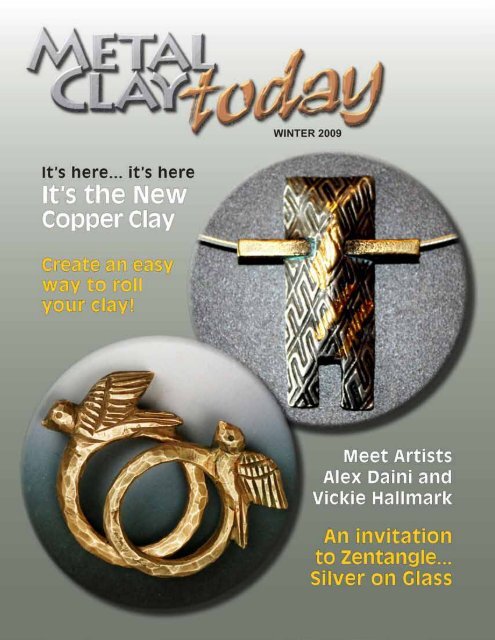
It’s here... it’s here<br />
It’s the New<br />
Copper <strong>Clay</strong><br />
Create an easy<br />
way to roll<br />
your clay!<br />
WINTER <strong>2009</strong><br />
An invitation<br />
to Zentangle...<br />
Silver on Glass<br />
Meet Artists<br />
Alex Daini and<br />
Vickie Hallmark<br />
Our cover features the beautiful work<br />
of 2 great <strong>Metal</strong> <strong>Clay</strong> artists:<br />
Alex Daini’s Wapa Pendant inspired by<br />
Amazon Indian basketry in Silver, Brass and Gold<br />
Vickie Hallmark’s hand-carved<br />
Bronz<strong>Clay</strong> Bird Rings.<br />
Subscribers are free to print this magazine for their own use.<br />
Please share it with your family and friends.<br />
The intellectual property and photos of the artists is copyright protected.<br />
<strong>Winter</strong> <strong>2009</strong> • <strong>Metal</strong><strong>Clay</strong><strong>Today</strong>.com 5
Artist Showcase<br />
by Tes Shea<br />
Alexandra<br />
Daini<br />
Wapa pendant<br />
Inspired by Amazon Indian basketry<br />
Silver, brass and gold<br />
River of grass Inspired by the Everglades<br />
Silver<br />
Alex lives in<br />
South Carolina, around Greenville, where she<br />
has her studio and home-schools her son. She<br />
was born in Caracas, Venezuela and grew up<br />
in a family of artists. Her first art lessons were<br />
with her father, the sculptor Hugo Daini. He<br />
would give her clay to make her own sculptures<br />
while he worked modeling his monumental<br />
sculptures.<br />
I had the pleasure of meeting Alexandra Daini<br />
at the <strong>Metal</strong> <strong>Clay</strong> Conference in Chicago IL this<br />
past July. She really opened my eyes to new<br />
possibilities with her presentation of mixing<br />
porcelain with<br />
Silver Overlay<br />
Paste.<br />
Trained as a designer in Milan, Italy, her artistic<br />
career began as a graphic artist. Finally she<br />
found her real passion in silver jewelry. It was<br />
in 2004 that she started to incorporate Silver<br />
<strong>Clay</strong> into her work.<br />
Comet brooch<br />
Silver and enamels<br />
6 <strong>Metal</strong><strong>Clay</strong><strong>Today</strong>.com • <strong>Winter</strong> <strong>2009</strong>
Artist Showcase<br />
I asked Alex what inspires her. She told me that<br />
she is deeply influenced by her formation as a<br />
designer and by the nature around her. She loves<br />
textures and color so she can find inspiration<br />
everywhere, and she doodles. Keeping a notebook<br />
with her to draw the things that interest her. When<br />
she returns to her notebook for ideas she will often<br />
incorporate one or more of them into the same<br />
body of work.<br />
2010 promises to be an exciting year for Alex.<br />
She will be celebrating a couple of graduations<br />
and launching a new line of porcelain and clay<br />
beads for metal clay enthusiasts. During the<br />
MCW Conference, her black pottery and porcelain<br />
creations were enjoyed so much that attendees began requesting she sell them.<br />
Flames<br />
Ceramics and Silver clay<br />
As an Art <strong>Clay</strong> Senior Instructor, Alexandra teaches workshops and certification classes<br />
at her studio. She has been a guest teacher at the Harvard University’s Ceramic<br />
program, and in <strong>2009</strong> was a presenter in the <strong>Metal</strong> <strong>Clay</strong> World Conference.<br />
Alex has won several<br />
contests including an<br />
Honorable Mention at the<br />
2007 Silver Accessories<br />
Contest, Japan. and the<br />
Judges’ Encouragement<br />
<strong>2009</strong> Silver Accessories<br />
Contest, Japan.<br />
Currently her work is<br />
being represented by the<br />
Canadian Ceramic and<br />
Glass Gallery, Waterloo, ON.<br />
Urban Jewelry series<br />
Ceramics and Silver <strong>Clay</strong><br />
To learn more about Alexandra visit<br />
www.adaini.com<br />
<strong>Winter</strong> <strong>2009</strong> • <strong>Metal</strong><strong>Clay</strong><strong>Today</strong>.com 7
Rising Star<br />
Vickie<br />
Hallmark<br />
Birdwatching bracelet. Hand-painted vitreous<br />
enamel on glass embedded in silver clay with<br />
beaded wire linkages<br />
Bridging many media, I pursue my artistic muses in whichever<br />
direction calls. My longtime fascinations with glass and metal<br />
have led me into explorations of lampworked beads and vessels,<br />
fused and enamel painted glass, and metal clay.<br />
Originally, I trained and worked as a research scientist, designing<br />
and building equipment, then conducting experiments directed<br />
at studies of metal and polymer surfaces. Years of playing with<br />
technical toys mean that the tools, torches, kilns and chemicals<br />
associated with working metal and glass feel very comfortable,<br />
even reminiscent of the laboratory. Experimentation with new ideas<br />
comes naturally, and I thoroughly enjoys testing and tinkering.<br />
My most recent series of work is inspired<br />
by bird watching. My family participates<br />
in a birding club and we have bird<br />
feeders in the backyard to attract these<br />
fanciful creatures. I love to sketch<br />
birds in various poses, and many of my<br />
silhouettes have been transformed into<br />
photopolymer plates with which I create<br />
the original textures on my jewelry.<br />
Spring Migration.<br />
Hand-painted vitreous enamel<br />
on glass, embedded in silver clay.<br />
Bird and Nest earrings.<br />
Enamel over silver clay.<br />
Focusing on a limited series like this is<br />
really beneficial as it frees my mind to<br />
focus on finer detail problems rather<br />
than attacking every new project from<br />
a blank slate. As in science, the work<br />
refines gradually, with each new piece<br />
fitting into my overall understanding of<br />
the subject.<br />
8 <strong>Metal</strong><strong>Clay</strong><strong>Today</strong>.com • <strong>Winter</strong> <strong>2009</strong>
Rising Star<br />
W o r k i n g<br />
across media,<br />
creating the<br />
same images<br />
in glass and<br />
Bird rings. Hand-carved Bronz<strong>Clay</strong><br />
metal, is also<br />
i n s i g h t f u l ,<br />
because the methods of creating the marks are totally different.<br />
Mixing media, particularly<br />
Sentinel cuff. Hand-carved Bronz<strong>Clay</strong><br />
such complementary elements<br />
as metal and glass, allows me to step beyond the more<br />
practiced methods of each field and create something totally<br />
original, bridging the two.<br />
The next year holds some exciting adventures for me. I’m<br />
stepping out more adventurously into the worlds of teaching,<br />
designing, and writing.<br />
Fledgling Earrings. Silver<br />
clay open lentils with enamel,<br />
Swarovski crystals and beaded<br />
wire linkages.<br />
Nightbird Brooch.<br />
Hand-formed tree and bird<br />
suspended over opening. Stilt<br />
riveted to carved faux bone back<br />
Moonbird pendant. Hand-formed<br />
tree and bird suspended over<br />
opening, faux bone spacer, resin,<br />
bezel set rainbow topazes<br />
The Birdwatching series will continue<br />
as I complete my first round of Master’s<br />
Registry projects. As always, I have a<br />
sketchbook full of ideas waiting for enough<br />
time to investigate. I’m never at a loss for<br />
questions to pursue. What will happen if…?<br />
Once a scientist; always a scientist!<br />
Flock bracelet.<br />
Bronz<strong>Clay</strong> tiles, textured with original design<br />
photopolymer plates, and beaded wire linkages.<br />
For more on Vickie Hallmark’s work,<br />
please check the following sites:<br />
http://www.vickiehallmark.com<br />
http://blog.vickiehallmark.com<br />
http://flickr.com/photos/vickiehallmark<br />
http://etsy.com/vickiehallmark<br />
Bird in Hand. Silver clay, resin.<br />
Strap band construction<br />
<strong>Winter</strong> <strong>2009</strong> • <strong>Metal</strong><strong>Clay</strong><strong>Today</strong>.com 9
The New<br />
Art <strong>Clay</strong><br />
Copper<br />
by Ann Rosier<br />
I could hardly wait for my shipment of Art <strong>Clay</strong> Copper from Art <strong>Clay</strong> World USA,<br />
that would fire in the kiln without carbon. You can also use a butane torch on smaller<br />
pieces. I was excited also, because my husband Stan and I could teach a copper<br />
clay class in one day. This clay does not have to be refrigerated and it has a 10%<br />
shrinkage.<br />
You should keep a separate set of tools to minimize cross-contamination between the<br />
three metals. Or you can meticulously clean your silver or bronze clay tools to use on<br />
the copper. I find it’s easier to have separate tools. Most of the texture tools that I<br />
use, I use for all three clays and really clean them for the next metal clay.<br />
When you order<br />
this clay from AC<br />
World or other<br />
distributors, read<br />
all the information<br />
and instructions<br />
before using.<br />
I got all my tools<br />
and textures ready before I opened the outer package. I read the enclosed directions.<br />
It’s important that as soon as you open the clay that you have a few pieces of plastic<br />
wrap to wrap up the clay you are not using at the moment. This clay will oxidize after<br />
opening, but I had absolutely no problems with that, as I wrapped up the unused clay<br />
immediately. In the end I used all 50 grams on pieces for a bracelet.<br />
If it does oxidize (darken), just simply scrape off the darkened layer and continue to<br />
use the clay. If you have any leftover, Jackie Truty suggested that you store it in a<br />
vacuum tight sealed bag or wrap it in several pieces of plastic wrap, put it in a plastic<br />
bag and use a straw to take the air out.<br />
10 <strong>Metal</strong><strong>Clay</strong><strong>Today</strong>.com • <strong>Winter</strong> <strong>2009</strong>
I used olive oil on all the tools and my hands, then conditioned the clay with a little<br />
drop of oil. I rolled out the clay, textured and cut it into rectangles for the bracelet.<br />
I dried it overnight, but you can dry it with a hair dryer for about 10-20 minutes,<br />
depending on the thickness,<br />
or on a hot plate for about 10<br />
minutes on the low setting.<br />
Make sure it is completely dry.<br />
You can check the dryness by<br />
putting the piece on a piece of<br />
stainless steel sheet and leave<br />
for a few seconds. If you have<br />
a vapor trail, it is not dry!<br />
Stan ramped our Paragon SC2<br />
full “speed 5” to 1778 degrees.<br />
He put the pieces into the hot<br />
kiln and held for 30 minutes at<br />
1778 degrees.<br />
Remove the pieces from the<br />
hot kiln one by one and put<br />
them in cold water to remove all or<br />
most of the firescale.<br />
Mixed metal linked bracelet by Katie Baum<br />
I was so happy with the pink/red color after quenching, I did not pickle them. But, if<br />
you want the true copper clay color, pickle the pieces in Sparex pickle.<br />
More experimenting to come in the future.<br />
Classes in metal clays, Art <strong>Clay</strong> certification (both<br />
Level 1 & Senior level) and cross-over certification for<br />
PMC certified artisans are offered at Stan and Ann’s<br />
studio, as well as other classes.<br />
Contact Stan and Ann Rosier for more information.<br />
ann_stanrosier@yahoo.com<br />
619-578-2075<br />
<strong>Winter</strong> <strong>2009</strong> • <strong>Metal</strong><strong>Clay</strong><strong>Today</strong>.com 11
Zentangles<br />
on Glass<br />
by patsy monk<br />
Zentangle is a repetitive pattern of drawing<br />
which is taking the country – no, the world – by storm!<br />
A step-by-step project for adding silver to glass<br />
Having taken the teacher/training workshop in Massachusetts in September, I began finding<br />
so many ways to incorporate the process of Zentangle and glass. Since I work with silver and<br />
hot glass, it only made sense to Tangle ON the glass.<br />
Divide up sections of a small piece of paper and then draw repetitive doodles and designs<br />
within each section. When you are done filling in each space with a different design, you’ve<br />
completed a unique piece of art. See www.Zentangle.com for more info.<br />
Supplies include:<br />
Art <strong>Clay</strong> Silver Overlay paste<br />
Brush to apply Overlay paste<br />
Flat glass<br />
Glass cleaner<br />
Coffee filter<br />
Tools to remove silver:<br />
Razor blade<br />
Exacto blade<br />
Straight pin<br />
Clean paint brush<br />
Paper/box to catch silver scrapings<br />
Process:<br />
Cut/ shape glass... any type glass will work. Clean glass well.<br />
Place 2 thin layers of Overlay Paste on glass with paint brush,<br />
and let dry. One layer is brushed on right to left, the second<br />
layer is brushed on up and down. Let the layers dry between<br />
applications.<br />
Draw a Tangle on the dry glass. You can do this with a light<br />
pencil touch or a thin Sharpie ®. Use a very light touch so as<br />
not to remove the silver under the marks.<br />
12 <strong>Metal</strong><strong>Clay</strong><strong>Today</strong>.com • <strong>Winter</strong> <strong>2009</strong>
Hold the glass carefully by the edges to<br />
avoid leaving any oil from your fingers.<br />
Remove silver with scraping tools as your<br />
pattern evolves.<br />
Remove the discarded silver over a piece<br />
of paper so you can add it to your paste<br />
container.<br />
When you scrape off the silver, use a clean<br />
brush to remove and expose the glass. Do<br />
NOT use your fingers!<br />
Use whatever tool that fits your<br />
hand and is comfortable. I often<br />
use an Exacto blade. On occasion,<br />
I have used a straight pin. You may<br />
need a magnifier to make sure you<br />
get as exact a pattern as possible.<br />
When you are happy with your<br />
pattern, place in kiln. Refer to<br />
kiln manufacturer for time and<br />
temperature.<br />
These are 2 of the pieces I did<br />
recently...<br />
the face was a fused mask to<br />
which I then added silver.<br />
I love BAMBOO, too.<br />
These are two pieces I did<br />
before Zentangles entered my life.<br />
Read more about<br />
patsy monk at<br />
www.monkink.com.<br />
<strong>Winter</strong> <strong>2009</strong> • <strong>Metal</strong><strong>Clay</strong><strong>Today</strong>.com 13
Tubular!<br />
<strong>Metal</strong> <strong>Clay</strong> Paper Beads<br />
By Linda Stiles Smith<br />
Beads, beads, beads…..everywhere there are beads of all sizes and<br />
descriptions. With two excellent new books on making beads with<br />
metal clay, (<strong>Metal</strong> <strong>Clay</strong> Beads by Barbara Becker Simon and Pure<br />
Silver <strong>Metal</strong> <strong>Clay</strong> Beads by Linda Kaye-Moses) I was hard pressed to<br />
design a new type of bead. I wanted a large silver bead for earrings,<br />
but I didn’t want something heavy or bulky, and as I researched<br />
shapes that might appeal, I decided on a tube or cylinder.<br />
This bead could be made by rolling out a slab of lump clay, but to<br />
make it even lighter I chose to try paper type clay. I’ve used paper<br />
type clay successfully to make a pendant bail, so I thought why<br />
not see if I could use the same principle and make it larger for a<br />
bead. The challenge was putting a cap on the ends so that I could have a very small hole<br />
for a hanging wire. Since paper type clay is thin and flexible, could I make it work and fire<br />
it so it would retain its shape and not collapse during firing?<br />
Here’s the result of my experiment... tubular bead earrings!<br />
Materials:<br />
2 12cm x 3cm strips of PMC+ Paper<br />
1 syringe PMC or paste clay<br />
1 plastic straw cut in half<br />
(I used a 7mm diameter straw)<br />
Tools:<br />
Flat nylon paint brush<br />
<strong>Clay</strong> shaper tool<br />
Stiff non-stick card (from cool-tools)<br />
Water in small dish<br />
Tissue blade<br />
Paper punches<br />
Craft knife<br />
Circle template<br />
Gridded work surface or sheet under clear work surface<br />
The <strong>Clay</strong> Punch or small hole punch<br />
Preparation<br />
1. You will need to prepare the clay for the end caps a day ahead of making the actual<br />
beads by laminating two pieces of the paper clay together. I made the<br />
caps slightly larger than the straw so there would not be the danger<br />
of them being too small. Estimate the size you will need for your caps<br />
and cut two identically sized pieces from one of the strips of PMC+<br />
paper strips. Place one of the pieces on the non-stick card and brush<br />
it thoroughly with water. Aligning the ends and sides, carefully drape<br />
the second piece onto the first while smoothing it down. A light, sure<br />
touch is the key to all stages of working with the paper type clay in this<br />
project. Set this laminated piece on the card aside to dry overnight (do<br />
not dry on a hot plate).<br />
14 <strong>Metal</strong><strong>Clay</strong><strong>Today</strong>.com • <strong>Winter</strong> <strong>2009</strong>
Making the beads<br />
2. Carefully roll one short end of a strip of PMC+ Paper around a straw<br />
twice so that you have two layers of sheet. You will be able to feel the<br />
beginning edge of the sheet through the layers. Gently mark along this<br />
edge on the strip with a soft tip marker. Don’t worry if your mark isn’t<br />
exactly straight.<br />
3. Unroll the clay strip and square up on the gridded<br />
work surface so that the edges are bordered on at<br />
least 2 sides by grid lines. Using the tissue blade, cut on or close to the<br />
marked line with a tissue blade using the grid line that is visible on both<br />
sides of the clay strip to make a straight cut.<br />
4. Place the other end of the longer PMC+ Paper strip beside the cut<br />
one on the grid. Be sure the edges are closely aligned and square on<br />
the grid. Cut the second strip the same<br />
length as the first one.<br />
5. Lightly oil a straw and start rolling one of the pieces you<br />
cut onto it. Where the leading edge meets the rest of the<br />
clay, begin brushing water onto the surface of the clay and<br />
roll, brush on water, and continue to roll the clay around<br />
onto itself smoothly, keeping edges aligned. (Water must be<br />
brushed onto all of the clay as you roll or it will not bond with<br />
the layer under it.) You will now have two layers of clay rolled<br />
up like a jelly roll. I did this while holding<br />
the straw and clay strip in my hand. It may be easier for you to lay the<br />
PMC+ Paper strip on the work surface and roll<br />
the straw up in the clay.<br />
6. Brush water over the seam edge to be sure it<br />
is sealed and set it aside to dry. Drying on a hot<br />
plate is ok at this stage, but do not place the<br />
wet area directly on the hot plate or allow the<br />
plastic straw to come in direct contact with the<br />
heat surface. Having two beads means you can<br />
work on one while the other is drying – work<br />
efficiently!<br />
7. If you want to hide the seam line, you will have to brush on either paste type clay or<br />
extrude a coil of syringe type clay and work<br />
it into the seam with water. Be careful with<br />
the brush and water, too much will cause<br />
the paper type clay to turn to mush and be<br />
easily damaged. I like to use a clay shaper<br />
tool to smooth and blend at the same time.<br />
You can repeat this process with sanding<br />
in between to level and smooth the bead<br />
surface.<br />
8. Once you are satisfied with the tube<br />
construction, the fun begins! Decorate it<br />
with cut-outs of paper type clay. Appliqué the cut-outs onto the<br />
bead by first brushing water onto the bead surface, lay the cut-out<br />
EXACTLY where you want it and tap down with the brush. Add water if necessary to be sure<br />
the cut-out has enough “water glue” to seal the edges down. Caution is necessary here: do<br />
<strong>Winter</strong> <strong>2009</strong> • <strong>Metal</strong><strong>Clay</strong><strong>Today</strong>.com 15
not brush across the paper type clay when it is covered with water<br />
as it will quickly turn to mush and even tear. Place on a hot plate<br />
and allow it to dry completely.<br />
NOTE: Since you are working with a rounded form it is advisable to<br />
only apply water and appliqués to one area/<br />
side at a time and allowing the application<br />
to dry before moving onto another side. If<br />
you place the wet paper type clay on a hot<br />
surface it will stick to the surface and tear<br />
when removed.<br />
9. To make the end caps, use the circle<br />
template to find a circle that is slightly<br />
larger, 1-2mm, in diameter than the straw.<br />
Too large and the overhang will slump<br />
when fired. Using a circle too small will not<br />
fully cover the end of the tube. Cut 2 circles<br />
for each bead from the laminated strip of<br />
paper type clay using a craft knife. Hold<br />
the template down firmly while cutting so<br />
it doesn’t slip.<br />
10. Locate the center of the clay circle by laying a smaller opening<br />
in the template onto it. Using the smallest brass tube from the <strong>Clay</strong><br />
Punch set cut a hole in the center (for stringing the bead). You<br />
could use a straight edge and draw intersecting lines to determine<br />
the center. Note: You MUST cut out the<br />
stringing hole before assembling and firing<br />
the bead.<br />
11. Gently slide the bead on the straw so that one end of the<br />
bead protrudes over the end of the straw. Brush the end cap with<br />
water and/or paste and gently press the clay tube onto the circle,<br />
centering it carefully. Set this on the hot plate to dry by standing it<br />
on the end cap.<br />
12. Slide the straw completely out of<br />
the clay tube and repeat the application<br />
of the bead cap to the opposite end. Be<br />
careful as you do this that you don’t<br />
squeeze the clay tube out of shape. Dry.<br />
13. Using the syringe type clay, carefully extrude a coil around<br />
the bead on the small lip of the cap where it meets the tube. (I<br />
used the large grey tip) Apply a small amount of water to seal<br />
it to the bead and either leave the coil<br />
round or smooth it into the bead and<br />
cap with a brush and water. Dry. Sand out any imperfections with<br />
a very light touch.<br />
14. Set beads straight up on end in your kiln and fire to 1470º for<br />
30 minutes.<br />
15. Tumble or brush polish, patina and you’re ready to create your<br />
earrings!<br />
USING Art <strong>Clay</strong> Silver Sheet: These directions work very well for PMC+ Paper. If<br />
you work with Art <strong>Clay</strong> Silver Paper, be sure to modify the directions to accommodate<br />
the paper type’s unique characteristics.<br />
16 <strong>Metal</strong><strong>Clay</strong><strong>Today</strong>.com • <strong>Winter</strong> <strong>2009</strong>
San Jose, CA Classes<br />
with Pat Evans<br />
Senior Art <strong>Clay</strong> Silver Instructor<br />
(also Level III PMCC)<br />
Join me for beginning through intermediate classes<br />
in metal clay, fused glass,<br />
basic bead stringing and wire wrapping.<br />
Art <strong>Clay</strong> Certification also available.<br />
Fun, creative private or semi-private classes<br />
in my studio or your home...<br />
makes a great party activity for teens and adults.<br />
Email Pat@ PatEvansDesigns.com<br />
for more information<br />
METAL CLAY JEWELRY<br />
In this introductory workshop, learn to<br />
work with the marvelous medium of metal<br />
clay while creating a beautiful pendant and<br />
matching earrings of fine silver.<br />
No previous experience in jewelry making or metalsmithing is required.<br />
Saturday, January 9 1 - 5pm<br />
Friday, February 5 9am - 1pm<br />
$50 members / $58 non-members<br />
Saturday, March 13 1 - 5pm Materials fee: $40.00<br />
To register, contact the Bravo School of Art<br />
2690 Decatur Road, San Diego (619) 223-0058<br />
www.bravoschoolofart.com<br />
<strong>Winter</strong> <strong>2009</strong> • <strong>Metal</strong><strong>Clay</strong><strong>Today</strong>.com 17
Tips ‘N Tricks<br />
FOLD<br />
Easy<br />
Rolling<br />
Sheet<br />
OPEN TOP<br />
The best way<br />
we’ve found<br />
to roll out clay with<br />
no muss... no fuss...<br />
no stick...<br />
our ‘Easy Rolling Sheet’.<br />
FOLD<br />
OPEN TOP<br />
1.<br />
Cut a heavyduty Sheet Protector<br />
in half.<br />
Trim the 2 sealed sides, leaving<br />
just the one fold at top.<br />
You now have two 5.5” wide by<br />
8.5” high acetate folders with<br />
a fold at top... one to use now<br />
and one to spare.<br />
FOLD<br />
2.<br />
Rub a tiny dab olive oil around the<br />
center of the inside of the folder.<br />
Close the folder and rub the<br />
surface which will coat the olive<br />
oil onto both sides of the inside.<br />
You now have a totally enclosed<br />
surface in which to roll your clay<br />
without it sticking to the roller.<br />
FOLD<br />
EASY ROLLING SHEET<br />
Here’s an easy way to roll your clay.<br />
Lift the top of the acetate folder and spread a dab of olive oil<br />
in the center. Drop the top and rub to transfer the oil to both insides.<br />
Place your clay and slats between the top and bottom layers... close the<br />
folder and roll away without the clay sticking to the roller or the acetate.<br />
www.metalclaytoday.com<br />
3.<br />
Print the following page, trim to size, and tape to<br />
the back of your folder for a handy sizing grid as you roll.<br />
18 <strong>Metal</strong><strong>Clay</strong><strong>Today</strong>.com • <strong>Winter</strong> <strong>2009</strong>
Easy Rolling Sheet - continued from previous page<br />
3. Print out and trim to size.<br />
Tape to the back of your folder for a handy sizing grid as you roll.<br />
EASY ROLLING SHEET<br />
Here’s an easy way to roll your clay.<br />
Lift the top of the acetate folder and spread a dab of olive oil<br />
in the center. Drop the top and rub to transfer the oil to both insides.<br />
Place your clay and slats between the top and bottom layers... close the<br />
folder and roll away without the clay sticking to the roller or the acetate.<br />
www.metalclaytoday.com<br />
<strong>Winter</strong> <strong>2009</strong> • <strong>Metal</strong><strong>Clay</strong><strong>Today</strong>.com 19
Blo g<br />
Best of the Blogs<br />
by Lori Phillips<br />
I was excited to see our first issue pop up in my email. Yep,<br />
this is real! All our hard work is out there in cyber space for<br />
everyone to peruse through and enjoy. I sure hope all of you<br />
are as thrilled as I am!<br />
When I last left you, I had given you three sites to explore. I<br />
can’t wait to hear what you are gaining from your journeys.<br />
I call them journeys because you can’t visit them all at once.<br />
I can only take a web trip once a day, otherwise my mind is<br />
reeling with ideas and I can’t make it stop. Oh, please make<br />
it stop!<br />
I have already gotten some blog suggestions from a few of you<br />
and I jumped on the chance to check out some new unknown<br />
territories. Not all of them were completely unknown to me<br />
though. Elaine, I love your blog!! I have been here before, but<br />
I was not going to give away all the tricks up my sleeve in the first issue.<br />
http://www.creativetexturetools.com/news<br />
This blog is the brain child of Elaine Luther. She has worked very hard to provide several<br />
‘how to’ articles and videos for working with the different metal clays. However, that is not<br />
all. She also gathered facts on many related subjects. This site alone can provide hours of<br />
entertainment and a plethora of information. Don’t you just love the word plethora? I don’t<br />
get to use it very often.<br />
http://pmctips.blogspot.com/<br />
This is a site I enjoyed because it was very easy to navigate. Nicola Callow set up this blog<br />
in such a way that you can scroll down to read several postings at one time. When you get<br />
to the bottom of the page, hit ‘Older Postings’ and you can keep on scrolling. I had to force<br />
myself to stop. Also, I noticed that just because it says PMC tips, it does not mean other<br />
metal clayers wouldn’t benefit from checking it out.<br />
OK, I found a woman after my own heart. Her name is Vickie Hallmark and she creates<br />
incredible items from metal clay, fibers and glass.<br />
http://fiberartglass.blogspot.com/<strong>2009</strong>/10/<br />
welcome-to-jewelry-blog-carnival.html<br />
Wow! I was checking out her blog when I came across her posting on November 16th. By<br />
this time, I had been on the computer for about 4 hours. I read what she wrote and started<br />
feeling a twinge of guilt. I suggest you read it for yourselves and maybe we can all start the<br />
new year a bit more artistically inspired!<br />
Happy Blogging,<br />
Lori<br />
20 <strong>Metal</strong><strong>Clay</strong><strong>Today</strong>.com • <strong>Winter</strong> <strong>2009</strong>
Trends, Forecasts & Predictions<br />
by Lori Delisle<br />
Let your light shine this Spring<br />
Spring 2010 runways show two very feminine themes:<br />
• soft, ethereal luxury<br />
• bright, tailored and geometric chic<br />
Trend – Light/Bright Colors<br />
Soft colors and neutrals are accented by bright colors; a soft gray<br />
blouse with a chartreuse satin belt or a navy dress color blocked<br />
with stripes of bright orange. Also pretty are monochromatic<br />
looks, all in soft icy pastels and neutrals. Check the Pantone<br />
Fashion Color Report for Spring 2010 for their top<br />
10 color picks and how designers are using them.<br />
Blue-ming Necklace<br />
by amieplante.etsy.com<br />
Design for the Trend<br />
Incorporate lots of sparkle and color with gemstones and<br />
crystal. On the soft side think of things like rose and smoky<br />
quartz, blue lace agate, and aquamarine. On the bright<br />
side go for lemon quartz, blue topaz, peridot, turquoise,<br />
amethysts, and deep pink spinel.<br />
Cameo Tears Necklace,<br />
brendamcgowan.etsy.com<br />
Sprint Time by<br />
artisanimpact.etsy.com<br />
Trend – Soft/Feminine Fabrication<br />
Light and airy, soft flowing and shimmery silks, chiffon, satins, high<br />
sheen velvet, and suede, with large soft folds and ruffles. On the bold<br />
side, designers are incorporating chicly tailored lines with geometric<br />
piecing of contrasting fabrics in stripes, wedges, and accented hems<br />
and seaming.<br />
Flower Pendant<br />
by Unique.etsy.com<br />
Design for the Trend<br />
Play with the luxurious fabrics they are using like velvet<br />
ribbons and strips or organza. Incorporate soft lines and<br />
feminine textures and use the new paper art clay to make<br />
soft folds and ruffles. On the geometric side play with<br />
weaving, color blocking and stripes of different clays.<br />
Aforfebre.etsy.com<br />
Trend Pieces<br />
More of the statement necklaces from fall, but<br />
also much simpler designs with, say, a long<br />
chain and one medallion piece.<br />
Walnut Square Necklace<br />
Bangles are hot for the wrist.<br />
by metalworks.etsy.com<br />
Happy Designing!<br />
Scalloped Lace Silver<br />
Cuff Bracelet by<br />
WhiteFly.etsy.com<br />
<strong>Winter</strong> <strong>2009</strong> • <strong>Metal</strong><strong>Clay</strong><strong>Today</strong>.com 21
Challenge Contest<br />
<strong>Metal</strong> <strong>Clay</strong> <strong>Today</strong> is sponsoring the<br />
Spirit of Giving<br />
Competition<br />
Send us your 4” x 6” 300 ppi photos along with your name,<br />
the project’s title, and your contact information<br />
to editor@metalclaytoday.com by January 15, 2010.<br />
We will post your submissions at www.metalclaytoday.com<br />
and your peers will vote to decide who wins.<br />
Voting will take place from January 25th to February 15th.<br />
Winners will be announced on February 20th.<br />
Projects must include at least 50% metal clay.<br />
First Place Prize - Set of Dynasty Rubber Stamps<br />
Second Place Prize - 50 Grams of Silver <strong>Clay</strong><br />
Third Place Prize - 25 Grams of Silver <strong>Clay</strong><br />
METALCLAYARTS<br />
IN - ABOUT - FOR METAL CLAY<br />
TOOLS - GLASS<br />
KILN SAFE STONES<br />
LiL BeLLA Humidifier<br />
HAND CRAFTED ART JEWELRY<br />
WORKSHOPS CLASSES<br />
PRIVATE INSTRUCTION<br />
GALLERY - LINKS - SOURCES<br />
LiL BeLLA<br />
metalclayarts@gmail.com<br />
www.metalclayarts.com<br />
metalclayarts.Etsy.com<br />
DonnaLewis.Etsy.com<br />
<strong>Winter</strong> <strong>2009</strong> • <strong>Metal</strong><strong>Clay</strong><strong>Today</strong>.com 23
Carpe Beadum!<br />
Seize the Bead!<br />
and ‘seize’ you did!<br />
We thank all of the artists who participated<br />
in <strong>Metal</strong> <strong>Clay</strong> <strong>Today</strong>’s first challenge.<br />
Carol Babineau<br />
Deb Brooks<br />
Sara Cole<br />
Jonna Faulkner<br />
Donna Lewis<br />
Deb Jemmot<br />
Check out the new challenge at www.metalclaytoday.com<br />
24 <strong>Metal</strong><strong>Clay</strong><strong>Today</strong>.com • <strong>Winter</strong> <strong>2009</strong>
Gail Moriarty<br />
Victoria Siexas<br />
Lauren King<br />
Patsy Monk<br />
Linda Stiles Smith<br />
Michela Verani<br />
Check out the new challenge at www.metalclaytoday.com<br />
<strong>Winter</strong> <strong>2009</strong> • <strong>Metal</strong><strong>Clay</strong><strong>Today</strong>.com 25
Carpe Beadum!<br />
Seize the Bead!<br />
Our readers voted and here are the results!<br />
First Place<br />
‘Roses Everywhere’<br />
by Gail Moriarty<br />
Gail received a Ring Kit from GBU-Art.com<br />
Second Place<br />
‘Go for Baroque’ Beads<br />
by Michela Verani<br />
Michela received 50 grams<br />
of Art<strong>Clay</strong> Silver<br />
Third Place<br />
‘Leaf Ball Squared’<br />
by Linda Stiles Smith<br />
Linda received a $25 Gift<br />
Certificate for Art<strong>Clay</strong> World<br />
Check out the new challenge at www.metalclaytoday.com<br />
26 <strong>Metal</strong><strong>Clay</strong><strong>Today</strong>.com • <strong>Winter</strong> <strong>2009</strong>
Class Listings, Show Schedules, Organization News<br />
Calling all Guilds!<br />
Tell the world where and when you meet.<br />
Send us information about your class listings, show schedules...<br />
and meeting times and locations of your<br />
metal clay, artisan or jewelry making organizations.<br />
Please include your name, where and when, name and<br />
e-mail address of the contact person.<br />
We believe that it is important for all metal clay enthusiasts<br />
to have a forum for networking and promoting their work.<br />
International — Australia<br />
The First International Chapter of the PMC Guild<br />
The Victoria, Australia Chapter, based in Melbourne.<br />
Meetings are held alternate months with the next one scheduled for late September.<br />
For Information contact carolgregory30@gmail.com<br />
United States — California<br />
<strong>Metal</strong> <strong>Clay</strong> Alchemists Society of San Diego County<br />
Meets quarterly at the Lapidary Society<br />
654 Mildred St., San Diego, CA 92110<br />
Next meeting October 15, <strong>2009</strong>—6:00-8:30 p.m.<br />
Contact Stan or Ann Rosier for more information<br />
All <strong>Metal</strong> <strong>Clay</strong> Enthusiasts are welcome!<br />
San Diego County Chapter of the PMC Guild<br />
Meetings are the 3rd Tuesday of every month at 6:30 pm<br />
5654 Mildred Street, San Diego, CA 92110<br />
Blog: www.sdcpmcguild.blogspot.com<br />
http://www.pmcguild.com/chapters/sandiego/about.html<br />
Contact Person: Melissa @ mwilcoxson83@aol.com<br />
Colorado<br />
The Western Slope <strong>Metal</strong> <strong>Clay</strong> Artisans Chapter<br />
aka Grand Junction Chapter of the PMC Guild and the Art <strong>Clay</strong> Society.<br />
We serve metal clay enthusiasts on the western slope of Colorado and in eastern Utah. We meet in<br />
Grand Junction, CO on the third Saturday of every month from 10 am to 2 pm where we have studio<br />
exploration time lead by our members as well as several seminars each year presented by nationally<br />
known metal clay artists. We are a ‘non-denominational’ group dually chartered by both PMC Guild<br />
(PMCG) and Art <strong>Clay</strong> Society (ACS) with interest in all types of metal clay. We have no local dues, but<br />
members are required to join both the ACS and PMCG after attending one meeting.<br />
Contact Cindy Holst Chapter Leader cindysancolorado@yahoo.com for more information.<br />
Florida<br />
The Miami <strong>Metal</strong> <strong>Clay</strong> Artists, which is the local chapter of Art <strong>Clay</strong> Society, USA, meets on<br />
the second Thursday of the month at 6:00 p.m. for social and 6:30 for meeting and project. We<br />
welcome all metal clay enthusiasts. Contact chapter leader Bernadette Denoux 305 273-8829.<br />
miamimetalclayartists@yahoo.com for more information.<br />
<strong>Winter</strong> <strong>2009</strong> • <strong>Metal</strong><strong>Clay</strong><strong>Today</strong>.com 27
Illinois<br />
Suburban Silver Society meets the second Friday of each month, all metal clay artists are invited. We<br />
are a hands-on group, we work on a project at each meeting. New techniques and demonstrations are<br />
presented. For more information contact Deb Wojnorowski at fussyfinery@sbcglobal.net.<br />
Kansas<br />
The Kansas City chapter of the PMC Guild is an eclectic group of artists from the great Kansas<br />
City metropolitan area with a common interest in metal clays—PMC, Art<strong>Clay</strong>, Copper, Bronze. We meet<br />
the 3rd Tuesday of each month to share a hands-on exploration of a technique or media. Dues are<br />
currently $10.00 annually. Contact chapter president Lynette Fisk at bylynette@gmail.com or check out<br />
our website www.kcpmcguild.org for current meeting information.<br />
Massachusetts<br />
Greater Boston <strong>Metal</strong> <strong>Clay</strong> Guild meets every 4th Sunday of each month at <strong>Metal</strong>werx, 50 Guinan<br />
Street, Waltham, MA from 7pm - 9pm. Each meeting we discuss new topics, ideas, have a demo, and<br />
discuss our current month’s challenge. For more information visit them at http://bostonmetalclay.com/ or<br />
http://www.facebook.com/#/group.php?gid=130525423846<br />
New Hampshire<br />
The Merrimack Valley <strong>Metal</strong> <strong>Clay</strong> Collaborative<br />
meets every third Sunday of the month, except holidays from 11 a.m. until ? at Art <strong>Clay</strong> Studio, llc,<br />
99 Factory St., Ext., Nashua, NH 03060<br />
Contact Carol at 603-560-5402 No dues<br />
www.freewebs.com/artclaysocietynewengland/<br />
New York<br />
PMC Guild-Syracuse/CNY Chapter meets the 3rd Sunday of the month at 3:00-4:45<br />
at the Manlius Public Library, 1 Arkie Albanese Way, Manlius<br />
Ohio<br />
The Northeast Ohio Chapter of the PMC Guild<br />
meets monthly in Chagrin Falls, Ohio.<br />
For more information please contact the<br />
chapter representative at neopmc155@gmail.com<br />
Wanted<br />
beta testers<br />
The Artists Gallery is an online Gallery<br />
devoted to <strong>Metal</strong> <strong>Clay</strong> Artists who desire<br />
to have a web presence, but do not want<br />
the expense of developing a website.<br />
We are currently looking for<br />
beta testers for this program.<br />
If you would like to participate, email<br />
editor@metalclaytoday.com<br />
with your name and contact information.<br />
Glass<br />
<strong>Clay</strong><br />
Classes<br />
Glass<br />
<strong>Clay</strong><br />
and other Glass Technique Classes*<br />
* Photopolymer Mask and Images on Glass Classes<br />
Check it out at www.kaiserglass.com<br />
Or e-mail Barry@kaiserglass.com<br />
Classes:<br />
Photopolymer Mask<br />
Photo-etching Dichro, masking and painting<br />
And Blue other Moon Glass, Austin, Technique TX Jan 21-11 Classes*<br />
Kaiser Glass Studio, March 6-7<br />
Glass <strong>Clay</strong><br />
Using Glass <strong>Clay</strong> to create elements for fusing<br />
Blue Moon Glass (Austin, TX) Jan 23-24<br />
Check it out at www.kaiserglass.com<br />
Or email Barry@kaiserglass.com<br />
Images on Glass<br />
Screen printing for jewelry and computer masks<br />
to create painting masterpieces<br />
Kaiser Galss Studio Mar 20-21<br />
*Photopolymer Mask and Images on Glass Classes<br />
28 <strong>Metal</strong><strong>Clay</strong><strong>Today</strong>.com • <strong>Winter</strong> <strong>2009</strong>
<strong>Metal</strong> <strong>Clay</strong><br />
Society of San Diego County<br />
This December, the <strong>Metal</strong> <strong>Clay</strong> Alchemists of San Diego County celebrated the season with a<br />
Holiday Potluck Party at a member’s home. It was fantastic… just the kind of evening you would<br />
hope for. There was loads of great and interesting food, lovely music and the constant chatter<br />
of friends catching up with each other. That alone would have<br />
made it special enough for me. I really enjoy the company<br />
of the Alchemists, but this year we added something new to<br />
the celebration. We had a charm exchange. The rules were<br />
simple: no charm could be smaller than a dime or larger<br />
than a quarter, and mixed media was encouraged. Everyone<br />
was impressed with the charms they received, and I’m fairly<br />
certain it will become a Holiday tradition!<br />
The Alchemists meet quarterly to talk about <strong>Metal</strong> <strong>Clay</strong>.<br />
Our membership boasts some nationally known metal clay<br />
artists, as well as beginning metal clay enthusiasts. It is a<br />
time of sharing, and encouragement. At each meeting we<br />
try to recognize the work of our members with our Featured<br />
Artist section in which we ask one member to talk about his<br />
or her work, and do a show and tell. During our last meeting,<br />
Jan Spencley was our Featured Artist. We’ve always known<br />
Jan to be very funny, but at this meeting we got to see just<br />
how talented she is, to boot!<br />
At each of our meetings, we have an opportunity to see a demonstration on a particular<br />
aspect of metal clay. Last month, Maria Martinez demonstrated her techniques for teaching<br />
new students how to work with the clay. As well as being our historian, Maria is a great<br />
teacher and I am always impressed with how easy she makes it look.<br />
In our charter, the Alchemists are required to provide<br />
educational opportunities for our membership. Usually<br />
our instructors are drawn from local talent, but we<br />
also try to have at least one well known instructor<br />
annually.<br />
Last year, we were fortunate to have Hadar Jacobson<br />
come to teach. Since our members number more than<br />
the number of students anyone could be reasonably<br />
expected to teach, we had a lottery to earn a spot in the<br />
classroom. Fortunately, we were able to accommodate<br />
most of the members and it was a wonderful weekend.<br />
Hadar is a great teacher and was <strong>Metal</strong> <strong>Clay</strong> <strong>Today</strong>’s<br />
first Featured Artist. We are all looking forward to<br />
seeing what interesting classes 2010 will bring to the<br />
Alchemists.<br />
You can find out more about our group by visiting<br />
http://www.GBU-art.com/index_files/<br />
<strong>Metal</strong><strong>Clay</strong>AlchemistSocietyMembershipPage.htm<br />
<strong>Winter</strong> <strong>2009</strong> • <strong>Metal</strong><strong>Clay</strong><strong>Today</strong>.com 29
Don Butler - The Carving Glove Guy<br />
5 small Dockyard Micro Carving Tools<br />
that have been of interest to PMC and Art <strong>Clay</strong> people.<br />
These tools are G2, G15, V15, 75V, SK 15...<br />
the smallest of the tools<br />
that Dockyard manufactures.<br />
Please visit our site at<br />
www.thecarvinggloveguy.com<br />
30 <strong>Metal</strong><strong>Clay</strong><strong>Today</strong>.com • <strong>Winter</strong> <strong>2009</strong>
Book Review<br />
by Patricia K. Evans<br />
All That Glitters:<br />
Combining the Brilliance<br />
of Glass with <strong>Metal</strong> <strong>Clay</strong><br />
by Dana Lee Peters<br />
Wapiti Mountain Publishing, <strong>2009</strong><br />
www.artesean.net<br />
Art <strong>Clay</strong> Master Instructor Dana Lee Peters brings a focus on combining<br />
metal clay with glass and porcelain. The book’s 14 projects span a<br />
range of techniques using not only silver clay, but also bronze and<br />
copper. The spiral binding makes for easy reference at the bench.<br />
Directions are generally clear and illustrated well enough that beginners<br />
with little clay experience should be able to succeed with most of the<br />
projects. Some techniques, such as the syringe pieces which require<br />
a careful hand with sanding, will be more suited to artists with a little<br />
more practice. Two of the projects make good use of laser cut dichroic<br />
shapes. Beginners to glass might have appreciated knowing that<br />
these shapes can be purchased pre-cut.<br />
The most unusual projects are Peters’s experiments with glass in<br />
bronze and copper settings. The glass emerges with a pitted surface<br />
due to the carbon used in firing, and colors may shift. Nonetheless,<br />
these pieces have an intriguing textural quality that makes her<br />
process worthy of further experimentation.<br />
The book includes a brief but informative section on basic fused glass for metal clay artists who<br />
have little glass experience. Peters confesses that she is not an expert in glass, which may explain<br />
the discrepancies in parts of this section. For example, Peters says that a full fuse occurs around<br />
1450 to 1550 degrees, but she gives her full fuse firing schedule as only reaching 1425 degrees.<br />
This self-published book could have benefited from the hand of a good editor. It is riddled with<br />
distracting typographical and mechanical errors, some of which are severe enough to interfere<br />
with the author’s meaning. In the description of different stages of glass firing, several sentences<br />
about annealing—a crucial part of glass fusing—appear to have been omitted. Nonetheless, All<br />
That Glitters brings a collection of interesting ways to work with glass, and it will be a good addition<br />
to comprehensive metal clay libraries.<br />
Pat Evans is a Senior Art <strong>Clay</strong> Silver instructor and holds PMCC Level III and Rio Rewards PMC<br />
certifications. Pat has been teaching about crafts and creativity to both children and adults for over<br />
20 years. She enjoys designing and writing about all types of jewelry, including metal clay, fused<br />
glass and wire-wrapping. Contact her at Pat@PatEvansDesigns.com, or check out her blog at<br />
http://patevansdesigns.blogspot.com/ .<br />
<strong>Winter</strong> <strong>2009</strong> • <strong>Metal</strong><strong>Clay</strong><strong>Today</strong>.com 31
Product Review<br />
The Art and<br />
Design of <strong>Metal</strong><br />
<strong>Clay</strong> Jewelry<br />
2010 Calendar<br />
by Holly Gage<br />
Be Inspired 365 days of the year.<br />
Holly Gage has combined the dazzling artistry of <strong>Metal</strong><br />
<strong>Clay</strong> with the functionality of the calendar in The Art<br />
and Design of <strong>Metal</strong> <strong>Clay</strong> Jewelry 2010 Calendar.<br />
Keep up with your day-to-day events, and discover<br />
upcoming events such as the 2010 PMC Conference,<br />
Bead and Button Shows, and contests like the Rings<br />
and Things Competition in February.<br />
Be inspired by your favorite artists’ work as<br />
showcased in this beautiful calendar.<br />
Artists included are Julia Rai on the cover and<br />
Elizabeth R. Agte, Lorena Angulo, Claudia Atkins,<br />
Carol A. Babineau, Nicola Callow, Debbi Clifford,<br />
Angela B. Crispin, Bernadette Denoux, Lorrene<br />
Davis, Louise Duhamel, Pam East, Sherry Eckert,<br />
Marnie Ehlers, Jonna Faulkner, Liz Hall, Vickie<br />
Hallmark, Lora Hart, Leslie Jensen, Patrik Kusek,<br />
Donna Lewis, Maria Martinez, Cindy Miller,<br />
Christine Norton, Melodie Owen, Catherine Davies<br />
Paetz, Kate Qualley Peterson, Lyle Rayfield,<br />
Susan Reinemeyer,Diane Sepanskie, Jennifer<br />
Smith-Righter, Deb Steele, Katrine Tan, Marsha<br />
Thomas, Michela Verani, Linda Warner, Sarah<br />
Webster-Eastman, Judi Weers, and Holly Gage.<br />
To order a copy of the 2010 Calendar visit<br />
http://www.hollygage.com/pages/<br />
theartanddesignofmetalclayjewelrycalendar.html.<br />
32 <strong>Metal</strong><strong>Clay</strong><strong>Today</strong>.com • <strong>Winter</strong> <strong>2009</strong>
If you haven’t had a chance to take a class from Linda Stiles Smith, then you are in luck,<br />
because Linda has recently self-published “<strong>Metal</strong> <strong>Clay</strong> Basics & Bench Reference: A Toolbox<br />
Guide to <strong>Metal</strong> <strong>Clay</strong>’, that reads as though you are sitting in Linda’s studio ready to dig into<br />
that next project.<br />
Don’t be confused – this isn’t a project book, though Linda does offer suggestions for your next<br />
endeavor at the end of the volume, rather it is a compilation of the information and wisdom<br />
that just flows from her during class.<br />
In class, Linda isn’t stingy with her tips and tricks and <strong>Metal</strong> <strong>Clay</strong> Basics is loaded with all<br />
the great ones she has for every aspect<br />
of taking a gray lump of pricey clay to an<br />
exquisite piece of fine jewelry.<br />
Her method of getting a really smooth paste<br />
out of leftovers is excellent, but my favorite<br />
tip is how to make a small, elegant bezel for<br />
your gemstone using clay punches.<br />
The book has a spiral binding so it lies flat<br />
on your work surface. Another great feature<br />
is the space that has been allowed within<br />
the text to jot notes or tape info or even<br />
sketches. At 8” by 5” it is a nice size to have<br />
at your work area, not too big and bulky.<br />
One frustration I had in Linda’s classes was<br />
that while she is dropping her pearls of<br />
wisdom my hands were covered with olive<br />
oil and expensive gray paste, which wasn’t<br />
really conducive to taking notes.<br />
Now I have her wisdom in a book and I’m<br />
thrilled. If you have ever had a class with<br />
Linda, I know you will want this book. If you<br />
haven’t had a class with her, now at least<br />
you can savor her knowledge in her book<br />
and take notes while you’re at it!<br />
Price: $24.95<br />
Discount available when ordering from<br />
www.naturescapesstudio.com.<br />
<strong>Metal</strong> <strong>Clay</strong> Basics<br />
and<br />
Bench Reference<br />
by Linda Stiles Smith<br />
Book Review<br />
by Kathy Gallant<br />
<strong>Winter</strong> <strong>2009</strong> • <strong>Metal</strong><strong>Clay</strong><strong>Today</strong>.com 33
Hurry!<br />
We have a limited quantity<br />
of rooms available!<br />
34 <strong>Metal</strong><strong>Clay</strong><strong>Today</strong>.com • <strong>Winter</strong> <strong>2009</strong>


