Mini IDE Tutorial
Mini IDE Tutorial
Mini IDE Tutorial

Create successful ePaper yourself
Turn your PDF publications into a flip-book with our unique Google optimized e-Paper software.
TUTORIAL<br />
How to download and verify the code in 68HC12 By using <strong>Mini</strong><strong>IDE</strong><br />
1. Create a Folder on the hard drive named it 68HC12. We will use this folder to save our codes<br />
and other related programs and files<br />
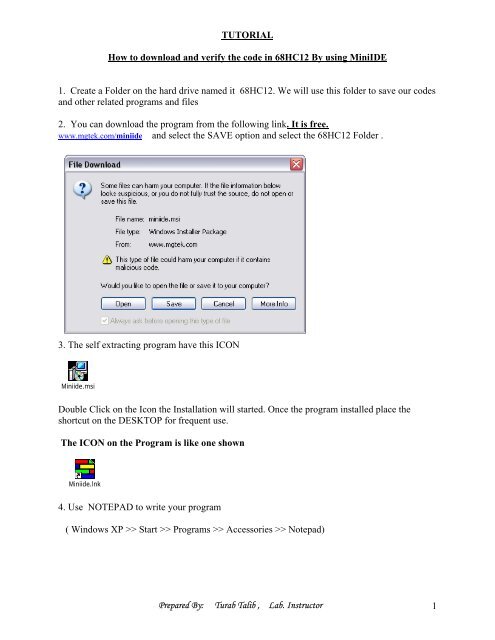
2. You can download the program from the following link. It is free.<br />
www.mgtek.com/miniide and select the SAVE option and select the 68HC12 Folder .<br />
3. The self extracting program have this ICON<br />
<strong>Mini</strong>ide.msi<br />
Double Click on the Icon the Installation will started. Once the program installed place the<br />
shortcut on the DESKTOP for frequent use.<br />
The ICON on the Program is like one shown<br />
<strong>Mini</strong>ide.lnk<br />
4. Use NOTEPAD to write your program<br />
( Windows XP >> Start >> Programs >> Accessories >> Notepad)<br />
Prepared By: Turab Talib , Lab. Instructor 1
5. Typed the following TEST program in the Notepad and SAVE AS test.asm in the 68HC12<br />
folder. You must typed the extension i.e. asm<br />
PROGRAM<br />
org $800 ;(RAM start location for user program)<br />
start: equ * ; Start the program from the beginning)<br />
ldaa #$4 ; # represent immediate, $ represent Hex<br />
ldab #$5<br />
end<br />
aba ; Add b to a then store result in a<br />
bra * ; Branch to the beginning of program<br />
6. To connect the uC with your computer, use BD9 cable (female end goes in the COM1 or<br />
COM2 port of your computer and other end with male DB9 connector in the Hardware ( UC<br />
Board).<br />
Prepared By: Turab Talib , Lab. Instructor 2
7. Apply 5V DC to the uC Positive lead is toward the BD 9 connector.<br />
9.Fire <strong>Mini</strong><strong>IDE</strong> program from the DeskTop<br />
<strong>Mini</strong>ide.lnk<br />
7.<br />
8. Press File from the tool bar, select your file i.e. test.asm, DO Not forget to type .asm<br />
Prepared By: Turab Talib , Lab. Instructor 3
The file will appear on the Top position of the <strong>Mini</strong><strong>IDE</strong>.<br />
9. Press the Build from the tool bar, Click on the “Set Project File” if not selected. Then, Again<br />
press Build and click on the “Build test.asm”.<br />
Some messages will appears on the second position of the screen, read the message and if you<br />
have reported an error/s correct them on the top window, then select the Build again and click on<br />
the “Set project file” if already selected then use the “Release project “ and again select the ”Set<br />
project”.<br />
Build your program again as per step 9.<br />
If no error are reported , Its mean that your program is successfully assembled.<br />
10. Print the test.lst file. It is store in the 68HC12 folder. Use the Note Pad to open this File<br />
Prepared By: Turab Talib , Lab. Instructor 4
11. To make the communication set up between the your Desktop and uC Board, Select the<br />
Terminal Tag in the OPTION of TERMINAL Tool Bar of <strong>Mini</strong><strong>IDE</strong><br />
You can change the COM port 2, if you are using it.<br />
11. Press the TERMINAL CONNECT/DICONNECT Icon on the <strong>Mini</strong><strong>IDE</strong> Tool Bar<br />
to connect your computer with the uC Board<br />
11. Press the RESET BUTTON of the uC Board and see the last window for the following<br />
message<br />
D-Bug12 v2.1.0b15<br />
Copyright 1996 - 1998 Motorola Semiconductor<br />
For Commands type "Help"<br />
It shows that you have successfully connected.<br />
11. Type help and press enter<br />
Prepared By: Turab Talib , Lab. Instructor 5
The help will show the commands of D-Bug12 Commands that you can use them to do a lot of<br />
useful thing.<br />
Press Any Key For More<br />
Prepared By: Turab Talib , Lab. Instructor 6
12. Type the LOAD COMMAND on the Prompt of the D-Bug12<br />
>load (then select the download icon<br />
the file<br />
FILENAME.s19)<br />
on the MINI<strong>IDE</strong> , Pop Up window appears, select<br />
( * will appear, If the file is successfully loaded in the uC.<br />
>rd ( register display command can be used to see the contents loaded in the uC.) Before that<br />
change the PC ( program counter to 800 location as our program is loaded from that position)<br />
PC SP X Y D = A:B CCR = SXHI NZVC<br />
0000 0A00 0000 0000 00:00 1001 0000<br />
0000 E00F SUBB 15,X<br />
>rm (register modified command will be used to change the PC from 0000 to 0800<br />
location)<br />
PC=0000<br />
SP=0A00<br />
IX=0000<br />
IY=0000<br />
Prepared By: Turab Talib , Lab. Instructor 7
A=00<br />
B=00<br />
CCR=90<br />
PC=0000 0800<br />
SP=0A00<br />
IX=0000<br />
IY=0000<br />
A=00<br />
B=00<br />
CCR=90 . ( . can be used to terminate rm command)<br />
>rd 0800<br />
( Again<br />
PC SP X Y D = A:B CCR = SXHI NZVC<br />
0800 0A00 0000 0000 00:00 1001 0000<br />
0800 860A LDAA #$0A<br />
>t ( TRACE COMMAND t will be used for next step by step operation)<br />
PC SP X Y D = A:B CCR = SXHI NZVC<br />
0802 0A00 0000 0000 0A:00 1001 0000<br />
0802 7A0821 STAA $0821<br />
>t<br />
PC SP X Y D = A:B CCR = SXHI NZVC<br />
0805 0A00 0000 0000 0A:00 1001 0000<br />
0805 C6CD LDAB #$CD<br />
>t<br />
PC SP X Y D = A:B CCR = SXHI NZVC<br />
0807 0A00 0000 0000 0A:CD 1001 1000<br />
0807 7B0822 STAB $0822<br />
>t<br />
PC SP X Y D = A:B CCR = SXHI NZVC<br />
080A 0A00 0000 0000 0A:CD 1001 1000<br />
080A 86A5 LDAA #$A5<br />
><br />
>t<br />
PC SP X Y D = A:B CCR = SXHI NZVC<br />
080C 0A00 0000 0000 A5:CD 1001 1000<br />
080C B6081E LDAA $081E<br />
>t<br />
PC SP X Y D = A:B CCR = SXHI NZVC<br />
080F 0A00 0000 0000 0A:CD 1001 0000<br />
Prepared By: Turab Talib , Lab. Instructor 8
080F F6081F LDAB $081F<br />
>t<br />
PC SP X Y D = A:B CCR = SXHI NZVC<br />
0812 0A00 0000 0000 0A:0C 1001 0000<br />
0812 1806 ABA<br />
>t<br />
PC SP X Y D = A:B CCR = SXHI NZVC<br />
0814 0A00 0000 0000 16:0C 1011 0000<br />
0814 8B01 ADDA #$01<br />
>t<br />
PC SP X Y D = A:B CCR = SXHI NZVC<br />
0816 0A00 0000 0000 17:0C 1001 0000<br />
0816 BB0820 ADDA $0820<br />
>t<br />
PC SP X Y D = A:B CCR = SXHI NZVC<br />
0819 0A00 0000 0000 19:0C 1001 0000<br />
0819 7A0823 STAA $0823<br />
>t<br />
PC SP X Y D = A:B CCR = SXHI NZVC<br />
081C 0A00 0000 0000 19:0C 1001 0000<br />
081C 20FE BRA $081C<br />
13. By using the mm ( memory modify) command insert the following number . At the cursor<br />
type<br />
>mm 0800<br />
(press enter)<br />
>0800 XX YY ( XX are any random alphanumeric number will be displayed actually these<br />
are the previous stored values at this memory location and you can insert the following new<br />
number at YY, one by one, where the cursor in blinking, press enter)<br />
45 , 4C , 54 , 4E , 20 , 32 , 33 , 31 , 38 , 20 , 4C , 61 , 62 , 20 , 20 , 20<br />
for example<br />
I am modifying the 0800 to onward memory location by 54 , 75 , 72 , 61 ,62<br />
>0800 42 54 ( Press Enter)<br />
>0801 4C 75 ( Press Enter)<br />
>0802 5E 72 ( Press Enter)<br />
>0803 2E 61 ( Press Enter)<br />
>0804 01 62 ( Press Enter)<br />
>0804 01 . ( insert dot to terminate the mm command then Press Enter)<br />
Prepared By: Turab Talib , Lab. Instructor 9
Enter the md (memory display command) as follow<br />
> md 0800 ( press Enter) md<br />
Look at the right hand side of the screen<br />
14. Turn Off the power of the uC and Turn On again<br />
press the reset button of the uC<br />
Type the md command<br />
> md 0800<br />
What happens to the data you stored at these location, Any Clue<br />
15. Display the memory content of location 0D00 by using md command<br />
> md 0D00 0D0F<br />
md ( Start Address) (End address)<br />
These memory location will be filled with some contents . NOW<br />
Type<br />
> BULK ( Press Enter)<br />
Again<br />
> md 0D00 0D0F<br />
What happened<br />
Repeat the step 13 & 14, But your memory location will 0D00 instead of 0800.<br />
What happened after step 14. Any Clue .<br />
16. By using the ASM command load the Accumalator A at location 0800 by immediate<br />
addressing with 09 then decrement this register 9 times. Set the Program counter PC to<br />
address of 0800 by using the Register modify command rm .Run your program. Watch what is<br />
happened after address 080C. The value in the A register .<br />
example for ASM Command<br />
D-Bug12 v2.1.0b15<br />
Copyright 1996 - 1998 Motorola Semiconductor<br />
For Commands type "Help"<br />
For Commands type "Help"<br />
>asm 0800<br />
0800 8609 LDAA #$09<br />
Prepared By: Turab Talib , Lab. Instructor 10
0802 43 DECA<br />
0803 43 DECA<br />
0804 43 DECA<br />
0805 43 DECA<br />
0806 43 DECA<br />
0807 43 DECA<br />
0808 43 DECA<br />
0809 43 DECA<br />
080A 43<br />
DECA<br />
080B 01 MEM >.<br />
>RM ( Changing the PC to 0800)<br />
PC=0000 0800<br />
SP=0A00<br />
IX=0000<br />
IY=0000 .<br />
>RD<br />
(Register Display)<br />
PC SP X Y D = A:B CCR = SXHI NZVC<br />
0800 0A00 0000 0000 00:00 1001 0000<br />
0800 8609 LDAA #$09<br />
>T ( Trace command )<br />
PC SP X Y D = A:B CCR = SXHI NZVC<br />
0802 0A00 0000 0000 09:00 1001 0000<br />
0802 43 DECA<br />
Keep using the Trace command until you reach the address 080B on the PC Register<br />
>T<br />
PC SP X Y D = A:B CCR = SXHI NZVC<br />
080A 0A00 0000 0000 01:00 1001 0000<br />
080A 43<br />
DECA<br />
>T<br />
PC SP X Y D = A:B CCR = SXHI NZVC<br />
080B 0A00 0000 0000 00:00 1001 0100<br />
080B 01<br />
MEM<br />
>T<br />
PC SP X Y D = A:B CCR = SXHI NZVC<br />
080C 0A00 0004 0001 00:00 1001 0100<br />
080C 8400 ANDA #$00<br />
At PC 080C you are start getting the values which you have not entered and your program is not<br />
ending. Again use the D-bug command and at this location insert the Break point command<br />
(BR). And rum your program by using G command .<br />
>BR 080C<br />
>G 0800<br />
You will see that your program is end nicely.<br />
To remove the Break point type NOBR. And run your program again. See the difference.<br />
Prepared By: Turab Talib , Lab. Instructor 11
Prepared By: Turab Talib , Lab. Instructor 12