Q200/HE Manual - QRS Diagnostic
Q200/HE Manual - QRS Diagnostic
Q200/HE Manual - QRS Diagnostic

Create successful ePaper yourself
Turn your PDF publications into a flip-book with our unique Google optimized e-Paper software.
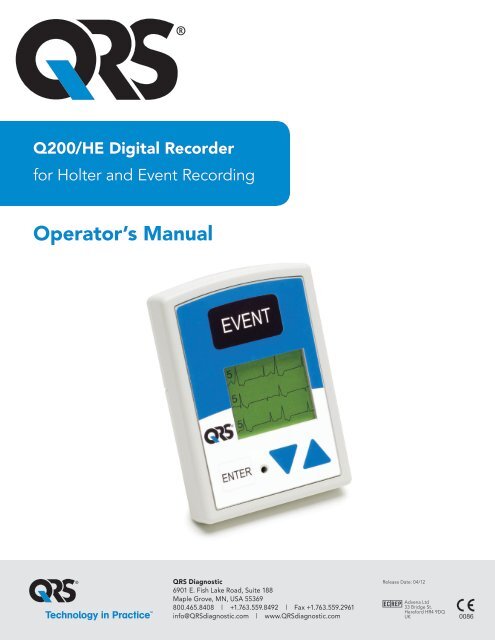
<strong>Q200</strong>/<strong>HE</strong> Digital Recorder<br />
for Holter and Event Recording<br />
Operator’s <strong>Manual</strong><br />
<strong>QRS</strong> <strong>Diagnostic</strong><br />
Release Date: 04/12<br />
6901 E. Fish Lake Road, Suite 188<br />
Maple Grove, MN, USA 55369<br />
Advena Ltd<br />
800.465.8408 | +1.763.559.8492 | Fax +1.763.559.2961<br />
33 Bridge St.<br />
Hereford HR4 9DQ<br />
info@<strong>QRS</strong>diagnostic.com | www.<strong>QRS</strong>diagnostic.com UK<br />
0086
Copyright 2012 NorthEast Monitoring, Inc. All rights reserved.<br />
Part number: NEMM019_<strong>QRS</strong>_REV_I March 2012<br />
The <strong>QRS</strong> Holter Recorder is manufactured by NorthEast Monitoring, Inc.<br />
NorthEast Monitoring, Inc. is an FDA Registered Facility (1224919) that follows all FDA CGMP Manufacturing Practices.<br />
The <strong>Q200</strong>/<strong>HE</strong> Digital Recorder has FDA 510K Product Classification (K061293 & K070014) and meets the AAMI EC-11/EC-38 standard for<br />
frequency response, amplitude accuracy and timing accuracy.
<strong>Q200</strong>/<strong>HE</strong><br />
Digital Recorder<br />
Operator’s <strong>Manual</strong><br />
WARNING: Federal law restricts this device to sale by or on the<br />
order of a physician.<br />
The <strong>QRS</strong> <strong>Q200</strong>/<strong>HE</strong> digital recorder can be used as either a Holter monitor<br />
or a looping Event recorder and is designed to facilitate ambulatory cardiac<br />
monitoring, on order of a physician, of those patients (including<br />
infants weighing less than 10 kg.) who may benefit from such monitoring,<br />
including but not limited to those with complaints of palpitations, syncope,<br />
chest pains, shortness of breath, or those who need to be monitored<br />
to judge their current cardiac function, such as patients who have recently<br />
received pacemakers.<br />
The data obtained by monitoring is not analyzed at the time of recording.<br />
After the recording is complete, the data must be downloaded to a compatible<br />
version of <strong>QRS</strong> <strong>Diagnostic</strong> Holter LX Analysis software to be analyzed.<br />
Note: The <strong>Q200</strong>/<strong>HE</strong> is not intended to replace real-time telemetry<br />
monitoring for patients suspected of having life-threatening<br />
arrhythmias and is not for In Vitro diagnostic use.<br />
<strong>Q200</strong>/<strong>HE</strong> Operator’s <strong>Manual</strong> 1
<strong>Q200</strong>/<strong>HE</strong> Physical Specifications<br />
<strong>Q200</strong>/<strong>HE</strong> Physical<br />
Specifications<br />
The <strong>Q200</strong>/<strong>HE</strong> Digital Recorder meets the following<br />
physical specifications:<br />
• 8.6 cm (l) x 6.0 cm (w) x 2.0 cm (d)<br />
• Weight: 70.9 grams (2.5 oz.) without battery;<br />
99.3 grams (3.5 oz.) with battery<br />
Electrical Specifications<br />
• Recording bandwidth: 0.05 to 70 hertz in<br />
180 samples/sec. mode.<br />
• Operation duty cycle: Continuous.<br />
• Data storage format: Sample difference.<br />
• Pacemaker sensitivity: 2 millivolts.<br />
• Pacemaker pulse duration: 150 to 2,500<br />
microseconds.<br />
• Resettable fuses: 0.5 amp<br />
Power Supply<br />
The <strong>Q200</strong>/<strong>HE</strong> is powered by one 1.5 volt AA<br />
alkaline battery (MN1500 or the equivalent),<br />
one AA rechargeable NiMH (nickel metal<br />
hydride) battery, or one AA Eveready Lithium<br />
L91 battery. Although battery life may last<br />
longer than a recording, batteries should not be<br />
re-used for a second patient. After one use,<br />
they should be disposed of following local<br />
ordinances.<br />
Environmental<br />
Specifications<br />
This equipment is not suitable for use in the<br />
presence of a flammable anaesthetic mixture<br />
with air, oxygen, or nitrous oxide.<br />
The operating range of the device is between<br />
10 and 45 degrees C, between 10 and 95%<br />
humidity, and between 700 and 1060 hPa pressure.<br />
Store and/or transport the recorder at temperatures<br />
between -40 and 70 degrees C, between<br />
10 and 100% relative humidity, and 500 and<br />
1060 hPa pressure.<br />
The <strong>Q200</strong>/<strong>HE</strong> recorder is rated IPX0 and is not<br />
for use in wet environments.<br />
Online help<br />
In addition to the information in this manual,<br />
more information and help is available at our<br />
web site, www.<strong>QRS</strong>diagnostic.com or<br />
• email: support@<strong>QRS</strong>diagnostic.com<br />
• Toll free: 800-465-8408<br />
• Phone: 763-559-8492<br />
• Fax: 763-559-2961<br />
Do not leave battery in the recorder for<br />
extended periods (more than two weeks) when<br />
the recorder is not in use.<br />
If you use rechargeable batteries, the battery<br />
recharger should be kept out of the patient<br />
environment and hook-up area. For details<br />
about recommended batteries/chargers, see<br />
Appendix B.<br />
<strong>Q200</strong>/<strong>HE</strong> Operator’s <strong>Manual</strong> 2
Warning Symbols<br />
Warning Symbols<br />
Please note that the recorder is labeled with the<br />
following warning symbols:<br />
Type BF device.<br />
Attention, consult accompanying<br />
document. Refer to<br />
documentation for full<br />
instructions.<br />
This device uses batteries<br />
that should be recycled.<br />
Repairing the Recorder<br />
Should the <strong>Q200</strong>/<strong>HE</strong> fail to work properly during<br />
its useful life, contact <strong>QRS</strong> at 800-465-<br />
8408 or email support@<strong>QRS</strong>diagnostic.com to<br />
arrange for repair and/or replacement. There<br />
are no user-serviceable parts.<br />
Removal of the label to open the recorder voids<br />
the warranty.<br />
LCD Screen<br />
The <strong>Q200</strong>/<strong>HE</strong> has an LCD screen that is used<br />
to display either time-of-day (during the<br />
recording), prompts and error messages (during<br />
the hookup procedure or during recording),<br />
and lead quality (during the Holter hookup procedure).<br />
For details about the information displayed<br />
on the LCD, refer to the hookup<br />
directions that follow.<br />
Patient Leads<br />
The <strong>Q200</strong>/<strong>HE</strong> is compatible with standard single-use<br />
silver/silver-chloride ECG electrodes.<strong>Q200</strong>/<strong>HE</strong><br />
uses the <strong>QRS</strong> shielded patient<br />
cables with either seven leads or five leads for<br />
a 3-channel Holter recording, or three leads for<br />
2-channel Holter recording. For event recording,<br />
a 2- or 3-lead shielded patient cable is<br />
used. The patient cable connects to the recorder<br />
via a 7-pin in-line receptacle.<br />
Patient electrodes should be left in their original<br />
packaging until use - following manufacturer’s<br />
instruction - and then after use, disposed<br />
of following local ordinances and the manufacturer’s<br />
instructions.<br />
Patient lead wires and cables should be cleaned<br />
and disinfected as required between uses, with<br />
70 percent isopropol alcohol and a soft cloth to<br />
disinfect, and a non-abrasive liquid soap and<br />
soft cloth to clean. Sterilization is not required.<br />
Note: Do not pull on or stretch the patient<br />
cables or lead wires when you clean them.<br />
This can cause premature failure of the<br />
cable. Instead, lay the cable and attached<br />
wires on a clean, flat surface, hold them down<br />
with one hand, and holding a cloth in the<br />
other hand, rub all surfaces of the cable.<br />
See Appendix A for details about cleaning and<br />
disinfecting the <strong>Q200</strong>/<strong>HE</strong> recorder as needed.<br />
Patient lead wires and cables should be visually<br />
inspected between uses for worn or cracked<br />
areas. Frequently used cables should be<br />
replaced at least every 6 months. Worn lead<br />
wires and cables should be replaced before<br />
next use and disposed of following local ordinances<br />
and the manufacturer’s instructions.<br />
Storage Capacity<br />
The patient’s Holter data is stored in the<br />
recorder on a removable SD Card. To store 24<br />
<strong>Q200</strong>/<strong>HE</strong> Operator’s <strong>Manual</strong> 3
Instructions to the User About Electrical Interference<br />
hours in normal mode, the minimum capacity<br />
of the SD Card should be 28 megabytes; 56<br />
megabytes are required for 24 hours in high<br />
resolution mode.<br />
There are some SD Card types that may draw<br />
excessive power, and will therefore drain the<br />
battery prematurely. If you purchase cards<br />
from a supplier other than <strong>QRS</strong>, it is recommended<br />
that you first test the SD card for a<br />
greater amount of time than the expected use.<br />
The patient’s Event data is stored in non-volatile<br />
memory internal to the recorder.<br />
Instructions to the<br />
User About Electrical<br />
Interference<br />
This equipment has been tested and found to<br />
comply with the limits for a Class-B digital<br />
device, pursuant to Part 15 of the FCC Rules.<br />
These limits are designed to provide reasonable<br />
protection against harmful interference in a residential<br />
installation. This equipment generates,<br />
uses and can radiate radio frequency energy<br />
and, if not installed and used in accordance<br />
with the instructions, may cause harmful interference<br />
to radio communications. However,<br />
there is no guarantee that interference will not<br />
occur in a particular installation. If this equipment<br />
does cause harmful interference to radio<br />
or television reception, which can be determined<br />
by turning the equipment off and on, the<br />
user is encouraged to try to correct the interference<br />
by one or more of the following measures:<br />
• Reorient or relocate the receiving antenna.<br />
• Increase the separation between the equipment<br />
and receiver.<br />
• Consult the dealer or an experienced radio/<br />
TV technician for help.<br />
This equipment has been certified to comply<br />
with the limits for a Class-B computing device,<br />
pursuant to FCC Rules. In order to maintain<br />
compliance with FCC regulations, shielded<br />
cables must be used with this equipment. Operation<br />
with non-approved equipment or<br />
unshielded cables is likely to result in interference<br />
to radio and TV reception. The user is<br />
cautioned that changes and modifications made<br />
to the equipment without the approval of manufacturer<br />
could void the user’s authority to<br />
operate this equipment.<br />
Using the <strong>Q200</strong>/<strong>HE</strong> for<br />
Holter Recording<br />
To use the <strong>Q200</strong>/<strong>HE</strong> to record a patient’s longterm<br />
ECG (Holter), follow the appropriate<br />
steps listed below:<br />
Step 1 - Hook up patient;<br />
Step 2 - Prepare the <strong>Q200</strong>/<strong>HE</strong> for recording;<br />
Step 3 - Set-up patient ID on recorder;<br />
Step 4 - Start recording.<br />
These steps are described in detail starting with<br />
the next section.<br />
If you have a new SD Card that has not been<br />
formatted with a flash.dat file, you will need to<br />
use your <strong>QRS</strong> Holter LX Analysis software to<br />
initialize the card for the first time.<br />
<strong>Q200</strong>/<strong>HE</strong> Operator’s <strong>Manual</strong> 4
Using the <strong>Q200</strong>/<strong>HE</strong> for Holter Recording<br />
Step 1: Hook up Patient for Holter<br />
The most important element in Holter monitoring<br />
is recording a clean long-term ECG signal.<br />
Because a clean signal is directly dependent on<br />
the hookup procedure, great care should be<br />
taken when hooking up the patient. Poor<br />
hookup causes poor signal quality and artifact.<br />
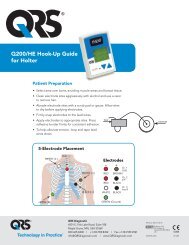
To ensure proper hookup, follow these steps:<br />
1. Using either the 5-Lead (3-channel) or 7-<br />
Lead (3-channel) hook-ups shown below,<br />
identify sites for the electrodes. You can<br />
also choose a 3-Lead hook-up (2-channel)<br />
which is shown in the Event section of this<br />
manual.<br />
Note: The 7-electrode hookup shown below<br />
consists of independent bipolar leads and<br />
corresponds to IEC60601-2-47 requirements<br />
(Code 2). The 5-electrode hookup does not<br />
5-LEAD PLACEMENT<br />
Channel 1:<br />
+ Brown 5th rib, left anterior axillary line<br />
- Red centered on manubrium<br />
Channel 2:<br />
+ Black 5th rib, left of mid-clavicular line<br />
- Red<br />
Channel 3:<br />
+ Black<br />
- White right manubrium<br />
Ground:<br />
Green centered over rib<br />
5 LEAD PLACEMENT<br />
7-LEAD PLACEMENT<br />
Channel 1:<br />
+ Red 5th rib, left anterior axillary line<br />
- White right manubrium<br />
Channel 2:<br />
+ Brown 2 cm. right of xiphoid process<br />
- Black left manubrium<br />
Channel 3:<br />
+ Orange 5th rib, left of mid-clavicular line<br />
- Blue centered on manubrium<br />
Ground:<br />
Green centered over rib<br />
7 LEAD PLACEMENT<br />
<strong>Q200</strong>/<strong>HE</strong> Operator’s <strong>Manual</strong> 5
Using the <strong>Q200</strong>/<strong>HE</strong> for Holter Recording<br />
Tape<br />
have independent leads, and so, does not<br />
correspond to either Code 1 or 2, but is widely<br />
used in the United States and Canada.<br />
2. Prepare the patient’s skin. If the patient has<br />
hair in any of the electrode areas, shave it<br />
with a safety razor. Use an alcohol pad and<br />
rub the sites briskly until the skin reddens.<br />
Let the skin air dry before proceeding.<br />
3. Attach the patient cable to the recorder.<br />
Next, snap a lead wire from the patient<br />
cable to each of the electrodes.<br />
4. Attach an electrode at each of the patient’s<br />
prepared sites. As you attach electrodes, be<br />
careful to not let any unattached electrode<br />
come in contact with other conductive<br />
objects, including ground. Be sure to refer<br />
to the diagrams on the previous page for<br />
correct placement of each colored lead. The<br />
electrodes should be placed over bone at<br />
each of the sites. Press the center of each<br />
electrode against the patient’s skin, then rub<br />
the outer circle of each electrode to secure<br />
it.<br />
5. If you use<br />
lead lock<br />
or clip<br />
lock electrodes,<br />
be<br />
sure to use<br />
the lock or<br />
clip to<br />
relieve<br />
stress on<br />
each lead<br />
wire; refer Using a clip lock electrode<br />
Electrode<br />
Stress Loop<br />
to the diagram at right for proper use. Otherwise,<br />
tape each lead wire into a stress<br />
loop (see the diagram below) to help prevent<br />
movement of the electrode.<br />
Step 2: Prepare <strong>Q200</strong>/<strong>HE</strong><br />
After connecting the patient to the recorder,<br />
follow these steps to prepare the recorder:<br />
1. Remove the battery cover from the back of<br />
the recorder. The battery compartment and<br />
the SD Card slot are now exposed.<br />
2. With the recorder front facing up and away<br />
from you, insert an SD Card into the slot.<br />
The SD Card should have the connector<br />
contacts down and toward the recorder as<br />
you gently push it in. Be sure to use the SD<br />
Card you formatted for this patient.<br />
If the card pops out slightly when you push<br />
it in, try again. Pushing gently on the card<br />
both inserts it and allows you to remove<br />
it. Never pull the card out as it will damage<br />
the recorder.<br />
Note: The SD Card should slide in easily.<br />
Make sure you do not force the card in; if<br />
you force the card in upside-down or force<br />
the card out by pulling, it can damage the<br />
connector inside the recorder.<br />
3. Insert a fresh 1.5 volt AA battery into the<br />
battery compartment, being sure to orient it<br />
as indicated in the diagram inside the compartment.<br />
See Appendix B for details about<br />
battery choices.<br />
4. Replace the battery cover by sliding it into<br />
the slot until it clicks.<br />
5. “<strong>Q200</strong>/<strong>HE</strong>” will first appear on the screen<br />
and then the <strong>QRS</strong> information will appear.<br />
Press ENTER to continue.<br />
6. If you did not erase the previous patient’s<br />
data from the SD Card, you will now be<br />
prompted to Erase memory. Use the blue<br />
arrows to select “*Yes” and press ENTER.<br />
<strong>Q200</strong>/<strong>HE</strong> Operator’s <strong>Manual</strong> 6
Using the <strong>Q200</strong>/<strong>HE</strong> for Holter Recording<br />
7. You will see ERASE DONE when erasing<br />
is complete.<br />
Note: If at any time you need to restart the<br />
set up process, just remove the battery to<br />
begin again.<br />
Note: If your recorder is in Event mode, the<br />
15-second countdown will begin when you<br />
put in a new battery. To interrupt the 15-<br />
second countdown, quickly press ENTER,<br />
down arrow, up arrow and then EVENT, in<br />
that order. You should now see the <strong>QRS</strong><br />
screen. Press ENTER to continue to the<br />
main menu.<br />
2. Now, the LCD will display the ECG signals,<br />
the battery level, and lead quality<br />
based on the level of impedance detected<br />
between the two electrodes for each channel.<br />
Lead quality for each channel is a number<br />
between 0 and 5. The best possible<br />
signal quality reading is 5; that indicates a<br />
good electrode-skin connection. A “0” indicates<br />
no signal is being received by on the<br />
recorder.<br />
3. Once a satisfactory lead quality signal of 3<br />
or more is displayed for all channels, continue<br />
with the final step - Start Recording.<br />
Note: If you do not push the EVENT button,<br />
the recorder will display lead quality for 10<br />
minutes, then start recording. To delay the<br />
start of recording, simply press the EVENT<br />
button briefly and the 10-minute countdown<br />
will start again.<br />
Step 3: Set-up Patient ID<br />
You will now see a screen with two choices:<br />
“New Patient” and “Settings”. Since the <strong>Q200</strong>/<br />
<strong>HE</strong> recorder will store settings between<br />
patients, you may only need to adjust settings<br />
when there is a time change or if you want to<br />
change between Holter and Event. For more<br />
information on adjusting settings, refer to<br />
Appendix C - To Adjust Settings on the <strong>Q200</strong>/<br />
<strong>HE</strong> Digital Recorder.<br />
1. If you would like to input the Patient ID at<br />
this time, press ENTER and use the blue up<br />
arrow to select the first character of the ID.<br />
Use the ENTER button when you have<br />
entered the first character and continue until<br />
all of the ID is entered. Once the patient ID<br />
is entered, press the EVENT button.<br />
Note: If you make an error while entering a<br />
character into the Patient ID, you can<br />
backspace one or more times by holding down<br />
the Enter key for several seconds until the<br />
cursor moves to the left.<br />
<strong>Q200</strong>/<strong>HE</strong> Operator’s <strong>Manual</strong> 7
Using the <strong>Q200</strong>/<strong>HE</strong> for Holter Recording<br />
Step 4: Start Recording<br />
1. Once the LCD displays satisfactory lead<br />
quality signals for all channels, you can<br />
start the recording by pressing the EVENT<br />
button for 3 seconds till you see “Recording<br />
Started”. If you do not do this, recording<br />
will begin automatically after 10<br />
minutes. During recording, time-of-day<br />
appears on the LCD. Once recording<br />
begins, it will continue until the battery is<br />
removed or the SD Card is full.<br />
2. The patient can choose between a belt clip<br />
or pouch with strap for wearing the<br />
recorder. All equipment, except the electrodes<br />
and a portion of the lead wires,<br />
should be over at least one layer of clothing<br />
so that it is not in direct contact with the<br />
patient’s skin. Orient the recorder on the<br />
patient so that the EVENT button is accessible<br />
and the LCD is visible.<br />
3. Advise the patient to not expose the<br />
recorder or electrodes to any wet environment;<br />
in addition, they should not shower,<br />
bathe, or swim while wearing the recorder.<br />
4. Instruct the patient on how to use the<br />
EVENT button to indicate symptomatic<br />
events or activities of interest during the<br />
Holter test. Advise them to push the<br />
EVENT button briefly. The patient may<br />
also be given the opportunity to enter a<br />
diary at the time of the event. They should<br />
use the up/down arrows to choose the most<br />
appropriate entry.<br />
5. When the patient returns, remove the electrodes,<br />
leads and recorder from the patient.<br />
Open the recorder and remove the battery<br />
and SD Card from the recorder. Pushing<br />
gently on the card both inserts it and<br />
allows you to remove it. Never pull the<br />
card out as it will damage the recorder.<br />
The Holter signal is now ready to be analyzed.<br />
Event Marker<br />
The EVENT button on the recorder marks the<br />
recording so that when the Holter signal is analyzed,<br />
the ECG at the time-of-day the button<br />
was pushed is kept as saved strips and labeled<br />
as an event and with the selected diary entry.<br />
Power Loss Protection Feature<br />
In Holter recording mode, if the battery is<br />
removed and replaced within 60 minutes, the<br />
recording will continue. If that happens, the<br />
LCD returns to the time-of-day and continues<br />
to record the patient’s Holter signal. When the<br />
patient’s recording is analyzed, the signal<br />
recorded while the batteries were not in place<br />
appears as continuous high-frequency artifact<br />
in all channels.<br />
If the battery is left out for more than 60 minutes,<br />
recording cannot be restarted. Instead, you<br />
will have to use the recording as is, or you will<br />
have to re-initiate the recording after erasing<br />
the memory on the SD Card.<br />
If the SD Card has been removed and you wish<br />
to restart the recorder without a card in order to<br />
update settings, you will need to press the following<br />
buttons in this exact order during the 15<br />
second countdown: ENTER, down arrow, up<br />
arrow, EVENT.<br />
<strong>Q200</strong>/<strong>HE</strong> Operator’s <strong>Manual</strong> 8
Using the <strong>Q200</strong>/<strong>HE</strong> in Event Mode.<br />
Using the <strong>Q200</strong>/<strong>HE</strong> in<br />
Event Mode.<br />
The <strong>Q200</strong>/<strong>HE</strong> can be used as a looping Event<br />
recorder to capture events automatically or<br />
when activated by the patient. Based upon your<br />
settings, the recorder can capture up to 90 minutes<br />
of event recordings. When one or more<br />
events are captured, the patient may transmit<br />
his/her recordings transtelephonically.<br />
Note: No SD Card is used during event<br />
recording.<br />
To use the <strong>Q200</strong>/<strong>HE</strong> in an Event mode, follow<br />
these steps:<br />
Step 1 - Hook up the patient;<br />
Step 2 - Prepare the recorder;<br />
Step 3 - Start recording.<br />
Step 1: Hook up Patient<br />
The <strong>Q200</strong>/<strong>HE</strong> uses a 2-electrode lead for 1-<br />
channel or an optional 3-electrode lead for 2-<br />
channel event recording.<br />
Refer to Step 1: Hook up Patient in the Holter<br />
Recording section of this manual for hook-up<br />
instructions, but refer to the 2- or 3-electrode<br />
diagram on this page for electrode placement<br />
instructions.<br />
Step 2: Prepare the <strong>Q200</strong>/<strong>HE</strong><br />
After connecting the patient to the recorder,<br />
follow these steps to prepare the recorder:<br />
1. Remove the battery cover from the back of<br />
the recorder. Now the battery compartment<br />
and the SD Card slot are exposed.<br />
2. If there is an SD Card in the recorder, it<br />
should be removed for event recording as it<br />
will drain the battery unnecessarily. To<br />
Channel 1:<br />
+ Red: 5th rib, left anterior axillary line<br />
- White: Right manubrium<br />
Channel 1 (Lead 1):<br />
+ Black: Left-mid-clavicular<br />
- White: Right mid-clavicular<br />
Channel 2 (Mod V5):<br />
+ Brown: 5th rib, left anterior axillary line<br />
- White<br />
<strong>Q200</strong>/<strong>HE</strong> Operator’s <strong>Manual</strong> 9
Using the <strong>Q200</strong>/<strong>HE</strong> in Event Mode.<br />
remove the SD Card, gently press on it and<br />
it should pop out slightly. You should be<br />
able to pull it out easily. If it doesn’t work<br />
the first time, try again.<br />
3. Insert a fresh 1.5 volt AA battery into the<br />
battery compartment, being sure to orient it<br />
as indicated in the diagram inside the compartment.<br />
The battery sits loosely in the<br />
compartment. See Appendix B for details<br />
about battery choices.<br />
4. Replace the battery cover by sliding it into<br />
the slot until it clicks.<br />
5. <strong>Q200</strong>/<strong>HE</strong> will first appear on the screen and<br />
then after 10 seconds, the recorder device<br />
should begin counting down from 15 seconds<br />
and will automatically begin recording.<br />
The time-of-day and battery level will<br />
appear on the display once recording has<br />
begun. If LCD also shows events stored on<br />
the recorder, regardless of whether they are<br />
sent, you need to erase them now.<br />
6. If the recorder is in Holter mode, you will<br />
get an error asking for an SD Card which<br />
will then alternate with a 15-second countdown.<br />
Interrupt the countdown with the<br />
button sequence, ENTER, down arrow, up<br />
arrow and EVENT and the go to the General<br />
Settings menu to change the Recording<br />
Type from Holter to Event. After doing<br />
that, go back to “Return” on the menus until<br />
<strong>Q200</strong>/<strong>HE</strong> and the 15-second countdown<br />
begins again. Event recording will start<br />
after 15 seconds.<br />
To Erase<br />
Events: If the<br />
previous<br />
patient’s events<br />
still exist on the<br />
<strong>Q200</strong>/<strong>HE</strong> and<br />
they have been<br />
transmitted or<br />
12:33<br />
96<br />
Sent<br />
10 / 100<br />
stored, you will see the word “Sent” on the<br />
LCD screen and you must erase the events<br />
before hooking up the new patient. To erase the<br />
events, hold down either blue arrow button for<br />
3 seconds. You will see “ERASING MEM-<br />
ORY” and once memory has been erased, the<br />
event counter at the bottom of the LCD screen<br />
will be reset and the word “Sent” will be<br />
replaced with the word “Recordings”.<br />
If the previous patient’s recordings were not<br />
“Sent” then you will need to transmit or store<br />
event data before erasing. For more information<br />
on saving event data, refer to “To Transmit<br />
or Store Events” on the next page.<br />
To Adjust Settings: In order to adjust settings,<br />
you will need to press the following buttons in<br />
this exact order during the 15 second countdown:<br />
ENTER, down arrow, up arrow,<br />
EVENT. While in Event mode, to restart the<br />
countdown, simply remove and reinsert the<br />
battery.<br />
For more information on settings and how to<br />
adjust them, refer to Appendix C.<br />
Note: If at any time you need to start the set<br />
up process over, just remove the battery to<br />
begin again.<br />
<strong>Q200</strong>/<strong>HE</strong> Operator’s <strong>Manual</strong> 10
To Transmit or Store Events<br />
Step 3: Start Recording:<br />
1. The recording will begin automatically after<br />
15 seconds. At first you may see the ECG<br />
signal and quality on the screen. The quality<br />
can range anywhere between 0 (no signal)<br />
to 5 (best signal). A rating of 3 or<br />
above should suffice, although you may<br />
want to get a signal of 5 before continuing.<br />
To view the ECG again, just remove the<br />
cable and re-insert. There will be a 10-second<br />
delay.<br />
2. During recording, time-of-day appears on<br />
the screen. Once recording begins, it will<br />
continue to record until the battery is<br />
removed or the memory is full.<br />
3. The patient can choose between a belt clip<br />
or pouch with strap for wearing the <strong>Q200</strong>/<br />
<strong>HE</strong>. All equipment, except the electrodes<br />
and a portion of the lead wires, should be<br />
over at least one layer of clothing so that it<br />
is not in direct contact with the patient’s<br />
skin. Orient the recorder on the patient so<br />
that the EVENT button is accessible and the<br />
LCD is visible.<br />
4. Advise the patient to not expose the<br />
recorder or electrodes to any wet environment;<br />
in addition, they should not shower,<br />
bathe, or swim while wearing the recorder.<br />
5. Instruct the patient how to use the EVENT<br />
button to record symptomatic events.<br />
Advise them to push the EVENT button<br />
briefly; when they use it depends on your<br />
institution’s procedures.<br />
Note: Although the <strong>Q200</strong>'s false negative<br />
rate is low, there is always the potential that<br />
an arrhythmic event being experienced by a<br />
patient is not captured automatically by the<br />
recorder. Therefore, we strongly recommend<br />
that even when automatic detection is turned<br />
on, that patients be informed that they should<br />
always press the EVENT button when they<br />
feel they are having an arrhythmic event.<br />
6. If you choose, instruct the patient when and<br />
how to send the recordings via the telephone.<br />
7. When the patient returns, review the screen<br />
first to ensure that all events have been sent.<br />
8. If the screen states that there are “Events<br />
Recorded” and does not state that any were<br />
“sent”, you will now need to transmit and<br />
save the events for the patient.<br />
9. After transmitting and erasing any unsent<br />
events, remove the electrodes, leads and<br />
recorder from the patient. You should now<br />
open the recorder and remove the battery.<br />
To Transmit or Store<br />
Events<br />
Transmit. Start the software application or<br />
recording device that will be recording the<br />
events. Once recording has begun, press the<br />
ENTER button on the <strong>Q200</strong>/<strong>HE</strong> for a second<br />
and the events will begin transmitting. Transmission<br />
will continue until all events are sent.<br />
Once the events are sent, you can now erase<br />
them from the recorder by pressing either one<br />
of the blue arrows for 3 seconds.<br />
At the beginning of the transmission a cal signal<br />
will be present. Additionally, at the beginning<br />
of each event there will be a marker. The<br />
marker is a digital signal that will include the<br />
serial number of the recorder and the time, date<br />
and type of each event. The digital signal can<br />
only be read by the <strong>QRS</strong> LX Event software. If<br />
you are using a different event recorder software,<br />
you will not be able to read the digital<br />
signal, but the signal will allow you to tell<br />
where each event begins.<br />
The recorder’s ECG transmission uses the standard<br />
FM transmission. The header uses a proprietary<br />
FSK format.<br />
<strong>Q200</strong>/<strong>HE</strong> Operator’s <strong>Manual</strong> 11
To Transmit or Store Events<br />
SD Card store. instead of transmitting events<br />
acoustically, users of the LX Event software<br />
can choose to store events on an SD Card.<br />
Before an SD Card is used for the first time, it<br />
must be formatted using the LX Event software.<br />
Also, only one set of data can exist on a<br />
card at any one time, so be sure that you save<br />
the previously stored data on the computer<br />
before beginning. (For more information on<br />
formatting the SD Card, please refer to your<br />
LX Event Software manual.)<br />
use the card again before saving on your<br />
computer, the data will be lost.<br />
6. Once the events are saved on the desktop,<br />
re-insert the battery into the <strong>Q200</strong>/<strong>HE</strong> and<br />
see the word “Sent” on the screen above the<br />
Event tally. You should now erase the<br />
events from the recorder by pressing either<br />
blue arrow for 3 seconds.<br />
To record the events onto a pre-formatted card,<br />
refer to the following steps:<br />
1. Remove the battery cover from the back of<br />
the recorder. The battery compartment and<br />
the SD Card slot are now exposed.<br />
2. With the recorder front facing up and away<br />
from you, insert an SD Card into the slot.<br />
The SD Card should have the connector<br />
contacts down and toward the recorder as<br />
you gently push it in. If the card pops out<br />
slightly when you push it in, try again.<br />
Pushing gently on the card both inserts it<br />
and allows you to remove it. Never pull<br />
the card out as it will damage the<br />
recorder.<br />
Note: The SD Card should slide in easily.<br />
Make sure you do not force the card in; if<br />
you force the card in upside-down or pull it<br />
out, it can damage the connector inside the<br />
recorder.<br />
3. Re-insert the battery into the recorder,<br />
being sure to orient it as indicated in the<br />
diagram inside the compartment.<br />
4. A message on the LCD screen will now<br />
appear - “COPYING EVENTS.” When<br />
the events are finished being copied to the<br />
SD Card, you will see the message “FIN-<br />
IS<strong>HE</strong>D REMOVE CARD.” Do as you are<br />
told by gently pressing down onto the SD<br />
Card. It should pop out.<br />
5. You should now insert the SD Card into<br />
your reader and save the data on your computer<br />
using the LX Event software. If you<br />
<strong>Q200</strong>/<strong>HE</strong> Operator’s <strong>Manual</strong> 12
Event Recording: Patient Operating Instructions<br />
Event Recording: Patient<br />
Operating Instructions<br />
The <strong>Q200</strong>/<strong>HE</strong> recorder is ready to use when<br />
you receive it from your physician or nurse.<br />
To Hookup:<br />
You will want to reapply fresh electrodes daily.<br />
To do this, simply snap lead wires into new<br />
electrodes first and then apply according to the<br />
technician’s instructions. We recommend that<br />
you do this after bathing or showering as the<br />
recorder or electrodes should not get wet.<br />
To Record an event:<br />
If your <strong>Q200</strong>/<strong>HE</strong> recorder has an automatic<br />
mode, the recorder may record events without<br />
your knowledge. This is normal operation and<br />
you may hear a beep when the <strong>Q200</strong>/<strong>HE</strong> is<br />
recording an event.<br />
If you feel that it is time to record an event<br />
manually, simply press the RECORD button<br />
and hold for a second. If your recorder is set up<br />
to accept a diary entry, you will see the word<br />
“<strong>Manual</strong> Event” on the recorder. No further<br />
action from you is required.<br />
After recording is complete, the screen will<br />
show the time, the word “Recordings” and a<br />
tally showing the number of event that were<br />
recorded and the total number of events that<br />
can be stored on the recorder. In this example,<br />
the patient has 10 events recorded out of a possible<br />
100:<br />
12:33<br />
89<br />
Recordings<br />
10 / 100<br />
To Send events:<br />
If you have been instructed by your technician<br />
to call the receiving center after time has<br />
passed or a certain number of events have been<br />
recorded. Your recorder may even beep and/or<br />
display a phone number when it is time to call.<br />
When it is time to call, please do the following:<br />
Step 1: If the recorder is in a pouch, remove<br />
the cable from the recorder and remove the<br />
recorder from the pouch. If the recorder is not<br />
in a pouch, it is not necessary to remove the<br />
cables from the recorder at this time, but you<br />
can do so if it makes it easier for you. Now, set<br />
the recorder on a flat surface with the screen<br />
side up and within reach of your telephone.<br />
Note: Cell phones DO NOT work for sending<br />
transmissions.<br />
Step 2: Call the receiving center phone number<br />
provided by the technician.<br />
Step 3: When the phone is answered, follow<br />
the instructions given to you by the technician<br />
on the other end of the line.<br />
Step 4: When instructed to “send your events”,<br />
do the following:<br />
1. Press the ENTER button that is located on<br />
the bottom left corner of the recorder.<br />
2. Gently rest the telephone on the table with<br />
the mouthpiece over the speaker that is<br />
located between the ENTER button and the<br />
down blue arrow on the recorder.<br />
3. The screen will display a message “Sending<br />
Event” with the number of the event that<br />
the device is currently sending and the total<br />
number of events it needs to send. (You<br />
may also be able to hear the events being<br />
sent over the phone line.) This process may<br />
take just a few or many minutes depending<br />
upon the number of events recorded and the<br />
amount of time of each event.<br />
4. Once all the events are sent, you will now<br />
see that the word “Sent” has replaced the<br />
word “Recordings”. This means that all of<br />
<strong>Q200</strong>/<strong>HE</strong> Operator’s <strong>Manual</strong> 13
Event Recording: Patient Operating Instructions<br />
the events in the recorder have been sent,<br />
but are still saved.<br />
Step 5: At this time the technician may ask you<br />
to erase your events by pressing either of the<br />
blue arrow buttons down for 3 seconds, but you<br />
SHOULD ONLY ERASE EVENTS W<strong>HE</strong>N<br />
INSTRUCTED TO DO SO. Once events are<br />
erased, you will see that the first number is<br />
changed to 0 as there are no longer any events<br />
stored on the recorder.<br />
You are now ready to record new events.<br />
Cleaning<br />
12:39<br />
You can clean the outside of the recorder with a<br />
soft cloth.<br />
LCD Screen Messaging<br />
89<br />
Sent<br />
10 / 100<br />
12:45<br />
89<br />
Recordings<br />
0 / 100<br />
Error messages may occur during recording. If<br />
you see an error message that is not listed on<br />
this page call your receiving center for further<br />
instructions.<br />
• If the time and event tally appears on the<br />
screen, this is normal and means that the<br />
<strong>Q200</strong>/<strong>HE</strong> is functioning appropriately.<br />
• If the screen is blank, this means that the<br />
<strong>Q200</strong>/<strong>HE</strong> is not working. It is possible that<br />
the battery no longer has enough power. Try<br />
putting in a fresh battery, but if this does not<br />
solve the problem, call your receiving center<br />
for further instructions.<br />
• Battery LOW: Battery power is running<br />
low. When this message first appears, you<br />
will have about 5 days of recording time left<br />
on your battery. In order to ensure that your<br />
next transmission is successful, be sure to<br />
replace the battery before you send any<br />
transmissions to the receiving center.<br />
• Battery FAILURE: Recording has<br />
stopped. Replace the battery as soon as possible.<br />
• LEAD LOOSE: This error will occur when<br />
there is a problem with the patient hook up.<br />
The problem may be with an electrode, a<br />
lead, or the cable that connects the leads to<br />
the <strong>Q200</strong>/<strong>HE</strong>. Please check all of the connectors<br />
to be sure that they are still in place.<br />
If you continue to see this error after 10 seconds,<br />
call the receiving center for further<br />
assistance.<br />
Batteries<br />
Your battery should last for the duration of<br />
your test, but if you need to change the battery,<br />
you can do so at any time and not lose any<br />
event data stored on the recorder.<br />
To replace the battery, insert a blunt object (for<br />
example, pen, coin or non-pointy tool) in the<br />
space between the battery and the top edge of<br />
the recorder. Press gently to easily remove the<br />
battery.<br />
To insert a fresh battery into the battery compartment,<br />
be sure to orient it as indicated in the<br />
diagram inside the compartment. The battery<br />
sits loosely in the compartment.<br />
Note: Do not leave batteries in the recorder<br />
for extended periods (more than two weeks)<br />
when the recorder is not in use.<br />
<strong>Q200</strong>/<strong>HE</strong> Operator’s <strong>Manual</strong> 14
Appendix A: Maintenance and Care of the <strong>Q200</strong>/<strong>HE</strong> Digital Recorder<br />
Appendix A:<br />
Maintenance and Care<br />
of the <strong>Q200</strong>/<strong>HE</strong> Digital<br />
Recorder<br />
Please follow these instructions to care for the<br />
<strong>Q200</strong>/<strong>HE</strong>:<br />
Clean the outside of the recorder with a damp<br />
soft cloth between uses; use water and a nonabrasive<br />
liquid soap, as required. DO NOT use<br />
any abrasive cleaners, such as acetone, on the<br />
outside of the recorder.<br />
Note: Always remove the battery before<br />
cleaning the recorder.<br />
Disinfect as needed, following instructions<br />
from your infection control department. Sani-<br />
Cloth germicidal surface wipes are recommended.<br />
Sterilization is not needed.<br />
Do not wrap the lead wires tightly around the<br />
recorder after each use. This can damage them.<br />
Do not pull on or stretch the lead wires when<br />
cleaning or untangling them. This can damage<br />
them.<br />
Do not clean the cable with harsh chemicals,<br />
such as acetone.<br />
Do not submerge the recorder or its cables in<br />
water.<br />
To Remove Belt Clip<br />
If you need to remove the belt clip, you will<br />
need a long flat tool like a screw driver. In<br />
order to remove the clip, one has to slightly pry<br />
up the end of the clip near the battery cover<br />
while pulling the clip out.<br />
Warranty Repairs<br />
Please contact your dealer prior to returning a<br />
recorder for repair to determine the warranty<br />
period, conditions and exclusions. If your<br />
dealer is unavailable, contact:<br />
<strong>QRS</strong> <strong>Diagnostic</strong><br />
6901 East Fish Lake Road, Suite 188<br />
Maple Grove, MN 55369 USA<br />
Toll free: (800) 465-8408<br />
Phone: 763-559-8492<br />
support@<strong>QRS</strong><strong>Diagnostic</strong>.com<br />
Prior to returning a recorder, you must obtain a<br />
return authorization (RMA) number. This<br />
RMA number must be visible on the outside of<br />
the packing carton, otherwise, <strong>QRS</strong> will refuse<br />
delivery.<br />
The <strong>Q200</strong>/<strong>HE</strong> contains no user-serviceable<br />
parts.<br />
Removing the label or opening the recorder<br />
voids the warranty.<br />
Replace the cable on a regular basis or at the<br />
first sign of damage.<br />
At the end of their useful lives, all <strong>QRS</strong> products<br />
should be disposed of following local ordinances.<br />
<strong>Q200</strong>/<strong>HE</strong> Operator’s <strong>Manual</strong> 15
Appendix B: Batteries for the <strong>Q200</strong>/<strong>HE</strong> Digital Recorder<br />
Appendix B: Batteries for<br />
the <strong>Q200</strong>/<strong>HE</strong> Digital<br />
Recorder<br />
The <strong>Q200</strong>/<strong>HE</strong> recorder uses one AA-size batteries.<br />
This requirement may be fulfilled in a<br />
number of ways. Battery types available on the<br />
market are:<br />
• Alkaline (example: Eveready Energizer<br />
E91, Duracell NM1500)<br />
• Heavy Duty<br />
• Nickel Metal Hydride (example: MAHA<br />
AA 1800 mAh, Rayovac 1600 mAh NiMH)<br />
• Nickel Cadmium (NiCd)<br />
Alkaline<br />
The alkaline is the most common type of battery.<br />
When a new, properly stored battery is<br />
used, a recording time of 30 days can be<br />
expected in event mode and 7 days in Holter.<br />
While a recording that runs for 24 hours will in<br />
theory use less than half the capacity of the battery,<br />
using a battery for two different patients’<br />
24-hour recordings is not recommended. The<br />
risk is that the "second" recording will not<br />
reach 24 hours.<br />
The primary limitation of this battery type is<br />
that there is only a limited ability to test the<br />
battery before it is used. Unfortunately, at<br />
times a defective battery will appear to initially<br />
have full capacity, but will fail well before the<br />
expected time. The probability of this type of<br />
failure is very small when the batteries are<br />
obtained from the primary suppliers.<br />
The best prevention available against defective<br />
batteries is to obtain them from suppliers who<br />
do not store them for a long time and do store<br />
them properly. There are few requirements for<br />
storage of alkaline batteries. They should be<br />
stored at "room" temperatures (50-90 F) and in<br />
a dry location. There is no advantage to storing<br />
them in a refrigerator. There is actually a significant<br />
problem with low-temperature storage.<br />
Normal refrigerators have a very high humidity<br />
inside and this can cause a much greater reduction<br />
of life that is gained by the lower temperatures.<br />
In addition, storage at a temperature<br />
below freezing will reduce battery life.<br />
Heavy Duty<br />
Batteries that are labeled "Heavy Duty" vary<br />
widely in capacity. The use of "Heavy Duty"<br />
batteries is not recommended.<br />
Nickel Metal Hydride (NiMH)<br />
This class of batteries is rechargeable and thus<br />
can be used in situations where a disposable<br />
battery is not desirable. Batteries of this type<br />
come in a range of capacities with the labeled<br />
capacity ranging from 1100 to 1800 mAh (milliamp<br />
hours). It is recommended that only batteries<br />
with a rating of at least 1500 mAh be<br />
used. Lower capacity batteries will operate the<br />
recorder for 7 days when they are new but after<br />
only a few uses may not be able to operate for<br />
the full 7 days.<br />
Charging these batteries is the most difficult<br />
part of their use. Only standard chargers that<br />
are specifically rated for use with NiMH batteries<br />
should be used such as the MAHA MH-<br />
204F or Rayovac 1-Hour charger; although<br />
medically-approved chargers can be used, they<br />
are not necessary. Older chargers designed<br />
only for NiCd (Nickel Cadmium) will overcharge<br />
this type of battery and can significantly<br />
shorten battery life. A charger that applies an<br />
excessive continuous charge can also shorten<br />
the battery life. If in doubt it is best not to leave<br />
the batteries on charge for long periods of time<br />
after the charger indicates a full charge.<br />
Unlike the older rechargeable battery types,<br />
NiMH batteries have no real "memory." Thus<br />
<strong>Q200</strong>/<strong>HE</strong> Operator’s <strong>Manual</strong> 16
Appendix B: Batteries for the <strong>Q200</strong>/<strong>HE</strong> Digital Recorder<br />
they do not need to be completely discharged<br />
or "conditioned" to insure that they will fully<br />
charge. Doing a complete discharge will reduce<br />
the total life of the battery as every time the<br />
battery is discharged below about 25% capacity,<br />
the life of the battery is shortened more<br />
than for a normal discharge cycle.<br />
Nickel Cadmium<br />
This type of battery has less capacity than the<br />
NiMH and is not recommended. Also, disposal<br />
of this battery can pose problems.<br />
Most chargers for NiMH batteries depend on a<br />
property of these batteries that causes them to<br />
heat up when they have reached full charge.<br />
This has two consequences. First, if the batteries<br />
are being charged in pairs, the first battery<br />
to be fully charged will heat up and shut down<br />
the charge cycle. This can leave one of the batteries<br />
partially charged. Thus it is best to keep<br />
pairs of batteries together so they are both discharged<br />
and charged together. Secondly, if the<br />
battery is too warm for any reason, it may shut<br />
down the charge early. For that reason the batteries<br />
should be charged at normal room temperatures<br />
and it is often best not to cover the<br />
batteries in any way during the charge. Even<br />
the charger's own cover may reduce the charge.<br />
Leave the cover open during charging.<br />
When the battery is not being charged, it will<br />
slowly discharge by itself. This type of battery<br />
will lose about one percent of its charge for<br />
each day. Most chargers will bring a partially<br />
charged battery up to full capacity in under an<br />
hour. Batteries that have not been used for over<br />
two weeks should be charged before use.<br />
If used properly, these batteries will last for<br />
300 to 1000 recordings of 7 days each. They<br />
will still not last forever. To control battery<br />
life, writing the date on the battery that the batteries<br />
are first put in service can be helpful.<br />
<strong>Q200</strong>/<strong>HE</strong> Operator’s <strong>Manual</strong> 17
Appendix C: To Adjust Settings on the <strong>Q200</strong>/<strong>HE</strong> Digital Recorder<br />
Appendix C: To Adjust<br />
Settings on the <strong>Q200</strong>/<strong>HE</strong><br />
Digital Recorder<br />
You should only adjust settings on the <strong>Q200</strong>/<br />
<strong>HE</strong> between patients. To begin, insert a battery<br />
to start the recorder.<br />
If your recorder is in Event mode, the 15-<br />
second countdown will begin when you put<br />
in a new battery. To interrupt the 15-second<br />
countdown, quickly press ENTER, down<br />
arrow, up arrow and then EVENT, in that<br />
order. You should now see the <strong>QRS</strong> screen.<br />
Press ENTER to continue to move to the<br />
main menu.<br />
If recorder is locked<br />
If the recorder is locked, you will not be able to<br />
review or update settings. See Menu Lock<br />
details on this page.<br />
To Adjust Settings<br />
To adjust the settings, use the blue arrows to<br />
move up and down between the menu items<br />
and ENTER to accept. The cursor “>” will<br />
appear next to the item that you are able to<br />
update. Press ENTER to begin updating that<br />
item, and then use the blue arrows to adjust the<br />
value. When finished adjusting a value press<br />
ENTER to save the value. To return to the previous<br />
menu, use the blue arrows to move the<br />
arrow to “Return” at the top of the menu and<br />
press ENTER.<br />
To Review Settings<br />
At any time, you can remove the battery from<br />
the recorder and re-insert. Then interrupt the<br />
15-second countdown as instructed above.<br />
You can now review settings without losing<br />
any event data.<br />
To Update Time and Date<br />
The recorder should save the correct time and<br />
date between uses, but if you ever need to<br />
update the time or the date, move the cursor to<br />
“Time and Date” and press ENTER. You can<br />
now update Hour, Minutes, Day, Month or<br />
Year by moving the cursor with the blue<br />
arrows and pressing ENTER.<br />
General Settings<br />
Contrast. Use arrows to increase or decrease<br />
contrast. You will see the update once you<br />
return to the main menu.<br />
Lead Loose.<br />
• On - Lead Loose message is enabled.<br />
• Off - Lead Loose message is disabled.<br />
Event marker. When on, the ECG will be<br />
labeled with one second of 6-cycle square<br />
wave where the event took place.<br />
Key mode.<br />
• Normal - Sound enabled and no delay;<br />
• Delayed - Patient will need to press Event<br />
and Enter buttons for several seconds in<br />
order to prevent false entries, and sounds<br />
enabled; or<br />
• Quiet - Sound disabled. No delay.<br />
Rec Type. Switch between Holter, Event and<br />
Both recording.<br />
The Both setting is for Event recording where<br />
you desire a Holter back-up file to be saved.<br />
For Both, you will need to put an SD flashcard<br />
with a flash.dat file into the recording as if you<br />
were doing a Holter recording. The Both setting<br />
will only allow for 1 or 2 channel recording,<br />
as with all Event recordings.<br />
<strong>Q200</strong>/<strong>HE</strong> Operator’s <strong>Manual</strong> 18
Appendix C: To Adjust Settings on the <strong>Q200</strong>/<strong>HE</strong> Digital Recorder<br />
Menu Lock. Menu Lock will prevent anyone<br />
from reviewing or updating any other settings.<br />
• To lock the menu, enter 217.<br />
• To unlock the menu, enter 151.<br />
Language. Select from U.S. English, International<br />
English, Danish, Finnish, German,<br />
French, Italian, Polish, Portuguese, and Spanish.<br />
Diary. When the Diary is turned On, and Post<br />
Event Seconds (see Post Event Sec. below) is<br />
set to 30 or greater, the patient will be able to<br />
select a symptom during the time of event. No<br />
options will be shown to the patient when<br />
Diary is Off.<br />
Hi Res. When turned On, the recorder will<br />
record in high resolution. High resolution<br />
mode provides enhanced R-wave reproduction<br />
for pediatric recordings.<br />
Event Settings<br />
Pre Event Sec. The number of seconds saved<br />
before the EVENT button is pressed by the<br />
patient.<br />
Post Event Sec. The number of seconds saved<br />
after the EVENT button is pressed by the<br />
patient. If this number is set to 15 seconds, the<br />
user will not be asked to select a diary entry<br />
after pressing the record button.<br />
Max Events. Limits the number of events that<br />
are saved at any one time. A total of 90 minutes<br />
can be saved on the recorder. The maximum<br />
number events may be automatically adjusted<br />
by the <strong>Q200</strong>/<strong>HE</strong> based on the number of seconds<br />
saved for each event as well as the number<br />
of channels.<br />
If a Max Events is set to 0 (zero) and all previously<br />
recorded events have been erased, the<br />
recorder will function in real-time transmissions<br />
mode. No events will be saved on the<br />
recorder. Before doing a real-time transmission,<br />
you must erase any events that are currently<br />
saved on the recorder.<br />
Channels. The recorder can record either one<br />
or two channels. If two channel recording is<br />
selected, the recorder will transmit both channels<br />
sequentially during the transmit process.<br />
A 3-lead cable is required for 2 channel recording.<br />
Send Settings.<br />
• Volume - Choose between “Normal” and<br />
“Quiet”. Quiet mode will lessen the discomfort<br />
for the patient while transmitting<br />
and will slightly improve battery life, however,<br />
Quiet mode will not work in all settings,<br />
such as distant rural locations.<br />
• Speed - Transmit at either 1, 3 or 4X<br />
speeds.<br />
Call message. Once events are recorded, you<br />
can inform the patient with either a sound or a<br />
phone number on the LCD screen:<br />
• Phone Num - Will show the entered phone<br />
number on the LCD screen after events are<br />
recorded. “Any” will show number if there<br />
is one or more events, “Full” will show<br />
number only if maximum number of events<br />
have been recorder.<br />
• Enter Phone Num - Enter the phone number<br />
that the patient should call when events<br />
recorded. Use blue arrows to update digits.<br />
Hold down ENTER button to backspace.<br />
• Reminder - Will cause the recorder to beep<br />
repeatedly after events are recorded.<br />
“Any” will beep if there is one or more<br />
events, “Full” will beep only if maximum<br />
number of events have been recorder.<br />
<strong>Q200</strong>/<strong>HE</strong> Operator’s <strong>Manual</strong> 19
Appendix C: To Adjust Settings on the <strong>Q200</strong>/<strong>HE</strong> Digital Recorder<br />
Auto Detect Settings<br />
Additional event settings for the auto detect<br />
mode are:<br />
Auto Detect. Turns all auto detect functions<br />
Off or On. Smart mode, which records on the<br />
“best” events for a given time period, can also<br />
be turned on here. See explanation of “Separation”<br />
below for more information on Smart<br />
mode.<br />
About<br />
To view the Serial No, the customer code (cc),<br />
the Version number of the software on the<br />
recorder, the build number for that software,<br />
and the number of times the recorder has been<br />
used in Holter mode.<br />
AF Detect. Turns Atrial Fibrillation detection<br />
Off or On.<br />
Brady Limit. If a heart rate on or below this<br />
number is detected, an event will be recorded.<br />
A range of 20 - 100 BPM is allowed.<br />
Tachy Limit. If a heart rate on or above this<br />
number is detected, an event will be recorded.<br />
A range of 50 - 300 BPM is allowed.<br />
Pause Limit. If no heart beat is detected for at<br />
least the pause length in seconds, an event will<br />
be recorded. A range of 1.0 to 10.0 seconds is<br />
allowed.<br />
Separation. Limits the number of events<br />
stored for the separation time period to one for<br />
each type. A range of 2 - 20 minutes is allowed.<br />
In smart mode, the <strong>Q200</strong> will save the best<br />
event for each event type for the entered time<br />
period. For example, if more than one tachy<br />
event is sensed during the time period, the<br />
event with the highest heart rate will be saved.<br />
If smart mode is turned off and auto detect is<br />
on, only the first event for each type will be<br />
saved within the separation time period. When<br />
the recording is running in Smart mode, you<br />
may see that the number of events saved on the<br />
SD card is greater than what is saved to the<br />
desktop, and this is appropriate.<br />
<strong>Q200</strong>/<strong>HE</strong> Operator’s <strong>Manual</strong> 20
Appendix D: Error Messages and troubleshooting<br />
Appendix D: Error<br />
Messages and<br />
troubleshooting<br />
If you see the time-of -day on the <strong>Q200</strong>/<strong>HE</strong><br />
screen, the recorder is recording.<br />
Note: If the LCD screen is completely blank,<br />
this means that the <strong>Q200</strong>/<strong>HE</strong> is not recording.<br />
An error message will appear when there is a<br />
problem with the recorder. The <strong>Q200</strong>/<strong>HE</strong> may<br />
display the following error messages:<br />
Battery LOW: Battery is running low. When<br />
this message first appears, you will have about<br />
5 days of recording time left on your battery.<br />
Battery FAILURE: Recording has stopped.<br />
Card Erase ERROR: An error was found<br />
while attempting to erase the SD Card. This<br />
usually means a defective card.<br />
LEAD LOOSE: This error will occur when<br />
there is a problem with the patient hook up.<br />
The problem may be with an electrode, a lead<br />
or the cable that connects the leads to the Tela-heart.<br />
The LEAD LOOSE message will<br />
remain on the screen for about 10 seconds after<br />
the problem has been corrected. This error<br />
message can be turned off in General Settings.<br />
SD Setup Failure: Failure during write of<br />
patient ID to SD Card. You will need to re-initialize<br />
your card using the LX software.<br />
SD Card Incorrectly erased: There may be<br />
disallowed files on the SD Card. Remove SD<br />
Card from recorder and use card reader and<br />
Explorer to identify and delete these files. The<br />
only file allowed is flash.dat.<br />
Short recording: There are some SD Card<br />
types that may draw excessive power, and will<br />
therefore drain the battery prematurely, resulting<br />
in a short recording. If you purchase cards<br />
from a supplier other than <strong>QRS</strong>, it is recommended<br />
that you first test the SD card for a<br />
greater amount of time than the expected use.<br />
Unable to write SD: An error was found while<br />
attempting to write to the SD Card. This message<br />
occurs when the card is full. Sometimes<br />
this message will appear when a card is defective.<br />
Write Timeout error: This usually means a<br />
defective card.<br />
Missing SD Card - There is no SD Card in the<br />
device. A card is required for Holter recording.<br />
SD Access: Unable to read the SD Card. This<br />
usually means a defective card.<br />
SD Card is write locked: Write Lock tab is set<br />
on the SD Card. Unlock Write Lock tab and try<br />
again.<br />
<strong>Q200</strong>/<strong>HE</strong> Operator’s <strong>Manual</strong> 21
Appendix E: Pacemaker Detection with the <strong>Q200</strong>/<strong>HE</strong> Digital Recorder<br />
Appendix E:<br />
Pacemaker Detection<br />
with the <strong>Q200</strong>/<strong>HE</strong><br />
Digital Recorder<br />
The <strong>Q200</strong>/<strong>HE</strong> recorders have a built-in pacemaker<br />
detection capability. This was designed<br />
to overcome some of the problem inherent with<br />
the analysis of Holter recordings from patients<br />
with pacemakers.<br />
A pacemaker is designed to initiate cardiac<br />
conduction by stimulating a spot on the myocardium<br />
with a pulse of 1-4 volts and a duration<br />
of typically 250 to 2,000 microseconds.<br />
When this pulse is seen at the surface recording<br />
electrodes it is significantly attenuated. For<br />
patients with a unipolar electrode configuration,<br />
the signal at the surface may range from<br />
under 50 to over 200 millivolts. When a bipolar<br />
lead configuration is used, the signal is typically<br />
much lower and is in the range of 3 to 50<br />
millivolts. Especially with the bipolar leads,<br />
the signal size is dependent on the positions of<br />
the pacemaker lead and the surface electrodes.<br />
The amplitude of the signal being referred to<br />
here is not the size of the "spike" commonly<br />
seen on an ECG cart or bedside monitor. Since<br />
the duration of the pulse is short compared to a<br />
<strong>QRS</strong> complex, normal ECG recorders will<br />
greatly attenuate the signal; in some cases it<br />
cannot be seen at all. Also, some ECG recorders<br />
have devices which enhance the pace pulse<br />
to insure that it will be displayed. Only very<br />
wide bandwidth recorders as are sometimes<br />
used in an electro-physiology study will show<br />
the unmodified full amplitude of the pulse.<br />
of the pulse is then digitally stored along with<br />
the Holter ECG data. When the data is analyzed,<br />
the pacemaker pulse is displayed and<br />
used for the analysis.<br />
At recording time, it is desirable to have the<br />
recorder be as sensitive to the pacemaker pulse<br />
as possible so pulses will not be missed. A conflicting<br />
requirement is that there should be as<br />
few false pacemaker detections as possible.<br />
False pacemaker detections are primarily<br />
caused by electrical events. Any external electrical<br />
signal that is coupled to the patient electrodes<br />
which looks like a pacemaker pulse will<br />
of necessity be stored by the recorder. The<br />
most common form of electrical signal that can<br />
look like a pacemaker signal is an electrostatic<br />
discharge (ESD) or "spark." These happen very<br />
frequently in dry weather but also occur, at a<br />
lower rate, under humid conditions.<br />
Fortunately most ESD spikes as seen at the<br />
patient electrodes are of shorter duration or of<br />
lower amplitude than the real pacemaker<br />
pulses. While there is no absolute limit to the<br />
size or duration of the ESD pulses, the recorder<br />
ignores all pulses that are less than 150 microseconds<br />
long or are less than two millivolts in<br />
size.<br />
As pacemakers are normally programmed to a<br />
pulse width greater than 200 microseconds, this<br />
does not cause a loss of detection. The requirement<br />
that the pacemaker pulse be at least two<br />
millivolts in size is not a common problem.<br />
The <strong>Q200</strong>/<strong>HE</strong> recorder has the wide bandwidth<br />
ECG amplifiers necessary to pass the pacemaker<br />
pulse. Since the pulse would still be too<br />
short to be recorded in a reliable manner at any<br />
practical sampling rate for Holter recording,<br />
the pulse is detected by the recorder. The time<br />
<strong>Q200</strong>/<strong>HE</strong> Operator’s <strong>Manual</strong> 22
Appendix F: EMC Information<br />
Attention should be paid to the following EMC information prior to installing or using the <strong>QRS</strong> <strong>Q200</strong>/<strong>HE</strong> Digital<br />
Recorder device.<br />
• Portable and mobile Radio Frequency (RF) communication equipment may interfere with the operation of<br />
the <strong>QRS</strong> <strong>Q200</strong>/<strong>HE</strong> Digital Recorder device.<br />
• The <strong>QRS</strong> <strong>Q200</strong>/<strong>HE</strong> Digital Recorder device has been tested and found to comply with IEC/EN 60601-1-2.<br />
• Computers, cables and accessories not tested to 60601-1-2 may result in increased emissions or decreased<br />
immunity of the <strong>QRS</strong> <strong>Q200</strong>/<strong>HE</strong> Digital Recorder device.<br />
• Verify normal operation if utilizing the <strong>QRS</strong><strong>Q200</strong>/<strong>HE</strong> Digital Recorder device adjacent to or stacked with<br />
other electrical equipment.<br />
Guidance and manufacturer’s declaration – electromagnetic emissions<br />
The <strong>QRS</strong> <strong>Q200</strong>/<strong>HE</strong> Digital Recorder is intended for use in the electromagnetic environment specified<br />
below. The customer or user of the <strong>QRS</strong> <strong>Q200</strong>/<strong>HE</strong> Digital Recorder should ensure that it is used in such<br />
an environment.<br />
Emissions Test Compliance Electromagnetic environment –<br />
guidance<br />
RF emissions CISPR 11 Group 1<br />
<strong>QRS</strong> <strong>Q200</strong>/<strong>HE</strong> Digital Recorder<br />
uses RF energy only for its<br />
internal function. Therefore, its<br />
RF emissions are not likely to<br />
cause any in nearby electronic<br />
equipment.<br />
RF emissions CISPR 11<br />
Harmonic emissions<br />
IEC 61000-3-2<br />
Voltage Fluctuations/flicker<br />
emissions IEC 61000-3-3<br />
Class B<br />
Not applicable<br />
Not applicable<br />
<strong>QRS</strong> <strong>Q200</strong>/<strong>HE</strong> Digital Recorder<br />
is suitable for use in all establishments<br />
other than domestic and<br />
those directly connected to the<br />
public low-voltage power supply<br />
network that supplies buildings<br />
used for domestic purposes.<br />
<strong>Q200</strong>/<strong>HE</strong> Operator’s <strong>Manual</strong> 23
Appendix F: EMC Information<br />
Guidance and manufacturer’s declaration – electromagnetic immunity<br />
The <strong>QRS</strong> <strong>Q200</strong>/<strong>HE</strong> Digital Recorder is intended for use in the electromagnetic environment specified<br />
below. The customer or user of the <strong>QRS</strong> <strong>Q200</strong>/<strong>HE</strong> Digital Recorder should ensure that it is used in such<br />
an environment.<br />
Immunity test IEC 60601 test level Compliance level Electromagnetic<br />
environment – guidance<br />
Electrostatic discharge<br />
(ESD) IEC 61000-4-2<br />
Electrical fast transient/<br />
burst<br />
IEC 61000-4-4<br />
Surge<br />
IEC 61000-4-5<br />
Voltage dips, short<br />
interruptions and voltage<br />
variations on power supply<br />
input lines<br />
IEC 61000-4-11<br />
± 6kV contact<br />
± 8kV air<br />
± 2 kV for power<br />
supply lines<br />
± 1 kV for input/<br />
output lines<br />
± 1 kV line(s) to<br />
line(s)<br />
± 2 kV line(s) to earth<br />
< 5 % U T<br />
(>95 % dip in U T )<br />
For 0,5 cycle<br />
40% U T<br />
(60% dip in U T )<br />
For 5 cycles<br />
± 6kV contact<br />
± 8kV air<br />
Not applicable.<br />
No cables exceed 3<br />
meters<br />
Not applicable.<br />
<strong>QRS</strong> <strong>Q200</strong>/<strong>HE</strong> Digital<br />
Recorder is battery<br />
powered.<br />
Not applicable.<br />
<strong>QRS</strong> <strong>Q200</strong>/<strong>HE</strong> Digital<br />
Recorder is battery<br />
powered.<br />
Floors should be wood,<br />
concrete or ceramic tile. If<br />
floors are covered with<br />
synthetic material, the<br />
relative humidity<br />
Mains power quality<br />
should be that of a typical<br />
commercial or hospital<br />
environment.<br />
N/A<br />
N/A<br />
70 % U T<br />
(30% dip in U T )<br />
for 25 cycles<br />
< 5% U T<br />
(>95 % dip in U T )<br />
for 5 s<br />
Power frequency (50/60 3 A/m 3 A/m Power frequency<br />
Hz) magnetic field<br />
magnetic fields should be<br />
IEC 61000-4-8<br />
at levels characteristic of a<br />
typical location in a typical<br />
commercial or hospital<br />
environment.<br />
NOTE U T is the a.c. mains voltage prior to application of the test level.<br />
<strong>Q200</strong>/<strong>HE</strong> Operator’s <strong>Manual</strong> 24
Appendix F: EMC Information<br />
Guidance and manufacturer’s declaration – electromagnetic immunity<br />
The <strong>QRS</strong> <strong>Q200</strong>/<strong>HE</strong> Digital Recorder is intended for use in the electromagnetic environment specified<br />
below. The customer or user of the <strong>QRS</strong> <strong>Q200</strong>/<strong>HE</strong> Digital Recorder should ensure that it is used in such an<br />
environment.<br />
Immunity test<br />
IEC 60601 test<br />
level<br />
Compliance<br />
level<br />
Electromagnetic environment – guidance<br />
Portable and mobile communications equipment<br />
should be used no closer to any part of the <strong>QRS</strong><br />
<strong>Q200</strong>/<strong>HE</strong> Digital Recorder, including cables, than<br />
the recommended separation distance calculated<br />
from the equation applicable to the frequency of<br />
the transmitter.<br />
Conducted RF<br />
IEC 61000-4-6<br />
3 Vrms<br />
150 kHz to 80 MHz<br />
3 V<br />
Recommended separation distance<br />
d = 1.2 P<br />
d = 1.2 P<br />
80 MHz to 800 MHz<br />
Radiated RF<br />
IEC 61000-4-3<br />
3 V/m<br />
80 MHz to 2,5 GHz<br />
3 V/m<br />
d = 2.3 P 800 MHz to 2.5 GHz<br />
Where P is the maximum output power rating of<br />
the transmitter in watts (W) according to the<br />
transmitter manufacturer and d is the<br />
recommended separation distance in metres (m).<br />
Field strengths from fixed RF transmitters, as<br />
determined by an electromagnetic site survey, a<br />
should be less than the compliance level in each<br />
frequency range. b<br />
Interference may occur in the vicinity of<br />
equipment marked with the following symbol:<br />
NOTE 1 At 80 MHz and 800 MHz, the higher frequency range applies<br />
NOTE 2 These guidelines may not apply in all situations. Electromagnetic propagation is affected by<br />
absorption and reflection from structures, objects and people.<br />
a Field strengths from fixed transmitters, such as base stations for radio (cellular/cordless)<br />
telephones and land mobile radios, amateur radio, AM and FM radio broadcast cannot be<br />
predicted theoretically with accuracy. To assess the electromagnetic environment due to fixed RF<br />
transmitters, an electromagnetic site survey should be considered. If the measured field strength<br />
in the location in which the <strong>QRS</strong> <strong>Q200</strong>/<strong>HE</strong> Digital Recorder is used exceeds the applicable RF<br />
compliance level above, the <strong>QRS</strong> <strong>Q200</strong>/<strong>HE</strong> Digital Recorder should be observed to verify normal<br />
operation. If abnormal performance is observed, additional measures may be necessary, such as<br />
re-orienting or relocation the <strong>QRS</strong> <strong>Q200</strong>/<strong>HE</strong> Digital Recorder<br />
b Over frequency range 150 KHz to 80 MHz, field strengths should be less than 3 V/m.<br />
<strong>Q200</strong>/<strong>HE</strong> Operator’s <strong>Manual</strong> 25
Appendix F: EMC Information<br />
Recommended separation distances between portable and mobile RF communications equipment<br />
and the <strong>QRS</strong> <strong>Q200</strong>/<strong>HE</strong> Digital Recorder<br />
The <strong>QRS</strong> <strong>Q200</strong>/<strong>HE</strong> Digital Recorder is intended for use in the electromagnetic environment in which<br />
radiated RF disturbances are controlled. The customer of the user of the <strong>QRS</strong> <strong>Q200</strong>/<strong>HE</strong> Digital Recorder<br />
can help prevent electromagnetic interference by maintaining a minimum distance between portable and<br />
mobile RF communications equipment (transmitters) and the <strong>QRS</strong> <strong>Q200</strong>/<strong>HE</strong> Digital Recorder as<br />
recommended below, according to the maximum output power of the communications equipment.<br />
Rated<br />
maximum<br />
output power of<br />
transmitter<br />
W<br />
150 KHz to 80 MHz<br />
d = 1.2 P<br />
Separation distance according to frequency of transmitter<br />
m<br />
80 MHz to 800 MHz<br />
d = 1.2 P<br />
800 MHz to 2.5 GHz<br />
d = 2.3 P<br />
0.01 0.12 0.12 0.23<br />
0.1 0.38 0.38 0.73<br />
1 1.2 1.2 2.3<br />
10 3.8 3.8 7.3<br />
100 12 12 23<br />
For transmitters rated at a maximum output power not listed above, the recommended separation distance<br />
d in metres (m) can be estimated using the equation to the frequency of the transmitter, where P is the<br />
maximum output power rating of the transmitter in watts (W) according to the transmitter manufacturer.<br />
NOTE 1<br />
NOTE 2<br />
At 80 MHz and 800 MHz, the separation distance for the higher frequency range applies.<br />
These guidelines may not apply in all situations. Electromagnetic propagation is affected by<br />
absorption and reflection from structures, objects and people.<br />
<strong>Q200</strong>/<strong>HE</strong> Operator’s <strong>Manual</strong> 26
Appendix G: <strong>Q200</strong>/<strong>HE</strong> Accessories<br />
Appendix G: <strong>Q200</strong>/<br />
<strong>HE</strong> Accessories<br />
702005-00 - 5-Lead Patient Cable, Adult<br />
702002-00 - 2-Lead Patient Cable (Event only)<br />
170003-00 - Battery Door<br />
180000-00 - Belt Clip<br />
170001-00 - Recorder Pouch and Straps<br />
190000-00 - Memory - SD Card<br />
180005-00 - Replacement Shoulder Strap<br />
180006-00 - Replacement Waist Strap<br />
170004-00 - Recorder Pouch (no straps)<br />
<strong>Q200</strong>/<strong>HE</strong> Operator’s <strong>Manual</strong> 27