WORKSHOP MANUAL - lombardini service
WORKSHOP MANUAL - lombardini service
WORKSHOP MANUAL - lombardini service

Create successful ePaper yourself
Turn your PDF publications into a flip-book with our unique Google optimized e-Paper software.
Disassembly / Reassembly<br />
4<br />
Vacuum pump and vacuum pump flange<br />
1<br />
Unscrew the three fastening screws 1 that fix the vacuum pump to<br />
the flange and remove the vacuum pump.<br />
Unscrew the fastening screws that fix the flange to the engine<br />
crankcase and remove it.<br />
1<br />
7<br />
Components:<br />
8<br />
7<br />
2<br />
1. Vacuum pump<br />
2. Clic clamp 86-50<br />
3. Vacuum pump flange<br />
4. Vacuum pump gasket-<br />
5. O-ring<br />
6. Three-way union for vacuum pump<br />
7. Vacuum pump pipe<br />
8. Screw<br />
6<br />
1 4 3 5<br />
When reassembling, tighten the screws 8 that fix the flange to the<br />
cylinder head to the specified torque of 10 Nm.<br />
8<br />
Exhaust manifold - engines with EGR<br />
2<br />
1<br />
Remove the E.G.R. pipe 1.<br />
Unscrew the locking nuts 2 and remove the exhaust manifold and<br />
the seal.<br />
Note: When reassembling the exhaust manifold, check that the<br />
inside is properly clean and free from cracks or breaks.<br />
Note: Replace the gasket each time the manifold is reassembled.<br />
Tighten the nuts at the prescribed torque of 25 Nm.<br />
9<br />
Alternator/Cooling fan belt drive<br />
1<br />
Danger - Attention<br />
Check the belt tension only with the engine off.<br />
Tension adjustment.<br />
Loosen screws 1 and 2.<br />
Adjust the belt tension so that a 100N force at the midpoint of the<br />
belt center (as shown) results in a 10-15mm deflection.<br />
2<br />
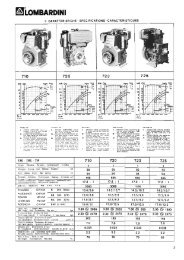
See page 18 for periodic maintenance details.<br />
10a<br />
10b<br />
FOCS Workshop Manual_cod. 1.5302.858_1° ed_ rev. 00<br />
- 25 -