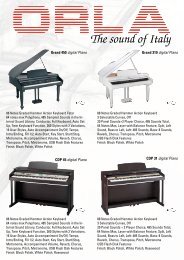
DP 300 - Con Farfisa il MADE IN ITALY vince
DP 300 - Con Farfisa il MADE IN ITALY vince
DP 300 - Con Farfisa il MADE IN ITALY vince

Create successful ePaper yourself
Turn your PDF publications into a flip-book with our unique Google optimized e-Paper software.
ITALIANO<br />
<strong>DP</strong> <strong>300</strong><br />
USER’S MANUAL<br />
1
Table of <strong>Con</strong>tents<br />
1. TECHNICAL FEATURES.............................................4<br />
2. PACK<strong>IN</strong>G CONTENT................................................4<br />
3. ACCESSORY UPON REQUEST..................................5<br />
4. MUSIC STAND.........................................................5<br />
5. WARN<strong>IN</strong>GS............................................................6<br />
6. POWER SUPPLY......................................................7<br />
7. SOCKETS................................................................8<br />
8. THE SUSTA<strong>IN</strong> PEDAL................................................8<br />
9. CONTROL PANEL....................................................9<br />
10. USE <strong>IN</strong>STRUCTIONS...............................................10<br />
SWITCH ON/OFF.................................................10<br />
GENERAL VOLUME...............................................10<br />
DEMONSTRATIVE SONGS (DEMO) .......................10<br />
SOUNDS..............................................................10<br />
DIVISION OF THE KEYBOARD (SPLIT).....................10<br />
COMB<strong>IN</strong>ATION OF TWO SOUNDS (DUAL)............12<br />
TRANSPOSITION OF THE NOTES (TRANSPOSER).....12<br />
THE EFFECTS ........................................................13<br />
REVERBERATION.................................................................. 13<br />
CHORUS ..............................................................................13<br />
DYNAMIC OR TOUCH-SENSITIVITY.......................13<br />
METRONOME.......................................................13<br />
HOW TO ADJUST THE SPEED OF THE METRONOME............ 13<br />
HOW TO SET THE DIVISIONS OF THE METRONOME............ 14<br />
HOW TO SET THE VOLUME OF THE METRONOME............... 14<br />
THE RECORDER (SEQUENCER)..............................14<br />
HOW TO RECORD THE 1st TRACK........................................ 14<br />
HOW TO RECORD THE 2st TRACK........................................ 14<br />
HOW TO RECORD ANOTHER TWO SONGS........................ 15<br />
THE PROGRAMMES ............................................15<br />
HOW TO RECALL A PROGRAM............................................ 15<br />
HOW TO SAVE A PROGRAM............................................... 15<br />
SPECIAL FUNCTIONS (SET)....................................16<br />
SELECTION OF THE 3 SONGS OF THE SEQUENCER............. 16<br />
SELECTION OF THE FUNCTIONS.......................................... 16<br />
MOV<strong>IN</strong>G OF THE OCTAVE OF THE LOWER SOUND......................16<br />
ASSIGN<strong>IN</strong>G OF PEDAL..................................................................16<br />
TUN<strong>IN</strong>G RANGE...........................................................................16<br />
SELECTION OF MIDI SETT<strong>IN</strong>GS............................................. 16<br />
TRANSMIT CHANNEL....................................................................16<br />
(LOCAL CONTROL ON/OFF..........................................................16<br />
PROGRAM CHANGE ON/OFF......................................................16<br />
11. CONNECTION TO A COMPUTER............................17<br />
M<strong>IN</strong>IMUM SYSTEM REQUISITES............................................ 17<br />
PROCEDURE FOR COMPUTER CONNECTION....................... 17<br />
FREE MUSICAL SOFTWARE DOWNLOADABLE FROM <strong>IN</strong>TERNET...... 17<br />
12. MIDI CONNECTION...............................................18<br />
WHAT IS MIDI...................................................................... 18<br />
13. CONNECTION TO AN EXTERNAL AMPLIFIER..................18<br />
14. PROBLEM SOLV<strong>IN</strong>G...............................................19<br />
15. TABLE OF SOUNDS AND RELATIVE PROGRAM CHANGE....19<br />
16. MIDI IMPLEMENTATION CHART.............................20<br />
ITALIANO<br />
WELCOME,<br />
Thank you and congratulations for having chosen this Digital Piano. For its correct use, please read this guide before<br />
use and keep the manual for future consultation.<br />
Instrument identification<br />
For any communication, always quote the model (<strong>DP</strong> <strong>300</strong>) reported at the bottom<br />
of the instrument.<br />
MODEL <strong>DP</strong> <strong>300</strong><br />
RAT<strong>IN</strong>G 13.5V 25W<br />
SER. N°. H425 0160<br />
3
1.Technical features<br />
KEYBOARD:<br />
TOUCH:<br />
POLYPHONY:<br />
DISPLAY:<br />
BASIC SOUNDS:<br />
MIXED SOUNDS:<br />
TRANSPOSER:<br />
TUN<strong>IN</strong>G RANGE:<br />
EFFECTS:<br />
METRONOME:<br />
PROGRAMMES:<br />
SEQUENCER:<br />
88 keys with “hammer action”<br />
immediate exclusion and restoration<br />
of touch-sensitivity (Dynamic) on 4<br />
levels<br />
64 notes at most<br />
3 digits<br />
21 polyphonic tones<br />
mix of two sounds<br />
shifting of +/– 12 semitones<br />
A3 (from 427Hz to 453Hz step 0.5Hz)<br />
CHORUS, 3 editable REVERBER<br />
immediate control with 6 signatures:<br />
1/4, 2/4, 3/4, 4/4, 6/8 and 12/8<br />
and volume adjustment<br />
7 programmes for the configuration of<br />
the keyboard<br />
REC and PLAY to record and listen.<br />
Memorising of 3 songs or Song with<br />
2 tracks each. The recording data<br />
permanently remains in the memory.<br />
DEMO:<br />
AMPLIFICATION:<br />
AC/DC ADAPTER:<br />
7 Demonstrative songs<br />
Stereo 15 + 15 watt (RMS) - Two<br />
high-efficiency Ø 100 mm loud<br />
speakers - Sound system: Bass Reflex<br />
Input Vdc= 13,5 V / I = 3,25 A<br />
(central positive – 6.3 and 3 mm)<br />
13.5 V DC <strong>IN</strong>PUT: Socket for connecting mains adapter<br />
L<strong>IN</strong>E OUT RIGHT<br />
AND LEFT/STEREO:<br />
PEDAL:<br />
USB TO HOST:<br />
MIDI OUT:<br />
PHONES:<br />
DIMENSIONI:<br />
PESO:<br />
Sockets for connection to external<br />
amplifier<br />
Socket for “sustain” pedal<br />
<strong>Con</strong>nection to a computer for data<br />
reception and transmission.<br />
Socket to transmit MIDI data to other<br />
instruments.<br />
2 Sockets for STEREO headphones<br />
1312 x 390 x 143 mm<br />
18,5 Kg<br />
BONTEMPI S.p.A. reserves the right to amend, without prior notice, the product features<br />
2.Packing content<br />
Digital piano<br />
User’s Manual<br />
Adapter ADS 1332<br />
Sustain pedal<br />
Music stand<br />
4
3.Accessory upon request<br />
ITALIANO<br />
CN 230: <strong>Con</strong>sole<br />
4.Music stand<br />
Insert the music stand in the appropriate holes.<br />
5
5.Warnings<br />
When using electric products, it is necessary to follow certain basic precautions, including:<br />
1. Carefully read the manual before using the instrument.<br />
2. The presence of an adult is required when the instrument is used by ch<strong>il</strong>dren.<br />
3. Do not use the instrument near water like, for example, near a washbasin, a swimming pool, on a wet surface, etc.<br />
4. The instrument is able to generate such sound level to cause permanent damaged to hearing. Do not use for long periods<br />
with high volume.<br />
If you notice a hearing loss immediately consult a doctor.<br />
5. The instrument must be displaced in order to allow its adequate vent<strong>il</strong>ation.<br />
6. The instrument must be displaced away from heat sources like radiators, stoves, solar ray, etc.<br />
7. Do not obstruct the air inlets of the power supplier with objects like curtains, clothes, etc.<br />
8. Do not place objects with naked flames on the keyboard like for example ignited candles.<br />
9. Ensure objects or liquids do not fall inside the cabinet.<br />
10. Ensure there is sufficient vent<strong>il</strong>ation to the adapter: the vent<strong>il</strong>ation slots must not be covered with objects like newspapers, table<br />
cloths, curtains, etc...<br />
11. The instrument must be taken to an after-sales assistance centre if:<br />
a) It has been exposed to rain.<br />
b) It does not seem to work normally or shows an evident decrease in performance.<br />
c) It has fallen or the cabinet is damaged.<br />
d) Objects or liquid has fallen inside.<br />
e) The adapter AC/DC socket is damaged.<br />
12. Do not attempt to repair the instrument yourself; all operations must be carried out by authorised staff penalty the voiding of<br />
the warranty rules.<br />
13. Do not clean using alcohol, solvents or sim<strong>il</strong>ar chemical substances. Clean the instrument using a soft cloth dampened in a<br />
m<strong>il</strong>d solution of water and neutral detergent. Soak the cloth in the solution and wring out unt<strong>il</strong> almost dry.<br />
ADAPTER WARN<strong>IN</strong>GS<br />
1. When connecting the plug to the mains ensure:<br />
a) not to have wet hands (danger of electric shock);<br />
b) not to pull it from the cable, but from the same plug.<br />
2. The instrument must be connected to the mains only using the AC/DC adapter envisioned by the manufacturer. Alternatively,<br />
another AC/DC adapter can be used, as long as it has the same nominal values of those of the adapter supplied with<br />
the equipment, with the same or better features. The identification and power supply data are on the bottom of the same<br />
product.<br />
3. When the instrument is not used for long periods, the AC/DC adapter must be disconnected from the mains.<br />
4. The AC/DC adapter must be directly connected to the mains: do not interpose other plugs.<br />
5. Do not expose the adapter to drops or squirts of water.<br />
6. Do not position the adapter behind furniture or in hidden positions.<br />
6
6.Power supply<br />
The power supply is supplied by the provided AC/DC ADS 1332 adapter (V = 13.5Vdc / I = 3.25 A)<br />
central positive.<br />
Such equipment is compliance with the national and international Standards on electrical safety.<br />
Insert the jack in the DC 13,5V socket. Alternatively, another AC/DC adapter can be used, as long as it has the same nominal<br />
values of those of the adapter supplied with the equipment, with the same or better features.<br />
RECOMMENDATION: The network socket must be eas<strong>il</strong>y accessible to be able to connect the adapter’s plug.<br />
ATTENTION: Every adapter, even if equipped with safety insulation, must be regularly examined to avoid possible risks due to<br />
damages to the cable, to the plug, to the casing or to other parts. In case of faults, only contact qualified staff.<br />
ITALIANO<br />
WASTE DISPOSAL STANDARDS<br />
For information regarding the disposal of the items mentioned here below, please refer to Counc<strong>il</strong> Administration office regarding<br />
specialised waste collection centres.<br />
1 - PACKAG<strong>IN</strong>G DISPOSAL<br />
Take the paper, cardboard and corrugated board to the appropriate waste collection centres. Plastic material must be placed in<br />
the relevant collection containers.<br />
The symbols indicating the various types of plastic are:<br />
01<br />
PET<br />
02<br />
PE<br />
03<br />
PVC<br />
Key for the different types of plastic materials:<br />
PET = Polyethylene terephtalate • PE= Polyethylene, code 02 for PE-HD, 04 for PE-LD • PVC =Polyvinyl chloride • PP= Polypropylene<br />
• PS= Polystyrene, Polystyrene foam • O= Other polymers (ABS, Laminates, etc.)<br />
2 - WASTE DISPOSAL OF USED ELECTRICAL AND ELECTRONIC APPLIANCES<br />
All articles displaying this symbol on the body, packaging or instruction manual of same, must not be thrown away into<br />
normal disposal bins but brought to specialised waste disposal centres. Here, the various materials w<strong>il</strong>l be divided by<br />
characteristics and recycled, thus making an important contribution to environmental protection.<br />
05<br />
PP<br />
06<br />
PS<br />
07<br />
O<br />
7
7.Sockets<br />
POWER - To switch the instrument on and off.<br />
<strong>IN</strong>PUT DC 13.5 V - Allows powering the instrument by means of an AC/DC adapter.<br />
L<strong>IN</strong>E OUT (LEFT/STEREO - RIGHT) - Mono audio output of the left and right channels for connection to an external amplification.<br />
The LEFT/STEREO output, by inserting a STEREO connector, allows detecting both LEFT and RIGHT signals.<br />
PEDAL - Socket for sustain pedal.<br />
USB - Socket for connecting the digital piano to a computer using a USB cable (not included).<br />
MIDI OUT - Socket for connecting the digital piano, using an appropriate cable (not included), to a MIDI unit and transmit data.<br />
PHONES - There are 2 sockets present for headphones placed on the left front side of the instrument. The upper excludes the<br />
internal amplifier upon insertion of the headphone’s jack, whereas the lower one does not. We recommend using headphones<br />
with 16-32 Ohm impedance<br />
8.The Sustain Pedal<br />
A normally-open pedal switch can be connected to the PEDAL socket.<br />
It is used to lengthen the sound of the notes.<br />
8
9.<strong>Con</strong>trol panel<br />
1 2 3 4 5 6 7 8 9 10 11 12 13 14<br />
15 16<br />
ITALIANO<br />
1. VOLUME for the adjustment of the general<br />
volume<br />
2. SEQUENCER A/B to select the A and/or B track of the<br />
Sequencer (recorder)<br />
2. SEQUENCER REC to record what is playing<br />
2. SEQUENCER PLAY to listen to the recording<br />
3. DEMO to listen to the demonstrative songs<br />
4. PROGRAMS LOAD to select the programmes<br />
4. PROGRAMS SAVE to save the programmes<br />
5. TOUCH to deactivate or re-activate the touchsensitivity<br />
of the keyboard (dynamic)<br />
6. REVERB to select the effects of the Reverb<br />
7. CHORUS to activate or deactivate the Chorus<br />
effect<br />
8. METRONOME to activate or deactivate the time<br />
tapped by the Metronome<br />
9. FUNCTIONS / to select or set the various parameters<br />
10. DISPLAY to display the selection of sounds,<br />
volumes and functions<br />
11. FUNCTIONS SET to select the special functions<br />
12. TRANSPOSER to activate or deactivate the<br />
Transposer<br />
13. BANK SELECT to select the banks of the sounds<br />
14. SOUNDS to select sounds<br />
15. LAYER to set the sound, the bank and the<br />
volume<br />
16. SPLIT to divide the keyboard between UPPER<br />
(right part) and LOWER (left part)<br />
9
10.Use instructions<br />
Switch on/off<br />
The instrument is switched on by moving the switch to “ I “ and<br />
is switched off by moving it to “ O “.<br />
The switch is on the back of the instrument.<br />
The 3 digit display indicates<br />
METRONOME.<br />
which is the speed of the<br />
The switched on warning light on the 1st row of the SOUNDS<br />
section and switched on button 1, indicate that the GRAND<br />
PIANO sound is active.<br />
Master volume<br />
To adjust the general volume, act on the VOLUME control.<br />
Demonstrative songs (Demosongs)<br />
To select the demonstrative songs, press the DEMO control and<br />
then press one of the 7 flashing buttons from the SOUNDS<br />
section.<br />
To interrupt the execution, press DEMO again.<br />
Sounds<br />
There are 21 sounds contained in the instrument.<br />
To select a sound, press a key from 1 to 7 from the SOUNDS<br />
section and choose one of the 3 banks using the BANK SELECT<br />
button.<br />
The active sound is identified by the corresponding of the<br />
line of BANK SELECT (LED light on) with the 1 to 7 column of<br />
SOUNDS (LED light on). Shown in the example figure at the<br />
side, the active sound is PUFF ORGAN.<br />
To select other sounds from the same fam<strong>il</strong>y, repeatedly press<br />
the BANK SELECT button.<br />
Division of the keyboard - Split<br />
By dividing the keyboard, it is possible to set a sound in the<br />
right part and another one in the left part of the keyboard.<br />
The SPLIT control divides the keyboard in two parts, the right<br />
one Upper and the left one Lower.<br />
10
Use instructions<br />
Press the SPLIT button; LED light on.<br />
The division point upon switch-on is G3 (Sol3).<br />
The Split or division point of the keyboard can be amended<br />
as follows:<br />
keep the SPLIT button pressed and, simultaneously, press a<br />
key on the keyboard. The pressed key becomes the lowest<br />
note for the Upper sound.<br />
The number shown by the display indicates the midi code of<br />
the pressed key.<br />
To return to the “joint” keyboard mode, press SPLIT, the LED light switches off.<br />
ITALIANO<br />
L O W E R<br />
U P P E R<br />
SPLIT PO<strong>IN</strong>T UPON SWITCH-ON OF THE PIANO<br />
The LAYER control allows changing the sound, bank and the volume for the Upper and Lower sounds:<br />
• Press the LAYER button once;<br />
the display temporar<strong>il</strong>y shows “ ” :<br />
“ “ stands for Upper meaning the sound on the<br />
right part, and “ ” is the volume of the Upper<br />
sound that can vary from 7 to 99.<br />
• Press one of the SOUNDS buttons to select a sound<br />
for the Upper<br />
• Press the or key to amend the volume of the<br />
Upper sound; by keeping the or key pressed,<br />
the numbers quickly change (autorepeat).<br />
• Press the BANK SELECT key to select other sounds<br />
from the same fam<strong>il</strong>y.<br />
• Press the LAYER button again to select the sound for<br />
the Lower;<br />
the display shows “ ”:<br />
“ ” stands for Lower meaning the sound on the left<br />
part, and “ ” is the volume of the Lower sound.<br />
• Press one of the SOUNDS buttons to select a sound<br />
for the Lower.<br />
• Press the or key to amend the volume of the<br />
Lower sound; by keeping the or key pressed,<br />
the numbers quickly change (autorepeat).<br />
• Press the BANK SELECT key to select other sounds<br />
from the same fam<strong>il</strong>y.<br />
Pressing the LAYER button again, it returns to the “TEMPO” mode, the display indicates<br />
METRONOME upon switch-on.<br />
which is the speed of the<br />
11
Use instructions<br />
Sound combination - Dual Mode<br />
It is possible to simultaneously play two sounds on the entire keyboard range. In this way, it is possible to simulate a “dual melody”<br />
or combine two sim<strong>il</strong>ar voices to create an acoustically deeper sound.<br />
• With the SPLIT control off, press the LAYER button<br />
once;<br />
the display temporar<strong>il</strong>y shows “ ” : “ “ indicates<br />
the first sound of the mix and “ ” is the<br />
volume.<br />
• To change sound, press one of the SOUNDS and<br />
BANK SELECT buttons.<br />
• Press the or key to amend the volume.<br />
• Press the LAYER button again;<br />
the display temporar<strong>il</strong>y shows “ ”: “ ” indicates<br />
the second sound of the mix and “ ” is the volume.<br />
• To change sound, press one of the SOUNDS and<br />
BANK SELECT buttons.<br />
• Press the or to amend the volume.<br />
• Pressing the LAYER button again, returns to the “Mix”<br />
mode.<br />
The two controls of the SOUNDS section switched on<br />
indicate the fam<strong>il</strong>ies that have been selected for the 1 st and<br />
2 nd sound. If only one control is switched on, it means that<br />
two sounds from the same fam<strong>il</strong>y have been selected.<br />
The display indicates which is the speed of the<br />
METRONOME upon switch-on.<br />
To exit the “Mix” mode, press the button of a single<br />
sound.<br />
To create a combination of two sound in immediate<br />
mode, keep a button of the SOUNDS section pressed<br />
(1st sound), and simultaneously press another (2nd<br />
sound).<br />
By pressing SPLIT in “Mix” mode, the two sounds w<strong>il</strong>l be distributed, one for the Upper, right part, and one for the Lower, left<br />
part, of the keyboard. The sounds w<strong>il</strong>l be automatically set with pre-defined octave.<br />
Transposition of the notes - Transposer<br />
The transposition of the keyboard is ava<strong>il</strong>able in the interval –12 / +12 semitones.<br />
By pressing the TRANSPOSER control, the display indicates the current<br />
transposition value which upon switch-on is “ “.<br />
To activate a transposition, keep the TRANSPOSER button pressed, and act<br />
on the or keys to set the wanted value.<br />
The TRANSPOSER key switched on, indicates that the set value is different<br />
from “ “.<br />
The Transposition is active only when the TRANSPOSER key is switched<br />
on.<br />
To cancel the transposition, select the value “ “ or press the TRANSPOSER<br />
button again to switch-off the LED.<br />
The value of the Transposition remains memorised unt<strong>il</strong> switch-off.<br />
12
Use instructions<br />
The effects<br />
The sounds can be enhanced by adding Reverb and Chorus effects.<br />
Reverberation<br />
It is possible to select 3 types of reverberation: Room 1, Room 2 and Hall<br />
and also set the depth that can vary from 0 to 20.<br />
Upon switch-on the central LED comes on and the Room 2 effect with depth<br />
10 is active; by pressing the REVERB. control, the highest LED switches on<br />
and the Hall effect is active,<br />
by pressing the REVERB. control again, the lowest LED switches on and the<br />
Room 1 effect is active,<br />
by pressing the REVER.B control again, all LED are switched off therefore<br />
the Reverb effect is excluded.<br />
How to display and set the depth of the reverb:<br />
To display the depth value, keep the REVERB. key pressed, the display indicates the current value.<br />
To set the depth, select an effect (Room 1, Room 2 or Hall), keep the REVERB. control pressed and then act on the and<br />
controls to choose the depth that can vary from 0 to 20. The display indicates the selected value. By keeping the or key<br />
pressed, the numbers quickly change (autorepeat).<br />
ITALIANO<br />
Chorus<br />
Upon switch-on the Chorus is not active.<br />
To activate the effect, press the CHORUS control, the LED light switches on.<br />
To adjust the depth, keep the CHORUS control pressed for a few seconds (the LED light switches on) and then act on the<br />
control; the interval varies from 0 to 20. The standard value is 10.<br />
and<br />
The Dynamic or touch-sensitivity<br />
The instrument is able to issue sounds with more or less high volume, depending on the pressure exercised on the keys like in a<br />
traditional piano.<br />
It is possible to choose between dynamic: Light, Normal or Hard.<br />
Upon switch-on, the Normal type touch-sensitivity is active.<br />
To select the other types of dynamic, repeatedly press the TOUCH control:<br />
the Light type of dynamic activates when the lowest LED is switched on,<br />
Normal with the central LED and Hard with the top LED.<br />
When the LED light are switched off, the touch-sensitivity is excluded. It is<br />
possible to adjust the Volume of the sound by keeping the TOUCH control<br />
pressed and then act on the and controls; the interval varies from 0<br />
to 127; it is usually 64.<br />
The Metronome<br />
The metronome helps learn music, tapping time during the exercises and<br />
simulates the classic instrument that beats the time.<br />
To activate the metronome, press the METRONOME control, the LED light is<br />
switched on.<br />
How to adjust the metronome speed<br />
To adjust the speed, act on the and controls; the interval varies from<br />
a minimum of 32 to a maximum of 250.<br />
To set the standard value of , press and together.<br />
13
Use instructions<br />
32 - 60<br />
60 - 66<br />
66 - 76<br />
76 - 108<br />
108 - 120<br />
120 - 168<br />
168 - 200<br />
200 - 250<br />
Table of the TIMES<br />
indicative for the<br />
METRONOME<br />
How to set the divisions of the metronome<br />
The divisions ava<strong>il</strong>able are 1/4, 2/4, 3/4, 4/4, 6/4, 6/8, 12/8 .<br />
To set a division, keep the METRONOME control pressed for a few seconds,<br />
the display indicates which is the division set upon switch-on; using the<br />
and controls , choose the wanted division.<br />
How to set the volume of the metronome<br />
To adjust the volume of the metronome, keep the METRONOME pressed for<br />
a few seconds, act on the SET control, the display indicates which is the<br />
value upon switch-on; using the and controls, choose the wanted<br />
volume. The volume of the METRONOME varies from 0 to 20.<br />
The Recorder – Sequencer<br />
With the Sequencer section it is possible to record and then to listen to all that played.<br />
The Sequencer allows you to test your musical learning level.<br />
It is possible to record three musical songs with two tracks.<br />
Upon switch-on, the Sequencer controls are switched off.<br />
How to record the 1 st track (for example A)<br />
• Press the REC control, the A and B buttons flash.<br />
• Press the A button which continues flashing (B<br />
switches off), therefore, two initial metronome beats<br />
are sounded to indicate it is possible to start recording<br />
by playing the keyboard.<br />
• Press REC to stop recording and then PLAY to listed<br />
to what was played.<br />
• To stop execution, press PLAY.<br />
How to record the 2 nd track (for example B)<br />
• Press the REC control, the A and B buttons flash.<br />
• Press the B button (ATTENTION, if the previously recorded<br />
track is chose, track A, the content w<strong>il</strong>l be<br />
deleted by the new recording), the A LED light remains switched on to indicate that it is in execution or PLAY and that of B<br />
flashes, initial beats of the metronome are sounded to indicate recording has started for track B, it is therefore possible to start<br />
recording by playing the keyboard.<br />
• Press REC to stop recording, the A and B LED light remain switched on. By pressing PLAY, the two recorded tracks can be<br />
listened to simultaneously.<br />
N.B.: During recording of the 2 nd track, if not wanting to listen to the 1 st recorded track, switch-off the LED light of the 1 st track<br />
before recording on the 2 nd track.<br />
14
Use instructions<br />
How to record another two songs<br />
Act on the SET control, the display indicates<br />
which is the song recorded first.<br />
Using the and control, it is possible to select<br />
, or meaning Song 1, Song 2 and<br />
Song 3.<br />
To record another two songs and listed to them, select<br />
or and follow the above described<br />
procedure.<br />
How to delete a recording<br />
To delete a recording, keep the REC control pressed,<br />
and also press the PLAY control, the two A and B LED light w<strong>il</strong>l switch-off.<br />
ITALIANO<br />
The Sequencer also records any sound changes. The recording carried out on the three songs permanently remains in the memory<br />
even if the instrument is switched off. If upon instrument switch-on, the warning lights LED of tracks A or B are switched on, it means<br />
there is previously recorded data present.<br />
The Programs<br />
A program is a function that allows setting certain keyboard parameters.<br />
It is possible to memorise and recall 7 programmes in the controls from 1 to 7 from the SOUNDS section.<br />
The following functions can be programmed:<br />
1 Upper Sound<br />
2 Upper Sound Bank<br />
3 Upper Sound Volume<br />
4 Lower Sound<br />
5 Lower Sound Bank<br />
6 Lower Sound Volume<br />
7 Split Yes or No<br />
8 Dual Yes or No<br />
How to recall a program<br />
To recall a program, press the LOAD control from the PROGRAMS section, the LED light switches on, then press one of the seven<br />
flashing controls from the SOUNDS section.<br />
How to save a program<br />
Set sounds and functions.<br />
To save, press the SAVE control from the PROGRAMS section, the LED light switches on, then press one of the seven flashing<br />
controls from the SOUNDS section.<br />
The data is kept on the internal memory even when the power supply is disconnected.<br />
N.B.: By pressing SAVE and then BANK SELECT the original programs w<strong>il</strong>l be restored.<br />
15
Use instructions<br />
Special Functions (SET)<br />
It is possible to configure certain special functions by repeatedly pressing the SET control.<br />
1. Selection of the three songs of the Sequencer<br />
Upon first pressing of the SET control the LED light switches on and the display show to indicate that the first song of<br />
the Sequencer is selected.<br />
By pressing the and controls, it is possible to choose the other songs or .<br />
2. Selection of the functions<br />
Upon subsequently pressing the SET control, the LED light switches on and the display shows .<br />
Moving of the octave of the Lower sound<br />
By pressing the 1 control from the SOUNDS section, the display shows to indicate the moving of the octave for the<br />
Lower sound.<br />
By pressing the and controls, it is possible to choose the moving of the octave for the Lower, from 0, 1 or 2.<br />
The standard value is .<br />
Assigning of pedal<br />
By pressing the 2 control from the SOUNDS section, the display indicates meaning the assigning of the “sustain”<br />
effect activated by acting on the pedal.<br />
The “sustain” effect can be assigned to the Upper or Lower sound or to both.<br />
By pressing the and controls, it is possible to assign the “sustain” effect only to the Upper sound when the display<br />
indicates , or only to the Lower sound when the display indicates , or to both with . The standard value<br />
.<br />
Tuning range<br />
By pressing the 3 control from the SOUNDS section, the display shows indicating the tuning range.<br />
By pressing the and controls, it is possible to set the tuning range with values of 0.5 from a minimum of 427.0<br />
Hz ( on the display) to a maximum of 453.0 Hz ( on the display). The standard value is 440 Hz ( on<br />
the display) .<br />
3. Selection of the MIDI settings<br />
Upon third pressing of the SET control, LED light on, the display shows<br />
to indicate certain settings for the MIDI.<br />
MIDI transmit channel<br />
It is possible to set the MIDI transmission channel for the note of the Upper sound.<br />
The Lower sound w<strong>il</strong>l be automatically transmitted on the subsequent channel.<br />
By pressing the 1 control from the SOUNDS section, the display shows indicating the MIDI transmission channel.<br />
By pressing the and controls, it is possible to select the MIDI transmission channel from 1 to 16.<br />
Channel 1 is active upon switch-on.<br />
Local <strong>Con</strong>trol On / Off<br />
By pressing the 2 control, the display shows indicating the “Local <strong>Con</strong>trol” function.<br />
The “Local <strong>Con</strong>trol” function allows connecting or not the sound generator to the keyboard.<br />
If “Local <strong>Con</strong>trol” is enabled ( ), the keyboard w<strong>il</strong>l play and send the MIDI information.<br />
If “Local <strong>Con</strong>trol” is deactivated ( ), the keyboard w<strong>il</strong>l no longer play, but w<strong>il</strong>l continue to send information of the<br />
notes via MIDI.<br />
By pressing the and controls, it can be configured at (enabled) or (disabled).<br />
The standard value is .<br />
Program Change On / Off<br />
By pressing the 3 control, the display shows indicating the Program Change (sound change) received and transmitted<br />
by the instrument.<br />
By pressing the and controls, the transmission and receipt can be configured at (enabled) or (disabled).<br />
The standard value is .<br />
16
11.<strong>Con</strong>nection to a computer<br />
The <strong>DP</strong> <strong>300</strong> Digital piano is equipped with a USB-MIDI socket for connection to a personal computer. <strong>Con</strong>nection is carried out<br />
using a USB cable (not included) as shown in the figure:<br />
USB Port<br />
USB Cable<br />
(not supplied)<br />
USB Port<br />
ITALIANO<br />
Minimum system requisites<br />
Personal Computer with Pentium3 processor at 800Mhz equipped with USB socket. Windows XP, Windows VISTA or<br />
Windows 7 operational system.<br />
Procedure for computer connection<br />
Before connecting the keyboard, ensure that the computer is switched on and the keyboard is switched off.<br />
Once the connection with the USB cable (not included) is carried out, switch-on the instrument.<br />
After a few seconds, a series of messages w<strong>il</strong>l appear on the computer:<br />
New hardware found<br />
USB Speakers<br />
New hardware found<br />
The new hardware has been installed and is read for use<br />
Now the keyboard is correctly connected and recognised by the computer.<br />
Notes:<br />
The recognition of the keyboard by the computer happens upon first connection; no message w<strong>il</strong>l appear on subsequent<br />
connections, but a characteristic acoustic signal w<strong>il</strong>l be heard made by the computer to indicate the insertion of a USB<br />
device.<br />
Should the keyboard not be recognised by the computer and an error of unrecognised peripheral appears, repeat the operation;<br />
if the problem persists, check if the minimum requisites have been complied with.<br />
Free musical software downloadable from internet<br />
A free musical software is ava<strong>il</strong>able from www.farfisa.eu, with instructions in various languages, to be downloaded from your<br />
computer to record, amend and listen to the MIDI musical songs using the keyboard.<br />
17
12.MIDI connection<br />
What is MIDI<br />
The initials MIDI is the abbreviation of “Musical Instrument Digital Interface” and represents a standard for the transmission<br />
of data via cable to another electronic musical instrument.<br />
<strong>Con</strong>nect a MIDI cable (not included) between the MIDI OUT socket of the <strong>DP</strong> <strong>300</strong> and the MIDI <strong>IN</strong> socket of another musical<br />
equipment.<br />
MIDI Cable (not supplied)<br />
13.<strong>Con</strong>nection to an external amplifier<br />
To further amplify a sound, connect using an<br />
appropriate cable (not included) the L<strong>IN</strong>E OUT (LEFT/<br />
STEREO - RIGHT) sockets to the input of an external<br />
amplification. The LEFT/STEREO output, by inserting<br />
a STEREO connector, allows detecting both LEFT and<br />
RIGHT signals.<br />
external amplification<br />
AUDIO Cable (not supplied)<br />
18
14.Trouble shooting guide<br />
Problem<br />
Cause/Corrective action<br />
When it is switched on, no sounds are heard when the keys<br />
are pressed<br />
Noise when using the mob<strong>il</strong>e telephone<br />
The external unit connected via MIDI to the piano does<br />
not play<br />
The sound is distorted and/or the LED light show an<br />
anomalous brightness<br />
Check the main volume and if the headphones are<br />
connected The headphones are inserted in the Phones<br />
socket: disconnect it.<br />
Avoid having the mob<strong>il</strong>e telephone near the piano.<br />
The instrument transmits on MIDI channels different from<br />
those of receipt of the external unit.<br />
Check that the network adapter is that provided or another<br />
with the same features<br />
ITALIANO<br />
15.Table of sounds and relative Program Change (PrCn)<br />
SOUND PrCn SOUND PrCn SOUND PrCn SOUND PrCn SOUND PrCn SOUND PrCn SOUND PrCn<br />
2<br />
5<br />
8<br />
11<br />
14<br />
17<br />
20<br />
1<br />
4<br />
7<br />
10<br />
13<br />
16<br />
19<br />
0<br />
3<br />
6<br />
9<br />
12<br />
15<br />
18<br />
19
16.Midi implementation chart<br />
MIDI<br />
MESSAGE<br />
HEX CODE<br />
DESCRIPTION<br />
COMPA<br />
TIBI-<br />
LITY<br />
NOTE ON 9nH kk vv<br />
Midi channel n(0-15) note ON #kk(1-127), velocity vv(1-127). vv=0 MIDI<br />
means NOTE OFF<br />
NOTE OFF 8nH kk vv<br />
Midi channel n(0-15) note OFF #kk(1-127),<br />
MIDI<br />
vv is don’t care.<br />
PITCH BEND EnH bl bh<br />
Pitch bend as specified by bh|bl (14 bits)<br />
GM<br />
Maximum swing is +/- 1 tone (power-up). Can be changed using<br />
« pitch bend sensitivity ». Center position is 00H 40H.<br />
PROGRAM CnH pp<br />
Program (patch) change. Midi channel n (0-15)<br />
GM/GS<br />
CHANGE<br />
Program change pp (0-20)<br />
CHANNEL<br />
AFTERTOUCH<br />
DnH vv<br />
vv pressure value. Effect set using Sys. Ex. 40H 2nH 20H-26H MIDI<br />
MIDI RESET FFH<br />
Reset to power-up condition<br />
CTRL 01 BnH 01H cc<br />
Modulation wheel. Rate and maximum depth can be set using SYSEX MIDI<br />
CTRL 05 BnH 05H cc<br />
Portamento time.<br />
MIDI<br />
C TRL 06 BnH 06H cc<br />
Data entry : provides<br />
data to RPN and NRPN<br />
MIDI<br />
CTRL 07 BnH 07H cc<br />
Volume (default=100)<br />
MIDI<br />
CTRL 10 BnH 0AH cc<br />
Pan (default=64 center)<br />
MIDI<br />
CTRL 11 BnH 0BH cc<br />
Expression (default=127)<br />
MIDI/GM<br />
CTRL 64 BnH 40H cc<br />
Sustain (damper) pedal<br />
MIDI<br />
CTRL 65 BnH 41H cc<br />
Portamento ON/OFF<br />
MIDI<br />
CTRL 66 BnH 42H cc<br />
Sostenuto pedal<br />
MIDI<br />
CTRL 67 BnH 43H cc<br />
Soft pedal<br />
MIDI<br />
CTRL 80 BnH 50H vv<br />
Reverb program vv=00H to 07H (default 04H)<br />
FARFISA<br />
00H : Room1<br />
02H : Room3<br />
04H : Hall2<br />
06H : Delay<br />
01H : Room2<br />
03H : Hall1<br />
05H : Plate<br />
07H : Pan delay<br />
CTRL 81<br />
BnH 51H vv<br />
Chorus program vv=00H to 07H (default 02H)<br />
FARFISA<br />
00H : Chorus1<br />
02H : Chorus3<br />
04H : Feedback<br />
06H : Short delay<br />
01H : Chorus2<br />
03H : Chorus4<br />
05H : Flanger<br />
07H : FB delay<br />
CTRL 91 BnH 5BH vv<br />
Reverb send level vv=00H to 7FH<br />
GS<br />
CTRL 93 BnH 5DH vv<br />
Chorus send level vv=00H to 7FH<br />
GS<br />
C TRL 120 BnH 78H 00H<br />
All sound off (abrupt stop of sound on channel n) MIDI<br />
CTRL 121 BnH 79H 00H<br />
Reset all controllers<br />
MIDI<br />
CTRL 123 BnH 7BH 00H<br />
All notes off<br />
MIDI<br />
CTRL 126 BnH 7EH 00H<br />
Mono on<br />
MIDI<br />
CTRL 127 BnH 7FH 00H<br />
Poly on (default power-up)<br />
MIDI<br />
C TRL CC1 BnH ccH vvH<br />
Assignable <strong>Con</strong>troller 1. cc=<strong>Con</strong>troller number (0-5Fh), vv=<strong>Con</strong>trol GS<br />
value (0-7Fh). <strong>Con</strong>trol number (ccH) can be set on CC1<br />
CONTROLLER NUMBER (Sys. Ex 40 1x 1F). The resulting effect is<br />
determined by CC1 controller function (Sys.Ex. 40 2x 40-4A)<br />
C TRL CC2 BnH ccH vvH<br />
Assignable <strong>Con</strong>troller 2. cc=<strong>Con</strong>troller number (00h-5Fh), vv=control<br />
value (0-7Fh). <strong>Con</strong>trol number can be set on CC2 CONTROLLER<br />
NUMBER (Sys.Ex. 40 1x 20). The resulting effect is determined by<br />
CC2 controller function (Sys.Ex.40 2x 50-5A).<br />
20
Midi implementation chart<br />
MIDI<br />
MESSAGE<br />
HEX CODE<br />
DESCRIPTION<br />
COMPA<br />
TIBI-<br />
LITY<br />
RPN 0001H BnH 65H 00H 64H 01H 06H vv Fine tuning in cents (vv=00 - 100, vv=40H 0, vv=7FH +100 MIDI<br />
RPN 0002H BnH 65H 00H 64H 02H 06H vv Coarse tuning in half-tones (vv=00 -64, vv=40H 0, vv=7FH +64 MIDI<br />
NRPN 0108H BnH 63H 01H 62H 08H 06H vv<br />
Vibrate rate modify (vv=40h-> no modif)<br />
GS<br />
NRPN 0109H BnH 63H 01H 62H 09H 06H vv<br />
Vibrate depth modify (vv=40h-> no modif)<br />
GS<br />
NRPN 010AH BnN 63H 01H 62H 0AH 06H vv Vibrate delay modify (vv=40h-> no modif)<br />
GS<br />
NRPN 0120H Bnh 63H 01H 62H 20H 06H vv<br />
TVF custoff freq modify (vv=40h-> no modif)<br />
GS<br />
NRPN 0121H BnH 63H 01H 62H 21H 06H vv<br />
TVF resonance modify (vv=40h-> no modif)<br />
GS<br />
NRPN 0163H Bnh 63H 01H 62H 63H 06H vv<br />
Env. attack time modify (vv=40h-> no modif)<br />
GS<br />
NRPN 0164H BnH 63H 01H 62H 64H 06H vv<br />
Env. decay time modify (vv=40h-> no modif)<br />
GS<br />
NRPN 0166H BnH 63H 01H 62H 66H 06H vv Env. release time modify (vv=40h-> no modif)<br />
GS<br />
NRPN 18rrH BnH 63H 18H 62H rr 06H vv Pitch coarse of drum instr. note rr in semitones (vv=40H -> no modif) GS<br />
NRPN 1ArrH BnH 63H 1AH 62H rr 06H vv Level of drum instrument note rr (vv=00 to 7FH) GS<br />
NRPN 1CrrH BnH 63H 1CH 62H rr 06H vv<br />
Pan of drum instrument note rr (40H = middle)<br />
GS<br />
NRPN 1DrrH BnH 63H 1DH 62H rr 06H vv Reverb send level of drum instrument note rr (vv=00 to 7FH) GS<br />
NRPN 1ErrH BnH 63H 1EH 62H rr 06H vv Chorus send level of drum instrument note rr (vv=00 to 7FH) GS<br />
Standard Sysex F0H 7EH 7FH 09H 01H F7H<br />
General MIDI reset<br />
GM<br />
Standard Sysex F0H 7FH 7FH 04H 01H 00H ll F7H Master volume (ll=0 to 127, default 127)<br />
GM<br />
SYSEX F0H 41H 00H 42H 12H 40H 00H 00H dd dd Master tune (default dd= 00H 04H 00H 00H) -100.0 to +100.0 cents. GS<br />
dd dd xx F7H<br />
Nibblized data should be used (always four bytes). For example, to<br />
tune to +100.0 cents, sent data should be 00H 07H 0EH 08H<br />
SYSEX F0H 41H 00H 42H 12H 40H 00H 04H vv xx Master volume (default vv=7FH)<br />
GS<br />
F7H<br />
SYSEX F0H 41H 00H 42H 12H 40H 00H 05H vv xx Master key-shift (default vv=40H, no transpose)<br />
GS<br />
F7H<br />
SYSEX F0H 41H 00H 42H 12H 40H 00H 06H vv xx Master pan (default vv=40H, center)<br />
F7H<br />
SYSEX F0H 41H 00H 42H 12H 40H 00H 7FH 00H<br />
xx F7H<br />
GS reset<br />
GS<br />
SYSEX<br />
F0H 41H 00H 42H 12H 40 01H 10H vv1 vv2<br />
vv3 vv4 vv5 vv6 vv7 vv8 vv9 vv10 vv11<br />
vv12 vv13 vv14 vv15 vv16 xx F7h<br />
Voice reserve :<br />
vv1= Part 10 (Default vv=2)<br />
vv2 to vv10 = Part 1 to 9 (Default vv=2)<br />
vv11 to vv16= Part 11 to 16 (Default vv=0)<br />
GS<br />
ITALIANO<br />
SYSEX<br />
F0H 41H 00H 42H 12H 40H 01H 30H vv xx<br />
F7H<br />
Reverb type (vv=0 to 7), default = 04H<br />
00H : Room1<br />
02H : Room3<br />
04H : Hall2<br />
06H : Delay<br />
01H : Room2<br />
03H : Hall1<br />
05H : Plate<br />
07H : Pan delay<br />
GS<br />
SYSEX<br />
SYSEX<br />
SYSEX<br />
SYSEX<br />
SYSEX<br />
SYSEX<br />
F0H 41H 00H 42H 12H 40H 01H 31H vv xx<br />
F7H<br />
F0H 41H 00H 42H 12H 40H 01H 32H vv xx<br />
F7H<br />
F0H 41H 00H 42H 12H 40H 01H 33H vv xx<br />
F7H<br />
F0H 41H 00H 42H 12H 40H 01H 34H vv xx<br />
F7H<br />
F0H 41H 00H 42H 12H 40H 01H 35H vv xx<br />
F7H<br />
F0H 41H 00H 42H 12H 40H 01H 38H vv xx<br />
F7H<br />
Reverb character, default 04H<br />
Reverb Pre-LPF, 0 to 7, default = 0<br />
Reverb master level, default = 64<br />
Reverb time<br />
Reverb delay feedback. Only if reverb number=6 or 7 (delays)<br />
Chorus type (vv=0 to 7), default = 02H<br />
00H : Chorus1<br />
02H : Chorus3<br />
04H : Feedback<br />
06H : Short delay<br />
01H : Chorus2<br />
03H : Chorus4<br />
05H : Flanger<br />
07H : FB delay<br />
GS<br />
GS<br />
GS<br />
GS<br />
GS<br />
GS<br />
SYSEX<br />
SYSEX<br />
SYSEX<br />
SYSEX<br />
F0H 41H 00H 42H 12H 40H 01H 39H vv xx<br />
F7H<br />
F0H 41H 00H 42H 12H 40H 01H 3AH vv xx<br />
F7H<br />
F0H 41H 00H 42H 12H 40H 01H 3BH vv xx<br />
F7H<br />
F0H 41H 00H 42H 12H 40H 01H 3CH vv xx<br />
F7H<br />
Chorus Pre-LPF, 0 to 7, default = 0<br />
Chorus master level, default = 64<br />
Chorus feedback<br />
Chorus delay<br />
GS<br />
GS<br />
GS<br />
GS<br />
21
Midi implementation chart<br />
MIDI<br />
MESSAGE<br />
SYSEX<br />
SYSEX<br />
SYSEX<br />
SYSEX<br />
SYSEX<br />
SYSEX<br />
SYSEX<br />
SYSEX<br />
SYSEX<br />
SYSEX<br />
SYSEX<br />
SYSEX<br />
SYSEX<br />
SYSEX<br />
SYSEX<br />
SYSEX<br />
SYSEX<br />
SYSEX<br />
SYSEX<br />
SYSEX<br />
SYSEX<br />
SYSEX<br />
HEX CODE<br />
F0H 41H 00H 42H 12H 40H 01H 3DH vv xx<br />
F7H<br />
F0H 41H 00H 42H 12H 40H 01H 3EH vv xx<br />
F7H<br />
F0H 41H 00H 42H 12H 40H 1pH 40H v1 v2<br />
... v12 xx F7H<br />
F0H 41H 00H 42H 12H 40H 1pH 1AH vv xx<br />
F7H<br />
F0H 41H 00H 42H 12H 40H 1pH 1BH vv xx<br />
F7H<br />
F0H 41H 00H 42H 12H 40H 1pH 1FH vv xx<br />
F7H<br />
F0H 41H 00H 42H 12H 40H 1pH 20H vv xx<br />
F7H<br />
F0H 41H 00H 42H 12H 40H 2pH 00H vv xx<br />
F7H<br />
F0H 41H 00H 42H 12H 40H 2pH 01H vv xx<br />
F7H<br />
F0H 41H 00H 42H 12H 40H 2pH 02H vv xx<br />
F7H<br />
F0H 41H 00H 42H 12H 40H 2pH 03H vv xx<br />
F7H<br />
F0H 41H 00H 42H 12H 40H 2pH 04H vv xx<br />
F7H<br />
F0H 41H 00H 42H 12H 40H 2pH 05H vv xx<br />
F7H<br />
F0H 41H 00H 42H 12H 40H 2pH 06H vv xx<br />
F7H<br />
F0H 41H 00H 42H 12H 40H 2pH 10H vv xx<br />
F7H<br />
F0H 41H 00H 42H 12H 40H 2pH 11H vv xx<br />
F7H<br />
F0H 41H 00H 42H 12H 40H 2pH 12H vv xx<br />
F7H<br />
F0H 41H 00H 42H 12H 40H 2pH 14H vv xx<br />
F7H<br />
F0H 41H 00H 42H 12H 40H 2pH 15H vv xx<br />
F7H<br />
F0H 41H 00H 42H 12H 40H 2pH 16H vv xx<br />
F7H<br />
F0H 41H 00H 42H 12H 40H 2pH 20H vv xx<br />
F7H<br />
F0H 41H 00H 42H 12H 40H 2pH 21H vv xx<br />
F7H<br />
DESCRIPTION<br />
Chorus rate<br />
Chorus depth<br />
Scale tuning, p is part (0H to FH), v1 to v12 are 12 semi-tones tuning<br />
values (C, C#, D, ... A#, B), in the range -64 (00H)<br />
0 (40H) +63(7FH) cents.<br />
This SYSEX allows non chromatic tuning of the musical scale on a<br />
given MIDI channel.<br />
Default v1, v2, ... ,v12 = 40H, 40H,...,40H (chromatic tuning).<br />
Scale tuning has no effect if the part is assigned to a rhythm channel<br />
or if the sound played is not of chromatic type.<br />
Velocity slope from 00H to 7FH (default = 40H)<br />
Velocity offset from 00H to 7FH (default = 40H)<br />
CC1 <strong>Con</strong>troller number (00-5FH) (default = 10H)<br />
CC2 <strong>Con</strong>troller number (00-5FH) (default = 11H)<br />
Mod pitch control (-24,+24 semitone) (default = 40H)<br />
Mod tvf cutoff contro l<br />
(default = 40H)<br />
Mod Amplitude control (-100%-+100%) (default=40H)<br />
Mod lfo1 rate control (default = 40H). n is don’t care. Rate is<br />
common on all channels<br />
Mod lfo1 pitch depth (0-600 cents) (default=0AH)<br />
Mod lfo1 tvf depth (default = 0H)<br />
Mod lfo1 tva depth (0-100%) (default = 0H)<br />
Bend pitch control (-24,+24 semitone) (default = 42H)<br />
Bend tvf cutoff control (default = 40H)<br />
Bend Amplitude control (-100%-+100%) (default=40H)<br />
Bend lfo1 pitch depth (0-600 cents) (default=0AH)<br />
Bend lfo1 tvf depth (default = 0H)<br />
Bend lfo1 tva depth (0-100%) (default = 0H)<br />
CAF pitch control (-24,+24 semitone) (default = 40H)<br />
CAF tvf cutoff contro l (default = 40H)<br />
COMPA<br />
TIBI-<br />
LITY<br />
GS<br />
GS<br />
GS<br />
GS<br />
GS<br />
GS<br />
GS<br />
GS<br />
GS<br />
GS<br />
GS<br />
GS<br />
GS<br />
GS<br />
GS<br />
GS<br />
GS<br />
GS<br />
GS<br />
GS<br />
GS<br />
GS<br />
22
Midi implementation chart<br />
MIDI<br />
MESSAGE<br />
SYSEX<br />
SYSEX<br />
SYSEX<br />
SYSEX<br />
SYSEX<br />
SYSEX<br />
SYSEX<br />
SYSEX<br />
SYSEX<br />
SYSEX<br />
SYSEX<br />
SYSEX<br />
SYSEX<br />
SYSEX<br />
SYSEX<br />
SYSEX<br />
HEX CODE<br />
F0H 41H 00H 42H 12H 40H 2pH 22H vv xx<br />
F7H<br />
F0H 41H 00H 42H 12H 40H 2pH 24H vv xx<br />
F7H<br />
F0H 41H 00H 42H 12H 40H 2pH 25H vv xx<br />
F7H<br />
F0H 41H 00H 42H 12H 40H 2pH 26H vv xx<br />
F7H<br />
F0H 41H 00H 42H 12H 40H 2pH 40H vv xx<br />
F7H<br />
F0H 41H 00H 42H 12H 40H 2pH 41H vv xx<br />
F7H<br />
F0H 41H 00H 42H 12H 40H 2pH 42H vv xx<br />
F7H<br />
F0H 41H 00H 42H 12H 40H 2pH 44H vv xx<br />
F7H<br />
F0H 41H 00H 42H 12H 40H 2pH 45H vv xx<br />
F7H<br />
F0H 41H 00H 42H 12H 40H 2pH 46H vv xx<br />
F7H<br />
F0H 41H 00H 42H 12H 40H 2pH 50H vv xx<br />
F7H<br />
F0H 41H 00H 42H 12H 40H 2pH 51H vv xx<br />
F7H<br />
F0H 41H 00H 42H 12H 40H 2pH 52H vv xx<br />
F7H<br />
F0H 41H 00H 42H 12H 40H 2pH 54H vv xx<br />
F7H<br />
F0H 41H 00H 42H 12H 40H 2pH 55H vv xx<br />
F7H<br />
F0H 41H 00H 42H 12H 40H 2pH 56H vv xx<br />
F7H<br />
DESCRIPTION<br />
CAF Amplitude control (-100%-+100%) (default=40H)<br />
CAF lfo1 pitch depth (0-600 cents) (default=0AH)<br />
CAF lfo1 tvf depth (default = 0H)<br />
CAF lfo1 tva depth (0-100%) (default = 0H)<br />
CC1 pitch control (-24,+24 semitone) (default = 40H)<br />
CC1 tvf cutoff control (default = 40H)<br />
CC1 Amplitude control (-100%-+100%) (default=40H)<br />
CC1 lfo1 pitch depth (0-600 cents) (default=0AH)<br />
CC1 lfo1 tvf depth (default = 0H)<br />
CC1 lfo1 tva depth (0-100%) (default = 0H)<br />
CC2 pitch control (-24,+24 semitone) (default = 40H)<br />
CC2 tvf cutoff control (default = 40H)<br />
CC2 Amplitude control (-100%-+100%) (default=40H)<br />
CC2 lfo1 pitch depth (0-600 cents) (default=0AH)<br />
CC2 lfo1 tvf depth (default = 0H)<br />
CC2 lfo1 tva depth (0-100%) (default = 0H)<br />
COMPA<br />
TIBI-<br />
LITY<br />
GS<br />
GS<br />
GS<br />
GS<br />
GS<br />
GS<br />
GS<br />
GS<br />
GS<br />
GS<br />
GS<br />
GS<br />
GS<br />
GS<br />
GS<br />
GS<br />
ITALIANO<br />
23
GB/USA - READ AND KEEP THIS MANUAL FOR FUTURE REFERENCE.<br />
F - LIRE ET CONSERVER CE MANUEL POUR LE RENDRE ACCESSIBLE POUR DE FUTURES CONSULTATIONS.<br />
D - DIESES HANDBUCH AUFMERKSAM DURCHLESEN UND ZUM NACHSCHLAGEN AUFBEWAHREN.<br />
E - LEA Y CONSERVE EL PRESENTE MANUAL PARA FUTURAS CONSULTAS.<br />
I - LEGGERE E CONSERVARE IL PRESENTE MANUALE PER FUTURE CONSULTAZIONI.<br />
BONTEMPI S.p.A. Viale Don Bosco, 35 - 62018 Potenza Picena (MC) - Italy • www.farfisa.eu • e-ma<strong>il</strong>: info@farfisa.eu<br />
24