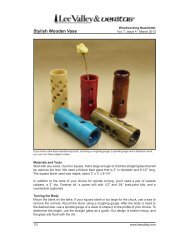
Stanley #5 and Up Plane Tote - Lee Valley Tools
Stanley #5 and Up Plane Tote - Lee Valley Tools
Stanley #5 and Up Plane Tote - Lee Valley Tools

You also want an ePaper? Increase the reach of your titles
YUMPU automatically turns print PDFs into web optimized ePapers that Google loves.
1 2 3 4 5 6 7<br />
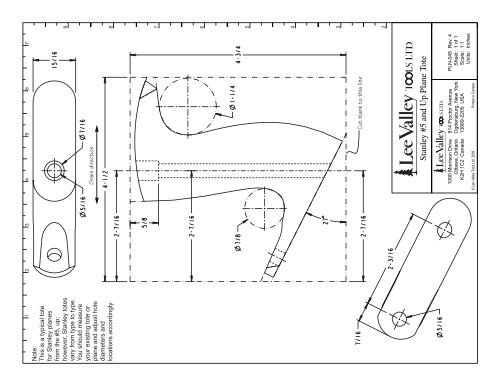
Note:<br />
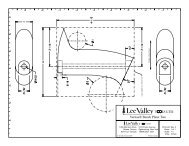
This is a typical tote<br />
for <strong>Stanley</strong> planes<br />
from the <strong>#5</strong>, up;<br />
however, <strong>Stanley</strong> totes<br />
vary from type to type.<br />
You should measure<br />
your existing tote or<br />
Grain direction<br />
plane <strong>and</strong> adjust hole<br />
diameters <strong>and</strong><br />
locations accordingly.<br />
9<br />
8<br />
7<br />
6<br />
5<br />
4<br />
3<br />
Cut blank to this line<br />
1090 Morrison Drive<br />
Ottawa, Ontario<br />
K2H 1C2 Canada<br />
© <strong>Lee</strong> <strong>Valley</strong> <strong>Tools</strong> Ltd. 2009<br />
<strong>Stanley</strong> <strong>#5</strong> <strong>and</strong> <strong>Up</strong> <strong>Plane</strong> <strong>Tote</strong><br />
814 Proctor Avenue<br />
Ogdensburg, New York<br />
13669-2205 USA<br />
Printed in Canada.<br />
PLN-045<br />
Sheet:<br />
Scale:<br />
Units:<br />
Rev. 4<br />
1 of 1<br />
1:1<br />
Inches<br />
2
<strong>Tote</strong> Template for <strong>Stanley</strong> <strong>#5</strong> <strong>and</strong> <strong>Up</strong> <strong>Plane</strong>s<br />
Instructions<br />
<strong>Tote</strong> Template for <strong>Stanley</strong> <strong>#5</strong> <strong>and</strong> <strong>Up</strong> <strong>Plane</strong>s<br />
Instructions<br />
This template can be used to make a replacement<br />
h<strong>and</strong>le for <strong>Stanley</strong> bench planes, sizes <strong>#5</strong> <strong>and</strong> up, as<br />
well as planes that are essentially reproductions of<br />
those planes.<br />
Glue template to<br />
h<strong>and</strong>le blank.<br />
It should be noted that <strong>Stanley</strong> planes have been<br />
manufactured for many years <strong>and</strong> there are small<br />
differences from type to type. The template is for a<br />
typical h<strong>and</strong>le; however, it is best to measure the existing<br />
h<strong>and</strong>le <strong>and</strong> adjust the template accordingly, particularly<br />
with regard to the relative sizes <strong>and</strong> locations of the<br />
mounting details.<br />
The shape shown is that used on the st<strong>and</strong>ard production<br />
planes. Providing the critical dimensions (i.e., h<strong>and</strong>le rod<br />
hole <strong>and</strong> associated mortises) are maintained, the outer<br />
shape can be modified to suit the user. The template has<br />
a 1 /4" scale printed along both edges of the sheet. These<br />
should be checked against an accurate rule to ensure<br />
that the template is at full scale before it is used. There<br />
are many reasons that a printed template may be off<br />
scale, including printer accuracy <strong>and</strong> humidity (like<br />
wood, paper moves with moisture content). In most<br />
cases, scale the output from the printer, or use a scaling<br />
photocopier to make any necessary adjustments. Also,<br />
do not print the template until you are ready to use it.<br />
Start by cutting a blank to slightly larger than the<br />
dimensions shown on the template (4 13 /16" × 4 9 /16").<br />
Note the correct grain direction. The thickness shown<br />
is that of a stock h<strong>and</strong>le, but feel free to make any<br />
adjustments to suit your grip.<br />
Bore out the h<strong>and</strong>le rod hole. Long narrow holes can<br />
sometimes be a problem to keep aligned. It may be<br />
easier to bore halfway through from either end of the<br />
blank, providing the blank is perfectly parallel <strong>and</strong><br />
carefully aligned in the drill press.<br />
Counterbore <strong>and</strong> drill tote<br />
rod hole centered on <strong>and</strong><br />
completely through blank.<br />
Transfer axis<br />
lines onto top <strong>and</strong><br />
bottom surfaces.<br />
Cut out the template along the outer box lines <strong>and</strong> paste<br />
it to the h<strong>and</strong>le blank. Spray adhesive is suitable for<br />
this. Avoid using white or carpenter’s glues, as their<br />
moisture content will deform the template.<br />
Trim the blank to match the outer template.<br />
Transfer the h<strong>and</strong>le rod hole axis onto the top <strong>and</strong><br />
bottom edges of the blank <strong>and</strong> mark the center point.
<strong>Tote</strong> Template for <strong>Stanley</strong> <strong>#5</strong> <strong>and</strong> <strong>Up</strong> <strong>Plane</strong>s<br />
Instructions<br />
Bore out the two holes that form the tightly curved parts<br />
of the h<strong>and</strong>le contour.<br />
Cut the bottom surface at the indicated 27° line.<br />
Trim the workpiece to the top, front <strong>and</strong> back contours.<br />
Depending on the final shaping method, it may be<br />
worthwhile to cut the contours slightly oversize.<br />
Drill out indicated<br />
holes to establish<br />
tight radii curves.<br />
Saw out<br />
h<strong>and</strong>le shape.<br />
Trim lower surface.<br />
Transfer the center of the 5 /16" hole onto the bottom<br />
surface <strong>and</strong> drill the hole centered on the blank.<br />
Partially cut out the front section of the tote, as shown<br />
below. At this point, it should be possible to do a trial<br />
fit to the plane to check that the mounting details are<br />
correct. Any errors are easier to correct while the<br />
blank still has flat reference surfaces. Also, if the error<br />
is not correctable, the minimum amount of work has<br />
been wasted.<br />
Final shaping can be done with a combination of<br />
round-over router bits, rasps, carving tools, s<strong>and</strong>paper,<br />
etc. Proceed carefully, testing the grip often to ensure<br />
a comfortable h<strong>and</strong>le. S<strong>and</strong> the final shape smooth <strong>and</strong><br />
finish as desired.<br />
Shape to suit.<br />
Cut out this section<br />
to allow trial fit.<br />
Drill mounting hole.<br />
742<br />
© <strong>Lee</strong> <strong>Valley</strong> Ltd. 2009<br />
1090 Morrison Drive<br />
Ottawa, Ontario<br />
K2H 1C2 Canada<br />
1-800-267-8761<br />
www.leevalley.com<br />
814 Proctor Avenue<br />
Ogdensburg, New York<br />
13669-2205 USA<br />
1-800-267-8735<br />
customerservice@leevalley.com<br />
INS-405 Rev. A<br />
Printed in Canada.