MACH 130 FP Mains Voltage 230V / 120V - Dr. Mach
MACH 130 FP Mains Voltage 230V / 120V - Dr. Mach
MACH 130 FP Mains Voltage 230V / 120V - Dr. Mach

Create successful ePaper yourself
Turn your PDF publications into a flip-book with our unique Google optimized e-Paper software.
<strong>MACH</strong> <strong>130</strong> <strong>FP</strong> Wall model<br />
16b 14 16b<br />
III<br />
II II<br />
I<br />
III III<br />
2<br />
52,53<br />
15<br />
16a<br />
I<br />
marking<br />
15<br />
<strong>Dr</strong>. <strong>Mach</strong><br />
Lamps and Engineering<br />
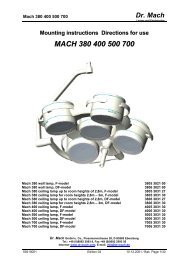
• Press filter disk 14 carefully against two springs<br />
16a (I).<br />
Attention: Touch the filter disk only with a<br />
non-fluffy cloth.<br />
• Press the other two springs 16b to the edge (II)<br />
and lift the filter disk (III).<br />
• Insert the new filter disk in reverse order. Make<br />
sure that the marking points to the upper side of<br />
the lamp housing as shown in the figure. The reverse<br />
side of the disk is steam finished.<br />
Only use filter disks, that have been cleaned<br />
properly.<br />
• Fix the bottom part 2 of the lamp housing with the<br />
three screws S.<br />
• Fix the cover 3, so that the two arrest pins snap<br />
in.<br />
6.3.5 Changing the protective disk<br />
In case you notice a impediment of the light quality<br />
because of a dull protective disk, it may be necessary<br />
to change the disk.<br />
To change the protective disk proceed as follows:<br />
• Turn off the lamp.<br />
• Remove the bottom part 2 of the lamp housing as<br />
described at point 4.4.4.<br />
• Loosen six screws 52/54 and remove them including<br />
the washers 53.<br />
Attention: Hold the protective disk 15 carefully,<br />
it is loosen now.<br />
• Remove the protective disk 15.<br />
• Insert the new protective disk, so that it is placed<br />
even to the bottom part of the lamp housing.<br />
• Fix the protective disk with six screws 52/54 and<br />
washers 53.<br />
Attention: Only use protective disks, that<br />
have been cleaned as described at point 3.2.<br />
• Fix the bottom part 2 of the lamp housing.<br />
• Fix the cover 3, so that the arrest pins snap in.<br />
59100002 Edition 07 05.06.2002 / Bak Page 18/25