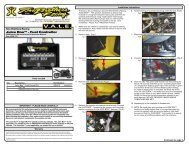
Takegawa 5 Speed - Two Brothers Racing
Takegawa 5 Speed - Two Brothers Racing
Takegawa 5 Speed - Two Brothers Racing

Create successful ePaper yourself
Turn your PDF publications into a flip-book with our unique Google optimized e-Paper software.
Installation Instructions<br />
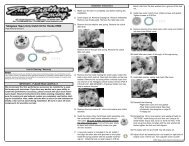
1. Drain the oil from the engine. Remove the engine from<br />
the frame. Remove the cylinder and head.<br />
After the cover is removed, you will be able to see the<br />
clutch locknut. Peel back the safety tabs and remove the<br />
clutch locknut using the Clutch Locknut Tool (# 010-9-01-<br />
03) or equivalent. Once this nut is removed slide the<br />
stock clutch off.<br />
Mfg: Honda Make: XR50R<br />
Year: All<br />
Product: <strong>Takegawa</strong> 5 <strong>Speed</strong> Transmission Kit<br />
3. Remove both gears, be sure to remove the bushing from<br />
the smaller gear as well.<br />
2. Remove the right side engine cover. Remove the clutch<br />
by first removing the arm on the shaft, be careful not to<br />
lose the spring or the bearing.<br />
Before<br />
Required Special Tools<br />
- <strong>Takegawa</strong> Flywheel Puller<br />
(# 010-9-01-03) or equivalent<br />
- <strong>Takegawa</strong> Rotor Holder<br />
(# 010-9-01-05) or equivalent<br />
- <strong>Takegawa</strong> Clutch Locknut Wrench<br />
(# 010-9-01-021) or equivalent<br />
Disclaimer / Warranty<br />
Remove the four phillips head screws and remove the<br />
cover.<br />
4. Remove the shift detent arm.<br />
After<br />
Disclaimer<br />
Before starting the installation of your new 5 speed transmission and clutch kit please understand that procedure<br />
first. If you have any questions do not hesitate to call us at 1-800-211-2767.<br />
The instructions provided are to be used as a guideline for installation based on the assumption that the installer<br />
has some mechanical inclination. If you are unsure of your self call us for help or seek a qualified technician. We<br />
have provided some photos and installation tips for you to use along with the Japanese instructions and diagrams.<br />
Please take your time and use care during installation and call us if you have any questions.<br />
Warranty<br />
<strong>Two</strong> <strong>Brothers</strong> <strong>Racing</strong> products are intended for closed course competition purposes only, and therefore are sold “as<br />
is” without warranty. <strong>Two</strong> <strong>Brothers</strong> <strong>Racing</strong> specifically disclaims any warranties of merchantability or fitness for a<br />
particular purpose and disclaims all responsibility for consequential and incidental damages or any other losses<br />
arising from the use of these products or parts.<br />
XR50R 5 <strong>Speed</strong> Transmission Instructions.qxd PAGE 1
Remove the star shaped piece by removing the 10mm headed<br />
bolt.<br />
5. Remove the snap ring from the kickstart shaft with snap ring<br />
pliers. Remove the kick start spring assembly. Note oriention<br />
of this piece, you may wish to practice installation of this piece<br />
before proceeding as this will make it easier to do so later on.<br />
7. Remove the left side engine cover. Remove the magnet<br />
assembly (left side of.<br />
Before<br />
Slide the shaft assembly completely out.<br />
6. Using an impact wrench remove the flywheel nut. If you do not<br />
have an impact wrench you can use the Rotor Holder (# 010-<br />
9-01-05). Remove the flywheel using the <strong>Takegawa</strong> Flywheel<br />
Puller (# 010-9-01-03) or equivalent.<br />
After<br />
8. Remove the two phillips head screws from the cam chain inner<br />
cover. These screws are pretty tight so you may have to use<br />
an impact driver to break them loose. Remove the screws and<br />
the cover.<br />
XR50R 5 <strong>Speed</strong> Transmission Instructions.qxd PAGE 2
9. Remove the cam tensioner bolt (17mm bolt), then remove the<br />
tensioner arm, guide wheel and cam chain.<br />
11. Lay the cases down with the drain plug facing up. Separate<br />
the cases. Do this slowly and carefully. If you have done<br />
everything correctly the cases will come apart very easily.<br />
Remove the 10mm shift drum bolt. Now turn the case around<br />
and the entire transmission can be removed.<br />
Before<br />
Before<br />
13. For the <strong>Takegawa</strong> 5 <strong>Speed</strong> Transmission to work you will need<br />
to cut this tab off of the inside of the case.<br />
After<br />
10. Remove the seven 8mm bolts from around the edge of the<br />
engine case. Take note of the different lengths.<br />
12. Remove the rubber cover.<br />
After<br />
Before<br />
After<br />
XR50R 5 <strong>Speed</strong> Transmission Instructions.qxd PAGE 3
14. Using a dremel(or similar) tool you will need to clearance the<br />
inside of the case slightly for the new kickstarter gear. It is best<br />
to install the gear first and look at how much material needs to<br />
be removed. Please note that not a lot of material needs to be<br />
removed in order to gain adequate clearance.<br />
16. Reinstall the 10mm shfit drum bolt and rubber cover. This will<br />
keep the transmission in place.<br />
Before installing the shiftshaft assembly you will need to trim it.<br />
Cut just beyond the welded area (be sure NOT to cut the<br />
weld). Do your cutting BEFORE installing the shiftshaft assembly.<br />
Remove the shift detent piece.<br />
Install the detent arm in the reverse order you disassembled<br />
them. Check for proper operation by spinning the shaft by<br />
hand, it should spin smoothly.<br />
15. Before reassembly, thoroughly clean the cases and bearings<br />
being sure to remove all debris. Relube the bearings with an<br />
engine assembly lube (be sure to coat the gears as well) and<br />
install the <strong>Takegawa</strong> 5 <strong>Speed</strong> Transmission<br />
Install the new kick starter gear and spindle (# 010-3-04-001).<br />
Check for smooth operation by spinning the transmission.<br />
Reinstall the crankshaft and bolt the engine cases back<br />
together.<br />
17. Reinstall the kick start spring assembly and check for proper<br />
operation by installing the kick starter and pushing it down as if<br />
you were kicking it. Make sure it returns after it is pushed<br />
down and that it works properly.<br />
Now you are ready to install the clutch (# 010-3-01-2632).<br />
XR50R 5 <strong>Speed</strong> Transmission Instructions.qxd PAGE 4
CLUTCH DIAGRAM<br />
XR50R 5 <strong>Speed</strong> Transmission Instructions.qxd PAGE 5
5 SPEED TRANSMISSION DIAGRAM<br />
XR50R 5 <strong>Speed</strong> Transmission Instructions.qxd PAGE 6