1JZGauQ
1JZGauQ 1JZGauQ
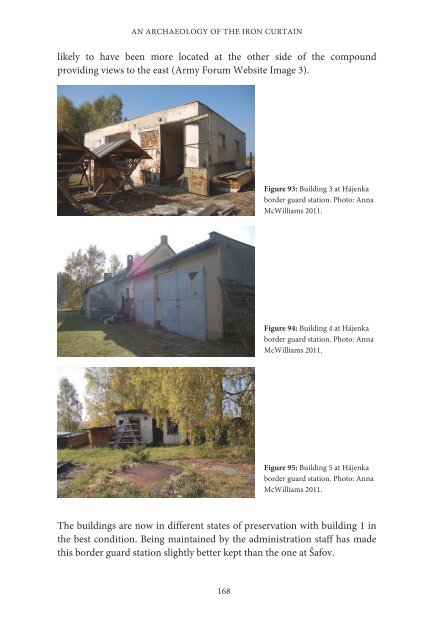
5: CASE STUDY 2: THE CZECH/AUSTRIAN BORDER this building another entrance leads into the smaller section of this building containing one large room and two small rooms (Figure 92). This is likely to have housed communications rooms for technical surveillance as the views from this building extend out across the approaching road. It is also close to the edge of the compound and therefore a suitable place for incoming cables and technology to be placed. This section of the building has no adjoining access to the other part of the same building used as workshops. Figure 91: Toilettes at Hájenka border guard station. Photo: Anna McWilliams 2011. Figure 92: Eastern part of building 2 at Hájenka border guard station. Photo: Anna McWilliams 2011. Building three consisted of two large garages now used by the parks administration staff (Figure 93). Building four could not be entered as it was locked whilst at building five, only one section could be entered (Figure 94). Building five is a small structure at the south-west corner of the compound used as part of the dog kennels (Figure 95). No room inside building one or two appeared to have been used for dogs. In old pictures, building five, on the other hand, can be seen with fencing around it (Army Forum Website Image 2). Old pictures also show that at least two watchtowers were located just inside the fencing at the western edge of the compound but there are 167
AN ARCHAEOLOGY OF THE IRON CURTAIN likely to have been more located at the other side of the compound providing views to the east (Army Forum Website Image 3). Figure 93: Building 3 at Hájenka border guard station. Photo: Anna McWilliams 2011. Figure 94: Building 4 at Hájenka border guard station. Photo: Anna McWilliams 2011. Figure 95: Building 5 at Hájenka border guard station. Photo: Anna McWilliams 2011. The buildings are now in different states of preservation with building 1 in the best condition. Being maintained by the administration staff has made this border guard station slightly better kept than the one at Šafov. 168
- Page 117 and 118: AN ARCHAEOLOGY OF THE IRON CURTAIN
- Page 119 and 120: AN ARCHAEOLOGY OF THE IRON CURTAIN
- Page 121 and 122: AN ARCHAEOLOGY OF THE IRON CURTAIN
- Page 123 and 124: AN ARCHAEOLOGY OF THE IRON CURTAIN
- Page 125 and 126: AN ARCHAEOLOGY OF THE IRON CURTAIN
- Page 128 and 129: CHAPTER 5 Case Study 2 The Czech/Au
- Page 130 and 131: 5: CASE STUDY 2: THE CZECH/AUSTRIAN
- Page 132 and 133: Figure 55: Bunker near the crossing
- Page 134 and 135: Figure 59: Military map from 1980 o
- Page 136 and 137: 5: CASE STUDY 2: THE CZECH/AUSTRIAN
- Page 138 and 139: 5: CASE STUDY 2: THE CZECH/AUSTRIAN
- Page 140 and 141: 5: CASE STUDY 2: THE CZECH/AUSTRIAN
- Page 142 and 143: 5: CASE STUDY 2: THE CZECH/AUSTRIAN
- Page 144 and 145: 5: CASE STUDY 2: THE CZECH/AUSTRIAN
- Page 146 and 147: 5: CASE STUDY 2: THE CZECH/AUSTRIAN
- Page 148 and 149: 5: CASE STUDY 2: THE CZECH/AUSTRIAN
- Page 150 and 151: 5: CASE STUDY 2: THE CZECH/AUSTRIAN
- Page 152 and 153: 5: CASE STUDY 2: THE CZECH/AUSTRIAN
- Page 154 and 155: 5: CASE STUDY 2: THE CZECH/AUSTRIAN
- Page 156 and 157: 5: CASE STUDY 2: THE CZECH/AUSTRIAN
- Page 158 and 159: 5: CASE STUDY 2: THE CZECH/AUSTRIAN
- Page 160 and 161: Figure 77-78: Painting inside the f
- Page 162 and 163: 5: CASE STUDY 2: THE CZECH/AUSTRIAN
- Page 164 and 165: 5: CASE STUDY 2: THE CZECH/AUSTRIAN
- Page 166 and 167: 5: CASE STUDY 2: THE CZECH/AUSTRIAN
- Page 170 and 171: 5: CASE STUDY 2: THE CZECH/AUSTRIAN
- Page 172 and 173: 5: CASE STUDY 2: THE CZECH/AUSTRIAN
- Page 174 and 175: 5: CASE STUDY 2: THE CZECH/AUSTRIAN
- Page 176 and 177: 5: CASE STUDY 2: THE CZECH/AUSTRIAN
- Page 178 and 179: 5: CASE STUDY 2: THE CZECH/AUSTRIAN
- Page 180 and 181: 5: CASE STUDY 2: THE CZECH/AUSTRIAN
- Page 182 and 183: 5: CASE STUDY 2: THE CZECH/AUSTRIAN
- Page 184 and 185: 5: CASE STUDY 2: THE CZECH/AUSTRIAN
- Page 186 and 187: 5: CASE STUDY 2: THE CZECH/AUSTRIAN
- Page 188 and 189: CHAPTER 6 An archaeology of the Iro
- Page 190 and 191: 6: AN ARCHAEOLOGY OF THE IRON CURTA
- Page 192 and 193: 6: AN ARCHAEOLOGY OF THE IRON CURTA
- Page 194 and 195: 6: AN ARCHAEOLOGY OF THE IRON CURTA
- Page 196 and 197: 6: AN ARCHAEOLOGY OF THE IRON CURTA
- Page 198 and 199: 6: AN ARCHAEOLOGY OF THE IRON CURTA
- Page 200 and 201: 6: AN ARCHAEOLOGY OF THE IRON CURTA
- Page 202 and 203: 6: AN ARCHAEOLOGY OF THE IRON CURTA
- Page 204 and 205: Figure 102: Fence and Watch Tower a
- Page 206 and 207: 6: AN ARCHAEOLOGY OF THE IRON CURTA
- Page 208 and 209: 6: AN ARCHAEOLOGY OF THE IRON CURTA
- Page 210 and 211: 6: AN ARCHAEOLOGY OF THE IRON CURTA
- Page 212 and 213: 6: AN ARCHAEOLOGY OF THE IRON CURTA
- Page 214 and 215: 6: AN ARCHAEOLOGY OF THE IRON CURTA
- Page 216 and 217: Sammanfattning (Summary in Swedish)
AN ARCHAEOLOGY OF THE IRON CURTAIN<br />
likely to have been more located at the other side of the compound<br />
providing views to the east (Army Forum Website Image 3).<br />
Figure 93: Building 3 at Hájenka<br />
border guard station. Photo: Anna<br />
McWilliams 2011.<br />
Figure 94: Building 4 at Hájenka<br />
border guard station. Photo: Anna<br />
McWilliams 2011.<br />
Figure 95: Building 5 at Hájenka<br />
border guard station. Photo: Anna<br />
McWilliams 2011.<br />
The buildings are now in different states of preservation with building 1 in<br />
the best condition. Being maintained by the administration staff has made<br />
this border guard station slightly better kept than the one at Šafov.<br />
168


