Owner's Guide to Installation and Use - Stark Electronics
Owner's Guide to Installation and Use - Stark Electronics
Owner's Guide to Installation and Use - Stark Electronics
Create successful ePaper yourself
Turn your PDF publications into a flip-book with our unique Google optimized e-Paper software.
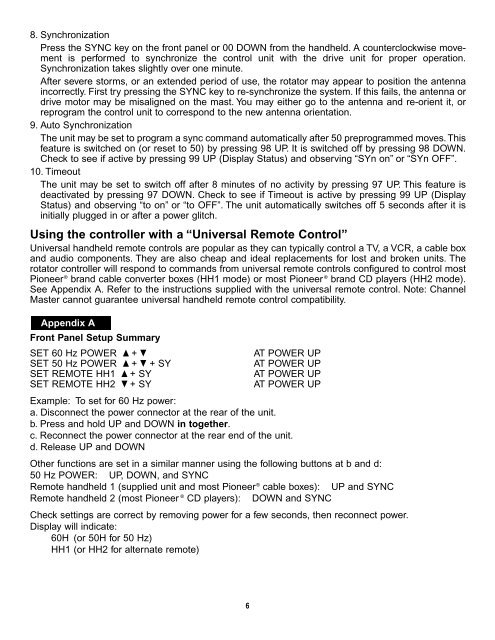
8. Synchronization<br />
Press the SYNC key on the front panel or 00 DOWN from the h<strong>and</strong>held. A counterclockwise movement<br />
is performed <strong>to</strong> synchronize the control unit with the drive unit for proper operation.<br />
Synchronization takes slightly over one minute.<br />
After severe s<strong>to</strong>rms, or an extended period of use, the rota<strong>to</strong>r may appear <strong>to</strong> position the antenna<br />
incorrectly. First try pressing the SYNC key <strong>to</strong> re-synchronize the system. If this fails, the antenna or<br />
drive mo<strong>to</strong>r may be misaligned on the mast. You may either go <strong>to</strong> the antenna <strong>and</strong> re-orient it, or<br />
reprogram the control unit <strong>to</strong> correspond <strong>to</strong> the new antenna orientation.<br />
9. Au<strong>to</strong> Synchronization<br />
The unit may be set <strong>to</strong> program a sync comm<strong>and</strong> au<strong>to</strong>matically after 50 preprogrammed moves. This<br />
feature is switched on (or reset <strong>to</strong> 50) by pressing 98 UP. It is switched off by pressing 98 DOWN.<br />
Check <strong>to</strong> see if active by pressing 99 UP (Display Status) <strong>and</strong> observing “SYn on” or “SYn OFF”.<br />
10. Timeout<br />
The unit may be set <strong>to</strong> switch off after 8 minutes of no activity by pressing 97 UP. This feature is<br />
deactivated by pressing 97 DOWN. Check <strong>to</strong> see if Timeout is active by pressing 99 UP (Display<br />
Status) <strong>and</strong> observing “<strong>to</strong> on” or “<strong>to</strong> OFF”. The unit au<strong>to</strong>matically switches off 5 seconds after it is<br />
initially plugged in or after a power glitch.<br />
Using the controller with a “Universal Remote Control”<br />
Universal h<strong>and</strong>held remote controls are popular as they can typically control a TV, a VCR, a cable box<br />
<strong>and</strong> audio components. They are also cheap <strong>and</strong> ideal replacements for lost <strong>and</strong> broken units. The<br />
rota<strong>to</strong>r controller will respond <strong>to</strong> comm<strong>and</strong>s from universal remote controls configured <strong>to</strong> control most<br />
Pioneer ® br<strong>and</strong> cable converter boxes (HH1 mode) or most Pioneer ® br<strong>and</strong> CD players (HH2 mode).<br />
See Appendix A. Refer <strong>to</strong> the instructions supplied with the universal remote control. Note: Channel<br />
Master cannot guarantee universal h<strong>and</strong>held remote control compatibility.<br />
Appendix A<br />
Front Panel Setup Summary<br />
SET 60 Hz POWER ▲ + ▼<br />
AT POWER UP<br />
SET 50 Hz POWER ▲ + ▼ + SY<br />
AT POWER UP<br />
SET REMOTE HH1 ▲ + SY<br />
AT POWER UP<br />
SET REMOTE HH2 ▼ + SY<br />
AT POWER UP<br />
Example: To set for 60 Hz power:<br />
a. Disconnect the power connec<strong>to</strong>r at the rear of the unit.<br />
b. Press <strong>and</strong> hold UP <strong>and</strong> DOWN in <strong>to</strong>gether.<br />
c. Reconnect the power connec<strong>to</strong>r at the rear end of the unit.<br />
d. Release UP <strong>and</strong> DOWN<br />
Other functions are set in a similar manner using the following but<strong>to</strong>ns at b <strong>and</strong> d:<br />
50 Hz POWER: UP, DOWN, <strong>and</strong> SYNC<br />
Remote h<strong>and</strong>held 1 (supplied unit <strong>and</strong> most Pioneer ® cable boxes): UP <strong>and</strong> SYNC<br />
Remote h<strong>and</strong>held 2 (most Pioneer ® CD players): DOWN <strong>and</strong> SYNC<br />
Check settings are correct by removing power for a few seconds, then reconnect power.<br />
Display will indicate:<br />
60H (or 50H for 50 Hz)<br />
HH1 (or HH2 for alternate remote)<br />
6


