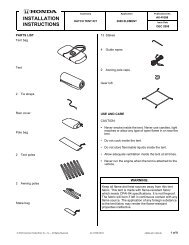
Body Side Molding Installation Instructions - Bernardi Acura Parts ...
Body Side Molding Installation Instructions - Bernardi Acura Parts ...
Body Side Molding Installation Instructions - Bernardi Acura Parts ...

You also want an ePaper? Increase the reach of your titles
YUMPU automatically turns print PDFs into web optimized ePapers that Google loves.
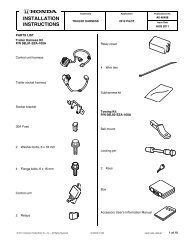
1. Position the left front template on the door, and align<br />
its edges with the edges of the left front door. Secure<br />
the template with masking tape as shown.<br />
4. Align the edges of the left front body side molding<br />
with the edges of the front template as shown, and<br />
install the left front body side molding on the left front<br />
door.<br />
LEFT FRONT DOOR<br />
LEFT FRONT DOOR<br />
LEFT FRONT BODY<br />
SIDE MOLDING<br />
ATTACHING POSITION<br />
(Clean using one alcohol pad.)<br />
MASKING<br />
TAPE<br />
FRONT<br />
TEMPLATE<br />
FRONT<br />
TEMPLATE<br />
Align.<br />
Align the bottom edge<br />
of the molding with the<br />
top of the template.<br />
Align the rear<br />
edge of the<br />
molding as<br />
shown.<br />
Align.<br />
EDGE OF LEFT<br />
FRONT DOOR<br />
790202AT<br />
2. Clean the door surface where the left front body side<br />
molding will attach using one alcohol pad. Allow the<br />
alcohol to dry.<br />
3. Peel back approximately 1½ inches of adhesive<br />
backing from each adhesive strip, and tape the<br />
ends to the front surface of the body side molding.<br />
Remove the small end pieces of adhesive backing.<br />
LEFT FRONT BODY<br />
SIDE MOLDING<br />
FRONT TEMPLATE<br />
790204BT<br />
5. Press on the left front body side molding firmly with<br />
the palm of your hand while removing the adhesive<br />
backings. Remove about 2 to 4 inches at a time.<br />
ADHESIVE BACKING<br />
(Remove.)<br />
LEFT FRONT DOOR<br />
LEFT FRONT BODY<br />
SIDE MOLDING<br />
LEFT FRONT BODY<br />
SIDE MOLDING<br />
MASKING TAPE<br />
4 ADHESIVE<br />
BACKINGS<br />
(Peel back 1½ inches<br />
and tape them to the<br />
front surface of the<br />
body side molding.)<br />
2 ADHESIVE BACKINGS<br />
(Press on the left front<br />
body side molding firmly<br />
with the palm of your<br />
hand while removing the<br />
adhesive backings.)<br />
790205CT<br />
ADHESIVE BACKING<br />
(Remove.)<br />
790203BT<br />
2 of 4 BII 44976 (1011) © 2010 American Honda Motor Co., Inc. – All Rights Reserved.