Body Side Molding Installation Instructions - Bernardi Acura Parts ...
Body Side Molding Installation Instructions - Bernardi Acura Parts ...
Body Side Molding Installation Instructions - Bernardi Acura Parts ...

Create successful ePaper yourself
Turn your PDF publications into a flip-book with our unique Google optimized e-Paper software.
Accessory<br />
Application<br />
Publications No.<br />
INSTALLATION<br />
INSTRUCTIONS<br />
BODY SIDE MOLDINGS<br />
2011 TSX<br />
BII 44976<br />
Issue Date<br />
NOV 2010<br />
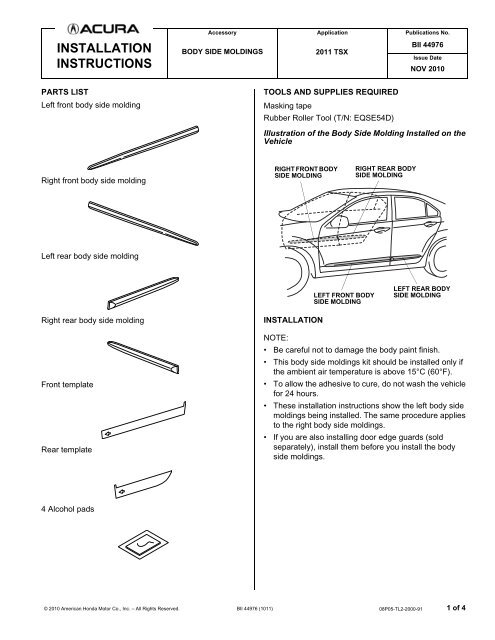
PARTS LIST<br />
TOOLS AND SUPPLIES REQUIRED<br />
Left front body side molding<br />
Masking tape<br />
Rubber Roller Tool (T/N: EQSE54D)<br />
Illustration of the <strong>Body</strong> <strong>Side</strong> <strong>Molding</strong> Installed on the<br />
Vehicle<br />
Right front body side molding<br />
RIGHT FRONT BODY<br />
SIDE MOLDING<br />
RIGHT REAR BODY<br />
SIDE MOLDING<br />
Left rear body side molding<br />
LEFT FRONT BODY<br />
SIDE MOLDING<br />
LEFT REAR BODY<br />
SIDE MOLDING<br />
Right rear body side molding<br />
Front template<br />
Rear template<br />
INSTALLATION<br />
NOTE:<br />
• Be careful not to damage the body paint finish.<br />
• This body side moldings kit should be installed only if<br />
the ambient air temperature is above 15°C (60°F).<br />
• To allow the adhesive to cure, do not wash the vehicle<br />
for 24 hours.<br />
• These installation instructions show the left body side<br />
moldings being installed. The same procedure applies<br />
to the right body side moldings.<br />
• If you are also installing door edge guards (sold<br />
separately), install them before you install the body<br />
side moldings.<br />
4 Alcohol pads<br />
© 2010 American Honda Motor Co., Inc. – All Rights Reserved. BII 44976 (1011) 08P05-TL2-2000-91 1 of 4
1. Position the left front template on the door, and align<br />
its edges with the edges of the left front door. Secure<br />
the template with masking tape as shown.<br />
4. Align the edges of the left front body side molding<br />
with the edges of the front template as shown, and<br />
install the left front body side molding on the left front<br />
door.<br />
LEFT FRONT DOOR<br />
LEFT FRONT DOOR<br />
LEFT FRONT BODY<br />
SIDE MOLDING<br />
ATTACHING POSITION<br />
(Clean using one alcohol pad.)<br />
MASKING<br />
TAPE<br />
FRONT<br />
TEMPLATE<br />
FRONT<br />
TEMPLATE<br />
Align.<br />
Align the bottom edge<br />
of the molding with the<br />
top of the template.<br />
Align the rear<br />
edge of the<br />
molding as<br />
shown.<br />
Align.<br />
EDGE OF LEFT<br />
FRONT DOOR<br />
790202AT<br />
2. Clean the door surface where the left front body side<br />
molding will attach using one alcohol pad. Allow the<br />
alcohol to dry.<br />
3. Peel back approximately 1½ inches of adhesive<br />
backing from each adhesive strip, and tape the<br />
ends to the front surface of the body side molding.<br />
Remove the small end pieces of adhesive backing.<br />
LEFT FRONT BODY<br />
SIDE MOLDING<br />
FRONT TEMPLATE<br />
790204BT<br />
5. Press on the left front body side molding firmly with<br />
the palm of your hand while removing the adhesive<br />
backings. Remove about 2 to 4 inches at a time.<br />
ADHESIVE BACKING<br />
(Remove.)<br />
LEFT FRONT DOOR<br />
LEFT FRONT BODY<br />
SIDE MOLDING<br />
LEFT FRONT BODY<br />
SIDE MOLDING<br />
MASKING TAPE<br />
4 ADHESIVE<br />
BACKINGS<br />
(Peel back 1½ inches<br />
and tape them to the<br />
front surface of the<br />
body side molding.)<br />
2 ADHESIVE BACKINGS<br />
(Press on the left front<br />
body side molding firmly<br />
with the palm of your<br />
hand while removing the<br />
adhesive backings.)<br />
790205CT<br />
ADHESIVE BACKING<br />
(Remove.)<br />
790203BT<br />
2 of 4 BII 44976 (1011) © 2010 American Honda Motor Co., Inc. – All Rights Reserved.
6. Using the rubber roller, apply firm pressure while<br />
rolling to set the adhesive.<br />
10. Peel back approximately 1½ inches of the adhesive<br />
backing from each adhesive strip, and tape the<br />
ends to the front surface of the body side molding.<br />
Remove the small end pieces of adhesive backing.<br />
LEFT FRONT DOOR<br />
LEFT FRONT BODY<br />
SIDE MOLDING<br />
4 ADHESIVE BACKINGS<br />
(Peel back 1½ inches<br />
and tape them to the<br />
front surface of the<br />
body side molding.)<br />
ADHESIVE<br />
BACKING<br />
(Remove.)<br />
MASKING TAPE<br />
FRONT<br />
TEMPLATE<br />
(Remove.)<br />
RUBBER<br />
ROLLER<br />
(ESQE54D)<br />
790211AT<br />
ADHESIVE<br />
BACKING<br />
(Remove.)<br />
LEFT REAR BODY<br />
SIDE MOLDING<br />
7. Remove the front template.<br />
8. Position the left rear template on the door, and align<br />
its edges with the edges of the left rear door. Secure<br />
the template with masking tape as shown.<br />
LEFT REAR DOOR<br />
790207BT<br />
11. Align the edges of the left rear body side molding<br />
with the edges of the rear template as shown, and<br />
install the left rear body side molding on the left rear<br />
door.<br />
LEFT REAR BODY<br />
SIDE MOLDING<br />
ATTACHING<br />
POSITION<br />
(Clean using one<br />
alcohol pad.)<br />
LEFT<br />
REAR<br />
DOOR<br />
Align the front edge<br />
of the molding<br />
as shown.<br />
Align the bottom edge<br />
of the molding with the<br />
top of the template.<br />
Align.<br />
REAR<br />
TEMPLATE<br />
LEFT REAR BODY<br />
SIDE MOLDING<br />
EDGE OF LEFT<br />
REAR DOOR<br />
Align.<br />
790206CT<br />
9. Clean the door surface where the left rear body side<br />
molding will attach using one alchol pad. Allow the<br />
alcohol to dry.<br />
REAR TEMPLATE<br />
790208DT<br />
© 2010 American Honda Motor Co., Inc. – All Rights Reserved. BII 44976 (1011) 3 of 4
12. Press on the left rear body side molding firmly with<br />
the palm of your hand while removing the adhesive<br />
backings. Remove about 2 to 4 inches at a time.<br />
2 ADHESIVE BACKINGS<br />
(Remove slowly.)<br />
LEFT REAR<br />
DOOR<br />
LEFT REAR BODY<br />
SIDE MOLDING<br />
13. Using the rubber roller, apply firm pressure while<br />
rolling to set the adhesive.<br />
LEFT REAR BODY<br />
SIDE MOLDING<br />
RUBBER<br />
ROLLER<br />
(ESQE54D)<br />
LEFT REAR<br />
DOOR<br />
REAR TEMPLATE<br />
(Remove.)<br />
14. Remove the rear template.<br />
15. Turn the templates over and repeat steps 1 thru 14<br />
to install the body side moldings on the right side of<br />
the vehicle.<br />
4 of 4 BII 44976 (1011) © 2010 American Honda Motor Co., Inc. – All Rights Reserved.