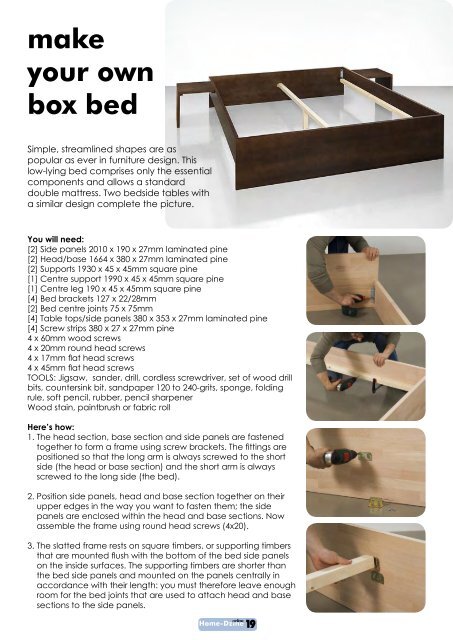
make your own box bed - Home-Dzine
make your own box bed - Home-Dzine
make your own box bed - Home-Dzine

Create successful ePaper yourself
Turn your PDF publications into a flip-book with our unique Google optimized e-Paper software.
<strong>make</strong><br />
<strong>your</strong> <strong>own</strong><br />
<strong>box</strong> <strong>bed</strong><br />
Simple, streamlined shapes are as<br />
popular as ever in furniture design. This<br />
low-lying <strong>bed</strong> comprises only the essential<br />
components and allows a standard<br />
double mattress. Two <strong>bed</strong>side tables with<br />
a similar design complete the picture.<br />
You will need:<br />
[2] Side panels 2010 x 190 x 27mm laminated pine<br />
[2] Head/base 1664 x 380 x 27mm laminated pine<br />
[2] Supports 1930 x 45 x 45mm square pine<br />
[1] Centre support 1990 x 45 x 45mm square pine<br />
[1] Centre leg 190 x 45 x 45mm square pine<br />
[4] Bed brackets 127 x 22/28mm<br />
[2] Bed centre joints 75 x 75mm<br />
[4] Table tops/side panels 380 x 353 x 27mm laminated pine<br />
[4] Screw strips 380 x 27 x 27mm pine<br />
4 x 60mm wood screws<br />
4 x 20mm round head screws<br />
4 x 17mm flat head screws<br />
4 x 45mm flat head screws<br />
TOOLS: Jigsaw, sander, drill, cordless screwdriver, set of wood drill<br />
bits, countersink bit, sandpaper 120 to 240-grits, sponge, folding<br />
rule, soft pencil, rubber, pencil sharpener<br />
Wood stain, paintbrush or fabric roll<br />
Here’s how:<br />
1. The head section, base section and side panels are fastened<br />
together to form a frame using screw brackets. The fittings are<br />
positioned so that the long arm is always screwed to the short<br />
side (the head or base section) and the short arm is always<br />
screwed to the long side (the <strong>bed</strong>).<br />
2. Position side panels, head and base section together on their<br />
upper edges in the way you want to fasten them; the side<br />
panels are enclosed within the head and base sections. Now<br />
assemble the frame using round head screws (4x20).<br />
3. The slatted frame rests on square timbers, or supporting timbers<br />
that are mounted flush with the bottom of the <strong>bed</strong> side panels<br />
on the inside surfaces. The supporting timbers are shorter than<br />
the <strong>bed</strong> side panels and mounted on the panels centrally in<br />
accordance with their length: you must therefore leave enough<br />
room for the <strong>bed</strong> joints that are used to attach head and base<br />
sections to the side panels.<br />
online<br />
<strong>Home</strong>-<strong>Dzine</strong> 19
4. Predrill holes for supporting timbers. Countersink holes pointed<br />
towards centre of <strong>bed</strong>. Mount supports with screws (4x60).<br />
5. Position centre leg centrally below supporting timber and screw<br />
in place. Predrill holes in supporting timber and countersink<br />
holes at the top. Use screws (4x60) to mount centre leg.<br />
6. Fasten supporting timber with centre <strong>bed</strong> joints to head/base<br />
sections of frame. These joints consist of two parts: a supporting<br />
bracket and retaining plate. The supporting bracket goes on the<br />
front side of the supporting timber - the retaining plate goes on<br />
head and base sections. Use flat head screws (4x17) to mount.<br />
7. Bedside table: The table top and side panel are fastened<br />
together from the insides with screws to form an angle using<br />
a screw strip. Predrill screw strip from both sides in advance.<br />
Ensure that you drill the holes so they are staggered diagonally<br />
and never at the same height, to prevent the screws from<br />
hitting each other in the strip. Countersink holes on visible<br />
surfaces.<br />
8. Place the side panel on <strong>your</strong> work surface with the visible<br />
surface facing d<strong>own</strong>wards. Position the predrilled screw strip<br />
onto the side panel so that it is flush with the upper edge and<br />
then fit the screw strip using screws (4x45).<br />
9. Place the table top on <strong>your</strong> work surface with the visible surface<br />
facing d<strong>own</strong>wards. Place the side panel fastened to the screw<br />
strip on top so that it is flush with the edge. You can now join the<br />
table top and side panel together using screws (4x45).<br />
source: bosch<br />
10. Use screws (4x45) to fit screw strips (predrilled in step 1) so they<br />
are flush with edge of table top. Position <strong>bed</strong>side table at the<br />
point along <strong>bed</strong>side frame where it can be most conveniently<br />
reached from the <strong>bed</strong>. Secure it in place using screws (4x45).<br />
Finishing<br />
Sand all edges with 180-grit sandpaper at a 45° angle to create<br />
a small bevel. Use <strong>your</strong> sander to sand all visible surfaces in the<br />
direction of wood grain, first with coarse sanding paper (120)<br />
and then fine (240). Wipe off the dust. The wood is now ready for<br />
surface treatment.<br />
Woodoc Stain Concentrates are suitable for use in both interior<br />
and exterior Clear Woodoc Sealers. They contain transparent<br />
iron oxides which absorb ultra-violet rays when added to exterior<br />
Woodoc Sealers. Woodoc Stain Concentrates are transparent<br />
showing the wood’s natural grain through the surface coating<br />
and giving it an uncommon warmth and beauty. Woodoc Stain<br />
Concentrates are available in eight natural wood colours.<br />
online<br />
<strong>Home</strong>-<strong>Dzine</strong> 20