Ultima Canopy datasheet - Armstrong
Ultima Canopy datasheet - Armstrong
Ultima Canopy datasheet - Armstrong

You also want an ePaper? Increase the reach of your titles
YUMPU automatically turns print PDFs into web optimized ePapers that Google loves.
ceiling<br />
systems<br />
[Between us, ideas become reality.]<br />
CI/SfB (35) Xy<br />
April 2008<br />
<strong>Ultima</strong> canopy<br />
Data sheet<br />
Acoustic performance meets High Design
<strong>Ultima</strong> canopy<br />
Installation Instructions<br />
I. GENERAL<br />
II. KIT COMPONENTS<br />
<br />
<br />
<br />
1. Product Description<br />
<strong>Ultima</strong> <strong>Canopy</strong> is a pre-formed<br />
acoustical canopy suspended with<br />
cables and available in either convex<br />
or concave configurations.<br />
2. Materials and Finishes<br />
<strong>Ultima</strong> <strong>Canopy</strong> panels consist of pre-formed and pre-curved<br />
layers of mineral fibre with an acoustically transparent<br />
membrane on all exposed surfaces.<br />
3. Storage and Handling<br />
The ceiling components shall be stored in a dry interior<br />
location and shall remain in original cartons prior<br />
to installation to avoid damage. The cartons shall be stored<br />
in a flat, horizontal position. Upon opening the carton,<br />
proper care should be taken to locate the accessory packet<br />
immediately. Targets printed on the top carton lid need<br />
to be kept for use during installation as a guide for hanging<br />
the canopies. Panels should not be removed from the<br />
cartons and the plastic film and protectors around the panels<br />
should not be removed until installation is complete. Proper<br />
care should be taken when handling to avoid damage and<br />
soiling.<br />
- Precautionary Measures:<br />
During installation, ensure that the work site is well<br />
ventilated to avoid breathing dust. All power-cutting tools<br />
must be equipped with dust collectors. Avoid contact<br />
with skin or eyes. Wear suitable clothes, gloves and eye<br />
protection.<br />
- First Aid Measures:<br />
If contact occurs flush eyes and skin irritation with plenty<br />
of water for at least 15 minutes.<br />
4. Jobsite Conditions<br />
<strong>Ultima</strong> canopies should be allowed to reach room<br />
temperature and have stabilised moisture content<br />
for a minimum of 24 hours before installation. Panels must<br />
be protected against damage from moisture, direct sunlight,<br />
surface contamination, and other causes. Building areas<br />
should be free of construction dust and debris before<br />
delivery.<br />
5. Temperature and Humidity during Installation<br />
The product can be installed in temperatures up to 38°C.<br />
It cannot be used in exterior or interior applications, where<br />
standing water is present, or where moisture will come in<br />
direct contact with the canopy.<br />
Installation must not be carried out in areas in excess<br />
of 90%RH; in the presence of chemical fumes requiring<br />
personal protection; or with temperatures at or below<br />
0°C. Following practical completion, conditions must be<br />
maintained below 70%RH (16-23°C).<br />
6. Fire Performance<br />
CONCAVE<br />
CONCAVE<br />
CONVEX<br />
CONVEX<br />
<strong>Ultima</strong> canopies, as with other architectural features located<br />
in the ceiling plane, may obstruct or skew the existing or<br />
planned fire sprinkler water distribution pattern, or possibly<br />
delay the activation of the fire sprinkler or fire detection<br />
system. Designers and installers are advised to consult a<br />
fire protection engineer and their local building codes for<br />
guidance on the proper installation techniques where fire<br />
detection or suppression systems are present.<br />
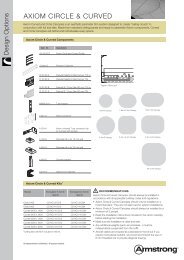
1. <strong>Ultima</strong> canopies<br />
<strong>Ultima</strong> canopies are 1905 mm x 1180 mm x 32 mm<br />
thick. Canopies are available in either Convex or Concave<br />
configurations with a fixed arc radius of 3.28 metres.<br />
2. Suspension System<br />
<strong>Ultima</strong> canopies are suspended with metal wire cables.<br />
Complete suspension cable kits are supplied with each<br />
canopy. They consist of four 4.88 metre cables per canopy<br />
and accessories that attach the cables to the canopy<br />
and structure with an adjustable gripper to easily set the<br />
proper elevation. Extended 9.15 metre cables are available<br />
as a separate accessory (BP625530)<br />
3. Light Fittings<br />
gripper<br />
structure<br />
anchor<br />
4,88 metres<br />
cable<br />
gripper<br />
anchor cap<br />
bottom<br />
end cable<br />
adjuster<br />
gripper<br />
bottom end<br />
assembly<br />
internal<br />
barrel cap<br />
Escutcheon<br />
Kit<br />
<strong>Ultima</strong> canopies have been designed to allow a suitable<br />
1200 mm light unit to be installed underneath the panel and<br />
still allow for the luminaire suspension fittings to pass outside<br />
the width of the canopy. Note that these cables must not be<br />
fixed to the canopy and no additional load should be applied<br />
to the canopy installation.<br />
Where <strong>Ultima</strong> canopy light fittings are installed below an<br />
existing ceiling, these must be supported from the structural<br />
soffit.
Installation<br />
General<br />
After opening the product carton, and before installation, be<br />
sure to locate, remove, and set aside the accessory kit before<br />
proceeding.<br />
<strong>Ultima</strong> canopies require two people to handle each panel safely,<br />
minimise damage and provide panel support during installation.<br />
DO NOT REMOVE THE CANOPIES FROM THE CARTON until step<br />
4 of the installation process. Since the canopies are pre-assembled,<br />
locate the suspension accessories and make all the connections<br />
while the product is still in the carton. Do not remove the plastic film<br />
or canopy edge protectors until the panel is installed.<br />
<strong>Ultima</strong> <strong>Canopy</strong> panels cannot be cut, drilled or altered in any<br />
way. The canopy must not be used to support any other<br />
material, fixtures or fittings. The cable suspension system<br />
must be fastened to the structure and cannot be hung from<br />
any commercial ceiling system. <strong>Ultima</strong> <strong>Canopy</strong> panels are not<br />
approved for exterior application.<br />
Suspension Cables<br />
Canopies must be installed with four suspension cables.<br />
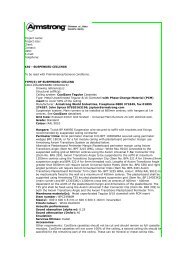
1. Cable attachment to structure<br />
1. Use the suspension cable targets on the top of the<br />
package to locate cable anchor points at the structure.<br />
Additional structural support may be required if cable<br />
anchor points are obstructed by HVAC, piping or other<br />
components in the plenum.<br />
2. Attach the gripper structure anchor to the structure<br />
with a fastener that will carry the full weight of the<br />
23 kg canopy, in accordance with EN13964. The top<br />
of the gripper anchor has a 6 mm threaded hole for<br />
use with an M6 (6 mm) bolt, or you can use a suitable<br />
wood or sheet metal screw through this hole for proper<br />
attachment to the structure.<br />
3. Insert the end of the cable into the gripper anchor cap.<br />
4. Screw the gripper anchor cap completely into the gripper<br />
structure anchor.<br />
(1)<br />
(2)<br />
(3)<br />
4,88 m<br />
2. Cable attachment to canopy<br />
All cable attachments should be made while the product<br />
is in the carton.<br />
1. Remove cardboard packaging from top of canopy.<br />
2. Pull back the plastic film to expose the four anchor<br />
points. This will ease final removal after the panel<br />
is installed.<br />
3. Locate the four embedded anchor points on the canopy.<br />
4. Insert the end of the cable into the internal barrel cap<br />
and completely screw this into the embedded canopy<br />
plate.<br />
5. Screw the bottom end cable adjuster into the gripper<br />
bottom end assembly.<br />
6. Repeat until all four-bottom end assemblies are attached<br />
to the canopy.<br />
(4)<br />
(5)<br />
(6)<br />
CANOPY
3. Install the <strong>Canopy</strong><br />
Insert Suspension Cables<br />
1. Move the carton to the approximate location<br />
of the installation.<br />
2. Keep the boxed canopy on a flat surface to support<br />
the carton.<br />
3. Insert a suspension cable into the top of the cable<br />
adjuster at all four corners.<br />
4. Gently pull the cable through the cable adjuster until<br />
all the slack is removed.<br />
5. Do not remove the canopy corner protectors.<br />
45°<br />
45°<br />
4. Suspend the <strong>Canopy</strong><br />
Canopies must be installed so the lowest point will not cause<br />
an obstruction or injury to people walking by. As a guideline<br />
we recommend that the lowest point is a minimum of<br />
2.25 metres from the finished floor level.<br />
1. Suspending the canopy requires two people.<br />
2. Make sure your hands are clean or wear white cotton<br />
gloves.<br />
3. Raise the panel and gently pull the cable(s) to take up<br />
the slack.<br />
Do not pull the cables to raise the canopy under full panel<br />
weight. Cable damage will occur.<br />
4. Continue to raise the canopy until you reach the required<br />
height.<br />
5. Canopies can be installed up to a 45 degree angle in<br />
either direction.<br />
6. To lower the canopy, take the weight off the cable(s),<br />
depress the plunger on top of the cable adjuster and<br />
lower the canopy. Release the plunger to lock the cable<br />
into the adjuster. Adjust panel height as desired.<br />
7. Do not allow excess cable to drop below the canopy<br />
while adjusting final panel height. Could cause injury or<br />
panel edge damage.<br />
8. Once the panel is installed at the correct height - cut off<br />
excess cable leaving about 25 mm remaining out of the<br />
cable adjuster.<br />
9. It is recommended to keep the edge protection and<br />
plastic film on the canopy until all canopies are installed<br />
and other trades have finished in the area. This will keep<br />
the panel clean and minimise edge damage.<br />
5. Installing the canopy below an existing ceiling<br />
<strong>Canopy</strong> suspension cables should not impose any additional<br />
load or lateral force on an existing ceiling.<br />
1. The structure gripper anchor must be mounted<br />
to a structural support at or above the existing ceiling.<br />
2. Use 6 mm threaded rod (1) attached to structure<br />
to secure the structure gripper anchor (2) at the correct<br />
height.<br />
3. Use diagonal bracing to structure to provide support<br />
and lateral restraint.<br />
4. Use the optional escutcheon kit accessory (3) to conceal<br />
the structure gripper anchor when installed above<br />
the ceiling level.<br />
(1)<br />
(2)<br />
(3)
Acoustics<br />
<strong>Ultima</strong> Canopies offers excellent additional sound absorption<br />
for larger open spaces such as Reception Areas, Call Centres,<br />
Shopping Malls and Atria.<br />
Canopies installed above an individual or group work station will<br />
enhance the overall atmosphere, creating a ‘localised acoustical<br />
enclosure’. This can be beneficial for open spaces with high<br />
ceilings.<br />
By providing sound absorption <strong>Ultima</strong> Canopies<br />
help to:<br />
• Reduce reverberation times<br />
• Control noise levels<br />
• Increase speech intelligibility<br />
• Provide a local sense of ‘acoustic enclosure’ for people<br />
working beneath them.<br />
For example: Each 2.2 m 2 canopy provides nearly 3 Sabines of<br />
sound absorption at 1 kHz (EN ISO 354).<br />
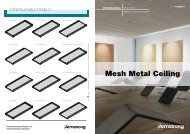
Sound absorption<br />
4,00<br />
3,50<br />
3,00<br />
2,50<br />
Sabines<br />
2,00<br />
1,50<br />
1,00<br />
<strong>Ultima</strong> <strong>Canopy</strong><br />
0,50<br />
<strong>Ultima</strong> tile<br />
0,00<br />
100 125 160 200 250 315 400 500 630 800 1000 1250 1600 2000 2500 3150 4000 5000<br />
Frequency Hz<br />
One canopy will absorb over 50% more sound than the same area of an <strong>Ultima</strong> flat ceiling.<br />
6,0<br />
5,0<br />
Reverberation time (s)<br />
4,0<br />
3,0<br />
2,0<br />
Plasterboard on joists<br />
<strong>Ultima</strong> <strong>Canopy</strong><br />
1,0<br />
0,0<br />
125 250 500 1000 2000 4000<br />
Frequency Hz<br />
Average Reverberation Time Tm [125 - 4000 Hz] =<br />
Plasterboard on joists 3.66 secs<br />
<strong>Ultima</strong> <strong>Canopy</strong> 2.26 secs<br />
In a modelled reception area space using plasterboard – 5 canopies will reduce the Reverberation Time by 38%.
Key Selection Attributes<br />
CONCAVE<br />
CONCAVE<br />
CONVEX<br />
CONVEX<br />
• Canopies can be used to define spaces,<br />
accentuate an area, provide focus and<br />
create ceiling sculptures.<br />
• You can mix & match shapes<br />
• Durable<br />
Washable<br />
Scrubbable (non-abrasive cloth)<br />
Impact-Resistant<br />
Strong Edges<br />
• Standard components allow you to create<br />
custom configurations<br />
• Lighting can enhance the impact<br />
of canopies<br />
• Use individually or in groupings, convex<br />
or concave<br />
• Suspended from the building structure<br />
• Installation is fast and simple – no special<br />
tools are required<br />
• Easy to order kits provide all the necessary<br />
accessories<br />
• Do not stack canopies vertically in design<br />
configurations<br />
Typical Applications<br />
High visibility and focus areas, including:<br />
• Hospitality & retail<br />
• Offices<br />
• Reception areas, atriums<br />
• Open plenum areas<br />
• Transportation, airports<br />
• Exhibitions<br />
Physical Data<br />
Dimensions<br />
1905 x 1180 x 32 mm<br />
Colour<br />
White<br />
Edge<br />
Paint on edges<br />
Edge detail<br />
Board<br />
Fire reaction A2, s1- d0 (EN 13964:2004)<br />
Humidity resistance<br />
70% RH<br />
Light reflectance 86%<br />
Scratch resistance<br />
Yes<br />
Thermal conductivity (W/mK) 0.052-0.057 W/mK<br />
Recycled content ≤ 70%<br />
Sound absorption – Sabine* 2.84 (1 kHz)<br />
Weight<br />
Panel = 23 kg<br />
Cleaning<br />
Use a clean, dry, soft white<br />
cloth to wipe off any dirt<br />
or fingerprints. Regular<br />
light dusting of the back<br />
side of the canopy is<br />
recommended.<br />
*(metric)<br />
CONCAVE<br />
CONVEX<br />
Item number Concave Convex<br />
1 piece per carton BP62591G BP62581G<br />
2 pieces per carton BP62592G BP62582G<br />
Extended Hanging Cables<br />
(4) 9.15 metre cables<br />
Escutcheon Kit<br />
Used when hanging canopies below an existing ceiling.<br />
(2) Collars with Set Screws<br />
(2) 50 mm Escutcheons<br />
Note: 2 kits are required for each <strong>Canopy</strong>.<br />
BP625530<br />
BP70056<br />
Recommendation<br />
- Attach the gripper structure anchor with a suitable fastener<br />
UK<br />
in accordance with EN13964.<br />
- Use the suspension cable template on the top of the carton<br />
to identify the cable anchor points on the structure.<br />
- Canopies cannot be drilled, cut or altered in any way.<br />
- <strong>Ultima</strong> Canopies are not recommended for external use.<br />
- All cable attachments should be made while the product is in the carton.<br />
- The <strong>Canopy</strong> (23 kg) should always be suspended by 2 people.<br />
- After opening the carton, remove and set aside the accessory kit before<br />
proceeding.<br />
- Do not remove the <strong>Canopy</strong> from the carton until the <strong>Canopy</strong> is suspended.<br />
- <strong>Canopy</strong> suspension cables should not impose any additional load<br />
or lateral force on an existing ceiling.<br />
- Do not allow excess cable to drop below the canopy when adjusting the<br />
panel to the required height. This could cause injury or panel edge damage.<br />
Please contact<br />
Internal Technical Sales<br />
for further details.<br />
United Kingdom / Republic of Ireland<br />
<strong>Armstrong</strong> World Industries Ltd.<br />
Building Products Division<br />
<strong>Armstrong</strong> House, 38 Market Square,<br />
Uxbridge UB8 1NG<br />
www.armstrong-ceilings.co.uk<br />
sales-support@armstrong.com<br />
0800 371849 (UK)<br />
1800 409002 (ROI)<br />
Fax: 00 44 (0) 1895 274287<br />
freefone<br />
Other countries:<br />
www.armstrong-europe.com<br />
Central Europe<br />
(+48) 22 337 86 10/-11<br />
Greece<br />
(+39) 02 66 22 76 50<br />
Scandinavia<br />
(+31) 76 521 77 33<br />
Africa / Middle East / Turkey<br />
(+44) 01895 251 122