dashboard mount rear view mirror bracket - Eckler's Classic Chevy
dashboard mount rear view mirror bracket - Eckler's Classic Chevy
dashboard mount rear view mirror bracket - Eckler's Classic Chevy

Create successful ePaper yourself
Turn your PDF publications into a flip-book with our unique Google optimized e-Paper software.
y Randy Irwin<br />
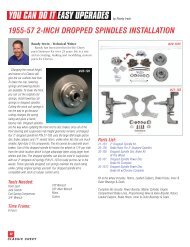
DASHBOARD MOUNT REAR VIEW MIRROR BRACKET<br />
Randy Irwin - Technical Writer<br />
Randy has been involved in the <strong>Chevy</strong><br />
parts business for over 30 years. He is a wizard<br />
at creating, making and modifying custom<br />
parts for <strong>Chevy</strong>s.<br />
From 1958 to 1962 the Corvette inside <strong>rear</strong> <strong>view</strong> <strong>mirror</strong> was <strong>mount</strong>ed<br />
off the <strong>dashboard</strong> and not off the windshield or windshield frame. This is<br />
one of those cool things about a “Vette”. It just has that BAD look, like<br />
something going 200 mph, or something from an Elvis movie. The<br />
<strong>mount</strong>ing <strong>bracket</strong> simply bolted to the top <strong>dashboard</strong> and held the <strong>mirror</strong><br />
in place. The only problem is the Corvette <strong>mount</strong>ing <strong>bracket</strong> is a little tall<br />
to be used in a Tri-Five. Now Eckler’s <strong>Classic</strong> <strong>Chevy</strong> has a shorter <strong>mirror</strong><br />
<strong>bracket</strong> that will work perfect in a Tri-Five <strong>Chevy</strong> or any other car with a<br />
somewhat flat <strong>dashboard</strong>. This <strong>bracket</strong> can be used with the standard<br />
<strong>mirror</strong>, a Day/Night <strong>mirror</strong> or just about any aftermarket <strong>mirror</strong> out there.<br />
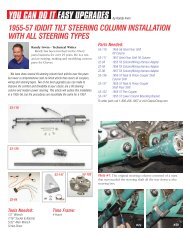
Photo #2: The <strong>mirror</strong><br />
<strong>bracket</strong> can be<br />
<strong>mount</strong>ed anywhere<br />
on the <strong>dashboard</strong>. On<br />
our 1955, we choose<br />
to <strong>mount</strong> the <strong>bracket</strong><br />
center of the<br />
<strong>dashboard</strong> and close<br />
to the front edge of<br />
the <strong>dashboard</strong>. On a<br />
1957 you will need to <strong>mount</strong> the <strong>bracket</strong> to the <strong>rear</strong> of the<br />
<strong>dashboard</strong> to clear the speaker grille like a 1958-62 Corvette.<br />
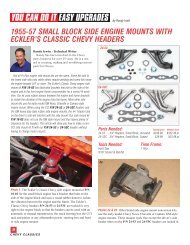
#3a #3b<br />
06-364 02-42<br />
02-19<br />
Photo #3a & 3b: We marked the center of our <strong>dashboard</strong> and<br />
measured back from the front edge 1-1/4”. We will drill a 1/4”<br />
for the <strong>mount</strong>ing stud on the <strong>mirror</strong> <strong>bracket</strong>. Use a sharp drill<br />
bit at a slow speed.<br />
Parts Needed: Catalog price Member price<br />
06-364 Mirror Bracket, Dashboard Mount 49.99 47.49<br />
02-42 1955-57 Rear View Mirror 21.99 20.89<br />
02-19 1957-62 Day/Night Mirror 67.99 64.59<br />
02-66 1955 Day/Night Mirror 54.99 52.24<br />
02-21 1956 Day/Night Mirror 67.99 64.59<br />
02-249 Mirror Adaptor For Aftermarket Mirror 47.99 45.59<br />
02-147 Bowtie Rear View Mirror 119.99 113.99<br />
02-250 Surf Board Rear View Mirror 59.99 56.99<br />
Tools Needed:<br />
Tape Measure<br />
Masking Tape<br />
Drill and 1/4” Drill Bit<br />
1/4” Wrench<br />
7/16” Wrench<br />
9/16” Wrench<br />
Photo #1: The <strong>mirror</strong> <strong>bracket</strong> P/N 06-364<br />
is held to the <strong>dashboard</strong> with a single 1/4”<br />
stud, nut and lock washer.<br />
Time Frame:<br />
2- Hours<br />
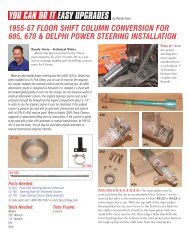
#4a<br />
#4b<br />
Photo #4a & 4b & 4c: #4c<br />
Using the <strong>mirror</strong><br />
<strong>mount</strong>ing <strong>bracket</strong> as a<br />
guide, place the<br />
<strong>mount</strong>ing stud into the<br />
new 1/4” hole in the<br />
<strong>dashboard</strong>. Push the<br />
<strong>bracket</strong> down making a<br />
mark in the <strong>dashboard</strong><br />
where the second 1/4”<br />
hole will need to be drilled for the alignment pin on the<br />
<strong>mirror</strong> <strong>bracket</strong>.
#5a<br />
#6a<br />
#5b<br />
#5c<br />
Photo #5a & 5b & 5c: The<br />
<strong>mirror</strong> <strong>bracket</strong> has 5/16”-18<br />
<strong>mirror</strong> <strong>mount</strong>ing threads so a<br />
standard <strong>mirror</strong> or a Day/-<br />
Night <strong>mirror</strong> or the Eckler’s<br />
<strong>Classic</strong> <strong>Chevy</strong> aftermarket<br />
<strong>mirror</strong> <strong>mount</strong>ing adaptor can<br />
be used. The<br />
hole in the<br />
<strong>mount</strong>ing<br />
<strong>bracket</strong> is 5/16”<br />
deep so the<br />
<strong>mirror</strong><br />
<strong>mount</strong>ing shaft<br />
had to be<br />
shortened. With<br />
the shaft<br />
shortened, use<br />
a 1/4” wrench to<br />
screw the shaft<br />
into the <strong>bracket</strong><br />
and a 9/16” to<br />
lock the shaft<br />
into place.<br />
#6b<br />
Photo #6a & 6b: The <strong>mirror</strong> looks great on the <strong>dashboard</strong>. This<br />
would look super cool on a convertible. All we need now is a<br />
tunnel ram and a straight axle.<br />
Good Luck.