- Page 1 and 2:
Kerio Control Administrator’s Gui
- Page 3 and 4:
Contents 1 Quick Checklist . . . .
- Page 5 and 6:
13 HTTP and FTP filtering . . . . .
- Page 7 and 8:
26 Technical support . . . . . . .
- Page 9 and 10:
8. Enable the intrusion prevention
- Page 11 and 12:
2.2 Conflicting software Warning: S
- Page 13 and 14:
2.3 System requirements met). 2.3 S
- Page 15 and 16:
2.4 Installation - Windows • TCP/
- Page 17 and 18:
2.4 Installation - Windows Warning:
- Page 19 and 20:
2.5 Initial configuration wizard (W
- Page 21 and 22:
2.6 Upgrade and Uninstallation - Wi
- Page 23 and 24:
2.7 Installation - Software Applian
- Page 25 and 26:
2.7 Installation - Software Applian
- Page 27 and 28:
2.10 Kerio Control Engine Monitor (
- Page 29 and 30:
2.11 The firewall’s console (Soft
- Page 31 and 32:
3.1 Kerio Control Administration we
- Page 33 and 34: 3.2 Administration Console - the ma
- Page 35 and 36: 3.3 Administration Console - view p
- Page 37 and 38: Chapter 4 License and Registration
- Page 39 and 40: 4.3 License information User is def
- Page 41 and 42: 4.4 Registration of the product in
- Page 43 and 44: 4.4 Registration of the product in
- Page 45 and 46: 4.4 Registration of the product in
- Page 47 and 48: 4.4 Registration of the product in
- Page 49 and 50: 4.6 Subscription / Update Expiratio
- Page 51 and 52: Chapter 5 Network interfaces Kerio
- Page 53 and 54: 5.3 Viewing and editing interfaces
- Page 55 and 56: 5.3 Viewing and editing interfaces
- Page 57 and 58: 5.5 Advanced dial-up settings Figur
- Page 59 and 60: 5.6 Supportive scripts for link con
- Page 61 and 62: 6.1 Persistent connection with a si
- Page 63 and 64: 6.1 Persistent connection with a si
- Page 65 and 66: 6.2 Connection with a single leased
- Page 67 and 68: 6.3 Connection Failover Advanced di
- Page 69 and 70: 6.3 Connection Failover Figure 6.8
- Page 71 and 72: 6.4 Network Load Balancing Note: 1.
- Page 73 and 74: 6.4 Network Load Balancing On the t
- Page 75 and 76: 6.4 Network Load Balancing Hint: Sp
- Page 77 and 78: Chapter 7 Traffic Policy Traffic Ru
- Page 79 and 80: 7.1 Network Rules Wizard Step 4 —
- Page 81 and 82: 7.1 Network Rules Wizard Figure 7.5
- Page 83: 7.1 Network Rules Wizard Note: In t
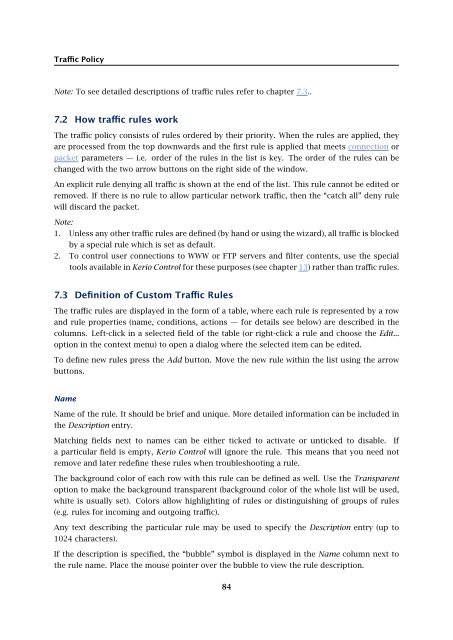
- Page 87 and 88: 7.3 Definition of Custom Traffic Ru
- Page 89 and 90: 7.3 Definition of Custom Traffic Ru
- Page 91 and 92: 7.3 Definition of Custom Traffic Ru
- Page 93 and 94: 7.3 Definition of Custom Traffic Ru
- Page 95 and 96: 7.3 Definition of Custom Traffic Ru
- Page 97 and 98: 7.4 Basic Traffic Rule Types Do not
- Page 99 and 100: 7.4 Basic Traffic Rule Types Figure
- Page 101 and 102: 7.4 Basic Traffic Rule Types Transl
- Page 103 and 104: 7.5 Policy routing 7.5 Policy routi
- Page 105 and 106: 7.6 User accounts and groups in tra
- Page 107 and 108: 7.7 Partial Retirement of Protocol
- Page 109 and 110: 7.8 Use of Full cone NAT as possibl
- Page 111 and 112: 7.9 Media hairpinning the port of t
- Page 113 and 114: 8.1 Network intrusion prevention sy
- Page 115 and 116: 8.1 Network intrusion prevention sy
- Page 117 and 118: 8.2 MAC address filtering Figure 8.
- Page 119 and 120: 8.3 Special Security Settings Anti-
- Page 121 and 122: 8.4 P2P Eliminator Figure 8.5 Detec
- Page 123 and 124: 8.4 P2P Eliminator The Define servi
- Page 125 and 126: 9.1 DNS module of the firewall’s
- Page 127 and 128: 9.1 DNS module Figure 9.2 Editor of
- Page 129 and 130: 9.1 DNS module Figure 9.3 Specific
- Page 131 and 132: 9.2 DHCP server If the Do not forwa
- Page 133 and 134: 9.2 DHCP server Figure 9.5 DHCP ser
- Page 135 and 136:
9.2 DHCP server Figure 9.7 DHCP ser
- Page 137 and 138:
9.2 DHCP server Figure 9.9 DHCP ser
- Page 139 and 140:
9.2 DHCP server Leases IP scopes ca
- Page 141 and 142:
9.2 DHCP server Figure 9.13 DHCP se
- Page 143 and 144:
9.3 Dynamic DNS for public IP addre
- Page 145 and 146:
9.4 Proxy server Proxy Server Confi
- Page 147 and 148:
9.5 HTTP cache Note: The configurat
- Page 149 and 150:
9.5 HTTP cache other objects can be
- Page 151 and 152:
9.5 HTTP cache TTL TTL of objects m
- Page 153 and 154:
Chapter 10 Bandwidth Limiter The ma
- Page 155 and 156:
10.2 Bandwidth Limiter configuratio
- Page 157 and 158:
10.2 Bandwidth Limiter configuratio
- Page 159 and 160:
10.3 Detection of connections with
- Page 161 and 162:
11.1 Firewall User Authentication T
- Page 163 and 164:
11.1 Firewall User Authentication a
- Page 165 and 166:
12.1 Web interface and certificate
- Page 167 and 168:
12.2 User authentication at the web
- Page 169 and 170:
Chapter 13 HTTP and FTP filtering K
- Page 171 and 172:
13.2 URL Rules Rules in this sectio
- Page 173 and 174:
13.2 URL Rules for example a rule a
- Page 175 and 176:
13.2 URL Rules • A page informing
- Page 177 and 178:
13.3 Content Rating System (Kerio W
- Page 179 and 180:
13.3 Content Rating System (Kerio W
- Page 181 and 182:
13.4 Web content filtering by word
- Page 183 and 184:
13.4 Web content filtering by word
- Page 185 and 186:
13.5 FTP Policy Weight Word weight
- Page 187 and 188:
13.5 FTP Policy Open the General ta
- Page 189 and 190:
13.5 FTP Policy Scan content for vi
- Page 191 and 192:
14.2 How to choose and setup antivi
- Page 193 and 194:
14.2 How to choose and setup antivi
- Page 195 and 196:
14.3 HTTP and FTP scanning Warning:
- Page 197 and 198:
14.3 HTTP and FTP scanning Use the
- Page 199 and 200:
14.4 Email scanning If only an aste
- Page 201 and 202:
14.4 Email scanning Figure 14.9 Set
- Page 203 and 204:
14.5 Scanning of files transferred
- Page 205 and 206:
15.2 Time Ranges Figure 15.2 IP gro
- Page 207 and 208:
15.3 Services Figure 15.4 Time rang
- Page 209 and 210:
15.3 Services Protocol The communic
- Page 211 and 212:
15.4 URL Groups Note: 1. Generally,
- Page 213 and 214:
15.4 URL Groups Examples:: • www.
- Page 215 and 216:
16.1 Viewing and definitions of use
- Page 217 and 218:
16.2 Local user accounts Accounts m
- Page 219 and 220:
16.2 Local user accounts Name Usern
- Page 221 and 222:
16.2 Local user accounts Step 3 —
- Page 223 and 224:
16.2 Local user accounts Figure 16.
- Page 225 and 226:
16.2 Local user accounts Within thi
- Page 227 and 228:
16.3 Local user database: external
- Page 229 and 230:
16.4 User accounts in Active Direct
- Page 231 and 232:
16.4 User accounts in Active Direct
- Page 233 and 234:
16.4 User accounts in Active Direct
- Page 235 and 236:
16.5 User groups Note: In case of u
- Page 237 and 238:
16.5 User groups Using the Add and
- Page 239 and 240:
Chapter 17 Administrative settings
- Page 241 and 242:
17.3 Update Checking Figure 17.2 Tr
- Page 243 and 244:
17.3 Update Checking Last update ch
- Page 245 and 246:
18.1 Routing table Route Types The
- Page 247 and 248:
18.2 Universal Plug-and-Play (UPnP)
- Page 249 and 250:
18.3 Relay SMTP server 18.3 Relay S
- Page 251 and 252:
Chapter 19 Status Information Kerio
- Page 253 and 254:
19.1 Active hosts and connected use
- Page 255 and 256:
19.1 Active hosts and connected use
- Page 257 and 258:
19.1 Active hosts and connected use
- Page 259 and 260:
19.2 Network connections overview
- Page 261 and 262:
19.2 Network connections overview F
- Page 263 and 264:
19.4 Alerts • Session duration.
- Page 265 and 266:
19.4 Alerts • Connection failover
- Page 267 and 268:
19.4 Alerts Click an event to view
- Page 269 and 270:
20.1 Volume of transferred data and
- Page 271 and 272:
20.2 Interface statistics Figure 20
- Page 273 and 274:
20.2 Interface statistics Figure 20
- Page 275 and 276:
21.1 Monitoring and storage of stat
- Page 277 and 278:
21.2 Settings for statistics and qu
- Page 279 and 280:
21.3 Connection to StaR and viewing
- Page 281 and 282:
21.3 Connection to StaR and viewing
- Page 283 and 284:
22.1 Log settings Figure 22.1 Log s
- Page 285 and 286:
22.1 Log settings Figure 22.3 Syslo
- Page 287 and 288:
22.2 Logs Context Menu • Target f
- Page 289 and 290:
22.3 Alert Log Figure 22.7 Highligh
- Page 291 and 292:
22.5 Connection Log A typical examp
- Page 293 and 294:
22.6 Debug Log The expression must
- Page 295 and 296:
22.7 Dial Log 3. Disconnection caus
- Page 297 and 298:
22.9 Filter Log • 8000-8099 — H
- Page 299 and 300:
22.10 Http log Packet log example:
- Page 301 and 302:
22.11 Security Log An example of Ht
- Page 303 and 304:
22.11 Security Log Example: [17/Jul
- Page 305 and 306:
22.13 Warning Log Events causing di
- Page 307 and 308:
Chapter 23 Kerio VPN Kerio Control
- Page 309 and 310:
23.1 VPN Server Configuration Figur
- Page 311 and 312:
23.1 VPN Server Configuration the V
- Page 313 and 314:
23.1 VPN Server Configuration Kerio
- Page 315 and 316:
23.3 Interconnection of two private
- Page 317 and 318:
23.3 Interconnection of two private
- Page 319 and 320:
23.3 Interconnection of two private
- Page 321 and 322:
23.4 Exchange of routing informatio
- Page 323 and 324:
23.5 Example of Kerio VPN configura
- Page 325 and 326:
23.5 Example of Kerio VPN configura
- Page 327 and 328:
23.5 Example of Kerio VPN configura
- Page 329 and 330:
23.5 Example of Kerio VPN configura
- Page 331 and 332:
23.5 Example of Kerio VPN configura
- Page 333 and 334:
23.5 Example of Kerio VPN configura
- Page 335 and 336:
23.6 Example of a more complex Keri
- Page 337 and 338:
23.6 Example of a more complex Keri
- Page 339 and 340:
23.6 Example of a more complex Keri
- Page 341 and 342:
23.6 Example of a more complex Keri
- Page 343 and 344:
23.6 Example of a more complex Keri
- Page 345 and 346:
23.6 Example of a more complex Keri
- Page 347 and 348:
23.6 Example of a more complex Keri
- Page 349 and 350:
23.6 Example of a more complex Keri
- Page 351 and 352:
23.6 Example of a more complex Keri
- Page 353 and 354:
23.6 Example of a more complex Keri
- Page 355 and 356:
23.6 Example of a more complex Keri
- Page 357 and 358:
23.6 Example of a more complex Keri
- Page 359 and 360:
23.6 Example of a more complex Keri
- Page 361 and 362:
24.1 Kerio Control SSL-VPN configur
- Page 363 and 364:
Chapter 25 Specific settings and tr
- Page 365 and 366:
25.3 Automatic user authentication
- Page 367 and 368:
25.3 Automatic user authentication
- Page 369 and 370:
25.4 FTP over Kerio Control proxy s
- Page 371 and 372:
25.5 Internet links dialed on deman
- Page 373 and 374:
25.5 Internet links dialed on deman
- Page 375 and 376:
25.5 Internet links dialed on deman
- Page 377 and 378:
The text file will be stored in the
- Page 379 and 380:
Appendix B Used open source items K
- Page 381 and 382:
Copyright © 2005 Harald Welte Dist
- Page 383 and 384:
Glossary of terms ActiveX This Micr
- Page 385 and 386:
Ident The Ident protocol is used fo
- Page 387 and 388:
Policy routing Advanced routing tec
- Page 389 and 390:
TCP Transmission Control Protocol i
- Page 391 and 392:
dial-up 64 dialing scripts 21, 58 h
- Page 393 and 394:
S service 89, 207 SIP 210 SSL-VPN 3


