Administrator's Guide - Kerio Software Archive
Administrator's Guide - Kerio Software Archive Administrator's Guide - Kerio Software Archive
Introduction For details, refer to chapter 17.3. Uninstallation Before uninstalling the product, it is recommended to close all Kerio Control components. The Add/Remove Programs option in the Control Panel launches the uninstallation process. All files under the Kerio Control directory can be optionally deleted. (the typical path is C:\Program Files\Kerio\WinRoute Firewall) — configuration files, SSL certificates, license key, logs, etc. Figure 2.5 Uninstallation — asking user whether files created in Kerio Control should be deleted Keeping these files may be helpful for copying of the configuration to another host or if it is not sure whether the SSL certificates were issued by a trustworthy certification authority. During uninstallation, the Kerio Control installation program automatically refreshes the original status of the Windows Firewall / Internet Connection Sharing, Universal Plug and Play Device Host) and SSDP Discovery Service system services. 2.7 Installation - Software Appliance and VMware Virtual Appliance Kerio Control in the software appliance edition is distributed: • as an ISO of the installation CD which is used to install the system and then install the firewall either on a physical or virtual computer (Software Appliance), • as a virtual appliance for VMware (VMware Virtual Appliance). Standalone Kerio Control installation package for installation on previously installed Linux is not available. 22
2.7 Installation - Software Appliance and VMware Virtual Appliance Software Appliance / VMware Virtual Appliance installation process consists of the following simple steps: Start of the installation Software Appliance ISO image of the installation CD can be burned on a physical CD and then the CD can be used for installation of the system on the target computer (either physical or virtual). In case of virtual computers, the ISO image can be also connected as a virtual CD ROM, without the need to burn the installation ISO file on a CD. Note: Kerio Control Software Appliance cannot be installed on a computer with another operating system. Existing operating system on the target disk will be removed within the installation. VMware Virtual Appliance Supported VMware hypervisor versions: • Workstation 6.5 and 7.0 • Server 2.0 • Fusion 2.0 and 3.0 • Player 2.5 and 3.0 • ESX 3.5 and 4.0 • ESXi 3.5 and 4.0 Use an installation package in accordance with the type of your VMware product (see above): • In case of products VMware Server, Workstation and Fusion, download the compressed VMX distribution file (*.zip), unpack it and open it in the your VMware product. • You can import a virtual appliance directly to VMware ESX/ESXi from the URL of the OVF file — for example: http://download.kerio.com/dwn/control/ kerio-control-appliance-7.0.0-1234-linux.ovf VMware ESX/ESXi automatically downloads the OVF configuration file and a corresponding disk image (.vmdk). If you import virtual appliance in the OVF format, bear in mind the following specifics: • In the imported virtual appliance, time synchronization between the host and the virtual appliance is disabled. However, Kerio Control features a proprietary mechanism for synchronization of time with public Internet time servers. Therefore, it is not necessary to enable synchronization with the host. • Tasks for shutdown or restart of the virtual machine will be set to default values after the import. These values can be set to “hard” shutdown or “hard” reset. However, this may cause loss of data on the virtual appliance. Kerio Control VMware Virtual Appliance supports so called Soft Power Operations which 23
- Page 1 and 2: Kerio Control Administrator’s Gui
- Page 3 and 4: Contents 1 Quick Checklist . . . .
- Page 5 and 6: 13 HTTP and FTP filtering . . . . .
- Page 7 and 8: 26 Technical support . . . . . . .
- Page 9 and 10: 8. Enable the intrusion prevention
- Page 11 and 12: 2.2 Conflicting software Warning: S
- Page 13 and 14: 2.3 System requirements met). 2.3 S
- Page 15 and 16: 2.4 Installation - Windows • TCP/
- Page 17 and 18: 2.4 Installation - Windows Warning:
- Page 19 and 20: 2.5 Initial configuration wizard (W
- Page 21: 2.6 Upgrade and Uninstallation - Wi
- Page 25 and 26: 2.7 Installation - Software Applian
- Page 27 and 28: 2.10 Kerio Control Engine Monitor (
- Page 29 and 30: 2.11 The firewall’s console (Soft
- Page 31 and 32: 3.1 Kerio Control Administration we
- Page 33 and 34: 3.2 Administration Console - the ma
- Page 35 and 36: 3.3 Administration Console - view p
- Page 37 and 38: Chapter 4 License and Registration
- Page 39 and 40: 4.3 License information User is def
- Page 41 and 42: 4.4 Registration of the product in
- Page 43 and 44: 4.4 Registration of the product in
- Page 45 and 46: 4.4 Registration of the product in
- Page 47 and 48: 4.4 Registration of the product in
- Page 49 and 50: 4.6 Subscription / Update Expiratio
- Page 51 and 52: Chapter 5 Network interfaces Kerio
- Page 53 and 54: 5.3 Viewing and editing interfaces
- Page 55 and 56: 5.3 Viewing and editing interfaces
- Page 57 and 58: 5.5 Advanced dial-up settings Figur
- Page 59 and 60: 5.6 Supportive scripts for link con
- Page 61 and 62: 6.1 Persistent connection with a si
- Page 63 and 64: 6.1 Persistent connection with a si
- Page 65 and 66: 6.2 Connection with a single leased
- Page 67 and 68: 6.3 Connection Failover Advanced di
- Page 69 and 70: 6.3 Connection Failover Figure 6.8
- Page 71 and 72: 6.4 Network Load Balancing Note: 1.
Introduction<br />
For details, refer to chapter 17.3.<br />
Uninstallation<br />
Before uninstalling the product, it is recommended to close all <strong>Kerio</strong> Control components. The<br />
Add/Remove Programs option in the Control Panel launches the uninstallation process. All<br />
files under the <strong>Kerio</strong> Control directory can be optionally deleted.<br />
(the typical path is C:\Program Files\<strong>Kerio</strong>\WinRoute Firewall)<br />
— configuration files, SSL certificates, license key, logs, etc.<br />
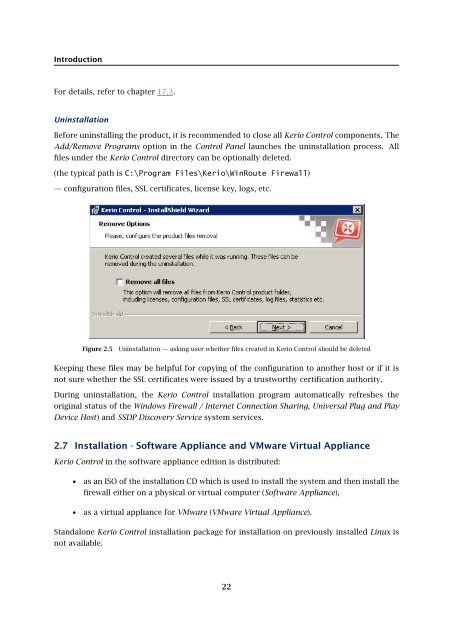
Figure 2.5<br />
Uninstallation — asking user whether files created in <strong>Kerio</strong> Control should be deleted<br />
Keeping these files may be helpful for copying of the configuration to another host or if it is<br />
not sure whether the SSL certificates were issued by a trustworthy certification authority.<br />
During uninstallation, the <strong>Kerio</strong> Control installation program automatically refreshes the<br />
original status of the Windows Firewall / Internet Connection Sharing, Universal Plug and Play<br />
Device Host) and SSDP Discovery Service system services.<br />
2.7 Installation - <strong>Software</strong> Appliance and VMware Virtual Appliance<br />
<strong>Kerio</strong> Control in the software appliance edition is distributed:<br />
• as an ISO of the installation CD which is used to install the system and then install the<br />
firewall either on a physical or virtual computer (<strong>Software</strong> Appliance),<br />
• as a virtual appliance for VMware (VMware Virtual Appliance).<br />
Standalone <strong>Kerio</strong> Control installation package for installation on previously installed Linux is<br />
not available.<br />
22


