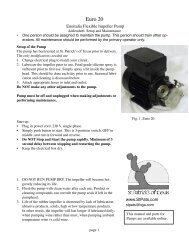
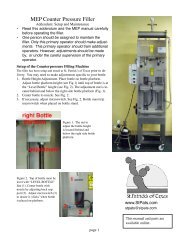
P12 Manual and Maintenance - St. Patrick's of Texas
P12 Manual and Maintenance - St. Patrick's of Texas
P12 Manual and Maintenance - St. Patrick's of Texas

You also want an ePaper? Increase the reach of your titles
YUMPU automatically turns print PDFs into web optimized ePapers that Google loves.
•<br />
•<br />
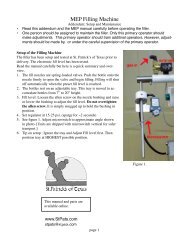
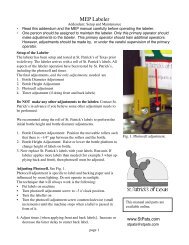
<strong>P12</strong> Corker<br />
Addendum: Setup <strong>and</strong> <strong>Maintenance</strong><br />
Read this addendum <strong>and</strong> the MEP manual carefully before operating the corker.<br />
One person should be assigned to maintain the corker. Only this primary operator should<br />
make adjustments to the corker. This primary operator should train additinal operators.<br />
However, adjustments should be made by, or under the careful supervision <strong>of</strong> the primary<br />
operator.<br />
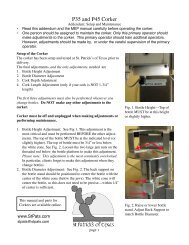
Setup <strong>of</strong> the Corker<br />
The corker has been setup <strong>and</strong> tested at <strong>St</strong>. Patrick’s <strong>of</strong> <strong>Texas</strong> prior to<br />
delivery.<br />
The final adjustments, <strong>and</strong> the only adjustments, needed are<br />
.<br />
2.<br />
3.<br />
4.<br />
Bottle Height Adjustment<br />
Bottle Diameter Adjustment<br />
Cork Depth Adustment<br />
Cork Length Adjustment (only if your cork is NOT 1-3/4” length)<br />
The first three adjustments must also be performed whenever you<br />
change bottles. Do NOT make any other adjustments to the corker.<br />
Disconnect air line from corker before making adjustments or performing<br />
maintenance.<br />
.<br />
2.<br />
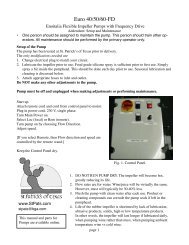
Bottle Height Adjustment: See Fig 1. This adjustment is the most<br />
critical <strong>and</strong> must be performed BEFORE the other adjustments.<br />
The top <strong>of</strong> the bottle MUST be at the indicated level (or slightly<br />
higher). The top <strong>of</strong> bottle must be 3/4” or less below the white<br />
cone. See Fig. 2. Disconnect air hose from corker. Loosen the jam<br />
nut below the white spacer. Hold the white spacer <strong>and</strong> turn the rod<br />
<strong>of</strong> the air cylinder. The <strong>P12</strong> is supplied with a black spacer (tied to<br />
bottle platform in Fig. 2.) Replace the white spacer with the black<br />
spacer for taller bottles.<br />
Please note: This adjustment is the most commonly overlooked. In<br />
particular, clients forget to make this adjustment when they change<br />
bottles.<br />
Bottle Diameter Adjustment: See Fig. 2. The back support on the<br />
bottle st<strong>and</strong> should be positioned to center the bottle with the center<br />
<strong>of</strong> the white cone (below the jaws). The white cone will center the<br />
bottle, so this does not need to be<br />
precise---within 1/4” <strong>of</strong> center is<br />
sufficient.<br />
This manual <strong>and</strong> parts for<br />
Corkers are available online.<br />
www.<strong>St</strong>Pats.com<br />
stpats@bga.com<br />
page <br />
Fig. 1. Bottle Height---Top <strong>of</strong><br />
bottle MUST be at this height or<br />
slightly higher.<br />
Fig. 2. Raise or lower bottle<br />
st<strong>and</strong>. Adjust Back Support to<br />
match Bottle Diameter. Note<br />
short spacer tied to the platform.<br />
Short spacer for ~13.5 to 15”<br />
bottles. Long spacer for ~11”-<br />
12”. [Extra long spacer (optional)<br />
available online for ~9-10”<br />
bottles.]
Fig. 3. Adjust Cork Descent Tube<br />
if Cork Length is NOT 1-3/4”<br />
3. Cork Length Adjustment: The corker has been setup for 45 mm<br />
(1-3/4”) cork length. You need to perform this adjustment ONLY<br />
if you are using 2” cork. See Figure 3. Note the gap between<br />
the top <strong>of</strong> the cork <strong>and</strong> the cork descent tube. Position the cork<br />
descent tube such that this gap is about 3/8”. Do not open the<br />
snapper plastic clamp. Simply twist <strong>and</strong> push upward on the cork<br />
descent tube (while pushing down on the snapper plastic clamp).<br />
4. Cork Depth Adjustment: Make this adjustment AFTER the Bottle<br />
Height Adjustment. The Bottle Height MUST be correct in order<br />
to properly make this adjustment. Raise <strong>and</strong> lower the cork pushing<br />
pin (Fig. 4) to adjust the depth <strong>of</strong> the cork in the bottle.<br />
Fig. 4. Adjust Cork Pushing Pin<br />
to change depth <strong>of</strong> cork in bottle.<br />
ONLY MAKE THIS ADJUST-<br />
MENT AFTER BOTTLE<br />
HEIGHT ADJUSTMENT.<br />
Periodic <strong>Maintenance</strong><br />
. Keep Top Plate clean. See Fig. 5. Wipe the top plate with clean damp cloth daily or as needed to<br />
keep cork dust to minimum. Windex or mild soap solution works well. .<br />
2. Grease Jaws periodically. Be sure air line is disconnected. Apply food grade grease to the jaws<br />
through opening in top plate. Simply dab with finger. Run unit several times without cork. Now,<br />
run several cork thru corker to remove excess grease. Also, apply small dab <strong>of</strong> grease between cork<br />
pusher <strong>and</strong> post.<br />
3. Lubricate moving parts annually. See Fig. 6. Remove back cover. Lubricate the rail. Aerosol spray<br />
<strong>of</strong> lithium grease works well.<br />
FIG. 5. Keep Top Plate clean.<br />
page
Fig. 6. Back <strong>of</strong> corker. Lubricate<br />
rail annually.<br />
DO NOT<br />
. DO NOT use OZONE to clean a corker. Ozone will destroy all<br />
rubber <strong>and</strong> plastic components <strong>and</strong> should NEVER be used on<br />
equipment with rubber or plastic components.<br />
2. DO NOT use a HOSE or PRESSURE WASHER to clean a<br />
corker. Simply wipe down with clean damp cloth. Pressure<br />
washers should NEVER be used on equipment with bearings or<br />
pneumatic cylinders.<br />
3. DO NOT use METABISULFITE (or any harsh chemicals) for<br />
cleaning or sanitizing. Metabisulfite is not a sanitizer nor a<br />
cleaner <strong>and</strong> should NEVER be used as such. Metabisulfite is corrosive<br />
to most metals including stainless steel.<br />
4. DO NOT remove the jaws or make any adjustments to the corker<br />
except those on the previous pages. Contact <strong>St</strong>. Patrick’s in<br />
advance if you believe some other adjustment needs to be performed.<br />
page
Problems <strong>and</strong> Solutions<br />
Problem: Nothing happens when you push the start buttons.<br />
Solution 1: Be sure air line is connected. Set pressure to 5-6 bar. Be sure the compressor is set >100 psi.<br />
Solution 2. Interlock is open. Clear safety shield must be in place to activate the interlock.<br />
Problem: Cork not pushed into bottle far enough.<br />
Solution 1: BOTTLE HEIGHT IS TOO LOW. This is the most <strong>of</strong>ten misdiagnosed problem. Be certain<br />
the BOTTLE HEIGHT IS CORRECT, THEN AND ONLY THEN ADJUST THE CORK PUSHING<br />
PIN.<br />
Solution 2. Cork pushing pin is too high.<br />
Problem: Cork does not come down the cork descent tube.<br />
Solution 1: Small spring (Tap0008) inside hopper is broken. Replace spring. (available online).<br />
Solution 2: See Fig. 7. Large spring (Tap0005) that drives the hopper shaft is broken (located underneath<br />
the metal cover on left side <strong>of</strong> corker.) Available online. Attention: When you replace the spring, be sure<br />
the end <strong>of</strong> spring is not be pulled into the cogs <strong>of</strong> the sprocket. Adjust chain such that the spring stops<br />
just before it reaches the sprocket.<br />
Solution 3: See Fig. 7. Check sprocket (pinion Tap0215) on hopper shaft. Remove chain from sprocket.<br />
Sprocket should rotate hopper shaft when turned counter-clockwise, but rotate freely in other direction<br />
(clockwise). (Sprocket is available online.)<br />
Problem: Corker initially operates fine but becomes sluggish during<br />
operation.<br />
Solution: Drain water from your air compressor tank. Compressor<br />
tank should be drained daily. The cause <strong>of</strong> this problem is condensation<br />
<strong>of</strong> the water in a valve in the corker.<br />
Fig. 7. Assembly to drive the<br />
hopper shaft.<br />
Top end <strong>of</strong> spring should not<br />
be pulled into the cogs <strong>of</strong> the<br />
sprocket (during downstroke <strong>of</strong><br />
corker). Adjust chain such that<br />
the spring stops just before it<br />
reaches the sprocket.<br />
page
M.E.P. - operator's h<strong>and</strong>book - corking machine <strong>P12</strong><br />
CONDITIONS OF SALE AND WARRANTY<br />
1. Read carefully this operator's h<strong>and</strong>book before operating our corking machine <strong>P12</strong>.<br />
2. M.E.P. guarantees his corking machine <strong>P12</strong> in case <strong>of</strong> breakages caused by faulty<br />
components or incorrect assembly.<br />
3. Our <strong>P12</strong> corking machine has a 12-month warranty. 12 month period begins on shipping date<br />
from <strong>St</strong>. Patrick’s <strong>of</strong> <strong>Texas</strong>. This guarantee is valid only for the first owner <strong>of</strong> the<br />
corking machine.<br />
4. Warranty only consists in replacing the damaged parts <strong>and</strong> it does include neither<br />
refunds for losses caused by the shutdown <strong>of</strong> the machine nor any cost <strong>of</strong> labour or<br />
any transport cost to send the filling machine to a repair shop.<br />
5. Any repair or modification made to the machine by unauthorized personnel will make<br />
the warranty void.<br />
6. We cannot be held responsible for damages due to incorrect use <strong>of</strong> the corking<br />
machine, or failure to carry out maintenance <strong>and</strong> lubrication, or problems or damage<br />
incurred during transport.<br />
7. M.E.P. reserves the right to introduce changes without previous notice to the corking<br />
machine <strong>P12</strong>; however, the supply <strong>of</strong> spare parts <strong>of</strong> the previous models will be<br />
guaranteed.<br />
INDEX<br />
Description <strong>of</strong> the corking machine <strong>P12</strong>............................................................page 2<br />
Operating directions.......................................................................................... 3<br />
Technical details ............................................................................................... 4<br />
Instructions for use............................................................................................ 5<br />
Faults <strong>and</strong> remedies check list........................................................................... 6<br />
<strong>Maintenance</strong> ..................................................................................................... 8<br />
Pneumatic system ............................................................................................. 9<br />
Components <strong>of</strong> the corking machine <strong>P12</strong> .......................................................... 10<br />
Cork container for corking machine <strong>P12</strong> - as optional equipment...................... 12<br />
Wheeled support model A - as optional equipment ........................................... 13<br />
1
M.E.P. - operator's h<strong>and</strong>book - corking machine <strong>P12</strong><br />
DESCRIPTION OF THE CORKING MACHINE <strong>P12</strong><br />
Our corking machine <strong>P12</strong> meets the requirements <strong>of</strong> those wine-growers who need a<br />
good quality product at a reasonable price. This corking machine is a good alternative to<br />
the traditional manual ones, which are less accurate in the bottling operation <strong>and</strong><br />
therefore might result in damaging the cork.<br />
Our corking machine <strong>P12</strong> is almost entirely made <strong>of</strong> stainless steel to make cleaning<br />
easier. Moreover all those parts which could come into contact with the corks are made<br />
<strong>of</strong> materials that do not react with the air (such as stainless steel, plexiglass, chromiumplated<br />
steel), in order to prevent all chances <strong>of</strong> polluting corks with rust splinters or<br />
whatever other substances bad for health. Even the internal mechanisms, such as<br />
connecting rods <strong>and</strong> levers, are galvanized.<br />
The inner mechanisms subject to movements are supported by ball-recirculating<br />
elements, in order to guarantee a higher precision <strong>of</strong> functioning <strong>and</strong> a restrained wear.<br />
All moving gears are protected by safety guards <strong>and</strong> those parts which the operator<br />
must reach <strong>of</strong>ten, such as the cork container <strong>and</strong> the jaws, are fitted up with easily<br />
removable safety guards. The latter are equipped with a sensor so that the corking<br />
machine cannot work when these guards are removed.<br />
SAFETY SYMBOLS:<br />
General danger<br />
Caution: refer to the operator's h<strong>and</strong>book<br />
2
M.E.P. - operator's h<strong>and</strong>book - corking machine <strong>P12</strong><br />
Caution: 230 volt tension.<br />
Caution: rotating gears. Severing <strong>of</strong> fingers.<br />
OPERATING DIRECTIONS<br />
Our corking machine <strong>P12</strong> positions the cork within jaws which squeeze it down to the<br />
size <strong>of</strong> the neck <strong>of</strong> the bottle. In this way less stress is needed to push the cork down into<br />
the neck <strong>of</strong> the bottle with the advantage <strong>of</strong> not damaging the cork itself that will exp<strong>and</strong><br />
once it is inserted <strong>and</strong> ensure a good seal.<br />
Corks must be manually pushed down the cork descent duct (see picture 1) which can<br />
hold 7-8 <strong>of</strong> them at a time.<br />
To start the corking machine a bottle must be placed on the bottle platform, the two<br />
starting push-buttons must be kept pressed for a couple <strong>of</strong> seconds (see picture 1). Then<br />
the jaws go down <strong>and</strong> compress the cork which is afterwards inserted into the neck <strong>of</strong> the<br />
bottle.<br />
At this point the two push-buttons can be released to start the cycle <strong>of</strong> return <strong>of</strong>f. This<br />
means the raising <strong>of</strong> the jaws, the ascent <strong>of</strong> the cork-pushing pin <strong>and</strong> the rotation <strong>of</strong> the<br />
cork pusher which picks up a cork from the cork descent duct <strong>and</strong> drives it into the jaws,<br />
ready to be used next time.<br />
3
M.E.P. - operator's h<strong>and</strong>book - corking machine <strong>P12</strong><br />
Picture 1.<br />
TECHNICAL DETAILS<br />
<strong>St</strong><strong>and</strong>ard equipment:<br />
- manual cork loading<br />
- cork size diameter 22-26 x 50 mm.<br />
- bottle height up to 390 mm.<br />
- corking time approximately 3 seconds<br />
Optional equipment:<br />
- cork descent duct <strong>and</strong> cork pusher for corks with diameter up to 28 mm.<br />
- wheeled support model A (made <strong>of</strong> stainless steel)<br />
4
M.E.P. - operator's h<strong>and</strong>book - corking machine <strong>P12</strong><br />
- upper container for corks fitted up with a mixing device that lines the corks up <strong>and</strong><br />
pushes them through the descent duct in the correct position for the corking to be<br />
carried out successfully (for corks with diameter up to 26 mm. <strong>and</strong> height up to 45<br />
mm.).<br />
Corking machine <strong>P12</strong><br />
Height: 1140 mm.<br />
Width: 335 mm.<br />
Length: 385 mm.<br />
Weight: 48 kg.<br />
Corking machine <strong>P12</strong> equipped with wheeled support <strong>and</strong> cork container<br />
Height: 1850 mm.<br />
Width: 520 mm.<br />
Length: 420 mm.<br />
Weight: 72 kg.<br />
Pneumatic cylinder<br />
Advised feeding pressure: 4 - 4,5 bar<br />
Feeding pressure for tough corks: 6-7 bar<br />
Cylinder - 1: bore 50 mm.; stroke 150 mm.<br />
Cylinder - 2: bore 80 mm.; stroke 125 mm.<br />
Air consumption for each corking (4 bar): 8,77 NI<br />
Air consumption for each corking (6 bar): 12,3 NI<br />
5
M.E.P. - operator's h<strong>and</strong>book - corking machine <strong>P12</strong><br />
INSTRUCTIONS FOR USE<br />
- Positioning. The corking machine <strong>P12</strong> should be placed on a steady support in a lit up<br />
room.<br />
In case the corking machine <strong>P12</strong> is fitted up with a wheeled support, make sure it is<br />
placed on an even ground.<br />
- Clean all the parts that come into contact with the corks, such as cork descent duct,<br />
cork pusher, jaws, cork-pushing pin <strong>and</strong> cork container.<br />
- Take <strong>of</strong>f the antiscratch light blue or white nylon film from the front plastic safety<br />
guard, tighten the fastener <strong>and</strong> make sure the brass sensor-activating square, which is<br />
screwed on the safety guard, can activate the sensor <strong>of</strong> the jaws (see picture 2).<br />
- Check that the top <strong>of</strong> the bottle placed on the bottle-platform is not further than 4 or 5<br />
cm. from the lower part <strong>of</strong> the bottle-guide cone (see picture 2); otherwise, change the<br />
spacer <strong>of</strong> the bottle-platform through the longer one supplied with the machine. To carry<br />
out this operation, undo the three screws with countersunk head located under the bottleplatform<br />
(see picture 2); then undo the spacer by holding tight the nut underneath. It<br />
should be noted that it is possible to obtain a precise height adjustment by screwing<br />
enough the spacer <strong>of</strong> the bottle-platform <strong>and</strong> then retightening its nut.<br />
- Connect the corking machine to the compressed-air feeding using the connection (see<br />
picture 3). Set the air feeding at 4-4,5 bar using the knob <strong>of</strong> the regulating-filter <strong>and</strong><br />
checking the pressure level on the manometer. The knob <strong>of</strong> the regulating-filter must be<br />
lifted up <strong>and</strong> turned clockwise or anticlockwise in order to increase or decrease the<br />
pressure level <strong>and</strong> then lowered once again at the end <strong>of</strong> the regulation.<br />
6
M.E.P. - operator's h<strong>and</strong>book - corking machine <strong>P12</strong><br />
Picture 2.<br />
- Insert the corks down the descent duct.<br />
- Now the corking machine is ready to be used <strong>and</strong> both the cork-pushing pin <strong>and</strong> the<br />
jaws should go up. Place a bottle on the bottle platform <strong>and</strong> the corking is carried out by<br />
keeping pressed the starting push-buttons for a couple <strong>of</strong> seconds.<br />
- At the end <strong>of</strong> work disconnect the feeding so that the cylinder drains the air <strong>and</strong> the<br />
jaws go down.<br />
Picture 3.<br />
7
M.E.P. - operator's h<strong>and</strong>book - corking machine <strong>P12</strong><br />
FAULTS AND REMEDIES CHECK LIST<br />
IMPORTANT<br />
Before intervening on the machine always disconnect the air feeding <strong>and</strong> wait until the<br />
jaws go down.<br />
- In case the corking machine does not start check that the fastener <strong>of</strong> the plastic safety<br />
guard is tightened in the correct way <strong>and</strong> the sensor-activating square can start properly<br />
the sensor <strong>of</strong> the jaws.<br />
In case the corking machine still does not start, the back plate should be removed (see<br />
picture 3) in order to check that all the hoses are connected properly.<br />
Anyway it is advisable not to go on trying too long <strong>and</strong> if the problem persists turn to the<br />
manifacturer.<br />
- If it is needed the cork to be inserted deeper or higher in the neck <strong>of</strong> the bottle, the<br />
fastening nut (see picture 3) must be loosened <strong>and</strong> the cork-pushing pin turned: the last is<br />
threaded then it can be moved up <strong>and</strong> down.<br />
- Our corking machine <strong>P12</strong> is set to compress the corks up to a diameter to 16 mm.<br />
8
M.E.P. - operator's h<strong>and</strong>book - corking machine <strong>P12</strong><br />
Picture 4.<br />
- In case the corks are not picked up precisely by the cork pusher, it is necessary to<br />
adjust the stroke <strong>of</strong> the cork pusher itself (the cork pusher is fastened to the jaws' upper<br />
plate) (see picture 4). To do this, the six upper screws <strong>of</strong> the jaws must be loosened <strong>and</strong><br />
the upper plate <strong>of</strong> the jaws can be moved towards the corking machine or in the opposite<br />
direction.<br />
- In the event <strong>of</strong> the corking machine vibrating, the front plate must be taken <strong>of</strong>f <strong>and</strong> the<br />
slides lubricated with oil.<br />
- In case the jaws do not easily reach the end <strong>of</strong> the cycle position (open position), it is<br />
advisable to drop some drops <strong>of</strong> oil inside them <strong>and</strong> let the machine do a couple <strong>of</strong> blank<br />
strokes. Before starting work it is better to clean the jaws to prevent the oil from dirting<br />
the corks.<br />
ATTENTION<br />
In the event <strong>of</strong> strong vibrations <strong>of</strong> the machine immediately release the starting pushbuttons<br />
<strong>and</strong> contact the manifacturer.<br />
9
M.E.P. - operator's h<strong>and</strong>book - corking machine <strong>P12</strong><br />
MAINTENANCE<br />
A long machine working life is dependent upon constant <strong>and</strong> methodical compliance with<br />
the following instructions:<br />
take <strong>of</strong>f the front safety plate <strong>and</strong> lubricate the two slides;<br />
clean the jaws from any cork dust;<br />
lubricate the inside <strong>of</strong> the jaws <strong>and</strong> remove the excess oil before starting work.<br />
At the end <strong>of</strong> each season we recommend to:<br />
• carefully clean the machine <strong>and</strong> the jaws;<br />
• store the machine in a dry place <strong>and</strong> cover it up with a cloth or a nylon film in order to<br />
prevent the dust from crusting over the corking machine.<br />
10
M.E.P. - operator's h<strong>and</strong>book - corking machine <strong>P12</strong><br />
PNEUMATIC SYSTEM OF THE CORKING MACHINE <strong>P12</strong><br />
11
M.E.P. - operator's h<strong>and</strong>book - corking machine <strong>P12</strong><br />
POS. DESCRIPTION REF. POS. DESCRIPTION REF.<br />
1 Lower support Tap1644 31 Manometer Tap0408<br />
2 Threaded bushing Tap1403 32 Screw M4x45 Tap0340<br />
3 Cylindrical head screw M10x20 Tap0328 33 Three-way connection - 4 mm Tap0415<br />
4 Nut M20 Tap0338 34 Curve 1/4 - hose 8 mm. Tap0410<br />
5 Cylinder 50 mm - 150 mm Tap0413 35 Regulating filter Tap0411<br />
6 Washer for screw M10 Tap0307 36 80 mm Cylinder safety guard Tap1649<br />
7 Screw M8x16 Tap0302 37 Connection Tap1337<br />
8 Washer for screw M8 Tap0303 38 Push-button Tap0227<br />
9 Right side plate Tap1630 39 Cylindrical head screw M4x20 Tap0341<br />
10 Cylinder 80 mm - 125 mm Tap0414 40 Sensor Tap0412<br />
11 Curve 3/8 - hose 8 mm. Tap0402 41 Upper plate Tap1638<br />
12 Nut M50 Tap0337 42 Cork-loading cone Tap1656<br />
13 Rod Tap0517 43 Chain protection cap Tap1639<br />
14 Nut M16 short Tap0347 44 Left side plate Tap1631<br />
15 50 mm cylinder fastening-plate Tap1646 45 Back plate Tap1635<br />
16 80 mm cylinder fastening-plate Tap1647 46 Slide Tap0233<br />
17 H<strong>and</strong>grip with screw M8x16 Tap0208 47 Screw M8x30 ZA Tap0348<br />
18 Screw M8x20 ZA Tap0308 48 Cylindrical head screw M6x20 Tap0312<br />
19 Screw M8x16 ZA Tap0348 49 Curve 1/8 for 6 mm hose Tap0416<br />
20 Platform Tap0509 50 Moving part Tap0234<br />
21 Countersunk head screwM5x12 Tap0333 51 Connection Tap1314<br />
22 Nut M8 Tap0306 52 Cylindrical head screw M8x16 Tap0313<br />
23 Reference for bottle Tap0508 53 End-<strong>of</strong>-stroke device Tap0417<br />
24 Cylindrical head screw M5x55 Tap0347 54 Spacer 110x20 Tap1036<br />
25 Nut M4 Tap0329 55 Pin side-plates Tap1312<br />
26 Curve 1/8 - hose 8 mm. Tap0403 56 Nut M5 Tap0316<br />
27 Curve 1/8 - hose 4 mm. Tap0404 57 Screw M5x30 Tap0319<br />
28 T connection 1/8 - hose 8 mm. Tap0405 58 Spring Tap0007<br />
29 Adapter for hose 8 mm. - 4 mm. Tap0406 59 Nut M14 Tap0349<br />
30 Valve 5/2 Tap0407 60 Elastic ring diameter 15 mm. Tap0211<br />
12
M.E.P. - operator's h<strong>and</strong>book - corking machine <strong>P12</strong><br />
POS. DESCRIPTION REF. POS. DESCRIPTION REF.<br />
61 Pin diameter 15 mm. Tap1023_1 76 Washer for screw M6 Tap0330<br />
62 Side plate Tap0706 77 Screw M6x12 Tap0324<br />
63 Bearing SKF 4302 Tap0226 78 Tap1313<br />
64 Fork Tap0702 79 Block Tap0719<br />
65 Bearing SKF 625-2Z Tap0228 80 Cork pusher Tap0801<br />
66 Cylindrical head screw M5x20 Tap0331 81 Safety guard Tap0721<br />
67 Spacer Tap0716 82 Connection Tap0213<br />
68 Spring Tap0004 83 Cork descent duct Tap1213<br />
69 Plate Tap0709 84 Upper plate Tap1319<br />
70 Spring-angle bar Tap0705 85 <strong>St</strong>ainless steel pin Tap1315<br />
71 Threaded angle bar Tap0704 86 Wedge Tap1309<br />
72 Prism for jaws Tap0701<br />
73 Plate Tap0708<br />
74 Countersunk head screwM4x16 Tap0325<br />
75 Cone Tap0713<br />
13
M.E.P. - operator's h<strong>and</strong>book - corking machine <strong>P12</strong><br />
CORK CONTAINER<br />
FOR CORKING MACHINE <strong>P12</strong><br />
(OPTIONAL)<br />
POS. DESCRIPTION REF. POS. DESCRIPTION REF.<br />
100 Cork container Tap1840 115 Tongue for mixing device Tap1210<br />
101 Elastic pin 5x30 Tap0224 116 Cork descent duct Tap1850<br />
102 Threaded h<strong>and</strong> grip M8 Tap0216 117 Free wheel diameter 14 mm. Tap0235<br />
103 Screw M6x16 Tap0350 118 Pinion for mixing device Tap0215<br />
104 Washer for screw M6 Tap0330 119 Elastic ring diameter 14 mm. Tap0236<br />
105 Nut M6 Tap0321 120 Chain bar Tap1652<br />
106 Bearing SBPF 203 Tap0214 121 8 mm. - link chain Tap0237<br />
107 Screw M5x30 Tap0319 122 Spring Tap0005<br />
108 Spacer for mixing device Tap1212 123 Cylindrical head screw M6x20 Tap0312<br />
109 Shaft Tap1657 124 Screw M8x16 Tap0302<br />
110 Screw M8x10 without head Tap0317 125 Washer for screw M8 Tap0303<br />
111 Nut M5 Tap0316 126 Screw M3x20 Tap0351<br />
112 Spring for mixing device Tap0008 127 Nut M3 Tap0352<br />
113 Contersunk head screw M4x6 Tap0336 128 Right side plate Tap1214<br />
114 Washer for screw M5 Tap0343 129 Left side plate Tap1215<br />
14
M.E.P. - operator's h<strong>and</strong>book - corking machine <strong>P12</strong><br />
WHEELED SUPPORT MODEL A (OPTIONAL)<br />
POS. DESCRIPTION REF.<br />
200 Frame Tap1645<br />
201 Support Tap1651<br />
202 Washer for screw M8 Tap0303<br />
203 Screw M8x16 Tap0302<br />
204 Nut M8 Tap0306<br />
205 Screw M12x35 Tap0344<br />
206 Plastic wheel Tap0238<br />
207 Washer for screw M12 Tap0345<br />
208 Nut M12 Tap0346<br />
15
M.E.P. - operator's h<strong>and</strong>book - corking machine <strong>P12</strong><br />
16
1<br />
2<br />
3<br />
4<br />
5<br />
6<br />
7<br />
8<br />
8<br />
7<br />
22<br />
9<br />
10<br />
11<br />
11<br />
12<br />
13<br />
14<br />
15<br />
16<br />
17<br />
18<br />
8<br />
19<br />
8<br />
20<br />
21<br />
23<br />
25<br />
26<br />
27<br />
28<br />
28<br />
27<br />
29<br />
30<br />
30<br />
31<br />
26<br />
32<br />
24<br />
33<br />
35<br />
34<br />
36<br />
37<br />
38<br />
40<br />
41<br />
42<br />
43<br />
44<br />
46<br />
47<br />
48<br />
52<br />
8<br />
7<br />
22<br />
49<br />
49<br />
52<br />
54<br />
50<br />
53<br />
45<br />
39<br />
25<br />
56<br />
57<br />
58<br />
60<br />
61<br />
62<br />
63<br />
64<br />
65<br />
66<br />
67<br />
68<br />
69<br />
70<br />
71<br />
72<br />
73<br />
74<br />
75<br />
76<br />
77<br />
57<br />
79<br />
80<br />
81<br />
82<br />
83<br />
84<br />
85<br />
86<br />
55<br />
78<br />
59<br />
Component <strong>of</strong><br />
the <strong>P12</strong> corking<br />
machine<br />
7<br />
8<br />
5<br />
47<br />
51<br />
25