2009 Pilot Remote Control Engine Starter - Bernardi Parts
2009 Pilot Remote Control Engine Starter - Bernardi Parts 2009 Pilot Remote Control Engine Starter - Bernardi Parts
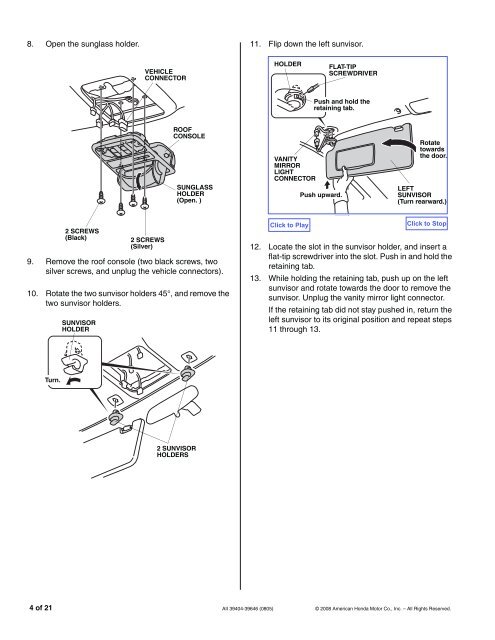
8. Open the sunglass holder. 11. Flip down the left sunvisor. VEHICLE CONNECTOR HOLDER FLAT-TIP SCREWDRIVER Push and hold the retaining tab. ROOF CONSOLE SUNGLASS HOLDER (Open. ) VANITY MIRROR LIGHT CONNECTOR Push upward. Rotate towards the door. LEFT SUNVISOR (Turn rearward.) 2 SCREWS (Black) 2 SCREWS (Silver) 700603BB 9. Remove the roof console (two black screws, two silver screws, and unplug the vehicle connectors). 10. Rotate the two sunvisor holders 45°, and remove the two sunvisor holders. SUNVISOR HOLDER 840902AY 12. Locate the slot in the sunvisor holder, and insert a flat-tip screwdriver into the slot. Push in and hold the retaining tab. 13. While holding the retaining tab, push up on the left sunvisor and rotate towards the door to remove the sunvisor. Unplug the vanity mirror light connector. If the retaining tab did not stay pushed in, return the left sunvisor to its original position and repeat steps 11 through 13. Turn. 2 SUNVISOR HOLDERS 700215BE 4 of 21 AII 39404-39646 (0805) © 2008 American Honda Motor Co., Inc. – All Rights Reserved.
14. Using a plastic trim tool, open the lid of the left A- pillar trim (two retaining tabs). LEFT A-PILLAR TRIM LEFT A-PILLAR TRIM LID 2 RETAINING TABS 18. Shift the select knob to “D” position by pressing down on the shift lock stopper with the ignition key. Remove the left side center panel (eight clips and unplug the vehicle connectors). LEFT SIDE CENTER PANEL VEHICLE CONNECTOR 8 CLIPS BOLT WEATHERSTRIP (Release.) CLIP 15. Remove the bolt from the left A-pillar trim. 16. Remove the weatherstrip and remove the left A-pillar trim (one clip). 17. Pull off the weatherstrip, remove the left side dashboard cover (seven retaining tabs). 792203AE IGNITION KEY SELECT KNOB VEHICLE CONNECTOR (If equipped) 792808AE 19. Remove the driver’s dashboard lower cover (12 clips, one self-tapping screw and unplug the vehicle connectors). Remove the A/C sensor (two remaining tabs). WEATHERSTRIP (Release.) 12 CLIPS A/C SENSOR 2 RETAINING TABS 7 RETAINING TABS LEFT SIDE DASHBOARD COVER 792403CE SELF-TAPPING SCREW VEHICLE CONNECTOR DRIVER’S DASHBOARD COVER A/C SENSOR 792205CE © 2008 American Honda Motor Co., Inc. – All Rights Reserved. AII 39404-39646 (0805) 5 of 21
- Page 1 and 2: INSTALLATION INSTRUCTIONS Accessory
- Page 3: Setting the Control Unit 3. Touch t
- Page 7 and 8: 26. Plug the engine starter harness
- Page 9 and 10: 34. Secure the 4-pin connector to t
- Page 11 and 12: 45. Route the engine starter harnes
- Page 13 and 14: 53. Secure the joint of the engine
- Page 15 and 16: 63. Route the antenna cable to the
- Page 17 and 18: 72. Using isopropyl on a shop towel
- Page 19 and 20: vehicle’s VIN will be required to
- Page 21: 6. Check the operation of the trans
8. Open the sunglass holder.<br />
11. Flip down the left sunvisor.<br />
VEHICLE<br />
CONNECTOR<br />
HOLDER<br />
FLAT-TIP<br />
SCREWDRIVER<br />
Push and hold the<br />
retaining tab.<br />
ROOF<br />
CONSOLE<br />
SUNGLASS<br />
HOLDER<br />
(Open. )<br />
VANITY<br />
MIRROR<br />
LIGHT<br />
CONNECTOR<br />
Push upward.<br />
Rotate<br />
towards<br />
the door.<br />
LEFT<br />
SUNVISOR<br />
(Turn rearward.)<br />
2 SCREWS<br />
(Black)<br />
2 SCREWS<br />
(Silver)<br />
700603BB<br />
9. Remove the roof console (two black screws, two<br />
silver screws, and unplug the vehicle connectors).<br />
10. Rotate the two sunvisor holders 45°, and remove the<br />
two sunvisor holders.<br />
SUNVISOR<br />
HOLDER<br />
840902AY<br />
12. Locate the slot in the sunvisor holder, and insert a<br />
flat-tip screwdriver into the slot. Push in and hold the<br />
retaining tab.<br />
13. While holding the retaining tab, push up on the left<br />
sunvisor and rotate towards the door to remove the<br />
sunvisor. Unplug the vanity mirror light connector.<br />
If the retaining tab did not stay pushed in, return the<br />
left sunvisor to its original position and repeat steps<br />
11 through 13.<br />
Turn.<br />
2 SUNVISOR<br />
HOLDERS<br />
700215BE<br />
4 of 21 AII 39404-39646 (0805)<br />
© 2008 American Honda Motor Co., Inc. – All Rights Reserved.


