2009 Pilot Remote Control Engine Starter - Bernardi Parts
2009 Pilot Remote Control Engine Starter - Bernardi Parts
2009 Pilot Remote Control Engine Starter - Bernardi Parts

Create successful ePaper yourself
Turn your PDF publications into a flip-book with our unique Google optimized e-Paper software.
Setting the <strong>Control</strong> Unit<br />
3. Touch the metal part of the screwdriver to any metal<br />
part of the vehicle to discharge any static electricity.<br />
CONTROL<br />
UNIT<br />
6. Using isopropyl alcohol on a shop towel, clean the<br />
area where the protective tape will attach. Remove<br />
the adhesive backing from the protective tape, attach<br />
the protective tape to the control unit over the<br />
switches.<br />
CONTROL<br />
UNIT<br />
SMALL<br />
FLAT-TIP<br />
SCREW-<br />
DRIVER<br />
Discharge any<br />
static electricity.<br />
SWITCHES<br />
SWITCHES<br />
SET<br />
PROTECTIVE<br />
TAPE<br />
ADHESIVE<br />
BACKING<br />
SWITCHES<br />
Clean with<br />
isopropyl alcohol.<br />
772505AS<br />
SW:1 RR Junction unit -----------------------> OFF<br />
SW:2 Trunk or Tailgate ----------------------> OFF<br />
SW:3 Smart Entry -----------------------------> OFF<br />
SW:4 Horn or Buzzer Answerback ------> OFF<br />
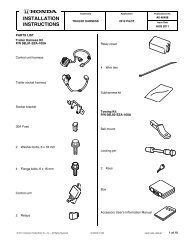
Removing the Vehicle <strong>Parts</strong><br />
7. Using a plastic trim tool, disengage the eight<br />
retaining tabs and remove left and right lens from the<br />
roof console.<br />
ROOF<br />
CONSOLE<br />
SW:5 Trunk Main SW -------------------------> OFF<br />
SW:6 Reserve ----------------------------------> ON<br />
7D2550AK<br />
4. Check a location of the switches on the control unit.<br />
RIGHT<br />
LENS<br />
NOTE:<br />
• The switches must be selected before the<br />
control unit is plugged in.<br />
• If the switch setting is not correct the remote<br />
engine starter will not operate correctly.<br />
• If you change the switch settings with the unit<br />
connected, you must disconnect the unit then<br />
reconnect it before the settings change.<br />
5. Using a small flat-tip screwdriver, adjust the switches<br />
on the control unit as shown.<br />
LEFT<br />
LENS<br />
4 RETAINING<br />
TABS<br />
4 RETAINING<br />
TABS<br />
PLASTIC TRIM<br />
TOOL<br />
700602BB<br />
© 2008 American Honda Motor Co., Inc. – All Rights Reserved.<br />
AII 39404-39646 (0805)<br />
3 of 21