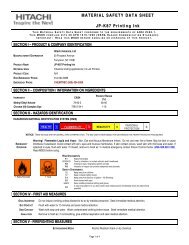
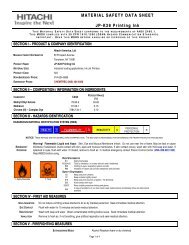
SJ700-2 Instruction Manual NT204DX - Hitachi America, Ltd.
SJ700-2 Instruction Manual NT204DX - Hitachi America, Ltd.
SJ700-2 Instruction Manual NT204DX - Hitachi America, Ltd.

Create successful ePaper yourself
Turn your PDF publications into a flip-book with our unique Google optimized e-Paper software.
Chapter 3 Operation<br />
3.3 How To Make a Test Run<br />
This section describes how to make a test run of the inverter that is wired and connected to external<br />
devices in a general way as shown below.<br />
For the detailed method of using the digital operator, see Section 3.2, "How To Operate the Digital<br />
Operator."<br />
(1) When entering operation and frequency-setting commands from the digital operator:<br />
(The operating procedure below is common to the standard and optional digital operators.)<br />
3-phase<br />
power supply<br />
R<br />
S<br />
T<br />
ELB<br />
Default jumper position for sinking type inputs<br />
(Altanatively, CM1-PLC for souricing tiype)<br />
R<br />
S<br />
T<br />
FW<br />
8 .<br />
.<br />
1<br />
.<br />
FM<br />
TH<br />
CM1<br />
PLC<br />
P24<br />
H<br />
O<br />
OI<br />
O2<br />
AM<br />
AMI<br />
L<br />
Digital operator<br />
(Operating procedure)<br />
1) Confirm that all wirings are correct.<br />
2) Turn on the earth-leakage breaker (ELB) to supply power to the inverter.<br />
(The POWER lamp [red LED] of the digital operator goes on.)<br />
* When using an inverter with the factory setting, proceed to step 5).<br />
3) Select the digital operator as the operating device via the frequency source setting function.<br />
- Display the function code "A001" on the monitor screen, and then press the FUNC key once.<br />
G<br />
DC reactor<br />
Type-D grounding (200 V class model)<br />
Type-C grounding (400 V class model)<br />
(The monitor shows a 2-digit numeric value.)<br />
- Use the 1 and/or 2 key to change the displayed numeric value to [02], and then press the<br />
STR key once to specify the digital operator as the operating device to input frequency-setting<br />
commands.<br />
(The display reverts to [A001].)<br />
4) Select the digital operator as the operating device by the run command source setting function.<br />
- Display the function code "A002" on the monitor screen, and then press the FUNC key once.<br />
(The monitor shows a 2-digit numeric value.)<br />
- Use the 1 and/or 2 key to change the displayed numeric value to "02", and then press the<br />
STR<br />
key once to specify the digital operator as the operating device to input operation commands.<br />
(The display reverts to [A002]. The operating device indicator lamp above the [RUN] key goes on.)<br />
5) Set the output frequency.<br />
FUNC<br />
- Display the function code "F001" on the monitor screen, and then press the key once.<br />
(The monitor shows a preset output frequency. With the factory setting,<br />
[0 Hz] is shown.)<br />
- Use the 1 and/or 2 key to change the displayed numeric value to the desired output frequency,<br />
and then press the STR key once to determine the frequency.<br />
(The display reverts to [F001].)<br />
6) Set the operation direction of the motor.<br />
FUNC<br />
- Display the function code "F004" on the monitor screen, and then press the key once.<br />
(The monitor shows "00" or "01".)<br />
U<br />
V<br />
W<br />
PD<br />
P<br />
RB<br />
N<br />
AL0<br />
AL1<br />
AL2<br />
11 .<br />
.<br />
15<br />
.<br />
CM2<br />
SP<br />
SN<br />
RP<br />
SN<br />
Motor<br />
Braking unit<br />
Alarm output contacts<br />
3 - 10