Installation Instructions - Watermark Designs
Installation Instructions - Watermark Designs Installation Instructions - Watermark Designs
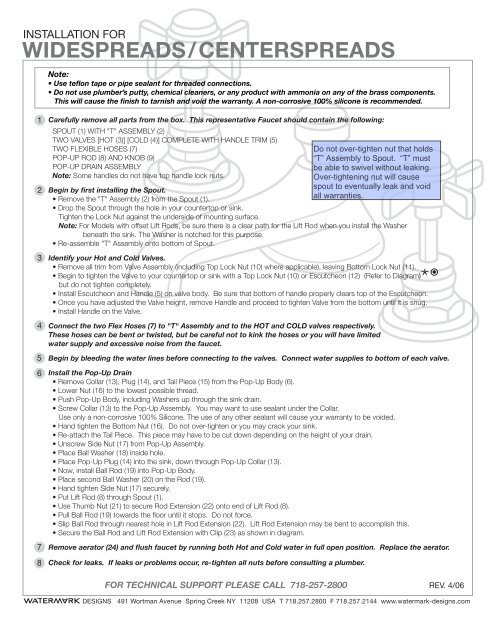
INSTALLATION FOR WIDESPREADS/CENTERSPREADS Note: • Use teflon tape or pipe sealant for threaded connections. • Do not use plumber’s putty, chemical cleaners, or any product with ammonia on any of the brass components. This will cause the finish to tarnish and void the warranty. A non-corrosive 100% silicone is recommended. 1 2 3 4 5 6 7 8 Carefully remove all parts from the box. This representative Faucet should contain the following: SPOUT (1) WITH "T" ASSEMBLY (2) TWO VALVES [HOT (3)] [COLD (4)] COMPLETE WITH HANDLE TRIM (5) TWO FLEXIBLE HOSES (7) POP-UP ROD (8) AND KNOB (9) POP-UP DRAIN ASSEMBLY Note: Some handles do not have top handle lock nuts. Begin by first installing the Spout. • Remove the "T" Assembly (2) from the Spout (1). • Drop the Spout through the hole in your countertop or sink. Tighten the Lock Nut against the underside of mounting surface. Note: For Models with offset Lift Rods, be sure there is a clear path for the Lift Rod when you install the Washer beneath the sink. The Washer is notched for this purpose. • Re-assemble "T" Assembly onto bottom of Spout. Identify your Hot and Cold Valves. • Remove all trim from Valve Assembly (including Top Lock Nut (10) where applicable), leaving Bottom Lock Nut (11). • Begin to tighten the Valve to your countertop or sink with a Top Lock Nut (10) or Escutcheon (12) (Refer to Diagram) but do not tighten completely. • Install Escutcheon and Handle (5) on valve body. Be sure that bottom of handle properly clears top of the Escutcheon. • Once you have adjusted the Valve height, remove Handle and proceed to tighten Valve from the bottom until it is snug. • Install Handle on the Valve. Connect the two Flex Hoses (7) to "T" Assembly and to the HOT and COLD valves respectively. These hoses can be bent or twisted, but be careful not to kink the hoses or you will have limited water supply and excessive noise from the faucet. Begin by bleeding the water lines before connecting to the valves. Connect water supplies to bottom of each valve. Install the Pop-Up Drain • Remove Collar (13), Plug (14), and Tail Piece (15) from the Pop-Up Body (6). • Lower Nut (16) to the lowest possible thread. • Push Pop-Up Body, including Washers up through the sink drain. • Screw Collar (13) to the Pop-Up Assembly. You may want to use sealant under the Collar. Use only a non-corrosive 100% Silicone. The use of any other sealant will cause your warranty to be voided. • Hand tighten the Bottom Nut (16). Do not over-tighten or you may crack your sink. • Re-attach the Tail Piece. This piece may have to be cut down depending on the height of your drain. • Unscrew Side Nut (17) from Pop-Up Assembly. • Place Ball Washer (18) inside hole. • Place Pop-Up Plug (14) into the sink, down through Pop-Up Collar (13). • Now, install Ball Rod (19) into Pop-Up Body. • Place second Ball Washer (20) on the Rod (19). • Hand tighten Side Nut (17) securely. • Put Lift Rod (8) through Spout (1). • Use Thumb Nut (21) to secure Rod Extension (22) onto end of Lift Rod (8). • Pull Ball Rod (19) towards the floor until it stops. Do not force. • Slip Ball Rod through nearest hole in Lift Rod Extension (22). Lift Rod Extension may be bent to accomplish this. • Secure the Ball Rod and Lift Rod Extension with Clip (23) as shown in diagram. Remove aerator (24) and flush faucet by running both Hot and Cold water in full open position. Replace the aerator. Check for leaks. If leaks or problems occur, re-tighten all nuts before consulting a plumber. FOR TECHNICAL SUPPORT PLEASE CALL 718-257-2800 REV. 4/06 DESIGNS 491 Wortman Avenue Spring Creek NY 11208 USA T 718.257.2800 F 718.257.2144 www.watermark-designs.com
INSTALLATION FOR<br />
WIDESPREADS/CENTERSPREADS<br />
Note:<br />
• Use teflon tape or pipe sealant for threaded connections.<br />
• Do not use plumber’s putty, chemical cleaners, or any product with ammonia on any of the brass components.<br />
This will cause the finish to tarnish and void the warranty. A non-corrosive 100% silicone is recommended.<br />
1<br />
2<br />
3<br />
4<br />
5<br />
6<br />
7<br />
8<br />
Carefully remove all parts from the box. This representative Faucet should contain the following:<br />
SPOUT (1) WITH "T" ASSEMBLY (2)<br />
TWO VALVES [HOT (3)] [COLD (4)] COMPLETE WITH HANDLE TRIM (5)<br />
TWO FLEXIBLE HOSES (7)<br />
POP-UP ROD (8) AND KNOB (9)<br />
POP-UP DRAIN ASSEMBLY<br />
Note: Some handles do not have top handle lock nuts.<br />
Begin by first installing the Spout.<br />
• Remove the "T" Assembly (2) from the Spout (1).<br />
• Drop the Spout through the hole in your countertop or sink.<br />
Tighten the Lock Nut against the underside of mounting surface.<br />
Note: For Models with offset Lift Rods, be sure there is a clear path for the Lift Rod when you install the Washer<br />
beneath the sink. The Washer is notched for this purpose.<br />
• Re-assemble "T" Assembly onto bottom of Spout.<br />
Identify your Hot and Cold Valves.<br />
• Remove all trim from Valve Assembly (including Top Lock Nut (10) where applicable), leaving Bottom Lock Nut (11).<br />
• Begin to tighten the Valve to your countertop or sink with a Top Lock Nut (10) or Escutcheon (12) (Refer to Diagram)<br />
but do not tighten completely.<br />
• Install Escutcheon and Handle (5) on valve body. Be sure that bottom of handle properly clears top of the Escutcheon.<br />
• Once you have adjusted the Valve height, remove Handle and proceed to tighten Valve from the bottom until it is snug.<br />
• Install Handle on the Valve.<br />
Connect the two Flex Hoses (7) to "T" Assembly and to the HOT and COLD valves respectively.<br />
These hoses can be bent or twisted, but be careful not to kink the hoses or you will have limited<br />
water supply and excessive noise from the faucet.<br />
Begin by bleeding the water lines before connecting to the valves. Connect water supplies to bottom of each valve.<br />
Install the Pop-Up Drain<br />
• Remove Collar (13), Plug (14), and Tail Piece (15) from the Pop-Up Body (6).<br />
• Lower Nut (16) to the lowest possible thread.<br />
• Push Pop-Up Body, including Washers up through the sink drain.<br />
• Screw Collar (13) to the Pop-Up Assembly. You may want to use sealant under the Collar.<br />
Use only a non-corrosive 100% Silicone. The use of any other sealant will cause your warranty to be voided.<br />
• Hand tighten the Bottom Nut (16). Do not over-tighten or you may crack your sink.<br />
• Re-attach the Tail Piece. This piece may have to be cut down depending on the height of your drain.<br />
• Unscrew Side Nut (17) from Pop-Up Assembly.<br />
• Place Ball Washer (18) inside hole.<br />
• Place Pop-Up Plug (14) into the sink, down through Pop-Up Collar (13).<br />
• Now, install Ball Rod (19) into Pop-Up Body.<br />
• Place second Ball Washer (20) on the Rod (19).<br />
• Hand tighten Side Nut (17) securely.<br />
• Put Lift Rod (8) through Spout (1).<br />
• Use Thumb Nut (21) to secure Rod Extension (22) onto end of Lift Rod (8).<br />
• Pull Ball Rod (19) towards the floor until it stops. Do not force.<br />
• Slip Ball Rod through nearest hole in Lift Rod Extension (22). Lift Rod Extension may be bent to accomplish this.<br />
• Secure the Ball Rod and Lift Rod Extension with Clip (23) as shown in diagram.<br />
Remove aerator (24) and flush faucet by running both Hot and Cold water in full open position. Replace the aerator.<br />
Check for leaks. If leaks or problems occur, re-tighten all nuts before consulting a plumber.<br />
FOR TECHNICAL SUPPORT PLEASE CALL 718-257-2800<br />
REV. 4/06<br />
DESIGNS 491 Wortman Avenue Spring Creek NY 11208 USA T 718.257.2800 F 718.257.2144 www.watermark-designs.com
WIDESPREADS/CENTERSPREADS<br />
DESIGNS<br />
9<br />
8<br />
1 5<br />
INSTALLATION DIAGRAM<br />
5<br />
24<br />
10<br />
11<br />
4<br />
3<br />
7 2<br />
7<br />
14<br />
POP-UP DRAIN<br />
ASSEMBLY<br />
21<br />
13<br />
22<br />
19<br />
16<br />
6<br />
23 17<br />
20<br />
18<br />
15<br />
THE ABOVE INSTALLATION DIAGRAM REPRESENTS WIDESPREAD MODEL NO. 502. MEANT TO CONVEY A TYPICAL FAUCET INSTALLATION<br />
12<br />
OFFSET LIFT ROD<br />
MODELS<br />
MODELS 130-2,<br />
140-2 & 150-2<br />
HANDLES WITHOUT<br />
TOP LOCKNUTS<br />
HANDLE TRIMS:<br />
F, G, T8, T9, U2-U7<br />
DESIGNS 491 Wortman Avenue Spring Creek NY 11208 USA T 718.257.2800 F 718.257.2144 www.watermark-designs.com


