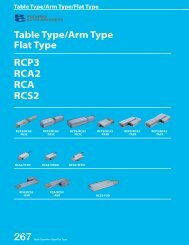

You also want an ePaper? Increase the reach of your titles
YUMPU automatically turns print PDFs into web optimized ePapers that Google loves.
<strong>HS6B</strong> Subminiature Interlock Switches<br />
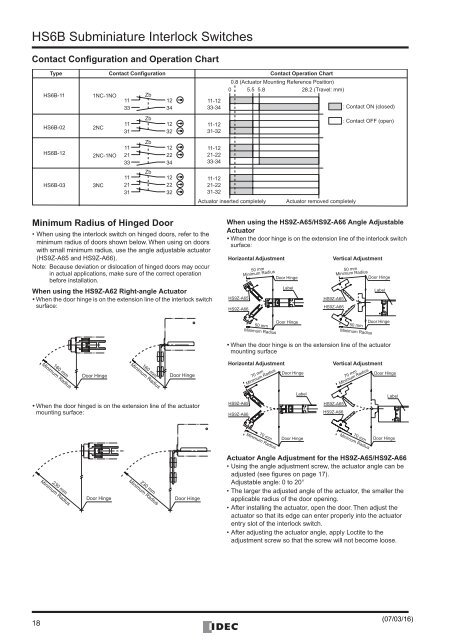
Contact Configuration and Operation Chart<br />
Type<br />
<strong>HS6B</strong>-11<br />
<strong>HS6B</strong>-02<br />
<strong>HS6B</strong>-12<br />
<strong>HS6B</strong>-03<br />
1NC-1NO<br />
2NC<br />
2NC-1NO<br />
3NC<br />
Contact Configuration<br />
11<br />
33<br />
11<br />
31<br />
11<br />
21<br />
33<br />
11<br />
21<br />
31<br />
Zb<br />
Zb<br />
Zb<br />
Zb<br />
12<br />
34<br />
12<br />
32<br />
12<br />
22<br />
34<br />
12<br />
22<br />
32<br />
11-12<br />
33-34<br />
11-12<br />
31-32<br />
11-12<br />
21-22<br />
33-34<br />
11-12<br />
21-22<br />
31-32<br />
Actuator inserted completely<br />
Contact Operation Chart<br />
0.8 (Actuator Mounting Reference Position)<br />
0 5.5 5.8 28.2 (Travel: mm)<br />
Actuator removed completely<br />
: Contact ON (closed)<br />
: Contact OFF (open)<br />
Minimum Radius of Hinged Door<br />
• When using the interlock switch on hinged doors, refer to the<br />
minimum radius of doors shown below. When using on doors<br />
with small minimum radius, use the angle adjustable actuator<br />
(HS9Z-A65 and HS9Z-A66).<br />
Note: Because deviation or dislocation of hinged doors may occur<br />
in actual applications, make sure of the correct operation<br />
before installation.<br />
When using the HS9Z-A62 Right-angle Actuator<br />
• When the door hinge is on the extension line of the interlock switch<br />
surface:<br />
When using the HS9Z-A65/HS9Z-A66 Angle Adjustable<br />
Actuator<br />
• When the door hinge is on the extension line of the interlock switch<br />
surface:<br />
Horizontal Adjustment<br />
HS9Z-A65<br />
HS9Z-A66<br />
50 mm<br />
Minimum Radius<br />
Door Hinge<br />
Label<br />
Vertical Adjustment<br />
HS9Z-A65<br />
HS9Z-A66<br />
50 mm<br />
Minimum Radius<br />
Door Hinge<br />
Label<br />
50 mm<br />
Minimum Radius<br />
Door Hinge<br />
50 mm<br />
Minimum Radius<br />
Door Hinge<br />
• When the door hinge is on the extension line of the actuator<br />
mounting surface<br />
160 mm<br />
Minimum Radius<br />
Door Hinge<br />
160 mm<br />
Minimum Radius<br />
Door Hinge<br />
Horizontal Adjustment<br />
70 mm<br />
Minimum Radius<br />
Door Hinge<br />
Vertical Adjustment<br />
70 mm<br />
Minimum Radius<br />
Door Hinge<br />
Label<br />
Label<br />
• When the door hinged is on the extension line of the actuator<br />
mounting surface:<br />
HS9Z-A65<br />
HS9Z-A66<br />
HS9Z-A65<br />
HS9Z-A66<br />
70 mm<br />
Minimum Radius<br />
Door Hinge<br />
70 mm<br />
Minimum Radius<br />
Door Hinge<br />
230 mm<br />
Minimum Radius<br />
Door Hinge<br />
230 mm<br />
Minimum Radius<br />
Door Hinge<br />
Actuator Angle Adjustment for the HS9Z-A65/HS9Z-A66<br />
• Using the angle adjustment screw, the actuator angle can be<br />
adjusted (see figures on page 17).<br />
Adjustable angle: 0 to 20°<br />
• The larger the adjusted angle of the actuator, the smaller the<br />
applicable radius of the door opening.<br />
• After installing the actuator, open the door. Then adjust the<br />
actuator so that its edge can enter properly into the actuator<br />
entry slot of the interlock switch.<br />
• After adjusting the actuator angle, apply Loctite to the<br />
adjustment screw so that the screw will not become loose.<br />
18<br />
(07/03/16)