IRPLLNR7 - International Rectifier
IRPLLNR7 - International Rectifier
IRPLLNR7 - International Rectifier

You also want an ePaper? Increase the reach of your titles
YUMPU automatically turns print PDFs into web optimized ePapers that Google loves.
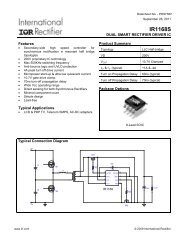
<strong>IRPLLNR7</strong><br />
Universal Input Linear Fluorescent Ballast Using the IRS2166D<br />
Features<br />
• Drives one 35 W TL5 Lamp<br />
• Input Voltage: 80 VAC to 260 VAC<br />
• High Power Factor/Low THD<br />
• High Frequency Operation<br />
• Lamp Filament Preheating<br />
• Lamp Fault Protection with Auto-Restart<br />
• Low AC Line Protection<br />
• End of Lamp Life Shutdown<br />
• IRS2166D(S)PbF HVIC Ballast Controller<br />
Table of Contents<br />
Page<br />
1. Description......................................................................................2<br />
2. Ballast Block Diagram....................................................................2<br />
3. Electrical Characteristics................................................................3<br />
4. Fault Protection Characteristics......................................................3<br />
5. Overview.........................................................................................3<br />
6. Schematic Diagram.........................................................................4<br />
7. PCB Layout and Component Placement Diagram..........................5<br />
8. Bill of Materials..............................................................................6<br />
9. Inductor Specifications (PFC Inductor) .........................................7<br />
10. Inductor Specifications (Resonant Inductor) ...............................8<br />
11. Demo Board Overview.................................................................9<br />
12. Power Factor Correction Section..................................................9<br />
13. Ballast Control Section.................................................................9<br />
14. Startup Mode.................................................................................9<br />
15. Preheat Mode..............................................................................10<br />
16. Ignition Ramp Mode...................................................................12<br />
17. Run Mode....................................................................................13<br />
18. Normal Power Down and Brown-Out Reset..............................14<br />
19. Lamp Removal and Auto-Restart...............................................14<br />
20. Fault Mode..................................................................................14<br />
21. Current Mode Configuration.......................................................17<br />
22. Design Procedure for Different Lamp Types..............................18<br />
www.irf.com<br />
1
1. Description<br />
The <strong>IRPLLNR7</strong> Demo Board is a high efficiency, high power factor, fixed output electronic ballast<br />
designed for driving rapid start fluorescent lamp types. The design contains an EMI filter, active power<br />
factor correction and a ballast control circuit using the IRS2166D(S)PbF Ballast Control IC 1 . This<br />
demo board is intended to ease the evaluation of the IRS2166D, demonstrate PCB layout techniques<br />
and serve as an aid in the development of a production ballast using <strong>International</strong> <strong>Rectifier</strong>’s<br />
IRS2166D.<br />
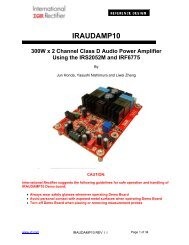
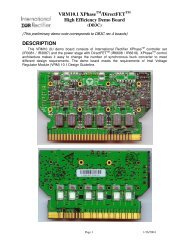
2. Ballast Block Diagram<br />
Line<br />
Input<br />
EMI Filter <strong>Rectifier</strong> Boost PFC Output Stage<br />
UVLO<br />
PFC Control<br />
Lamp<br />
Control IC<br />
IRS2166D<br />
Half-Bridge Driver<br />
Lamp Fault<br />
1 For convenience, the “(S)PbF” extension of IRS2166D(S)PbF will be removed in the rest of this<br />
document<br />
www.irf.com<br />
RD-0609<br />
2
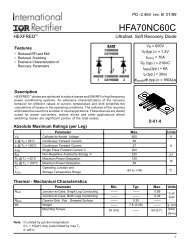
3. Electrical Characteristics<br />
Parameter Units Value<br />
Lamp Type<br />
35 W TL5<br />
Input Power [W] 38<br />
Lamp running voltage [Vpp] 690<br />
Run Mode Frequency [kHz] 45<br />
Preheat Mode Frequency [kHz] 60<br />
Preheat Time [s] 1<br />
Lamp Preheat Voltage [Vpp] 600<br />
Ignition Voltage [Vpp] 1600<br />
Input AC Voltage Range [VACrms] 80-260 VAC<br />
Power Factor<br />
0.995 at 120 VAC (rms)<br />
0.971at 220 VAC (rms)<br />
Total Harmonic Distortion [%]
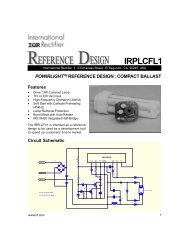
6. Schematic Diagram:<br />
IRS2166D, Single Lamp, Voltage Mode Heating<br />
L<br />
F1<br />
N<br />
GND<br />
L1<br />
CY<br />
RV1<br />
C1<br />
BR1<br />
C2<br />
LPFC<br />
DPFC<br />
RBUS1<br />
CVDC<br />
VBUS<br />
HO RHO<br />
1<br />
16<br />
CPH<br />
CBUS<br />
RT<br />
RPH<br />
CT<br />
CCOMP<br />
RZX<br />
CPH<br />
2<br />
RT<br />
3<br />
RPH<br />
4<br />
CT<br />
5<br />
COMP<br />
6<br />
ZX<br />
7<br />
PFC<br />
8<br />
VS<br />
15<br />
CBOOT<br />
VB<br />
14<br />
VCC<br />
13<br />
COM<br />
12<br />
LO<br />
11<br />
CS<br />
10<br />
9<br />
CSD<br />
MPFC<br />
RPFC<br />
Note: Thick traces represent high-frequency, high-current paths. Lead<br />
lengths should be minimized to avoid high-frequency noise problems<br />
IRS2166D<br />
RBUS2<br />
RVDC<br />
SD<br />
RLIM2 RLIM1<br />
CVCC1 CVCC2<br />
RLO<br />
RLIM<br />
DSD<br />
IC BALLAST<br />
DCOMP<br />
CSD1<br />
CCS<br />
MHS<br />
MLS<br />
RSD<br />
RCS<br />
RSUPPLY<br />
DCP2<br />
RPU<br />
LRES:A<br />
CSNUB<br />
DCP1<br />
DEOL1 DEOL2<br />
CRES<br />
CEOL<br />
REOL3<br />
REOL2<br />
REOL1<br />
CDC<br />
RDC<br />
REOL4<br />
LRES:B<br />
CH1<br />
LRES:C<br />
CH2<br />
www.irf.com<br />
RD-0609<br />
4
7. PCB Layout and Component Placement Diagram<br />
www.irf.com<br />
RD-0609<br />
5
8. Bill Of Materials<br />
Note: Different lamp types require different frequency programming components.<br />
Item # Qty Manufacturer Part Number Description Reference<br />
1 1 <strong>International</strong> <strong>Rectifier</strong> DF10S Bridge <strong>Rectifier</strong>, 1A 1000V BR1<br />
2 1 Roederstein WY0222MCMBF0K Capacitor, 2.2nF 275 VAC Y Cap CY<br />
3 1 Dale CW-1/2 Resistor, 0.5 ohm, 1/2W F1<br />
4 1 Roederstein F1772433-2200 Capacitor, 0.33uF 275 VAC C1<br />
5 1 Panasonic ELF-15N007A EMI Inductor, 1X10mH 0.7Apk L1<br />
6 2 Wima MKP10 Capacitor, 0.1uF 400 VDC C2, CDC,<br />
7 1 Panasonic ERZ-V05D471 Transient Suppressor RV1<br />
8 1 Panasonic Capacitor, 10uF 450VDC 105C CBUS<br />
9 1 B.I. Technologies HM00-01761 PFC Inductor, 1.0mH 3Apk LPFC<br />
10 2 Panasonic ECJ-2VB1HC104K Capacitor, 0.1uF SMT 1206 CBOOT, CVCC2<br />
11 1 Panasonic ECU-V1H473KBM Capacitor, 0.47uF SMT 1206 CPH<br />
12 2 Panasonic ECU-V1H102JCH Capacitor, 1nF SMT 1206 CSD, CEOL<br />
13 1 Panasonic ECU-V1H333KBM Capacitor, 0.33uF SMT 1206 CSD1<br />
14 1 Panasonic ECU-V1H103KBM Capacitor, 0.01uF SMT 1206 CVDC<br />
15 1 Panasonic ECE-A1HGE02R2 Capacitor, 2.2uF 50VDC 105C CVCC1<br />
16 1 Panasonic ECJ-3YB1E105K Capacitor, 1.0uF SMT 1206 CCOMP<br />
17 1 Johanson Dielectrics 102R29W821KV4E Capacitor, 820pF 1KV SMT 1812 CSNUB<br />
18 1 WIMA FKP1-3300/2000/5 Capacitor, 3.3nF 2KV CRES<br />
19 1 Panasonic ECU-V1H221KBM Capacitor, 220pF SMT 1206 CCS<br />
20 2 Panasonic ECQB1104JFW Capacitor, 0.1uF 100V CH1, CH2<br />
21 1 Panasonic ECU-V1H821KBN Capacitor, 820pF SMT 1206 CT<br />
22 1 Digi-key MURS160DICT-ND Diode, 1A 600V, SMT SMB DPFC<br />
23 3 Diodes LL4148DICT-ND Diode, 1N4148 SMT DL35 DCP1, DCP2, DSD<br />
24 1 Diode, 11V Zener, SMT 1206 DCOMP<br />
25 1 <strong>International</strong> <strong>Rectifier</strong> IRS2166D IC, Ballast + PFC Control IC BALLAST<br />
26 1 B.I. Technologies HM00-01762 Inductor, 4.0mH 3Apk LRES<br />
27 3 <strong>International</strong> <strong>Rectifier</strong> IRF830 Transistor, MOSFET MPFC, MHS, MLS<br />
28 3 Panasonic ERJ-8GEYJ22 Resistor, 22 ohm SMT 1206 RPFC, RLO, RHO<br />
29 1 Panasonic ERJ-6ENF5902V Resistor, 59K ohm 1% SMT1206 RPH<br />
30 1<br />
Phoenix Passive<br />
5033ED220K0F12AF<br />
Components<br />
5<br />
Resistor, 220K ohm 1/2W<br />
RSUPPLY<br />
31 2 Panasonic ERJ-8GEYJ680K Resistor, 680K ohm SMT 1206 RBUS1, RBUS2<br />
32 1 Panasonic ERJ-6ENF2202V Resistor, 22K ohm 1% SMT 1206 RT<br />
33 1 Panasonic ERJ-8GEYJ1K Resistor, 1K ohm SMT 1206 RLIM<br />
34 2 Panasonic ERJ-8GEYJ10 Resistor, 10 ohm SMT 1206 RLIM1, RLIM2<br />
35 1 Panasonic ERJ-12RQF1R5U Resistor, 1.5 ohm 1% SMT 2010 RCS<br />
36 1 Panasonic ERJ-8GEYJ223V Resistor, 22K ohm SMT 1206 RZX<br />
37 1 Panasonic ERJ-6ENF1302V Resistor, 13K ohm 1% SMT 1206 RVDC<br />
38 1 Resistor, 100K ohm 1/2W RDC<br />
39 1 Panasonic ERJ-8GEYJ104V Resistor, 100K ohm SMT 1206 RSD<br />
40 3 Panasonic ERJ-8GEYJ224V Resistor, 220K ohm SMT 1206 REOL1, REOL2, REOL3<br />
41 1 Panasonic ERJ-8GEYJ333V Resistor, 20K ohm SMT 1206 REOL4<br />
42 1 Diode, 10V Zener SMT 1206 DEOL1<br />
43 1 Diode, 5.6V Zener SMT 1206 DEOL2<br />
44 1 Panasonic ERJ-8GEYJ105V Resistor, 1meg ohm SMT 1206 RPU<br />
45 1 Panasonic ERJ-8GEYJR00V Resistor, 0 ohm SMT 1206 RJ1<br />
46 4 Wire Jumper J1, J2, JV1, JV2<br />
47 1 WAGO 235-203 Connector, 3 terminal X1<br />
48 1 WAGO 235-207 Connector, 4 terminal X2<br />
Total 65<br />
www.irf.com<br />
RD-0609<br />
6
9. Inductor Specifications (PFC Inductor)<br />
CORE SIZE<br />
BOBBIN<br />
INDUCTOR SPECIFICATION<br />
TYPE : LPFC<br />
E25/13/7 (EF25) 1<br />
HORIZONTAL<br />
GAP LENGTH<br />
PINS<br />
CORE MATERIAL Philips 3C85, Siemens N27 or equivalent<br />
8<br />
mm<br />
NOMINAL INDUCTANCE<br />
MAXIMUM CURRENT<br />
MAXIMUM CORE TEMPERATURE<br />
1<br />
2<br />
100<br />
mH<br />
Apk<br />
ºC<br />
WINDING START PIN FINISH PIN TURNS WIRE DIAMETER (mm)<br />
MAIN<br />
ZX<br />
1 6 125<br />
3 8 10<br />
4 strands of AWG 32<br />
4 strands of AWG 32<br />
ELECTRICAL LAYOUT<br />
PHYSICAL LAYOUT<br />
20.05mm<br />
TOP VIEW<br />
5mm<br />
25mm<br />
1<br />
2<br />
3<br />
4<br />
8<br />
7 5mm<br />
6<br />
5<br />
TEST<br />
(TEST FREQUENCY = 50kHz)<br />
mH<br />
MAIN WINDING INDUCTANCE MIN 0.9 MAX 1.1<br />
mH<br />
MAIN WINDING RESISTANCE<br />
MAX 1.5<br />
Ohms<br />
NOTE : Inductor must not saturate at maximum current and maximum core temperature at given<br />
test frequency.<br />
www.irf.com<br />
RD-0609<br />
7
10. Inductor Specifications (Resonant Inductor)<br />
CORE SIZE<br />
BOBBIN<br />
INDUCTOR SPECIFICATION<br />
TYPE : LRES(VOLTAGE MODE)<br />
E25/13/7 (EF25) 1<br />
HORIZONTAL<br />
GAP LENGTH<br />
PINS<br />
CORE MATERIAL Philips 3C85, Siemens N27 or equivalent<br />
8<br />
mm<br />
NOMINAL INDUCTANCE<br />
MAXIMUM CURRENT<br />
MAXIMUM CORE TEMPERATURE<br />
4<br />
2<br />
100<br />
mH<br />
Apk<br />
ºC<br />
WINDING START PIN FINISH PIN TURNS WIRE DIAMETER (mm)<br />
MAIN<br />
CATHODE (1)<br />
CATHODE (2)<br />
1 8 250 4 strands of AWG 32<br />
6 7 10 4 strands of AWG 32<br />
4 5 10 4 strands of AWG 32<br />
ELECTRICAL LAYOUT<br />
PHYSICAL LAYOUT<br />
20.05mm<br />
TOP VIEW<br />
5mm<br />
25mm<br />
1<br />
2<br />
3<br />
4<br />
8<br />
7<br />
6<br />
5<br />
5mm<br />
TEST<br />
(TEST FREQUENCY = 50kHz)<br />
mH<br />
MAIN WINDING INDUCTANCE MIN 3.9 MAX 4.1<br />
mH<br />
MAIN WINDING RESISTANCE<br />
MAX 2<br />
Ohms<br />
NOTE : Inductor must not saturate at maximum current and maximum core temperature at given<br />
test frequency.<br />
www.irf.com<br />
RD-0609<br />
8
11. Demo Board Overview<br />
This demo-board is designed for single TL5/35W Lamp, voltage mode heating (JV1 and JV2 mounted,<br />
JC1 and JC2 not mounted). TL5 lamps are becoming more popular due to their lower profile and<br />
higher lumen/ watt output. These lamps, however, can be more difficult to control due to their higher<br />
ignition and running voltages. A typical ballast output stage using current-mode filament heating<br />
(filament placed inside L-C tank) will result in excessive filament current during running. The output<br />
stage has therefore been configured for voltage-mode filament heating using secondary windings off of<br />
the resonant inductor LRES. The lamp has been placed outside the under-damped resonant circuit loop,<br />
which consist of LRES and CRES. The filament heating during preheat can be adjusted with the<br />
capacitors CH1 and CH2. The result is a more flexible ballast output stage necessary for fulfilling the<br />
lamp requirements. The DC blocking capacitor, CDC, is also placed outside the under-damped<br />
resonant circuit loop such that it does not influence the natural resonance frequency of LRES and<br />
CRES. The snubber capacitor, CSNUB, serves as charge pump for supplying the IRS2166D.<br />
The IRS2166D Ballast Control IC is used to program the ballast operating points and protect the<br />
ballast against conditions such as lamp strike failures, low DC bus, thermal overload or lamp failure<br />
during normal operations. It is also used to regulate the DC bus and for power factor control allowing<br />
high power factor and low harmonic distortion.<br />
12. Power Factor Correction Section<br />
The power factor correction section contained in the IRS2166D forms the control for a boost topology<br />
circuit operating in critical conduction mode. This topology is designed to step-up and regulate the<br />
output DC bus voltage while drawing sinusoidal current from the line (low THD) which is “in phase”<br />
with the AC input line voltage (HPF).<br />
13. Ballast Control Section<br />
The ballast control section of the IRS2166D Ballast Control IC contains an oscillator, a high voltage<br />
half-bridge gate driver and lamp fault protection circuitry. Please, refer to the datasheet of this IC for<br />
the block diagram and the state diagram. The following is a breakdown of the operation of the ballast<br />
in all of the different modes of operation.<br />
14. Startup Mode<br />
When power is initially applied to the ballast, the voltage on the VCC pin of the IRS2166D begins to<br />
charge up. The voltage for the IRS2166D is derived from the current supplied from the rectified AC<br />
line through startup resistor RSUPPLY. During this initial startup when the VCC voltage of the<br />
IRS2166D is below its rising under-voltage lock-out threshold, it is in UVLO mode and draws micropower<br />
current from VCC. The micro-power current of the IRS2166D allows the use of a large value,<br />
low wattage startup resistor (RSUPPLY). When the voltage on the IRS2166D reaches the rising undervoltage<br />
lockout threshold (12.5V), the gate driver oscillator is enabled (this assumes that there are no<br />
fault conditions) and drives the half-bridge output MOSFETs (MHS and MLS). When the half-bridge<br />
is oscillating, capacitor CSNUB, diodes DCP1 and DCP2 form a snubber /charge pump circuit which<br />
limits the rise and fall time at the half-bridge output and also supplies the current to charge capacitor<br />
CVCC2 to the VCC clamp voltage (approx. 15.6V) of IRS2166D. When the rising under-voltage<br />
lockout threshold of the IRS2166D is reached, the power factor control oscillator starts to oscillate and<br />
drive MOSFET MPFC to boost and regulate the bus voltage to 400 VDC.<br />
www.irf.com<br />
RD-0609<br />
9
15. Preheat Mode<br />
When the ballast reaches the end of the UVLO mode, the Preheat mode is entered. At this point the<br />
ballast control oscillator of the IRS2166D has begun to operate and the half-bridge output is driving<br />
the resonant load (lamp) circuit. There is an initial startup frequency that is much higher than the<br />
steady state Preheat mode frequency that lasts for only a short duration. This is done to ensure that the<br />
initial voltage appearing across the lamp at the startup of oscillation does not exceed the minimum<br />
lamp ignition voltage. If, at the initiation of oscillation of the half-bridge, the voltage across the lamp is<br />
large enough, a visible flash of the lamp occurs which should be avoided. This in effect is a cold strike<br />
of the lamp, which could shorten the life of the lamp.<br />
The ballast control section oscillator of the IRS2166D is similar to oscillators found in many popular<br />
PWM voltage regulator ICs and consists of a timing capacitor and resistor connected to ground.<br />
Resistors RT and RPH program a current that determines the ramp up time of capacitor CT. The<br />
downward ramping time of CT is the deadtime between the switching off of the LO (HO) and the<br />
switching on of the HO (LO) pins on the IRS2166D. The Preheat mode frequency of oscillation is<br />
determined from the parallel resistance of RT and RPH. It is selected such that the voltage appearing<br />
across the lamp is below the minimum lamp ignition voltage while supplying enough current to<br />
preheat the lamp filaments to the correct emission temperature within the Preheat mode period. The<br />
preheating of the lamp filaments is performed with a constant voltage during the Preheat mode. The<br />
waveform in Figure 2 shows the lamp filament current while Figure 3 shows lamp filament voltage<br />
during the normal Startup, Preheat, and Ignition Ramp modes of the ballast.<br />
Figure 2: Lamp filament current during Preheat and Ignition Ramp (500mA / div)<br />
(Crossed lamps)<br />
www.irf.com<br />
RD-0609<br />
10
Figure 3: Lamp filament voltage during preheat and Ignition Ramp<br />
(Crossed lamps)<br />
Figure 4 shows a plot of the half-bridge oscillation frequency as a function of time for all of the normal<br />
modes of operation: Preheat mode, Ignition Ramp mode and Run mode.<br />
f osc<br />
f Preheat<br />
f Run<br />
f Ignition<br />
Figure 4: Oscillator frequency versus time, Normal operating conditions<br />
preheat ignition run<br />
t<br />
www.irf.com<br />
RD-0609<br />
11
The duration of the Preheat mode as well as the mode of operation of the ballast are determined by the<br />
voltage on the CPH pin of the IRS2166D. At the completion of the UVLO mode, Preheat mode is<br />
entered and an internal current source is activated at the CPH pin of the IR2166, which begins to<br />
charge up capacitor CPH. The ballast remains in the Preheat mode until the voltage on the CPH pin<br />
exceeds the Ignition Ramp mode threshold (10 V).<br />
16. Ignition Ramp Mode<br />
At the completion of the Preheat mode the ballast switches to the Ignition Ramp mode and the<br />
frequency ramps down to the run frequency. Resistor RPH is no longer connected directly in parallel<br />
with resistor RT so the run frequency is determined only with RT. During this ramping downward of<br />
the frequency, the voltage across the lamp increases in magnitude as the frequency approaches the<br />
resonant frequency of the LC load circuit until the lamp ignition voltage is exceeded and the lamp<br />
ignites. The maximum ignition voltage that can be generated is determined from the value of RCS, but<br />
in any case the ignition frequency must be higher than the run frequency. Figure 5 shows the ramping<br />
of voltage appearing across the lamp.<br />
Fig. 5: Ignition ramp (crossed lamps)<br />
During the Ignition Ramp mode the voltage on the CPH pin of the IRS2166D continues to ramp up<br />
until the voltage at the CPH pin of the IRS2166D exceeds the Run mode threshold (13 V). Overcurrent<br />
sensing and fault counter are enabled during Preheat and Ignition modes. A full explanation of<br />
the functionality of the over-current sensing is in the section on Fault Mode.<br />
www.irf.com<br />
RD-0609<br />
12
17. Run Mode<br />
During the Run mode the frequency is shifted to the run frequency. The run frequency is determined<br />
only by RT. The 1 V to 3 V end-of-life window comparator in the SD pin is enabled at the beginning<br />
of the Run mode. The full explanation of the functionality of the end-of-life sensing is in the section on<br />
Fault Mode. The Run mode frequency is that at which the lamp is driven to the lamp manufacturer’s<br />
recommended lamp power rating. The running frequency of the lamp resonant output stage for selected<br />
component values is defined as,<br />
VDCbus<br />
PLamp<br />
PLamp<br />
VLamp<br />
frun<br />
= − ⎛ LC ⎝ ⎜ ⎞<br />
⎟ + − ⎛ − ⎛ ⎡<br />
CV Lamp⎠<br />
LC ⎝ ⎜ ⎞ ⎤ ⎝ ⎜ 2 ⎞<br />
2<br />
2<br />
2 1 ⎟<br />
1 1<br />
1<br />
π ⎠<br />
2<br />
⎢ 2 ⎟ ⎥ − 4<br />
2<br />
2<br />
2 2<br />
2π<br />
CV Lamp<br />
⎣⎢<br />
⎠<br />
⎦⎥<br />
LC<br />
where,<br />
L = Lamp resonant circuit inductor (L3) (H)<br />
C = Lamp resonant circuit capacitor (C14) (F)<br />
PLamp = Lamp running power<br />
(W)<br />
VLamp = Lamp running voltage amplitude<br />
(V)<br />
Figure 6 shows the voltage appearing across the lamp during Startup, Preheat, Ignition Ramp and Run<br />
modes.<br />
2<br />
Fig. 6: Preheat, Ignition Ramp and Run Voltage in the lamp<br />
www.irf.com<br />
RD-0609<br />
13
18. Normal Power Down and Brown-Out Reset<br />
A normal power down occurs when the AC line voltage is disconnected from the ballast. A brown-out<br />
condition occurs when the AC line is disconnected momentarily. When either of these conditions<br />
occurs, the COMP pin voltage gets limited by the zener diode DCOMP causing the PFC on-time to<br />
become limited and the voltage on the VBUS pin of the IRS2166D to drop below the undervoltage<br />
reset threshold (3 V). VCC will then be discharged below the power down threshold (UVLO-) and the<br />
ballast will go into UVLO mode. The ballast control oscillator is stopped, the half-bridge and PFC gate<br />
driver outputs (LO, HO and PFC) are turned off and the IRS2166D goes into its UVLO/micro-power<br />
mode and the bus voltage collapses. When the AC line returns, VCC will increase again above<br />
UVLO+ and the ballast will restart in Preheat mode.<br />
19. Lamp Removal and Auto-Restart<br />
When the lamp is removed, the SD pin will pull above the 5 V shutdown threshold via the external<br />
pull-up resistor RPU. The ballast will remain in a non-latched shutdown condition with LO, HO, and<br />
the PFC gate drive outputs off. When the lamp is re-inserted, the lower filament will pull the SD pin<br />
back below 3 V and the ballast will restart in Preheat mode.<br />
20. Fault Mode<br />
Fault mode is when the ballast driver is shutdown due to the detection of a lamp fault. Note that when<br />
the ballast is in this Fault mode the power factor correction section of the ballast is also shutdown and<br />
the bus voltage will drop to the non-boosted/unregulated level. There are several lamp fault conditions<br />
that can put the ballast into the Fault mode. The lamp fault conditions detected include: hard-switching<br />
detection, over-current detection (CS pin) and end-of-life or no load detection (SD pin). Resistor RCS<br />
in the source lead of the low-side MOSFET (MHS) serves as the current sensing point for the halfbridge,<br />
which is used to detect these lamp fault conditions. In operation when the half-bridge is<br />
oscillating, a voltage appears across RCS whenever the low-side MOSFET, MHS, is turned on or the<br />
high-side MOSFET, MLS, is turned off. The magnitude of this voltage directly relates to the current in<br />
the lamp resonant circuit. Figure 7 shows the voltage which appears across resistor RCS during normal<br />
Run mode conditions. Also shown in Figure 7 are the gate drive signals for the low-side MOSFET (LO<br />
pin) and the high-side MOSFET (HO-VS pin).<br />
www.irf.com<br />
RD-0609<br />
14
Figure 7: Normal Run mode; Upper trace: voltage across RCS, Middle trace: IC2 LO pin voltage,<br />
Lower trace: IC2 HO-VS pin voltage<br />
During the Preheat and Ignition modes the over-current threshold at the CS pin and internal fault<br />
counter are enabled. During Run mode the fault counter is disabled. If at any time thereafter the<br />
voltage magnitude across resistor RCS rises above the over-current threshold (1.3 V) for a single<br />
event, a lamp fault condition is signaled and the half-bridge output MOSFETs’, (MHS and MLS) are<br />
turned off and the ballast goes into Fault mode. During Preheat and Ignition, a lamp fault condition is<br />
signaled only after 25 cycles to avoid triggering this protection in the case of a current transient that<br />
can happen during normal ignition. An over-current condition can occur if the lamp fails to ignite or<br />
the lamp is broken (an open circuit cathode or broken lamp). Figure 8 shows the voltage across resistor<br />
RCS and the voltage at the half-bridge (VS pin) when the ballast detects a failure to ignite the lamp<br />
and goes into Fault mode. Figure 9 shows the voltage appearing across the lamp during the tail end of<br />
the Preheat mode and the Ignition Ramp mode for a failure of the lamp to ignite condition. If a<br />
cathode is broken (open circuit) the half-bridge output hard-switches and each time the low-side<br />
MOSFET (MHS) is turned on a large current pulse occurs and thus a large voltage pulse occurs across<br />
resistor RCS signaling a fault, Figure 10 shows this hard-switching condition. The ballast will remain<br />
in Fault mode until either the line voltage is reset or a lamp replacement is performed.<br />
www.irf.com<br />
RD-0609<br />
15
CS<br />
VS<br />
Figure 8: Failure of lamp to ignite condition (lamp filaments good): Upper trace: voltage across<br />
RCS, Lower trace: voltage at VS pin<br />
Figure 9: Failure of lamp to ignite condition (lamp filaments good): Lamp voltage during end of<br />
Preheat and Ignition Ramp modes<br />
www.irf.com<br />
RD-0609<br />
16
Figure 10: Hard-switching condition (upper filament open): Upper trace: voltage across RCS,<br />
Middle trace: IC2 LO pin voltage, Lower trace: IC2 HO-VS pin voltage<br />
During an end-of-life lamp fault condition, the lamp voltage can increase or decrease asymmetrically.<br />
The resulting excessive voltage across the lamp filaments can cause the lamp ends to reach<br />
temperatures high enough to melt the tube glass. The lamp can then fall out of the fixture and cause<br />
harm or damage. To protect against this condition, resistors REOL1, REOL2, REOL3, REOL4, and<br />
zener diodes DEOL1 and DEOL2, are used for end-of-life protection. The end-of-life window<br />
comparator at the SD/EOL pin is enabled in Run Mode. If the voltage on SD/EOL pin falls outside the<br />
range of the internal 1 V to 3 V window comparator, the IC will enter Fault Mode. The SD/EOL pin is<br />
internally biased at 2 V with an internal +/-10 µA OTA. The value of REOL4, DEOL1 and DEOL2 are<br />
selected such that the SD/EOL pin remains at 2 V during normal operation, but increases above 3 V or<br />
decreases below 1 V during an end-of-life fault condition. The lamp voltage end-of-life threshold can<br />
be adjusted by changing the value of resistor REOL4 and/or zener diodes DEOL1 and DEOL2 (a<br />
threshold of 30% higher than the nominal running lamp voltage is typical).<br />
21. Current Mode Configuration<br />
The same PCB can be configured for current mode heating. It is needed to remove the Jumpers JV1<br />
and JV2 and to introduce the Jumpers JC1 and JC2. It could be also useful to add a resistor RDC in<br />
parallel to CDC because in this configuration striations (visible dark rings) on the lamps can occur<br />
particularly when the lamp has been off for some time and is cold. The value should in the order of 100<br />
kΩ 0.5 W.<br />
We suggest the use of the Ballast Designer software to determine the values of the components to use<br />
in this configuration.<br />
www.irf.com<br />
RD-0609<br />
17
22. Design Procedure for Different Lamp Types<br />
To adapt the design to different types of lamps you need to adjust the values of: LPFC, MPFC, MLO,<br />
MHO, CPH, RT, RPH, RCS, CT, REOL4, CRES, and LRES. Do not change any others values!<br />
1) Use the Ballast Designer Software V4.0 (visit IR website to download) to set the values of<br />
LRES, CRES, LPFC, MPFC, MLO and MHO, CT, and to set the starting values of CPH, RT,<br />
RPH, RCS and LPFC.<br />
Cross both lamps (i.e. connect a filament or resistor to each lamp cathode position but not a good lamp)<br />
and measure the lamp voltage at ignition using a storage oscilloscope.<br />
1) Set RCS to get the right maximum ignition voltage (decrease RCS to increase the ignition<br />
voltage)<br />
Cross both lamps (i.e. connect a filament or resistor to each lamp cathode position but not a<br />
good lamp) and measure the lamp voltage at ignition using a storage oscilloscope.<br />
Connect both lamps correctly and measure the input power<br />
2) Set RT to set the power on the lamp (increase RT to decrease the frequency and increase the<br />
power on the lamp)<br />
3) Set RPH to set the right preheat frequency (increase RPH to decrease the preheat frequency<br />
and increase the preheat current)<br />
In the case of voltage mode heating, increase CH1 and CH2 to increase the preheat voltage (use 6-7<br />
turns in the secondary of LRES).<br />
4) Select CPH to set the preheat time (increase CPH to increase the preheat time)<br />
5) Verify the value of LPFC at each limit of the line/load range:<br />
Maximum input voltage:<br />
If the COMP pin becomes less than 400 mV the PFC will not operate in a stable manner and it is<br />
necessary to increase LPFC.<br />
Minimum input voltage:<br />
If the PFC does not operate in a stable manner and audible noise can be heard from LPFC, it is<br />
necessary to decrease LPFC.<br />
6) Set ROL4 to set the end-of-life protection to a percentage of the lamp voltage. For example, to<br />
set the protection threshold to 30% of the lamp voltage:<br />
The value of REOL4 is chosen to have the SD pin varying between 2-0.7 V and 2+0.7 V during normal<br />
operations and exceeding the window comparator limits (less than 1 V or more than 3 V) with 30%<br />
change in the voltage of the lamp.<br />
(Fine tuning of this threshold can be done by trying different REOL4 values on the test bench)<br />
www.irf.com<br />
RD-0609<br />
18