IF 1448 Revision 1 - Cooper Industries
IF 1448 Revision 1 - Cooper Industries
IF 1448 Revision 1 - Cooper Industries

You also want an ePaper? Increase the reach of your titles
YUMPU automatically turns print PDFs into web optimized ePapers that Google loves.
Luminarea Series<br />
WLFL Series 150W & 175W Floodlight Luminaires<br />
Installation & Maintenance Information<br />
<strong>IF</strong> <strong>1448</strong><br />
SAVE THESE INSTRUCTIONS FOR FUTURE REFERENCE<br />
APPLICATION<br />
<strong>Cooper</strong> Crouse-Hinds Luminarea 150 watt High Pressure<br />
Sodium and 175 watt Metal Halide WLFL Series flood light<br />
luminaires are ideally suited for general outdoor area and<br />
outdoor parking lot lighting. The WLFL series comes with a<br />
standard adjustable mounting knuckle. The housing is made<br />
from epoxy powder painted die cast aluminum for a long,<br />
trouble-free service life.<br />
WLFL series luminaires are UL and cUL certified for ordinary<br />
wet locations (Type 3R). WLFL fixtures are available with<br />
multi-tap (120, 208, 240 and 277 volts) or tri-tap (120, 277 and<br />
347 volts) ballast.<br />
WARNING<br />
To avoid the risk of fire or electric shock, this product<br />
should be installed, inspected and maintained by a qualified<br />
electrician only in accordance with the National Electrical<br />
Code and all applicable local electrical codes.<br />
WARNING<br />
To avoid electrical shock:<br />
• Be certain electrical power is OFF before and during<br />
installation and maintenance.<br />
• Luminaire must be supplied by a wiring system with an<br />
equipment grounding conductor.<br />
• Make sure the supply voltage is the same as the<br />
luminaire voltage.<br />
• Use proper supply wiring as specified on the luminaire<br />
nameplate or carton label.<br />
• Before opening, electrical power to the luminaire must be<br />
turned off. Keep tightly closed when in operation.<br />
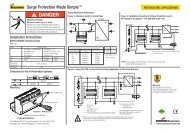
INSTALLATION<br />
1. Loosen glass lens door screws and open fixture.<br />
Note: The fixture is provided with a multi-tap (120, 208, 240<br />
and 277 volts) or tri-tap (120, 277 and 347 volts) ballast.<br />
The fixture is wired at factory to the highest voltage. If a<br />
different voltage is desired, follow steps 2 to 5, if not<br />
proceed to step 6.<br />
2. Remove reflector mounting screws and reflector from the<br />
fixture.<br />
3. Disconnect jumper wire from undesired ballast voltage and<br />
replace wirenut on unused ballast voltage lead.<br />
4. Find the desired ballast voltage lead, remove insulation and<br />
connect lead to the jumper wire using a wirenut.<br />
5. Install reflector using reflector mounting screws.<br />
6. Screw lamp into lamp holder. Make sure lamp is secure.<br />
7. Close door and tighten door screws.<br />
Mounting<br />
Note: Luminaire is designed for mounting on a listed wet<br />
location rated outlet box cover.<br />
8. Thread locknut on knuckle to upper end of knuckle.<br />
9. Insert fixture leads through outlet box cover and thread<br />
cover onto knuckle.<br />
10. Make wire connections, connect the black supply wire to<br />
black fixture wire and white supply wire to white fixture wire.<br />
11. Attach the ground supply wire to the green ground wire on<br />
the housing.<br />
12. Mount cover and fixture to outlet box.<br />
13. Aim the fixture horizontally and tighten locknut onto box<br />
cover.<br />
14. To position vertically, loosen knuckle bolt, adjust and retighten<br />
bolt.<br />
15. Turn power back on.<br />
LAMP REPLACEMENT<br />
1. Disconnect power to luminaire and allow to cool completely.<br />
2. Loosen glass lens door screws and open fixture.<br />
3. Remove lamp.<br />
4. Perform cleaning and inspection as noted in<br />
MAINTENANCE section.<br />
5. Screw new lamp into lampholder and hand tighten securely.<br />
New lamp must be identical type, size and wattage as<br />
marked on the luminaire nameplate.<br />
6. Close door and tighten door screws.<br />
<strong>IF</strong> <strong>1448</strong> • 09/02 Copyright © 2002, <strong>Cooper</strong> <strong>Industries</strong>, Inc. Page 1
MAINTENANCE<br />
• Perform visual, electrical and mechanical inspections on a<br />
regular basis. It is recommended that checks be made at<br />
least once a year. We recommend an Electrical<br />
Preventative Maintenance Program as described in the<br />
National Fire Protection Association Bulletin NFPA No. 70B:<br />
Recommended Practice for Electrical Equipment<br />
Maintenance (www.nfpa.org).<br />
• The lens should be cleaned periodically to insure continued<br />
lighting performance. To clean, wipe the lens with a clean<br />
damp cloth. If this is not sufficient, use a mild soap or liquid<br />
cleaner. Do not use an abrasive, strong alkaline or acid<br />
cleaner. Damage may result.<br />
• Visually check for undue heating evidenced by discoloration<br />
of wires or other components, damaged parts or leakage<br />
evidenced by water in the interior. Replace all worn,<br />
damaged or malfunctioning components and clean gasket<br />
seals before putting luminaire back into service.<br />
• Electrically check to make sure that all connections are<br />
clean and tight.<br />
• Mechanically check that all parts are properly assembled.<br />
All statements, technical information and recommendations contained herein are based on information and tests we believe to be<br />
reliable. The accuracy or completeness thereof are not guaranteed. In accordance with Crouse-Hinds "Terms and Conditions of Sale",<br />
and since conditions of use are outside our control, the purchaser should determine the suitability of the product for his intended use<br />
and assumes all risk and liability whatsoever in connection therewith.<br />
<strong>Cooper</strong> <strong>Industries</strong> Inc. <strong>IF</strong> <strong>1448</strong><br />
Crouse-Hinds Division <strong>Revision</strong> 1<br />
PO Box 4999, Syracuse, New York 13221 • U.S.A. New 09/02<br />
Copyright© 2002, <strong>Cooper</strong> <strong>Industries</strong>, Inc.