EXM 352R - Ample Audio
EXM 352R - Ample Audio
EXM 352R - Ample Audio

You also want an ePaper? Increase the reach of your titles
YUMPU automatically turns print PDFs into web optimized ePapers that Google loves.
In Car <strong>Audio</strong>,<br />
[ék-san-ik] means<br />
Sonic Excellence by<br />
Mobile Entertainment<br />
INSTRUCTION MANUAL<br />
EXONIC Mobile Entertainment<br />
Buena Park, CA. 90621 U.S.A.<br />
www.exonicmobile.com<br />
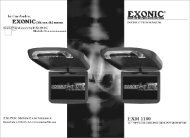
<strong>EXM</strong> <strong>352R</strong><br />
3.5" Digital TFT LCD Rearview Monitor
Installation<br />
Operation<br />
<strong>EXM</strong> <strong>352R</strong><br />
Universal Rearview Monitor<br />
Remote control<br />
Switching Cable<br />
Red(+)Switched lgnition<br />
Black(-)Ground<br />
Blue(+)Reverse Wire<br />
Sucker bracket<br />
Gift box<br />
Yellow(RCA)Video Input Wire<br />
White(RCA)Camera Input Wire<br />
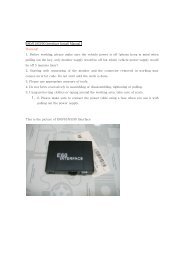
Mounting<br />
1. Firmly press suction cup on to clean area on glass.<br />
2. Depress lever to lock into place.<br />
Wiring<br />
1. Route wiring away from all moving vehicle parts.<br />
2. Connect the BLACK wire to an area of metal on the vehicles frame for<br />
ground.<br />
3. Connect the RED wire to a switched ignition source (cigarette lighter<br />
jack or fuse block).<br />
4. Connect BLUE reverse trigger wire to the switched side of the reverse<br />
light, or a positive reverse trigger wire.<br />
5. Connecting the BLUE trigger wire is optical, by not connecting the BLUE<br />
trigger wire, the monitor will not trun on automatically when shifted to<br />
reverse.<br />
6. Connect the Rearview Camera Input wire WHITE RCA plug to<br />
Rearview Camera.<br />
7. Connect the Video Input wire YELLOW RCA plug to Video Source.<br />
Color LCD Screen<br />
Remote receiving<br />
window<br />
Volume+<br />
Volume-<br />
AV output<br />
Menu<br />
DC Input<br />
Power on/off<br />
CAM1/CAM2 shift<br />
Press “M” to display options as following:<br />
PICTURE SYS TEM<br />
1.PICTURE<br />
Bright,Contrast,color and TINT display on the screen as illustrated<br />
below. Press Volume+/- to select bright / Contrast / color / TINT, press<br />
“M”to confirm,press volume+/- to adjust the analog quantity of bright<br />
from 0 to 100, then press “M”to quit.<br />
CAM(NOR)<br />
PICTURE<br />
BRIGHT<br />
CONTRAST<br />
COLOR<br />
TINT<br />
50<br />
50<br />
50<br />
50<br />
50<br />
CAM1(NOR)<br />
SYSTEM<br />
LANGUAGE<br />
COLOR SYS<br />
ENLISH<br />
AUTO<br />
NORMAL<br />
CAM1<br />
CAM2<br />
TRG DELAY TIME 0<br />
2.SYSTEM<br />
Press Volume+/- to select Language,press“M”to confirm, press<br />
volume+/- to change the language, then press “M” to quit.<br />
Press Volume+/- to select COLOR SYS,press“M”to confirm,press<br />
volume+/- to choose the corresponding color system, then press “M” to<br />
quit.If the color system is not suit,the image will be bad color or no<br />
color Suggest to choose AUTO.<br />
Press Volume+/- to select CAM1,press“M”to confirm,press<br />
volume+/- to change CAM1 image normal or mirror, then press “M” to quit.<br />
Press Volume+/- to select CAM2,press“M”to confirm,press<br />
volume+/- to change CAM2 image normal or mirror, then press “M” to quit.<br />
Press Volume+/- to select TRG DELAY TIME ,press“M”to confirm,<br />
then Press Volume+/- to set up the delay time(0-30S) of the reverse<br />
image.press “M” to quit.