AGB 673/DP AGB 673/WP AGB 786/WP AGB 787/WP AGB 666/WP ...
AGB 673/DP AGB 673/WP AGB 786/WP AGB 787/WP AGB 666/WP ...
AGB 673/DP AGB 673/WP AGB 786/WP AGB 787/WP AGB 666/WP ...

You also want an ePaper? Increase the reach of your titles
YUMPU automatically turns print PDFs into web optimized ePapers that Google loves.
PROFESSIONAL DISHWASHERS<br />
MODELS – MODELES – MODELLE – MODELLI - MODELOS<br />
<strong>AGB</strong> <strong>673</strong>/<strong>DP</strong><br />
<strong>AGB</strong> <strong>673</strong>/<strong>WP</strong><br />
<strong>AGB</strong> <strong>786</strong>/<strong>WP</strong><br />
<strong>AGB</strong> <strong>787</strong>/<strong>WP</strong><br />
<strong>AGB</strong> <strong>666</strong>/<strong>WP</strong><br />
<strong>AGB</strong> 669/<strong>WP</strong><br />
<strong>AGB</strong> 669/<strong>DP</strong><br />
<strong>AGB</strong> 669/<strong>DP</strong>-SP/3<br />
<strong>AGB</strong> 664/<strong>WP</strong><br />
05/2010
1 Safety and usage instructions<br />
2 Technical characteristics<br />
3 Installation and positioning<br />
4 INSTALLER – TECHNICAL ASSISTANT INSTRUCTIONS<br />
5 First startup<br />
6 USER INSTRUCTIONS<br />
7 Program selection<br />
8 Maintenance and cleaning<br />
9 Problems and anomalies (user)<br />
Thank you for having chosen this product.<br />
We recommend that you read all of the instructions contained in the manual attentively in order to become<br />
familiar with the most suitable conditions for the correct use of the dishwasher.<br />
TECHNICAL INSTRUCTIONS:<br />
Are intended for qualified personnel who will perform the installation, the setup, the testing<br />
and eventual assistance operations.<br />
USER INSTRUCTIONS:<br />
Indicate the recommended usage, the command descriptions and the proper cleaning and<br />
maintenance operations for the dishwasher.<br />
2
1 USAGE AND SAFETY WARNINGS<br />
THIS MANUAL CONSTITUTES AND INTEGRAL PART OF THE DISHWASHER; IT MUST<br />
ALWAYS BE PRESERVED INTACT AND KEPT TOGETHER WITH THE MACHINE.<br />
POSITIONING, CONNECTIONS, ACTIVATION AND TROUBLESHOOTING, AND<br />
SUBSTITUTION OF THE POWER CABLE MUST BE PERFORMED BY QUALIFIED<br />
PERSONNEL.<br />
THE DISHWASHER IS INTENDED EXCLUSIVELY FOR PROFESSIONAL USE AND MUST BE USED BY<br />
AUTHORIZED PERSONNEL. IT IS DESIGNED TO WASH DISHES (PLATES, CUPS, BOWLS, TRAYS,<br />
SILVERWARE) AND SIMILAR ITEMS USED IN GASTRONOMIC SECTORS AS WELL AS IN THE PUBLIC<br />
CATERING BRANCH, AND IN CONFORMITY TO THE INTERNATIONAL ELECTRICAL AND MECHANICAL<br />
SAFETY (CEI-EN-IEC 60335-2-58/61770) AND ELECTROMAGNETIC COMPATIBILITY (CEI-IEC-EN 55014-<br />
1/-2, 61000-3;4, 50366) NORMS.<br />
THE MANUFACTUIRER DECLINES ANY RESPONSIBILITY FOR DAMAGE TO PERSONS OR THINGS<br />
CAUSED BY FAILURE TO OBSERVE THE INSTRUCTIONS PRESENT IN THE MANUAL, INCORRECT<br />
USE, TAMPERING, EVEN WITH A SINGLE PART OF THE MACHINE, AND THE USE OF NON-ORIGINAL<br />
SPARE PARTS. IN CASE OF DAMAGE OF THE POWER SUPPLY CABLE, IT MUST BE REPLACED ONLY<br />
BY MANUFACTURER OR BY AUTHORIZED CUSTOMER CENTER AND BY QUALIFIED TECNICIANS.<br />
THE GROUNDING CONNECTION IS OBLIGATORY, IN ACCORDANCE WITH THE METHODS<br />
PRESCRIBED BY THE ELECTRICAL SYSTEM’S SAFETY NORMS.<br />
THIS MACHINE IS MARKED IN CONFORMITY TO THE EUROPEAN DIRECTIVE 2002/96/EC, WASTE<br />
ELECTRICAL AND ELECTRONIC EQUIPMENT (WEE).<br />
ENSURING THAT THIS PRODUCT BE DISPOSED OF IN A PROPER MANNER CONTRIBUTES TO THE<br />
PREVENTION OF POTENTIAL NEGATIVE HEALTH AND ENVIRONMENTAL CONSEQUENCES. WE<br />
DECLARES THAT THE EMISSION SOUND PRESSURE LEVEL LPA IS 62 DB/A WITH AN UNCERTAINTY<br />
EQUALS TO KPA + 1 DB. SOUND POWER LEVEL IS LWA 73.79 WITH ITS UNCERTAINTY EQUALS TO<br />
KWA + 1 DB<br />
THE SYMBOL UPON THE PRODUCT, OR UPON ITS ACCOMPANYING DOCUMENTATION,<br />
INDICATES THAT THIS PRODUCT MAY NOT BE TREATED AS DOMESTIC WASTE, BUT RATHER MUST<br />
BE TAKEN TO A COLLECTION FACILITY WHICH IS SUITABLE FOR THE RECYCLING OF ELECTRIC AND<br />
ELECTRONIC EQUIPMENT.<br />
DISCARD THIS PRODUCT IN CONFORMITY TO THE LOCAL NORMS REGARDING WASTE DISPOSAL.<br />
FOR MORE INFORMATION REGARDING THE TREATMENT, SALVAGE AND RECYCLING OF THIS<br />
PRODUCT, CONTACT YOUR COMPETENT LOCAL OFFICES, YOUR LOCAL WASTE COLLECTION<br />
SERVICE PROVIDER OR THE POINT OF SALE IN WHICH THE PRODUCT WAS PURCHASED.<br />
DO NOT INSERT SOLVENTS SUCH AS ALCOHOL OR TURPENTINE INTO THE MACHINE,<br />
WHICH COULD CAUSE AN EXPLOSION. DO NOT INSERT DISHES WITH ASH, WAX OR<br />
VARNISH RESIDUES INTO THE MACHINE.<br />
NEVER USE THE DISHWASHER OR ITS PARTS AS A STEPLADDER OR SUPPORT FOR<br />
PERSONS, THINGS OR ANIMALS.<br />
LEANING OR SITTING UPON THE DISHWASHER’S OPEN DOOR COULD CAUSE AN<br />
OVERTURN WITH CONSEQUENT DANGER TO PEOPLE IN THE PROXIMITY.<br />
IN ORDER TO AVOID TRIPPING UPON IT, DO NOT LEAVE THE DISHWASHER DOOR OPEN.<br />
DO NOT DRINK THE RESIDUAL WATER WHICH MAY BE PRESENT WITHIN THE DISHES OR<br />
THE DISHWASHER ITSELF AFTER A WASH CYCLE.<br />
THE MACHINE IS NOT SUITABLE TO BE USED BY MINORS, AND BY PEOPLE WITH<br />
REDUCED PHYSICAL, SENSORIAL OR MENTAL CAPABILITIES, WHO LACK THE<br />
NECESSARY EXPERIENCE AND KNOWLEDGE FOR ITS PROPER OPERATION.THE USE OF<br />
THE MACHINE IS PERMITTED TO THESE PEOPLE EXCLUSIVELY UNDER THE<br />
SUPERVISION OF A PERSON IN CHARGE OF THEIR SAFETY.<br />
3
Electrical Scheme – voltage regulation<br />
400/3 Volt 230/3 Volt<br />
TRB<br />
TRB<br />
R S T R S T<br />
400/3 Volt<br />
230/3 Volt<br />
Wash Pump<br />
Boiler Resistance<br />
2 INSTALLATION AND POSITIONING<br />
INSTALLATION and POSITIONING<br />
Bring the dishwasher to its installation location, remove its packaging and verify the integrity of the apparatus<br />
and of the components. If damaged, written notification must be sent to the transporter.<br />
The packaging elements (plastic bags, polystyrene foam, nails, etc) must not be left within reach of children<br />
and domestic animals as they are a potential source of danger.<br />
All of the materials used for packaging are compatible with the environment. They may be safely preserved, or<br />
may be disposed of at an appropriate waste disposal facility.<br />
The components in plastic material subject to eventual disposal through recycling are marked in the following<br />
manner:<br />
PE polyethylene: external wrapping, instructions bag, protection bags.<br />
PP polypropylene: bands.<br />
PS polystyrene foam: protective corners, packaging cover.<br />
The wood and cardboard components can be disposed of by respecting the norms in vigor.<br />
When disposing of the product, avoid leaving it in the environment; its disposal must respect the norms in vigor.<br />
All of the metallic parts are in stainless steel and are detachable.<br />
The plastic parts are marked with the symbol of the relative material.<br />
POSITIONING:<br />
Warning: the internal system and the locations in which communal apparatus are to be installed,<br />
must answer to the norms in vigor.<br />
The manufacturer declines any responsibility for direct damages to persons of things deriving from lack of<br />
respect for the said norms.<br />
Prior to installation verify that objects and materials which could be damaged by aqueous vapor or by spray<br />
from washing solutions are not in the vicinity, or are adequately protected.<br />
Position the dishwasher in the desired position and remove the protective wrapping.<br />
Level the dishwasher (with the help of a level) on its four feet, regulating them in such a way so as to<br />
guarantee stability; any alternate solution must be approved by the manufacturer.<br />
4
3 INSTALLER – TECHNICAL ASSISTANT INSTRUCTIONS<br />
Water and drain connection:<br />
The water tubes and the electrical power cable stick out from the back of the machine. Connect the water<br />
supply tube to a ¾” threaded gas outlet.<br />
Use only new tubes for the connection to the water supply; old or used tubes must not be utilized.<br />
The dynamic supply pressure must be between 200 and 400 kPa; if the pressure is higher, a pressure<br />
reducer must be installed.<br />
It is indispensable to install a general faucet on the supply water input tubing; the faucet must be accessible<br />
after installation has been completed. Do not install the faucet behind the dishwasher.<br />
The declared cycle durations refer to a 50° hot water supply.<br />
Where a cold water supply is used, the duration of the cycle could increase in relation to the input water<br />
temperature since the dishwasher is equipped with a constant temperature and pressure rinse system.<br />
Drain:<br />
Every dishwasher comes equipped with a drain connection tube; this is prescribed to be at floor level, with a<br />
trap drain.<br />
Caution: make sure that the supply and drain tubes are not bent, restricted or crushed after<br />
installation.<br />
3.1 Electrical connection<br />
The dishwasher’s electrical connection and that of eventual supplementary apparatus is to be<br />
entrusted to authorized and qualified personnel, with respect to the norms in vigor; observe also the<br />
technical regulations for the connections.<br />
The total power installed is given upon the apparatus’ technical data label.<br />
Other apparatus must not be protected along with the dishwasher.<br />
The user must provide for the installation, according to the norms in vigor, of a main electrical power<br />
switch and of a differential switch compatible with the machine’s characteristics.<br />
These switches must be installed near the dishwasher, be easily accessible after installation and<br />
guarantee complete disconnection from the electrical supply in category III overvoltage conditions.<br />
Caution!!!<br />
The dishwasher is free of electrical current only when the main switch is off.<br />
- Connect the apparatus to the usage equalizer. The clamp for the connection is located at the lower<br />
back of the machine.<br />
- The protection conductor (PE) is yellow-green in color, the neutral conductor (N) is blue and the<br />
phase conductors (L1, L2, L3) are black, gray and brown.<br />
4 FIRST STARTUP<br />
FIRST STARTUP<br />
The electrical protection system must be subjected to a functional test before use. The installation must be<br />
performed and/or verified by the authorized retailer who will be responsible for the first startup and for the<br />
instructions relative to the dishwasher’s operation.<br />
PREPARATION FOR USE<br />
5
Important:<br />
The rinse-aid dosing unit (3) is always present in all models<br />
while the detergent dosing unit (1) is present in only few .<br />
If both dosing units are present, position the external<br />
detergent and rinse-aid containers and insert their<br />
respective suction tubes located at the back of the machine.<br />
Red tube: detergent<br />
Transparent tube: rinse-aid<br />
Before inserting the tubes into the containers, apply the<br />
weights (necessary to keep the tubes at the bottom of the<br />
container) and the filters as indicated in the diagram (2).<br />
For adjustments, use the adjustment screws indicated in the diagram. It is<br />
recommended the adjustments be performed by personnel from the companies who<br />
have supplied the detergent products.<br />
If the detergent metering unit did not come pre-installed, it can be installed by ordering<br />
the relative KIT at a later time.<br />
Alternatively, an external dosing unit can be connected by means of an electrical<br />
connection with a 2x0.5 mm type H05 RN-F cable. This cable must be inserted through<br />
the passage indicated in the TECHNICAL CHARACTERISTICS scheme and<br />
connected in accordance with the electrical scheme furnished with the dishwasher.<br />
The dosing unit must be 230V/50Hz with a maximum absorbed power of 15W.<br />
Connect the external detergent dosing unit to the dishwasher through the red tube cited above.<br />
Machine without detergent dosing: introduce the detergent directly in the tank every 4-5 cycles. Wash tank<br />
water must be at 50°C. For the dosage refer to the detergent supplier indications.<br />
.<br />
5.1 Control panel<br />
5 USER INSTRUCTIONS<br />
On Off button<br />
Tank filling symbol<br />
Boiler draining button<br />
Brief wash cycle<br />
Medium wash cycle<br />
Long wash cycle<br />
Continuous wash cycle<br />
6
Led indicator functions: off; flashing/on<br />
5.2 Before washing<br />
Use only detergents and rinse-aids for industrial dishwashers.<br />
Do not use detergents intended for hand washing.<br />
It is recommended to use products which were designed especially for this dishwasher.<br />
During the loading of the tanks be careful not to switch products as this could provoke dishwasher<br />
malfunction and damage.<br />
Do not mix different detergents together as this could damage the metering unit.<br />
Detergents for industrial dishwashers can cause serious irritations. Take care to respect the instructions<br />
provided by the detergent manufacturer on the packaging.<br />
Open the<br />
water supply<br />
faucet<br />
(usage).<br />
The levels of<br />
detergent and<br />
rinse-aid in the<br />
containers.<br />
Verify:<br />
The correct positioning of the filters, the rotation of<br />
the sprinklers, the absence of foreign objects<br />
within the dishwasher.<br />
Turn on the main<br />
switch (usage)<br />
5.3 FIRST DAILY USE (Tank and boiler empty)<br />
With machine off, place the overflow pipe and close the door/hood.<br />
Activate the wall switch. Two small illuminated points on the display will turn on; the led indicator on the left of the<br />
switch<br />
will be lit red in order to indicate that the machine is receiving electrical current. Always with machine<br />
closed press the general power button. The led indicator to the right of the button turns green and<br />
the machine begins to fill itself. The<br />
led indicator will begin to flash. Once filling has been completed it will<br />
stop flashing and will remain a steady green<br />
Select the desired washing time by means of the<br />
selectors, keeping in mind that upon first use<br />
the machine is positioned automatically on a medium cycle . The green led indicator relative to the selected<br />
cycle turns on. The led indicator flashes until the end of the wash cycle, after which it turns a steady green again.<br />
The display will indicate the wash or rinse temperatures based upon the active function of the machine.<br />
Note: if the machine came equipped with rinse delay, the wash will continue until the programmed rinse<br />
temperature is reached, after which the cycle will terminate. After having selected the continuous cycle<br />
, the<br />
led indicator will start to flash. To interrupt the cycle press again. The rinse will begin and the cycle will<br />
terminate once the led indicator<br />
becomes a steady green.When finished, for models with a drain pump,<br />
remove the overflow and press for 4 seconds. Drainage will begin once the led indicator turns on, and will<br />
terminate with the automatic shutdown of the machine.<br />
7
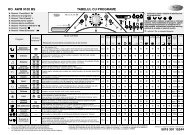
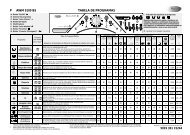
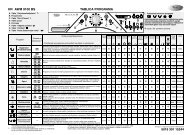
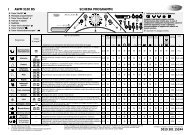
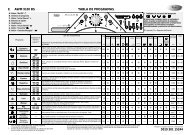
6 PROGRAM SELECTION<br />
PROGRAM WASH TYPEOLOGY DURATION (*)<br />
Glasses Brief about 1’<br />
Glasses, cups, very dirty plates Medium about 2’<br />
Silverware and very dirty plates Long about 3’<br />
Particularly dirty dishes Continuous from 0 to 10’<br />
(*)The cycle durations indicated above are based upon a tri-phase connection with a 50°C hot water<br />
supply. Where a cold water supply is used, the duration of the cycle could increase in relation to the input<br />
water temperature.<br />
Plates<br />
The basket can contain<br />
12 bowls or 18 flat plates.<br />
Remove solid residues from the dishes<br />
(bones, peels, cores, etc.); before<br />
washing, let dishes with residues of<br />
dried-on cheese, egg…… etc. soak in<br />
cold water.<br />
Glasses<br />
Cups should be positioned upside down.<br />
Silverware<br />
Use the appropriate basket(s). It is preferable to arrange large amounts of silverware with the handles facing down,<br />
taking care to avoid injury from fork prongs and knife blades.<br />
Total drainage at the end of the day<br />
When all washing operations have been completed, do the following:<br />
- turn the main switch to the "OFF" position;<br />
- turn off the main wall switch;<br />
- close the water supply faucet;<br />
- remove the overflow (the machine begins to drain) ;<br />
- remove the filter once the machine is empty;<br />
- wash the inside of the Tank and the filters with suitable products;<br />
- reposition the filters and the overflow in their respective lodgings.<br />
At the end of the working day, for models with a drain pump (optional), with machine “on” remove the overflow and<br />
press the drain button for 4 seconds. Drainage will begin once the led indicator turns on and will<br />
terminate with the automatic shutdown of the machine.<br />
The cleaning of the filters is recommended after a complete draining, as described in the previous paragraph.<br />
Do not turn off the washing machine while the Tank is full. Always drain it first.<br />
7 MAINTENANCE AND CLEANING<br />
Notwithstanding that special, programmed maintenance is not required, we recommend having the dishwasher<br />
checked by a specialized technician twice a year.<br />
Note: intentional damage or that derived from carelessness, negligence, lack of respect for the regulations,<br />
instructions and norms or erred connections are not to be considered the responsibility of the manufacturer.<br />
8
7.1 Daily cleaning<br />
The dishwasher has an IPX1 protection rating, but the use of direct streams of water for its cleaning is forbidden.<br />
Cleaning of the filter during the day<br />
In case of particularly heavy usage it is recommended to perform a cleaning of the filter every 30-40 wash cycles in<br />
order to maintain the machine in operative conditions; Use “partial Tank draining” in order to perform these<br />
cleanings.<br />
Remove the filters (it is sufficient to lift them out of their lodgings as shown in<br />
the figure), making sure that greasy residues do not fall into the opening<br />
underneath the filters. Clean away the residues and rinse the filters<br />
abundantly before correctly replacing them; Do not utilize pointy or sharp<br />
objects for cleaning.<br />
Be sure to remove eventual hardened calcium deposits in order to avoid their<br />
accumulation;<br />
- Clean the surfaces well and frequently with a damp rag; use neutral,<br />
non-abrasive detergents which do not contain chlorine-based<br />
substances. Corrosive products can damage stainless steel.<br />
In order to avoid drops or vapors damaging the steel surfaces, do not even use the above-indicated products for<br />
the cleaning of the flooring beneath or around the dishwasher.<br />
7.2 Periodic checks<br />
Disassemble the sprinklers (lower and upper 2-4) by removing the central screw (4); unscrew the caps at the two<br />
far ends of the rinsing sprinklers (7).<br />
Clean the holes and the nozzles under a stream of clean water. Do not use utensils which could cause damage.<br />
Carefully reassemble the sprinklers.<br />
Clean the outside of the machine with neutral soap and a damp cloth. Rinse and dry with care.<br />
7.3 Prolonged disuse<br />
If the use of the dishwasher is not foreseen for a relatively long period of time it is necessary to drain the<br />
detergent and rinse-aid dispenser in order to avoid crystallization and pump damage: Remove the suction<br />
tubes from the detergent and rinse-aid containers and emerge them in a container filled with clean water. Perform a<br />
few wash cycles and drain the machine completely.<br />
Finally, turn off the main switch and close the water supply faucet. The detergent and rinse-aid suction tubes will be<br />
placed back in the containers when the machine is ready to be put back in use, taking care so as not to invert<br />
the tubes (red tube = detergent; transparent tube = rinse-aid).<br />
Do not leave the device on, inactive and in disuse for long periods of time.<br />
9
8 PROBLEMS AND ANOMALIES (USER)<br />
PROBLEM POSSIBLE CAUSE POSSIBLE REMEDY<br />
THE LED POWER INDICATOR<br />
DOES NOT TURN ON<br />
There is no electrical current<br />
Verify the electrical current connection.<br />
THE WASH PROGRAM DOES<br />
NOT START<br />
The dishwasher has not finished<br />
loading Wait for the led indicator to<br />
turn on<br />
POOR WASHING RESULTS<br />
RINSE INSUFFICIENT<br />
GLASSES AND SILVERWARE<br />
ARE STAINED<br />
WATER IS PRESENT IN THE<br />
TANK AFTER DRAINING<br />
Sprinkler wash holes are clogged<br />
or encrusted<br />
Detergent or rinse-aid insufficient<br />
or not adequate<br />
Plates / glasses poorly positioned<br />
Low wash temperature<br />
Inadequate cycle setting<br />
Sprinkler nozzles clogged<br />
Calcium encrustations in the<br />
boiler<br />
Rinse-aid inadequate or not<br />
dispensed correctly.<br />
Water is of a hardness level<br />
above 12°dF or contains many<br />
dissolved salts<br />
Drainage tube is positioned poorly<br />
or is partially blocked<br />
Disassemble and clean the sprinklers<br />
(8.2 Periodic checks)<br />
Verify detergent type and quantity.<br />
Arrange plates / glasses accordingly.<br />
Verify the temperature shown on the<br />
display, if below 50°C call Assistance.<br />
Increase the duration of the wash<br />
cycle, particularly if dishes are very<br />
dirty or contain partially dried residues.<br />
Verify the cleanliness of the nozzles<br />
and the correct function of any<br />
installed water softeners.<br />
Verify the rinse-aid container and<br />
ensure its adequacy for use with the<br />
water supply. If the problem persists<br />
contact assistance.<br />
Verify that the dishwasher’s tube and<br />
drain are not blocked and that the<br />
drain is not in too high of a position;<br />
see the connection diagram.<br />
8.1 Tronic model screen displayed anomalies (user)<br />
If the problem persists after having turned the machine off and then on again, contact technical assistance and<br />
refer the error type which appears on the display:<br />
E1 Boiler sensor malfunction Consult with the Technical Assistance Service<br />
E2 Tank sensor malfunction Consult with the Technical Assistance Service<br />
E3<br />
E4<br />
E5<br />
Water loading timeout ( the water loading duration<br />
has exceeded the set time )<br />
Boiler temperature has exceeded the maximum<br />
temperature.<br />
Tank temperature has exceeded the maximum<br />
temperature.<br />
Verify that the water supply faucet is open, the<br />
dynamic pressure of the supply and the<br />
cleanliness of the water input filter. If the problem<br />
persists consult with the Technical Assistance<br />
Service.<br />
Consult with the Technical Assistance Service<br />
10
E6<br />
E7<br />
E8<br />
E9<br />
Draining anomaly. At the end of the draining phase<br />
the CPU still detects water in the tank. This may<br />
be due to: Drain pump malfunction (if present),<br />
drain tube blockage, tank pressostat malfunction,<br />
drain cycle time set too low, overflow inserted in<br />
the tank<br />
15 minute boiler timeout<br />
30 minute tank timeout<br />
Parameter in memory incorrect<br />
Verify the cleanliness of the filters and that the<br />
drain tube is not blocked, bent or crushed.<br />
Verify that the drain pump is not blocked by foreign<br />
objects, and act as indicated in point “10.2 Periodic<br />
Checks”.<br />
If the problem persists consult with the Technical<br />
Assistance Service.<br />
Consult with the Technical Assistance Service<br />
11