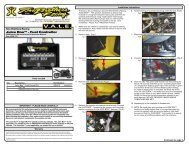
Teryx 750 (2008) Coil Kit
Teryx 750 (2008) Coil Kit
Teryx 750 (2008) Coil Kit

You also want an ePaper? Increase the reach of your titles
YUMPU automatically turns print PDFs into web optimized ePapers that Google loves.
Dynatek <strong>Coil</strong> <strong>Kit</strong> DCK2-4<br />
Kawasaki <strong>Teryx</strong> <strong>750</strong> UTV <strong>2008</strong> (Carbureted models)<br />
Congratulations on your purchase of a Dynatek Ignition <strong>Coil</strong> <strong>Kit</strong>. Please take a moment to read these instructions<br />
completely before installing the ignition coils. The installation will take about 1 hour.<br />
WARNING: This kit is for carbureted models only. Do not use on fuel injected models or damage to the injection<br />
computer may result. Injected models require kit number DCK2-6 supplied with 3 ohm coils .<br />
This kit includes: (2) Dynatek 0.5 Ohm (one-half ohm)Mini-<strong>Coil</strong><br />
(2) M6 x 80 long bolts<br />
(2) Spark plug wires, 16” and 48” (2) M6 locking nuts<br />
(1) Wire harness adaptor (front cylinder primary) (4) Flat washers<br />
(1) Wire harness extension (rear cylinder primary) (4) Mounting Spacers<br />
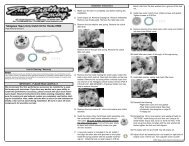
Note: The stock sparkplug boots will be reused in this application.<br />
Note: Route all wires carefully. Secure wires in factory loops or use cable ties to ensure electrical wires do not chafe or<br />
touch anything hot. Pay close attention to the wiring detail and wire crimping, successful installation depends on this.<br />
Tools Required: 8mm, 10mm socket wrench<br />
1/4” Flat blades, #3 Phillips screw drivers<br />
Center punch, Drill, and .25” drill bit (1/4”)<br />
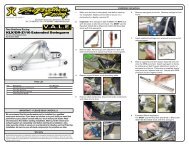
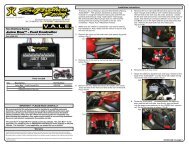
Installation<br />
1) Remove seats, air filter cover, engine cover, drive shaft cover, and front engine cover. Do this by removing a lot<br />
of push pins. Push pin center can be lifted out using two 1/4” flat blade screw drivers on either side of the push<br />
pin. Use #3 Phillips to remove 3 screws holding cover over shifter.<br />
2) The front cylinder coil is located under the driver seat. The rear cylinder coil is located under the passenger seat.<br />
3) Disconnect the two primary wires from each coil. Unplug the spark plug caps. Remove the mounting screws<br />
and the coils. Hold the stock sparkplug wire near the cap and unscrew the cap counterclockwise. This cap will<br />
be used with the Dyna coils.<br />
4) Both Dyna coils will be fastened to the sheet metal below the driver seat. Center the Dyna coils, right to left,<br />
below the factory coil tab. This requires two 1/4” holes. Find the metal piece that is 1.5“ tall. It is 1/8” thick<br />
and extends about 8 inches right to left under the driver seat. Mark the hole centers 0.75” up the metal, and<br />
3.25” apart. Then drill thru using .25” bit. (see picture, Step 4) (Use drill template)<br />
5) Mount a Dyna coil on each side of the metal, so that spark plug towers point toward engine. The aluminum<br />
spacers go between both coils and the sheet metal. Fasten using long M6 bolts with flat washers under the heads<br />
and nuts. Tighten all bolts securely so Dyna coils are not loose (see pictures, Step 5, 6)<br />
6) Attach primary wires to the Dyna coils. The coil in front of the metal is for the front cylinder. Green/White wire<br />
to terminal without a dot. Black/Yellow wire goes to Orange adapter wire then to terminal with a RED dot. Use<br />
a razor knife to trim the electrical tape and wire sleeve of the factory harness back a few inches. This will relieve<br />
wire strain from the Orange wire. The coil behind the metal is for the rear cylinder. Use the wire harness<br />
extension. Blue/White wire to terminal without a dot. Black/Yellow wire to terminal with a RED dot. Connect<br />
other end of harness extension to same colors of factory harness. (see pictures, Step 6)<br />
7) Attach the short spark plug wires to the front coil. Route wire thru frame loop and to front spark plug. Trim<br />
length if required. Screw factory cap clockwise onto new wire until bottomed. Then press cap onto spark plug.<br />
Attach the long spark plug wire to the rear coil. Route wire with others thru frame, 90 degree V, and thru factory<br />
loops to rear spark plug. Trim wire length if required. Screw factory cap clockwise onto new wire until<br />
bottomed. Then press cap onto spark plug. (see pictures, Step 7)<br />
8) Check that all wires are routed and held securely. Use zip-ties. Use the flexible factory cable and hose<br />
restraints. (see pictures, Step 8)<br />
9) Replace engine covers, and seat.<br />
10) Start the engine. Installation is complete!<br />
DYNATEK 164 S. Valencia St., Glendora, CA 91741 800-928-3962 www.dynaonline.com
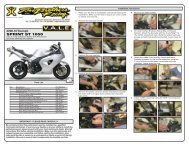
2801376C<br />
Step 4: Drill 2 holes. (0.25 inch dia.)<br />
Step 5: Mount Dyna coils.<br />
Step 6: Attach coil primary wires.<br />
Step 7: Wire routing. (Front Cylinder)<br />
Step 7: Wire routing. (Rear Cylinder)<br />
Step 8: Wire routing. (Rear Cylinder)<br />
DYNATEK 164 S. Valencia St., Glendora, CA 91741 800-928-3962 www.dynaonline.com