Building A Holt From Recycled Plastic 2 - Otter Specialist Group
Building A Holt From Recycled Plastic 2 - Otter Specialist Group
Building A Holt From Recycled Plastic 2 - Otter Specialist Group

You also want an ePaper? Increase the reach of your titles
YUMPU automatically turns print PDFs into web optimized ePapers that Google loves.
Surrey Wildlife Trust<br />
<strong>Otter</strong>s & Rivers<br />
Project<br />
Supported by The Environment Agency, Thames Water & SC Johnson<br />
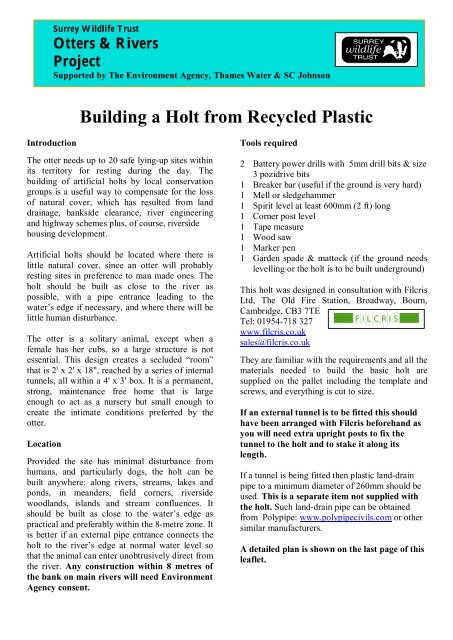
<strong>Building</strong> a <strong>Holt</strong> from <strong>Recycled</strong> <strong>Plastic</strong><br />
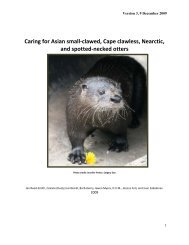
Introduction<br />
The otter needs up to 20 safe lying-up sites within<br />
its territory for resting during the day. The<br />
building of artificial holts by local conservation<br />
groups is a useful way to compensate for the loss<br />
of natural cover, which has resulted from land<br />
drainage, bankside clearance, river engineering<br />
and highway schemes plus, of course, riverside<br />
housing development.<br />
Artificial holts should be located where there is<br />
little natural cover, since an otter will probably<br />
resting sites in preference to man made ones. The<br />
holt should be built as close to the river as<br />
possible, with a pipe entrance leading to the<br />
water’s edge if necessary, and where there will be<br />
little human disturbance.<br />
The otter is a solitary animal, except when a<br />
female has her cubs, so a large structure is not<br />
essential. This design creates a secluded “room”<br />
that is 2' x 2' x 18", reached by a series of internal<br />
tunnels, all within a 4' x 3' box. It is a permanent,<br />
strong, maintenance free home that is large<br />
enough to act as a nursery but small enough to<br />
create the intimate conditions preferred by the<br />
otter.<br />
Location<br />
Provided the site has minimal disturbance from<br />
humans, and particularly dogs, the holt can be<br />
built anywhere: along rivers, streams, lakes and<br />
ponds, in meanders, field corners, riverside<br />
woodlands, islands and stream confluences. It<br />
should be built as close to the water’s edge as<br />
practical and preferably within the 8-metre zone. It<br />
is better if an external pipe entrance connects the<br />
holt to the river’s edge at normal water level so<br />
that the animal can enter unobtrusively direct from<br />
the river. Any construction within 8 metres of<br />
the bank on main rivers will need Environment<br />
Agency consent.<br />
Tools required<br />
2 Battery power drills with 5mm drill bits & size<br />
3 pozidrive bits<br />
1 Breaker bar (useful if the ground is very hard)<br />
1 Mell or sledgehammer<br />
1 Spirit level at least 600mm (2 ft) long<br />
1 Corner post level<br />
1 Tape measure<br />
1 Wood saw<br />
1 Marker pen<br />
1 Garden spade & mattock (if the ground needs<br />
levelling or the holt is to be built underground)<br />
This holt was designed in consultation with Filcris<br />
Ltd, The Old Fire Station, Broadway, Bourn,<br />
Cambridge, CB3 7TE<br />
Tel: 01954-718 327<br />
www.filcris.co.uk<br />
sales@filcris.co.uk<br />
They are familiar with the requirements and all the<br />
materials needed to build the basic holt are<br />
supplied on the pallet including the template and<br />
screws, and everything is cut to size.<br />
If an external tunnel is to be fitted this should<br />
have been arranged with Filcris beforehand as<br />
you will need extra upright posts to fix the<br />
tunnel to the holt and to stake it along its<br />
length.<br />
If a tunnel is being fitted then plastic land-drain<br />
pipe to a minimum diameter of 260mm should be<br />
used. This is a separate item not supplied with<br />
the holt. Such land-drain pipe can be obtained<br />
from Polypipe: www.polypipecivils.com or other<br />
similar manufacturers.<br />
A detailed plan is shown on the last page of this<br />
leaflet.
Preparation<br />
1) If an external tunnel is to be fitted then a short<br />
length of the extra post material should be cut as<br />
below:<br />
same. There is a smooth and rough side to the<br />
planks. The smooth side should face inwards.<br />
2) Select a suitable site for the holt that and<br />
make it as level as possible with the roof on<br />
the ground.<br />
You may have to dig soil away to achieve this.<br />
Construction<br />
1) Stretch the template out on the ground and peg<br />
firmly in place.<br />
Drill and screw the top row first, locating the<br />
planks 10mm down from the top of the posts.<br />
This is to make a gap which will create a little<br />
airflow, reducing condensation forming inside<br />
the holt. Slide the lower planks onto the upper<br />
ones locking them using the tongue & groove<br />
slots and screw them in. Any gaps at the<br />
bottom can now be made up with soil. IT IS<br />
IMPORTANT TO FOLLOW THE PLAN<br />
EXACTLY. If the plan says that a corner lines<br />
up like this:<br />
Don’t<br />
line it<br />
up like<br />
this<br />
4) Now fit the outer walls and fill any gaps<br />
under the bottom of the walls with soil as<br />
above.<br />
Errors will creep in due to underground<br />
roots or stones but any minor adjustments can<br />
be made with the saw for an accurate fit.<br />
2) Hammer in the posts, using the holes in the<br />
template, to a height of 43cm (17″), remove<br />
the template and level the posts accurately<br />
using the spirit level and corner post level.<br />
3) Fit the inner walls (there is not room to operate the<br />
drills with the outer walls in place). It does not<br />
matter whether the tongue or the groove in the<br />
plank is uppermost as long as all the walls are the<br />
5) The external tunnel (if fitted) should be<br />
fixed now. Line the pipe up in place over<br />
the entrance door allowing space to fit the<br />
pipe support allowing clearance above the<br />
entrance hole, and draw the shape round<br />
the pipe with the marker pen. Get an<br />
assistant to hold the support in place.<br />
MAKE SURE THE DRILL BIT<br />
CANNOT GO THROUGH THE<br />
SUPPORT AND INTO THE<br />
ASSISTANT’S HAND.<br />
6) Fit the screws. Slide the pipe over the<br />
support and drill through the pipe for the
screws. Finally fix supports to hold the pipe<br />
firmly to the ground to make the pipe as rigid<br />
as possible.<br />
On a flat site that does not need much<br />
preparation the holt can be built in less than a<br />
day using 3 or 4 volunteers.<br />
Advantages<br />
Whilst the materials may seem quite expensive,<br />
the end product is strong, totally weatherproof,<br />
provides good insulation, is difficult to vandalise<br />
and is permanent. It is reasonably light to handle<br />
during construction and needs no ongoing<br />
maintenance so that labour costs are kept to a<br />
minimum. Replacement of any brash cover can<br />
be easily done whenever the holt is monitored<br />
for otter presence. Finally, being quite small, the<br />
holt is easily made unobtrusive.<br />
7) Position the roof on top of the holt. Lay the<br />
template onto the roof, lining up the corner<br />
posts with the template holes. This will enable<br />
you to locate the internal posts for their screw<br />
fixings.<br />
8) The finished holt is small enough to be<br />
inconspicuous but it can be covered with brash<br />
to hide it from human interference, to improve<br />
insulation and to be more aesthetically<br />
pleasing. Soil can also be packed around the<br />
pipe entrance (if fitted) to improve stability<br />
and exclude light.<br />
<strong>Plastic</strong> holts can be buried underground as the<br />
materials will not rot. However, more time will<br />
have to be allocated to allow for excavation for<br />
the hole and trenches for the pipework. Extra<br />
pipe will also be required for the back entrance.<br />
It would also pay to drill a hole in the roof of the<br />
sleeping chamber and insert a small ventilation<br />
pipe (about 40mm diameter) with a cranked end<br />
to prevent rain getting in. This can be disguised<br />
on the surface by covering with a bit of brash.<br />
The pipe could also be used to insert a small<br />
surveillance camera.<br />
If you have any queries or comments either to<br />
improve the design of the holt or this leaflet<br />
please feel free to contact me.<br />
Chris Matcham<br />
Surrey Wildlife Trust<br />
School Lane<br />
Pirbright<br />
WOKING<br />
Surrey GU24 0JN<br />
Tel: 01483-795 457<br />
E-mail: chris.matcham@surreywt.org.uk<br />
Surrey Wildlife Trust’s <strong>Otter</strong>s & Rivers Project<br />
is co-ordinated by the Wildlife Trust<br />
Partnership’s Water for Wildlife project and is<br />
sponsored by:<br />
On sites where there is a risk of flooding the holt<br />
can be staked to the ground using sheep netting for<br />
extra security. Note: Extra posts, screws and/or<br />
staples will be required for this. If possible a few<br />
plants such as hawthorn, dogwood, and dog rose can<br />
be planted around to grow up and hide everything.<br />
Fencing off the patch of land is recommended<br />
particularly if livestock are present.
Detailed plan for holt<br />
1220<br />
832<br />
600<br />
576<br />
600<br />
832<br />
1220 x 2<br />
832 x 2<br />
600 x 2<br />
576 x 1<br />
1220<br />
Top Layer<br />
1220<br />
576<br />
600<br />
832 832<br />
600<br />
1220<br />
983<br />
600<br />
360<br />
600<br />
832<br />
1220 x 1<br />
832 x 1<br />
600 x 3<br />
360 x 1<br />
983 x 1<br />
600<br />
Base Layer<br />
1220