Protocol for E. coli Fermentation Last revised 4/25/2011
Protocol for E. coli Fermentation Last revised 4/25/2011 Protocol for E. coli Fermentation Last revised 4/25/2011
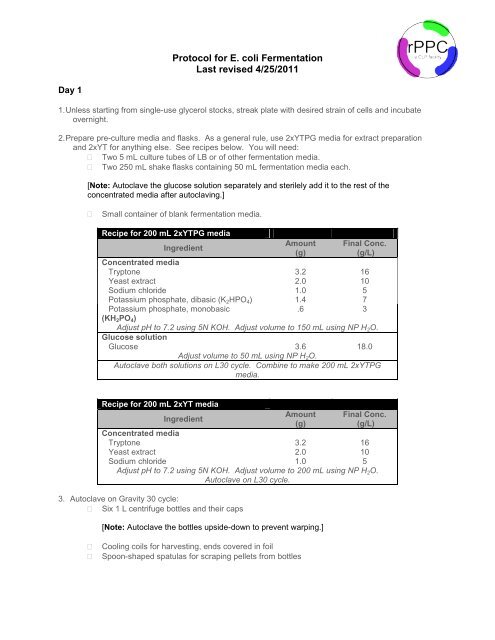
Protocol for E. coli Fermentation Last revised 4/25/2011 Day 1 1. Unless starting from single-use glycerol stocks, streak plate with desired strain of cells and incubate overnight. 2. Prepare pre-culture media and flasks. As a general rule, use 2xYTPG media for extract preparation and 2xYT for anything else. See recipes below. You will need: Two 5 mL culture tubes of LB or of other fermentation media. Two 250 mL shake flasks containing 50 mL fermentation media each. [Note: Autoclave the glucose solution separately and sterilely add it to the rest of the concentrated media after autoclaving.] Small container of blank fermentation media. Recipe for 200 mL 2xYTPG media Ingredient Amount (g) Final Conc. (g/L) Concentrated media Tryptone 3.2 16 Yeast extract 2.0 10 Sodium chloride 1.0 5 Potassium phosphate, dibasic (K 2 HPO 4 ) 1.4 7 Potassium phosphate, monobasic .6 3 (KH 2 PO 4 ) Adjust pH to 7.2 using 5N KOH. Adjust volume to 150 mL using NP H 2 O. Glucose solution Glucose 3.6 18.0 Adjust volume to 50 mL using NP H 2 O. Autoclave both solutions on L30 cycle. Combine to make 200 mL 2xYTPG media. Recipe for 200 mL 2xYT media Ingredient Amount (g) Final Conc. (g/L) Concentrated media Tryptone 3.2 16 Yeast extract 2.0 10 Sodium chloride 1.0 5 Adjust pH to 7.2 using 5N KOH. Adjust volume to 200 mL using NP H 2 O. Autoclave on L30 cycle. 3. Autoclave on Gravity 30 cycle: Six 1 L centrifuge bottles and their caps [Note: Autoclave the bottles upside-down to prevent warping.] Cooling coils for harvesting, ends covered in foil Spoon-shaped spatulas for scraping pellets from bottles
- Page 2 and 3: Day 2 4. Inoculate a 5 mL culture t
- Page 4 and 5: Check the air supply pressure valve
- Page 6 and 7: d. Upon inoculation, synchronize th
- Page 8: Assembly of condenser unit. 24. Fil
<strong>Protocol</strong> <strong>for</strong> E. <strong>coli</strong> <strong>Fermentation</strong><br />
<strong>Last</strong> <strong>revised</strong> 4/<strong>25</strong>/<strong>2011</strong><br />
Day 1<br />
1. Unless starting from single-use glycerol stocks, streak plate with desired strain of cells and incubate<br />
overnight.<br />
2. Prepare pre-culture media and flasks. As a general rule, use 2xYTPG media <strong>for</strong> extract preparation<br />
and 2xYT <strong>for</strong> anything else. See recipes below. You will need:<br />
Two 5 mL culture tubes of LB or of other fermentation media.<br />
Two <strong>25</strong>0 mL shake flasks containing 50 mL fermentation media each.<br />
[Note: Autoclave the glucose solution separately and sterilely add it to the rest of the<br />
concentrated media after autoclaving.]<br />
<br />
Small container of blank fermentation media.<br />
Recipe <strong>for</strong> 200 mL 2xYTPG media<br />
Ingredient<br />
Amount<br />
(g)<br />
Final Conc.<br />
(g/L)<br />
Concentrated media<br />
Tryptone 3.2 16<br />
Yeast extract 2.0 10<br />
Sodium chloride 1.0 5<br />
Potassium phosphate, dibasic (K 2 HPO 4 ) 1.4 7<br />
Potassium phosphate, monobasic<br />
.6 3<br />
(KH 2 PO 4 )<br />
Adjust pH to 7.2 using 5N KOH. Adjust volume to 150 mL using NP H 2 O.<br />
Glucose solution<br />
Glucose 3.6 18.0<br />
Adjust volume to 50 mL using NP H 2 O.<br />
Autoclave both solutions on L30 cycle. Combine to make 200 mL 2xYTPG<br />
media.<br />
Recipe <strong>for</strong> 200 mL 2xYT media<br />
Ingredient<br />
Amount<br />
(g)<br />
Final Conc.<br />
(g/L)<br />
Concentrated media<br />
Tryptone 3.2 16<br />
Yeast extract 2.0 10<br />
Sodium chloride 1.0 5<br />
Adjust pH to 7.2 using 5N KOH. Adjust volume to 200 mL using NP H 2 O.<br />
Autoclave on L30 cycle.<br />
3. Autoclave on Gravity 30 cycle:<br />
Six 1 L centrifuge bottles and their caps<br />
[Note: Autoclave the bottles upside-down to prevent warping.]<br />
<br />
<br />
Cooling coils <strong>for</strong> harvesting, ends covered in foil<br />
Spoon-shaped spatulas <strong>for</strong> scraping pellets from bottles
Day 2<br />
4. Inoculate a 5 mL culture tube from a freshly streaked plate. Alternatively, inoculate from a single-use<br />
glycerol stock thawed at room temperature. Grow culture <strong>for</strong> 7 hours at 37C on a shaker (2<strong>25</strong> rpm)<br />
or rotator (speed 7). After 7 hours use this pre-culture to inoculate two 50 mL flasks of media, in a<br />
pre-warmed <strong>25</strong>0 mL shake flask. Incubate overnight on a shaker (2<strong>25</strong> rpm) at 37C.<br />
4. Prepare the tri-port assembly attached to three bottles. All tubing connections should be<br />
zip-tied, and each piece of tubing should be clamped on both ends. Ensure that the triport<br />
is in the closed position. For typical E. <strong>coli</strong> fermentations, bottles should contain<br />
glucose feed solution (see recipe in Step 6), 5N potassium hydroxide (<strong>for</strong> pH control),<br />
and water (to correct the working media volume <strong>for</strong> evaporative losses during<br />
sterilization). One opening on each bottle cap should be connected to the tri-port by<br />
tubing and this opening should be attached on the inside to tubing that runs to the bottom<br />
of the bottle. The other opening should be attached to an air filter. The tubing to the air<br />
filter should be clamped and the filter should be covered with foil to protect it from<br />
moisture. Bottle caps should be loose during the autoclave run. Autoclave on Liquid 30<br />
cycle, and write a tally on each of the air filters to record the number of autoclave runs<br />
they have experienced.<br />
[Note: Acids and bases should NOT be put in the autoclave. Instead, autoclave an<br />
empty bottle and sterilely transfer acid/base into the bottle later.]<br />
[Note: If acid feed is required, use Tygon rather than silicone tubing, as acid degrades<br />
silicone rapidly.]<br />
6. Prepare 10 L of 2xYTPG media. Make the glucose solution first, as this takes the longest.<br />
Recipe <strong>for</strong> 10 L 2xYTPG media<br />
Ingredient<br />
Amount<br />
(g)<br />
Final Conc.<br />
(g/L)<br />
Concentrated media<br />
Tryptone 160 16<br />
Yeast extract 100 10<br />
Sodium chloride 50 5<br />
Potassium phosphate, dibasic (K 2 HPO 4 ) 70 7<br />
Potassium phosphate, monobasic<br />
30 3<br />
(KH 2 PO 4 )<br />
Adjust pH to 7.05 using 5N KOH. Adjust volume to 9.2 L using NP H 2 O. Sterilize<br />
in place.<br />
Glucose solution<br />
Glucose 180.2 18.0<br />
Adjust volume to .8 L using NP H 2 O. Prepare in 1L glass bottle that can be<br />
autoclaved as part of the tri-port assembly (see Step 5).<br />
Recipe <strong>for</strong> 10 L 2xYT media<br />
Ingredient<br />
Amount Final Conc.<br />
(g)<br />
(g/L)<br />
Tryptone 160 16<br />
Yeast extract 100 10<br />
Sodium chloride 50 5<br />
Adjust pH to 7.2 using 5N KOH. Adjust volume to 10 L using NP H 2 O.
7. Prepare wash buffer and store at 4°C. Below are recipes <strong>for</strong> two commonly used buffers:<br />
Recipe <strong>for</strong> 1 L Buffer A (from ribosome prep)<br />
Ingredient<br />
Stock<br />
Final<br />
concentration concentration<br />
Amount (mL)<br />
Tris-HCl, pH 7.2 @4°C 1 M 20 mM 20<br />
NH 4 Cl 3 M 100 mM 33.3<br />
MgCl 2 1 M 10 mM 10<br />
EDTA, pH 8.0 .5 M .5 mM 1<br />
DTT 1 M 1 mM 1<br />
Adjust volume to 1 L using NP H 2 O. Store at 4°C. Add DTT just be<strong>for</strong>e use.<br />
Recipe <strong>for</strong> 1 L S30 Extract Buffer<br />
Ingredient<br />
Stock<br />
Final<br />
concentration concentration<br />
Amount (mL)<br />
Tris-OAc, pH 8.2 @<br />
1 M 10 mM 10<br />
RT<br />
Mg(OAc) 2 1.4 M 14 mM 10<br />
KOAc 6 M 60 mM 10<br />
DTT 1 M 2 mM 2<br />
Adjust volume to 1 L using NP H 2 O. Store at 4°C. Add DTT just be<strong>for</strong>e use.<br />
8. Prepare the fermenter.<br />
a. Turn the fermenter ON using the red switch on the side. Drain water out of the fermenter and<br />
collect in the 5 gallon bucket. Ensure that the harvest port is CLOSED afterwards.<br />
b. Remove the pH probe from its storage solution, calibrate, and insert into a port near the bottom of<br />
the fermenter. This takes approximately 15 minutes. During setup and sterilization, ensure the pH<br />
controller is OFF.<br />
c. Remove pO2 probe and insert into another port near the bottom of the fermenter. This probe will<br />
be calibrated after sterilization.<br />
d. Fill the fermenter with media using a funnel through one of the ports on the top. Make sure that<br />
the drain valve on the bottom of the vessel is closed be<strong>for</strong>e adding media.<br />
[Note: Check to see if the pH probe reading approximately matches reading from tabletop pH meter.]<br />
e. Make sure the two front ports on the top of the fermenter have good septa installed.<br />
f. After autoclaving and sterilely adding acid/base, attach the trip-port assembly to the fermenter.<br />
g. Sterilization checklist:<br />
Open the valve labeled STEAM, located on the wall behind the fermenter. Pressure should<br />
read 35-40 psi (Insufficient pressure will lead to long or failed sterilization cycles).<br />
Open the air valve on the wall to the left of the fermenter. Adjust the regulator at the wall to<br />
100 psi.
Check the air supply pressure valve, which is located on the lower left back corner of the<br />
fermenter control unit, is about 2 bar.<br />
Open the main water supply at the wall.<br />
Check that the cooling water supply pressure is about 0.5 bar. The gauge is located directly<br />
behind the stirrer motor.<br />
Close the green valve on the exhaust condenser so that cooling water flow is OFF (this is<br />
required to properly sterilize the entire filter).<br />
Remove the light and plastic ring from the top of the fermenter to prevent melting during<br />
sterilization.<br />
On the air sparger attachment, switch to Ster setting (not Ferm).<br />
Open the rotameter on the front of the control unit to about 10 SLPM. The Main control<br />
screen can then be used to control the actual air flow. Trust the values on the screen, not on<br />
the rotameter. Set the air flow to 4 SLPM.<br />
h. On the Main control screen, press the Phases button. Choose StateStart. Sterilization takes<br />
approximately 90 minutes.<br />
i. Sterilize the sample and harvest ports. Remove the sleeves and open the green steam valves to<br />
both ports. Liquid condensate should come through first. After steam begins to flow, close the<br />
valves, return the sleeves, re-open the valves, and sterilize <strong>for</strong> 30 minutes.<br />
j. When the sterilization cycle finishes, the control unit will beep and display a message. Press Enter<br />
to acknowledge the message and silence the alarm. On the Main control screen, set the<br />
temperature to 37°C.<br />
[Note: Can skip to step o at any time.]<br />
k. After the sterilization cycle is complete and the vessel has cooled, pump the glucose solution into<br />
the fermenter. Unscrew the tri-port to the open position and remove tubing clamps. Install the<br />
glucose feed tubing in the external red Watson-Marlow pump. Using the mechanical switch on<br />
the pump box, set the pump in Auto mode (not Manual). On the Main control screen, choose<br />
SUBAT. Adjust the Setpoint to 100%, and set the Mode to Auto. This pump is controlled as<br />
Substrate A. Be sure to return later to turn the pump off.<br />
l. At 37°C, adjust the pH to its working value of 7.1 (or adjusted value as determined from<br />
comparison to benchtop pH readings). Install tubing into the BASE pump on the front of the<br />
fermenter and turn on the pH controller. From the Main control screen, choose pH. Adjust the<br />
Setpoint to 7.1 and set the Mode to Auto. Watch to make sure that base is flowing properly<br />
through the tri-port assembly.<br />
m. Under fermentation conditions, calibrate the pO2 probe. This takes about 20 minutes. Make sure<br />
that:<br />
Temperature = 37°C<br />
Stir rate = 600 rpm<br />
Air flow = 8 SLPM (Set using Main control screen, not the rotameter)<br />
<br />
<br />
Air sparger is set to Ferm position<br />
All readings are steady (takes about 10 minutes)<br />
(i) Choose Calibration button. Under Sensors, choose pO2.<br />
(ii) At the wall, close the air valve. Open the nitrogen valve.<br />
(iii) Choose ModeCalib. Nitro. The program will wait <strong>for</strong> the system to reach steady<br />
conditions be<strong>for</strong>e accepting a calibration value.<br />
(iv) At the wall, close the nitrogen valve and open the air valve.<br />
(v) A window will appear to begin the air calibration. Press ok.<br />
[Note: Percentages refer to the ratio of air fed. 0% air means 100% nitrogen.]
(vi) Check the zero (0-15 nA) and slope (<strong>25</strong>-200 nA) <strong>for</strong> appropriate values.<br />
n. If the fermenter is not going to be inoculated right away:<br />
Turn the stirrer control off.<br />
Turn the pH control off (BEFORE reducing temperature)<br />
Set the temperature to 15°C.<br />
Leave the air on 4 SLPM to maintain positive pressure.<br />
Begin recording data on the PC. Monitoring the readings during down time will indicate<br />
contamination or other problems.<br />
(i) Open MFCS Shell using the desktop icon.<br />
(ii) Choose RunOperator service.<br />
(iii) Choose Start BatchStart Batch.<br />
(iv) Choose ActionsSynchronize.<br />
(v) Hit Plotting button and double-click on the current batch. Choose variables to<br />
display. Useful values are CO2, O2, pO2, pH, stir rate, and temperature.<br />
9. Prepare overnight cultures. Combine glucose with concentrated media solution. Inoculate two 50 mL<br />
cultures from 5 mL starter culture tubes. Grow overnight <strong>for</strong> 14-hrs at 37 on a rotary shaker (280 rpm)<br />
Day 3<br />
10. Final preparations <strong>for</strong> fermenter:<br />
Set the temperature to 37°C. Takes about 10 minutes to stabilize.<br />
After the temperature has stabilized, turn the pH controller on. Set to pH 7.1 (or adjusted<br />
value).<br />
Turn the exhaust condenser water flow on using the green valve.<br />
Calibrate the pO2 probe if not already done. (See step 6.n.)<br />
On the Main control screen, set the air flow rate to 8 SLPM.<br />
Set the stir rate to 600 rpm.<br />
11. Inoculate the fermenter.<br />
a. Measure the OD 600 of overnight cultures using 1:20 dilution in blank media. Calculate inoculum<br />
volume below:<br />
V starter *OD starter = V ferm *OD init<br />
The OD init is calculated from the desired OD at harvest and the number of doublings i (6-8 is<br />
acceptable)<br />
OD init *2 i = OD harvest<br />
b. Sterilely collect a sample of blank media.<br />
(i) Remove sample port sleeve and open valve to blow out condensate. Return sleeve.<br />
(ii) Sterilize the sample port once between each sample removal. Open green valve to<br />
flow steam <strong>for</strong> 15 minutes. Close the valve.<br />
(iiI) Use an autoclave glove to remove the port sleeve.<br />
(iv) Open the lever valve to remove ~10-20 mL of media. This is waste.<br />
(v) Collect a ~20 mL of media <strong>for</strong> OD measurement (blank) and dilutions.<br />
(vi) Open the green valve to flow steam BEFORE replacing the sleeve. This step<br />
washes any leftover media through the line.<br />
(vii) Replace the sleeve and sterilize <strong>for</strong> 15 minutes.<br />
c. Sterilize the septum injection port by removing the plug and filling it with 70% ethanol. Using a<br />
sterile syringe and Gauge 20 needle, inject the desired amount of overnight culture through the<br />
septum into the fermenter. To maintain sterility, load the syringe in the biosafety cabinet or next<br />
to a flame (the butane torch works well).
d. Upon inoculation, synchronize the batch by right clicking on the batch in the Batch Management<br />
indow list and choosing Synchronize.<br />
e. Take the OD of a small sample immediately after inoculation (see Step 9.b). This reading should<br />
match the calculated OD init .<br />
12. Monitor the fermentation. Take OD measurements approximately every thirty minutes. Track the<br />
doubling time as the fermentation proceeds. Doubling time is typically 5-10 minutes longer in the<br />
fermenter than in shake flasks.<br />
13. Prepare to harvest cells.<br />
Be sure that the harvest port is sterile as the OD approaches its final value.<br />
Cool Beckman Avanti high speed centrifuge to 4°C.<br />
Place Beckman JLA 8.1 rotor in the dairy case. Do NOT cool inside the centrifuge.<br />
Pre-weigh 50 mL falcon tubes.<br />
Make sure the harvesting coils are sterile.<br />
Cools Thermo Multifuge (benchtop centrifuge) to 4°C.<br />
14. Harvest the cells at desired OD (typically OD 3-3.3).<br />
a. To harvest, change fermenter settings below:<br />
Set the air flow rate at 4 SLPM.<br />
Set the stir rate to 100 rpm.<br />
Turn off the pH control.<br />
Set the temperature to 4°C.<br />
b. Remove the sleeve on the harvest port. Attach the cooling coil to the port and drain culture into<br />
sterile 1 L centrifuge bottles. Balance the bottles. After the first six bottles are full, continue<br />
collecting culture in sterile 2 L bottles.<br />
c. Spin bottles in the Beckman Optima high speed centrifuge at 6000g at 4°C <strong>for</strong> 15 minutes to<br />
harvest. Some strains (such as KC6) require a longer spin.<br />
d. Remove supernatant by pouring. Dispense the remaining culture in centrifuge bottles on top of<br />
the first round of pellets. Re-centrifuge.<br />
e. Once all the cells have been pelleted, use a spoon-shaped spatula to transfer cells to pre-weighed<br />
50 mL Falcon tubes. Resuspend cells in 20-30 mL wash buffer by vortexing and pipetting up and<br />
down. If desired, use VWR tissue homogenizer on the second-lowest setting.<br />
[Note: Rinse homogenizer with 70% ethanol be<strong>for</strong>e and after use.]<br />
f. Centrifuge Falcon tubes in the Thermo Multifuge (fixed angle rotor) at 5000g and 4°C <strong>for</strong> 15<br />
minutes to pellet cells. Decant supernatant by pouring.<br />
g. Wash cells again as in steps (e-f).<br />
h. Drain pellets upside down in the dairy case <strong>for</strong> 10 minutes.<br />
i. Determine mass of each cell pellet. Flash freeze on liquid nitrogen and store at -80°C.<br />
Cleanup:<br />
Note: If the fermenter is not going to be cleaned the same day as the fermenter run it can be just rinsed<br />
well with water and left filled with some water until the next day <strong>for</strong> cleaning.
15. Turn all controllers off except the air. Leave the air flow on at 4 SLPM to keep the culture out of the<br />
air sparger. Release the pressure in the fermenter by opening the back regulator. Drain the<br />
fermenter and turn the air flow off.<br />
16. Remove the pH and PO2 probes from the fermenter and rinse them with water. Store the pH<br />
electrode in 3M KCl. Store the pO2 probe in pO2 storage solution. Insert stoppers in the ports <strong>for</strong> the<br />
probes.<br />
17. Disconnect the tri-port assembly. Use a syringe to empty the acid and base feed lines back into the<br />
stock bottles, or alternatively, one can switch the feed lines on the pump the acid and base back into<br />
the bottles. Use a disposable syringe to flush the lines with water after they are empty.<br />
18. Disconnect all wires, tubing, plugs, and connections from the fermenter lid. Use the hex wrench to<br />
remove the two screws holding the motor in place. Remove the motor and set it on its stand.<br />
19. Disassemble the exhaust filter housing and inspect the filter <strong>for</strong> damage or excessive accumulation of<br />
dirt. Unscrew the pressure sensor from the block at the top of the exhaust cooler and set it aside.<br />
20. Unscrew the four large bolts that hold the lid on and lift the lid off. Be sure not to scratch the interior<br />
of the fermenter. Lay the assembly on the rim and the handle with the impeller and sparger sticking<br />
up in the air. Use the crescent wrench to loosen the sparge tube nut and disconnect it. Remove the<br />
screws at the bottom of sparge ring.<br />
21. Use squirt bottles of acetic acid and water to rinse the interior of the fermenter. To preserve the<br />
polish finish, do not scrub.<br />
22. Wash all parts of the fermenter (except o-rings and filters) as follows:<br />
(i) Wash with liquinox solution.<br />
(ii) Rinse with 5% (v/v) acetic acid. There is a wash bottle by the sink <strong>for</strong> this.<br />
(iii) Rinse with DI water.<br />
(iv) Reassemble the fermenter Make sure the screws are in the sparge ring ring and it is<br />
attached to the lid be<strong>for</strong>e replacing the lid.<br />
23. Replace all plumbing and electrical connections.<br />
[Note: Each connection fits in only one location, EXCEPT the Foam and High Foam probe wires.<br />
Assembly of foam probe.
Assembly of condenser unit.<br />
24. Fill the fermenter with 6-8 L of DI water and sterilize if it will not be used in the next 2-3 days.<br />
After sterilization, turn off the control unit and close the air, water, and steam supply valves. Turn off<br />
flow at the wall first, and then turn them off at the fermenter.


