3E1044 SmartScale 500 _NZ_ - Gallagher Europe
3E1044 SmartScale 500 _NZ_ - Gallagher Europe
3E1044 SmartScale 500 _NZ_ - Gallagher Europe

Create successful ePaper yourself
Turn your PDF publications into a flip-book with our unique Google optimized e-Paper software.
User Manual <strong>SmartScale</strong> <strong>500</strong><br />
<strong>SmartScale</strong> <strong>500</strong><br />
User Manual<br />
Viewing A Session<br />
1. Select the session that you want to view, as described previously.<br />
2. In the Session Menu screen, use the arrow key to highlight VIEW.<br />
3. Press the button to view the records from the selected<br />
weighing session.<br />
4. Use the and buttons to scroll through the<br />
records and to view the Tag Number, Weight or Condition Score.<br />
5. Press to return to the Session Menu screen.<br />
Note: You cannot edit the weight records from this view. Refer to Editing<br />
Weight Records (p 42) if you want to edit records in the current<br />
weighing session.<br />
Printing A Session<br />
Make sure the <strong>SmartScale</strong> printer is connected to the Scale. To<br />
configure the port that the printer connects to on the Scale, refer to<br />
Communications (p 23).<br />
1. Select the session that you want to print, as described in Selecting<br />
a Session (p 17).<br />
2. In the Session Menu screen, use the arrow key to highlight<br />
PRINT.<br />
3. Press .<br />
4. Press SORT to select the required printing order.<br />
5. Press PRINT to print the session on the attached printer.<br />
The weight records will be printed.<br />
Edit a Weight Record<br />
To edit a weight record, follow these steps.<br />
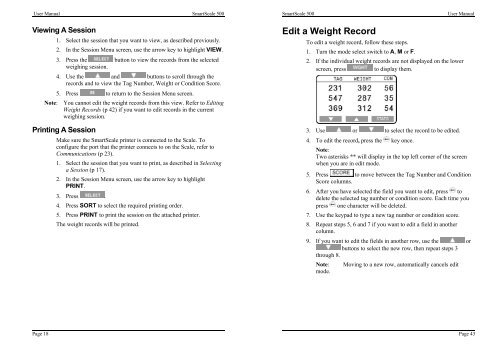
1. Turn the mode select switch to A, M or F.<br />
2. If the individual weight records are not displayed on the lower<br />
screen, press to display them.<br />
3. Use or to select the record to be edited.<br />
4. To edit the record, press the key once.<br />
Note:<br />
Two asterisks ** will display in the top left corner of the screen<br />
when you are in edit mode.<br />
5. Press to move between the Tag Number and Condition<br />
Score columns.<br />
6. After you have selected the field you want to edit, press to<br />
delete the selected tag number or condition score. Each time you<br />
press one character will be deleted.<br />
7. Use the keypad to type a new tag number or condition score.<br />
8. Repeat steps 5, 6 and 7 if you want to edit a field in another<br />
column.<br />
9. If you want to edit the fields in another row, use the or<br />
buttons to select the new row, then repeat steps 3<br />
through 8.<br />
Note: Moving to a new row, automatically cancels edit<br />
mode.<br />
Page 18<br />
Page 43