Slope Ceiling adapter - Sea Gull Lighting
Slope Ceiling adapter - Sea Gull Lighting Slope Ceiling adapter - Sea Gull Lighting
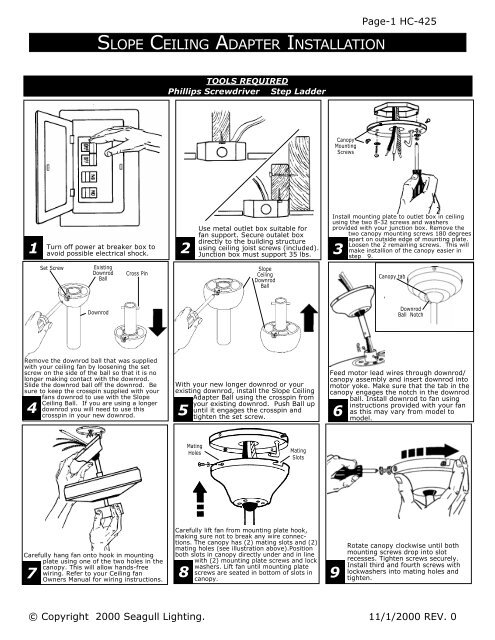
Turn off power at breaker box to 1 avoid possible electrical shock. 2 Remove the downrod ball that was supplied with your ceiling fan by loosening the set screw on the side of the ball so that it is no longer making contact with the downrod. Slide the downrod ball off the downrod. Be sure to keep the crosspin supplied with your fans downrod to use with the Slope Ceiling Ball. If you are using a longer 4 downrod you will need to use this crosspin in your new downrod. 8 Set Screw Existing Downrod Ball Downrod Cross Pin Carefully hang fan onto hook in mounting plate using one of the two holes in the canopy. This will allow hands-free 7 wiring. Refer to your Ceiling fan Owners Manual for wiring instructions. SLOPE CEILING ADAPTER INSTALLATION TOOLS REQUIRED Phillips Screwdriver Step Ladder Mating Holes Use metal outlet box suitable for fan support. Secure outalet box directly to the building structure using ceiling joist screws (included). Junction box must support 35 lbs. Slope Ceiling Downrod Ball With your new longer downrod or your existing downrod, install the Slope Ceiling Adapter Ball using the crosspin from your existing downrod. Push Ball up 5 until it engages the crosspin and tighten the set screw. Canopy Mounting Screws Page-1 HC-425 Install mounting plate to outlet box in ceiling using the two 8-32 screws and washers provided with your junction box. Remove the two canopy mounting screws 180 degrees apart on outside edge of mounting plate. Loosen the 2 remaining screws. This will 3 make installion of the canopy easier in step 9. © Copyright 2000 Seagull Lighting. 11/1/2000 REV. 0 Mating Slots Carefully lift fan from mounting plate hook, making sure not to break any wire connections. The canopy has (2) mating slots and (2) mating holes (see illustration above).Position both slots in canopy directly under and in line with (2) mounting plate screws and lock washers. Lift fan until mounting plate 8 screws are seated in bottom of slots in canopy. Feed motor lead wires through downrod/ canopy assembly and insert downrod into motor yoke. Make sure that the tab in the canopy engages the notch in the downrod ball. Install downrod to fan using instructions provided with your fan 6 as this may vary from model to model. 9 Canopy tab Downrod Ball Notch Rotate canopy clockwise until both mounting screws drop into slot recesses. Tighten screws securely. Install third and fourth screws with lockwashers into mating holes and tighten.
Turn off power at breaker box to<br />
1 avoid possible electrical shock. 2<br />
Remove the downrod ball that was supplied<br />
with your ceiling fan by loosening the set<br />
screw on the side of the ball so that it is no<br />
longer making contact with the downrod.<br />
Slide the downrod ball off the downrod. Be<br />
sure to keep the crosspin supplied with your<br />
fans downrod to use with the <strong>Slope</strong><br />
<strong>Ceiling</strong> Ball. If you are using a longer<br />
4 downrod you will need to use this<br />
crosspin in your new downrod.<br />
8<br />
Set Screw<br />
Existing<br />
Downrod<br />
Ball<br />
Downrod<br />
Cross Pin<br />
Carefully hang fan onto hook in mounting<br />
plate using one of the two holes in the<br />
canopy. This will allow hands-free<br />
7 wiring. Refer to your <strong>Ceiling</strong> fan<br />
Owners Manual for wiring instructions.<br />
SLOPE CEILING ADAPTER INSTALLATION<br />
TOOLS REQUIRED<br />
Phillips Screwdriver Step Ladder<br />
Mating<br />
Holes<br />
Use metal outlet box suitable for<br />
fan support. Secure outalet box<br />
directly to the building structure<br />
using ceiling joist screws (included).<br />
Junction box must support 35 lbs.<br />
<strong>Slope</strong><br />
<strong>Ceiling</strong><br />
Downrod<br />
Ball<br />
With your new longer downrod or your<br />
existing downrod, install the <strong>Slope</strong> <strong>Ceiling</strong><br />
Adapter Ball using the crosspin from<br />
your existing downrod. Push Ball up<br />
5 until it engages the crosspin and<br />
tighten the set screw.<br />
Canopy<br />
Mounting<br />
Screws<br />
Page-1 HC-425<br />
Install mounting plate to outlet box in ceiling<br />
using the two 8-32 screws and washers<br />
provided with your junction box. Remove the<br />
two canopy mounting screws 180 degrees<br />
apart on outside edge of mounting plate.<br />
Loosen the 2 remaining screws. This will<br />
3 make installion of the canopy easier in<br />
step 9.<br />
© Copyright 2000 <strong>Sea</strong>gull <strong>Lighting</strong>. 11/1/2000 REV. 0<br />
Mating<br />
Slots<br />
Carefully lift fan from mounting plate hook,<br />
making sure not to break any wire connections.<br />
The canopy has (2) mating slots and (2)<br />
mating holes (see illustration above).Position<br />
both slots in canopy directly under and in line<br />
with (2) mounting plate screws and lock<br />
washers. Lift fan until mounting plate<br />
8 screws are seated in bottom of slots in<br />
canopy.<br />
Feed motor lead wires through downrod/<br />
canopy assembly and insert downrod into<br />
motor yoke. Make sure that the tab in the<br />
canopy engages the notch in the downrod<br />
ball. Install downrod to fan using<br />
instructions provided with your fan<br />
6 as this may vary from model to<br />
model.<br />
9<br />
Canopy tab<br />
Downrod<br />
Ball Notch<br />
Rotate canopy clockwise until both<br />
mounting screws drop into slot<br />
recesses. Tighten screws securely.<br />
Install third and fourth screws with<br />
lockwashers into mating holes and<br />
tighten.
Page-2 HC-425<br />
SLOPE CEILING ADAPTER INSTALLATION<br />
Safety Tips WARNING: TO REDUCE THE RISK OF FIRE, ELECTRIC SHOCK, OR INJURY TO PERSONS, OBSERVE THE FOLLOWING:<br />
READ AND SAVE THESE INSTRUCTIONS<br />
1.<br />
2.<br />
3.<br />
4.<br />
5.<br />
6.<br />
7.<br />
8.<br />
Installation work and electrical wiring must be done by qualified person(s) in accordance with all applicable codes and<br />
standards, including fire-rated construction.<br />
Before you begin installing the fan, disconnect the power by removing fuses or turning off circuit breakers.<br />
Be cautious! read all instructions and safety information before installing your new fan. Review the accompanying<br />
assembly diagrams.<br />
When cutting or drilling into wall or ceiling, do not damage electrical wiring and other hidden utilities.<br />
Make sure the installation site you choose allows the fan blades to rotate without any obstructions. Allow a minimum<br />
clearance of 7 feet from the floor to the trailing edge of the blade.<br />
To reduce the risk of fire, electric shock, or personal injury, mount to outlet box or supporting system acceptable for fan<br />
support.<br />
(Mounting must support at least 35 lbs.)<br />
Longer downrod will be needed in most cases with this unit. Make sure that the downrod you choose is compatible with<br />
the ceiling fan you have and this unit.<br />
This unit will accommadate slopes of upto 46 degrees.<br />
© Copyright 2000 <strong>Sea</strong>gull <strong>Lighting</strong>.<br />
11/1/2000 REV. 0<br />
SLOPE CEIL-


